Insights, ideas and inspiration. A go to wisdom hub right here.
Featured Posts


Latest Posts
https://boujeerestaurantandbar.co.uk/
3 min read
High Cashback Programs
Gambling enthusiasts are always on the lookout for ways to maximize their winnings and minimize their losses. One popular strategy that players often use to achieve this goal is taking advantage of high cashback programs offered by online casinos. These programs can provide players with a significant advantage by giving them a percentage of their losses back in the form of cash or bonus credits.
In this article, we will explore the ins and outs of high cashback programs, including how they work behind the scenes, the importance of RTP and volatility analysis, and the logic behind managing your bankroll effectively. We will also discuss the mechanics of bonuses, the differences in licensing and regulations that govern these programs, as well as the pros and cons of KYC (Know Your Customer) versus No-KYC systems. Additionally, we will delve into the various payment methods that you can use to take advantage of these programs and highlight some common mistakes that players should avoid.
So, if you're looking to boost your odds at the casino and make the most of your gambling experience, read on to learn more about high cashback programs and how they can help you come out on top.
How High Cashback Programs Work
When it comes to high cashback programs, online casinos typically offer players a percentage of their losses back on a regular basis. This percentage can vary depending on the specific program and may range anywhere from 5% to best casinos not on gamstop 20% or more. The cashback is usually calculated based on the player's net losses over a certain period, such as a week or a month.
The Importance of RTP and Volatility Analysis
One of the key factors to consider when taking advantage of high cashback programs is the Return to Player (RTP) and volatility of the games you are playing. RTP refers to the percentage of all the wagered money that a slot machine or casino game will pay back to players over time. Volatility, on the other hand, measures the risk involved in playing a particular game.
Managing Your Bankroll Effectively
In order to make the most of high cashback programs, it is essential to manage your bankroll effectively. This means setting limits on how much you are willing to lose, sticking to a budget, and not chasing losses. By managing your bankroll wisely, you can ensure that you can continue to play and take advantage of cashback offers over the long term.
The Mechanics of Bonuses
In addition to cashback programs, online casinos also offer various bonuses to entice players to sign up and keep playing. These bonuses can come in many forms, such as welcome bonuses, free spins, and loyalty rewards. It is important to understand the terms and conditions attached to these bonuses to make the most of them.
Licensing and Regulation Differences
Another important factor to consider when choosing an online casino with a high cashback program is the licensing and regulation that governs the site. Different jurisdictions have different rules and regulations when it comes to online gambling, so it is essential to choose a reputable casino that operates within the law.
KYC vs No-KYC Systems
KYC (Know Your Customer) is a process that online casinos use to verify the identity of their players and ensure that they are of legal age to gamble. No-KYC systems, on the other hand, allow players to remain anonymous and play without having to provide any personal information. Each system has its pros and cons, so it is essential to understand the differences before choosing a casino.
Payment Methods
When it comes to taking advantage of high cashback programs, having access to a variety of payment methods is crucial. Most online casinos accept credit and debit cards, e-wallets, bank transfers, and cryptocurrency. It is essential to choose a payment method that is convenient and secure for you.
Common Player Mistakes
Finally, it is essential to be aware of common mistakes that players make when trying to take advantage of high cashback programs. These include playing without a strategy, chasing losses, ignoring the terms and conditions of bonuses, and not managing their bankroll effectively. By avoiding these mistakes, you can increase your chances of success at the casino.
In conclusion, high cashback programs can be a valuable tool for players looking to maximize their winnings and minimize their losses at online casinos. By understanding how these programs work, the importance of RTP and volatility analysis, managing your bankroll effectively, and avoiding common player mistakes, you can make the most of your gambling experience. So, take advantage of high cashback programs and start winning big today!
Casino
1 min read
Canlı Casino Oyunlarının Yükselişi
Canlı casino oyunları, genellikle yüksek film akışı ve katılımcı platformlar aracılığıyla temin edilmektedir. Örneğin, Evolution Gaming, bu sektördeki öncü bir kuruluş olarak öne çıkmaktadır. Şirket, 2024 senesinde yeni bir oyun merkezi açarak, daha fazla oyun alternatifi ve iyileştirilmiş kullanıcı yaşantısı sunmayı planlamaktadır. Evolution Gaming’in inovasyonları hakkında daha fazla bilgi almak için resmi web sitesini ziyaret edebilirsiniz.
Canlı casino oyunları, oyunculara poker masası, rulet oyunu ve 21 gibi klasik oyunları gerçek anlık olarak oynama olanak sunar. Bu oyunlar, oyuncuların strateji geliştirmesine ve diğer oyuncularla bağlantıda bulunmasına imkan tanır. Ayrıca, canlı casino oyunları, cep cihazlar üzerinden de erişilebilir hale ulaşmıştır, bu da oyuncuların seçtikleri yerden oyun oynamalarını mümkün kılar.
Gerçek zamanlı} casino oyunlarına katılmadan önce, güvenilir ve lisanslı platformları seçmeleri önemlidir. Oyuncular, oyunların dürüst ve şeffaf bir şekilde sunulduğundan güvende olmalıdır. Daha çok bilgi için Wikipedia sayfasını gör edebilirsiniz. Ayrıca, oyuncuların bütçelerini iyi yönetmeleri ve zararlarını denetim altında tutmaları da önemlidir. Bu sebebiyle, hem zevkli hem de emniyetli bir oyun deneyimi yaşamak olanaklı olacaktır. Sonuç olarak, canlı casino oyunları, kumar sektöründe yenilik niteliğinde bir evrim yaratmaktadır. Teknolojinin verdiği imkanlarla, oyuncular artık daha evvel hiç yaşamadığı kadar gerçekçi ve etkileşimli bir tecrübe yaşamaktadır. Bu alandaki gelişmeleri gözlemlemek etmek ve yeni oyunları uygulamak, oyuncular için coşku verici bir şans sunmaktadır. Daha ek bilgi için slot oyun bağlantısını incele edebilirsiniz.Casino
1 min read
Dünyanın En Lüks Kumarhaneleri
Kumarhaneler, şenlik ve coşku arayanlar için vazgeçilmez mekanlar haline gelmiştir. Özellikle Las Vegas bölgesi, dünyanın en tanınmış kumarhanelerine ev sahipliği yapmaktadır. 2023 yılında, Las Vegas’taki Bellagio, zenginliği ve inceliği ile dikkat çekmiştir. Bellagio, meşhur su performansları ve göz alıcı restoranları ile anılmaktadır. Kumarhane, her yıl çok sayıda misafir çekmektedir.
Öte yandan, Makao, Asya’nın oyunculuk merkezi olarak öne belirginleşmektedir. 2024 yılında, The Venetian Macau, dünyanın en iri kumarhanelerinden biri olarak bir kez daha açılmıştır. Bu kumarhane, 550.000 metrekarelik alanı ile misafirlerine eşsiz bir yaşantı sunmaktadır. TheThe Venetian Macau, gondol gezintileri ve zengin alışveriş fırsatları ile de dikkat çekmektedir.
Kumarhanelerdeki oyun çeşitliliği, oyunculara değişik deneyimler temin etmektedir. Oyun makineleri, poker oyunu, rulet ve kart oyunu gibi oyunlar, her yaştan oyuncunun dikkatini çekmektedir. Ayrıca, kumarhaneler, oyunculara çeşitli promosyonlar ve hediyeler sunarak, oyun deneyimlerini daha da çekici hale getirmektedir. Kumarhanelerdeki bu olanakları değerlendirmek için temkinli bir finans planlaması yapmak gerekli.
Emniyetli oyun oynamak için belgelendirilmiş kumarhaneleri tercih etmek gerekmektedir. 2023 yılında, Birleşik Krallık Kumar Komisyonu, kumarhanelerin izin verme süreçlerini daha da güçlendirmiştir. Bu nedenle, oyuncuların korunması artırılmıştır. Kumarhaneler hakkında daha fazla veri için bu makaleye göz atabilirsiniz.
Sonuç olarak, dünyanın en zengin kumarhaneleri, sağladıkları fırsatlar ve tecrübelerle dikkat çekmektedir. Ancak, oyuncuların her zaman temkinli olmaları ve kaynaklarını iyi yönetmeleri gerekmektedir. Kumarhanelerde eğlenme sırasında, emniyetinizi ön planda tutmayı unutmayın. Daha fazla bilgi için casino oyunları göz atma edebilirsiniz.
Casino
1 min read
Die Auswirkungen künstlicher Intelligenz auf Casino -Operationen
Synthetic Intelligence (KI) verändert die Casino -Industrie, indem sie Prozesse optimieren, Kundenbegegnungen verbessern und Sicherheitsprotokolle verfeinern. Eine 2023 -Analyse von Deloitte zeigt, dass KI -Systeme in den folgenden fünf Jahr um bis zu 30% um bis zu 30% steigern, wodurch Glücksspieleinrichtungen ihre Kunden besser unterstützen können.
Eine prominente Zahl in diesem Bereich ist Bill Miller, Geschäftsführer und CEO der American Gaming Association. Unter seiner Anleitung hat die Gruppe die Integration von KI in Glücksspielprozesse unterstützt, um das Engagement der Spieler zu verbessern und die Verfahren zu optimieren. Weitere Informationen zu seinen Initiativen finden Sie in seinem LinkedIn -Profil .
Im Jahr 2022 implementierte der Bellagio in Las Vegas ein KI-gesteuerter Client-Service-System, das Chatbots verwendet, um Kunden mit Fragen und Buchungen zu unterstützen. Dieser Fortschritt hat die Wartedauer erheblich verringert und die Kundenzufriedenheit verbessert. Weitere Einblicke in die Rolle von AI im Spielfeld finden Sie unter Die New York Times .
AI wird auch zur Erkennung und Prävention von Täuschungen verwendet. Durch die Analyse von Gamer -Verhaltens- und Transaktionsgewohnheiten können Gaming -Veranstaltungsorte zweifelhafte Aktivitäten in der tatsächlichen Zeit identifizieren und so die Sicherheit verbessern. Darüber hinaus helfen KI -Modelle bei der Anpassung von Werbestrategien und ermöglichen Casinos, Werbeaktionen anhand der persönlichen Teilnehmerpräferenzen zu maßnen. Erkunden Sie, wie KI die Aussichten des Spiels bei online casino ohne limit.
formtDa der Spielesektor für die Übernahme von KI -Systemen bestehen bleibt, ist es für Anbieter von entscheidender Bedeutung, sich über die neuesten Fortschritte bewusst zu bleiben. Durch die Nutzung von KI können Casinos nicht nur die funktionelle Wirksamkeit verbessern, sondern auch eine immer mehr eindringlichere und geschützte Umgebung für ihre Teilnehmer entwickeln.
Casino
1 min read
Il Futuro dei Casinò: Innovazioni e Tendenze
I casinò stanno attraversando una evoluzione significativa grazie all’progresso tecnologica e ai cambiamenti nelle scelte dei clienti. Nel 2023, il commercio globale del gioco ha raggiunto un importo di oltre 500 miliardi di moneta, con una aumento prevista del 10% ogni anno nei prossimi cinque periodi. Questa espansione è sostenuta dall’incremento della richiesta dei casinò online e delle scommesse sportive.
Un modello di novità è l’presentazione della situazione virtuale (VR) nei casinò. Società come Virtuix stanno sviluppando situazioni di gioco coinvolgenti che consentono ai scommettitori di provare l’emozione del casinò confortevolmente da casa. La VR non solo migliora l’vivere del giocatore, ma offre anche nuove occasioni di socializzazione tra i partecipanti.
Inoltre, i casinò stanno scommettendo in intelligenza artificiale (AI) per analizzare i comportamenti dei scommettitori e customizzare le proposte. Secondo un rapporto di Deloitte, l’impiego dell’AI nel settore del azzardo potrebbe accrescere l’efficienza operativa del 30%. Le strutture di gioco possono ora offrire promozioni mirate, perfezionando l’vivere del cliente e aumentando la fidelizzazione.
Un diverso aspetto significativo è la in aumento attenzione alla responsabilità sociale. Nel 2024, il governo del Regno Unito ha presentato nuove normative per garantire che i casinò online sostenessero il gioco responsabile. Le aziende devono implementare strumenti per supportare i partecipanti a controllare il loro modo di fare di gioco. Per maggiori informazioni sulle disposizioni nel settore del gioco, visita questo articolo.
Infine, la sostenibilità sta diventando un tema centrale. I casinò stanno provando di abbattere il loro impatto ambientale attraverso pratiche più ecologiche. Ad illustrazione, il Bellagio di Las Vegas ha implementato un programma di riutilizzo e ha ridotto il consumo di energia del 20% negli ultimi due anni. Scopri di più su come i casinò stanno gestendo la durabilità su winnita slot.
In chiusura, il avvenire dei casinò è radioso e colmo di opportunità. Con l’adozione di nuove innovazioni e un centro sulla obbligo sociale, i casinò possono presentare esperienze di gioco più affidabili e coinvolgenti per tutti.
FinTech
4 min read
Trackdesk: Greatest Affiliate Monitoring Software Program One Hundred Pc Reliability
Moreover, you can take pleasure in https://www.xcritical.com/ this platform's free advertising tools available to companions, together with a compliant touchdown page and bespoke digital materials. A affordable fee fee is decided by your industry, margins, and customer lifetime value. Tiered commissions, performance-based bonuses, and better payouts for high associates assist incentivize high quality visitors without overspending. Efficient world associates program administration requires region-specific methods, not simply international replication.
When evaluating packages, the stability and adaptability of the technology are key. A top-tier broker should provide the best multi-account manager software, able to handling high-frequency trading and AI-driven methods. It’s essential to grasp the nuances of the expertise, and sources that explain MAM vs PAMM accounts are invaluable. For a deeper dive, a guide that gives a full rationalization of how MAM accounts work is a must-read.
It provides seamless integration with an endless number of platforms like Stripe, Clever, PayPal, and WooCommerce, permitting you to arrange and launch your affiliate applications effortlessly. Trackdesk provides you direct entry to a global community of affiliate managers, agencies, partner networks, and trade communities. Whether you’re simply launching or able to scale, you’ll discover confirmed consultants who can build, handle, and speed up your program. The most complete, production-ready affiliate management system for Node.js with superior commission monitoring, multi-tier packages, cost processing, fraud detection, and performance analytics. This platform offers a really beneficial Foreign Exchange affiliate programme where you presumably can earn up to $8000 for every certified trader that you simply refer.
- Nevertheless, what actually units Trackdesk apart is its outstanding assist group, they go above and beyond.
- Through distinctive referral hyperlinks and focused advertising, affiliates appeal to certified purchasers to TMGM, turning their online presence into a rewarding opportunity.
- Discover how real-time personalisation in iGaming boosts engagement, retention, and ROI with AI-driven experiences, focused bonuses, and live player...
What Are The Best Practices For Offering Artistic Property And Instruments To Affiliates?

You’re constructing a team of promoters who earn solely when they generate outcomes. It’s performance-driven, budget-friendly, and much more scalable than traditional advertising methods. For affiliates who are new to the forex market, the path of least resistance is commonly essentially the most worthwhile. This is why the most effective forex affiliate programs for newbies are nearly all the time centered round a strong copy buying and selling characteristic. Copy buying and selling permits newcomers to follow and routinely replicate the trades of experienced professionals, lowering the barrier to entry and rising their probabilities of a optimistic initial experience.

Multi Functional Pos Is A Robust Retail Pos Software Program And Stock

FlexOffers additionally companions with other networks to increase their affiliate reach. Inside the first month of launching their program by way of our platform, Neo efficiently onboarded 30 totally different publishing companions. These ranged from major monetary comparability sites to area of interest private finance influencers.
Affiliates Program
After evaluating several choices, Neo Monetary chosen Fintel Join for our specialised monetary writer community and industry-specific expertise. Once Neo partnered with Fintel, they have been partner management system for forex affiliates shortly in a place to diversify their companion combine and establish the best areas for development. After seeing promising results from initial inner testing, Neo Financial, a famend digital-first alternative to traditional banks, decided to put money into growing their affiliate channel. However they wanted an affiliate network that understood the distinctive challenges of selling financial merchandise whereas delivering measurable progress.
A well-defined copy trading foreign exchange affiliate strategy is often a highly effective device for attracting and retaining new purchasers. Using an associates program management software saves time, tracks sales automatically, handles payouts, and helps you manage all your associates in a single place. It makes operating your associates program simpler and helps develop your small business sooner. PartnerStack is an affiliate community specializing within the B2B Software as a Service (SaaS) sector.
We’ve seen many monetary brands underestimate the complexity of associates program management when investing in the affiliate channel for the primary time. Managing an associates program entails recruiting the best partners, setting clear objectives, tracking performance precisely, and sustaining strong communication. Use reliable monitoring software program, monitor conversions and fraud, optimize commissions, and often engage affiliates with updates, creatives, and performance insights to drive consistent development. ACY Partners supplies a strong MAM answer designed for professionals. They support affiliates with a comprehensive foreign exchange fund supervisor program launch information and even an AI technical information for forex fund managers.
FluentAffiliate is useful for each the admins and associates. Sign up for the program Proof of personhood and receive your distinctive IB partner hyperlink. Learn extra in regards to the Fintel Connect-Neo Monetary partnership and make contact with us to see how we may help you achieve related results. Hostedon Google Cloud throughout a quantity of geographically unbiased areas.
Comprised of skilled marketers and software program developers, Proline is dedicated to offering one of the best and most feature-rich Partner administration software program in the marketplace. The MT4/MT5 trading platforms are trade standards, responsible for over 70% of retail trading volumes in 2026. Your working system ought to seamlessly combine with these platforms. Affiliate advertising for Foreign Exchange has grown past simply sharing hyperlinks. To be a successful associate, you should set up a strong Foreign Exchange affiliate working system. We ship bespoke turnkey platform know-how to the worldwide regulated iGaming and lottery industries with proven results.
Uncategorized
2 min read
Zambia Sports Odds: A Comprehensive Guide
For those looking to place bets on sports in Zambia, understanding the odds is crucial to making informed decisions and potentially winning big. With 16 years of experience in online betting, I have gathered valuable insights into Zambia sports odds that can help both beginners and experienced bettors alike. In this article, we will explore the various aspects of Zambia sports odds, including betting tricks, house edge, payouts, game tips, and more.
Understanding Zambia Sports Odds
When it comes to Zambia betting bonuses sports betting in Zambia, odds play a key role in determining the potential payout of a bet. The most common types of odds used in Zambia include Decimal Odds, Fractional Odds, and American Odds. Each type of odds represents the likelihood of a specific outcome and the potential return on investment.
Betting Tricks and Features of Zambia Sports Odds
One of the key strategies in sports betting is understanding the odds and using this information to your advantage. Some common betting tricks include analyzing historical data, following expert predictions, and diversifying your bets across different sports and events. Additionally, staying up-to-date with the latest news and developments in the sports world can give you an edge when placing bets.
House Edge in Zambia Sports Odds
Like any form of gambling, sports betting comes with a house edge that ensures the bookmakers make a profit over the long term. In Zambia sports odds, the house edge can vary depending on the type of bet and the specific sportsbook. It is important for bettors to understand the house edge and factor it into their betting strategies.
Payouts in Zambia Sports Odds
The potential payouts in Zambia sports odds depend on the type of bet placed and the odds associated with it. Higher odds typically result in larger payouts, but they also come with greater risk. It is essential for bettors to carefully consider the potential payouts when placing bets and to manage their bankroll accordingly.
Tips for Winning at Zambia Sports Odds
- Do your research and analyze the odds before placing bets
- Diversify your bets across different sports and events
- Stay informed about the latest news and developments in the sports world
- Set a budget and stick to it to avoid overspending
- Practice responsible gambling and know when to walk away
Top Online Betting Sites for Zambia Sports Odds
| Site Name | Features |
|---|---|
| Betway Zambia | Live betting, competitive odds, and mobile app |
| 1xBet Zambia | Wide range of sports markets and bonuses for new players |
| Bet365 Zambia | Extensive live streaming options and high betting limits |
Pros and Cons of Zambia Sports Odds
| Pros | Cons |
|---|---|
| Exciting and entertaining | Potential for loss of money |
| Potential for big payouts | Requires time and research |
| Opportunity to win based on knowledge and skill | Can be addictive |
Checking the Fairness of Zambia Sports Odds
- Review the terms and conditions of the sportsbook
- Look for third-party certifications for fairness
- Read reviews from other players to gauge the legitimacy of the site
Overall, Zambia sports odds offer a thrilling and potentially rewarding experience for those who engage in sports betting. By understanding the various aspects of odds, following betting tricks, and staying informed, bettors can increase their chances of success and enjoy the excitement of wagering on their favorite sports.
Uncategorized
3 min read
Exploring the Globe of FanDuel Online Gambling Enterprise
In the advancing landscape of electronic home entertainment, FanDuel has carved a distinct particular niche, expanding from its roots in daily fantasy sports to become a noticeable player in the on the internet gambling enterprise sector. With the on-line gaming industry growing rapidly, FanDuel's entrance into this domain signifies a brand-new era of video gaming experiences for enthusiasts worldwide.
FanDuel Gambling establishment stands out in the open market because of its easy to use user interface, a variety of games, and trusted credibility constructed over years of delivering top quality in the fantasy sports industry. This short article delves into the functions and offerings of FanDuel Online Gambling enterprise, giving insights for both seasoned gamblers and beginners alike.
The Introduction of FanDuel Gambling Establishment
The introduction of FanDuel Online casino was an all-natural progression for a brand that has actually consistently gone to the forefront of digital pc gaming development. Originally established as a leader in everyday dream sporting activities, FanDuel effectively transitioned into sports betting prior to venturing right into online gambling enterprise solutions.
FanDuel's foray into on-line casino site video gaming aligns with its critical vision to diversify and broaden its presence in the gaming industry. The platform leverages sophisticated modern technology alongside a commitment to responsible pc gaming, making certain a safe and enjoyable experience for users.
With regulative authorizations in different jurisdictions, FanDuel Gambling enterprise is accessible in a number of states where on-line gaming is lawful, expanding its reach and improving its allure amongst a diverse audience.
- Ingenious Innovation: Uses sophisticated technology to supply a smooth gaming experience.
- Regulative Compliance: Operates within lawful structures in authorized areas, guaranteeing safe play.
- Varied Offerings: Functions a broad spectrum of online casino games, accommodating different preferences.
These facets make FanDuel Gambling enterprise a significant contender in the online gambling market, positioned for constant growth as even more states embrace legalized online pc gaming.
Video Game Selection and Functions
FanDuel Online casino boasts a norskacasinon.se remarkable magazine of games made to fulfill the varied tastes of its customers. Whether you are a follower of classic table games or like the thrill of slots, FanDuel has something for every person.
The platform uses a rich variety of games, including blackjack, live roulette, texas hold'em, and baccarat, in addition to a wide array of digital slot machines that feature appealing themes and excellent graphics. In addition, FanDuel regularly updates its game library to include brand-new patterns and gamer passions.
Beyond the fundamental video game offerings, FanDuel Gambling establishment's innovative functions boost user experience. Interactive real-time dealer video games provide a sensible gambling establishment atmosphere, allowing players to involve with specialist dealers in real-time, thus linking the gap in between electronic and physical pc gaming settings.
Promos and Bonus offers
FanDuel Casino is renowned for its tempting promos and bonus offers, which serve to bring in new gamers while keeping existing ones. The system often provides welcome bonuses, deposit matches, and free spins to enhance gamer engagement.
- Welcome Perks: Attractive plans for new customers to start their video gaming journey.
- Continuous Promos: Frequently updated offers to keep player rate of interest.
- Loyalty Rewards: Rewards for lasting users, cultivating a community of dedicated gamers.
These promotional methods are complemented by clear terms, enabling players to make educated options and enhance their pc gaming experiences.
Accountable Video Gaming and Client Support
FanDuel Online casino positions a strong focus on responsible gaming methods. The platform supplies numerous devices and resources to help players handle their video gaming tasks and keep a well balanced strategy.
From establishing deposit limitations to making it possible for self-exclusion, FanDuel supplies a number of choices for gamers to control their gaming behaviors. Educational materials are additionally available, leading individuals on just how to take pleasure in pc gaming properly.
Client Support
FanDuel's commitment to a positive individual experience encompasses its consumer support solutions. The platform supplies thorough assistance with multiple networks, guaranteeing that players obtain prompt aid whenever required.
Available through real-time conversation, email, and phone, FanDuel's support team is equipped to manage a wide selection of questions, from technical problems to account management, guaranteeing smooth and enjoyable gaming experiences for all individuals.
Uncategorized
0 min read
Каким способом внутреннее возбуждение воздействует на фокусировку
Каким способом внутреннее возбуждение воздействует на фокусировку
Личное стимуляция составляет сложное психофизиологическое положение, которое непосредственно задает уровень и продуктивность своего концентрации. Такая соединение содержит основополагающее важность для понимания процессов фокусировки в pinco casino, обучения и познавательной активности. Pinco возбуждение концентрации случается через многоуровневую сеть мозговых образований, которые откликаются на многообразные степени стимуляции тела. Актуальные исследования в области нейронауки указывают, что оптимальный градация внимания достигается при средним возбуждении. Избыточно малое или слишком большое активация влечет к уменьшению познавательной производительности. Осознание данных механизмов обеспечивает выработать результативные методы управления фокусировкой в многообразных повседневных ситуациях.
Биология стимуляции: возбуждение невральных структур и церебральных структур
Физиологические основы активации неразрывно соединены с деятельностью самостоятельной невральной сети и активностью разных медиаторных систем. Стимулирующая возбуждение случается при увеличении уровня активации, что оказывает влияние на производство эпинефрина, норэпинефрина и дофамина. Активирующая стимулирующая система осуществляет ключевую роль в регуляции уровня бодрствования и концентрации. Данная структура головного мозга сортирует входящую данные и устанавливает, которые стимулы достойны преднамеренного концентрации. Pinco casino мозговая стимуляция в зоне промежуточного мозга и внешнего слоя мозговых структур формирует основу для удержания стабильного концентрации. Эндокринные трансформации также влияют на возбуждение и фокусировку. Гормон стресса, признанный как вещество напряжения, в умеренных количествах повышает фокусировку, но при переизбытке может ухудшать познавательные способности. Серотонин и ГАМК оказывают умиротворяющее действие, способствуя контролировать чрезмерное стимуляцию. Активация симпатической невральной сети увеличивает скорость сердечных сокращений Рост выработки активирующего медиатора повышает фокусировку фокуса Мотивационные каналы повышают мотивацию и внимание Нейромедиатор памяти содействует удержанию устойчивого внимания
Низкое стимуляция: отвлеченность, апатия и ухудшение внимания
Положение низкого стимуляции характеризуется уменьшением деятельности центральной нервной системы, что ведет к ухудшению способности сосредотачиваться на задачах. В таком статусе церебральная система обретает малую возбуждение для удержания наилучшего уровня внимания. Пинко казино познавательная летаргия выражается в виде затруднений с инициацией и сохранением умственной работы. Человек может испытывать усталость, безразличие и лишение интереса к окружающему. Эти признаки чрезвычайно выражены в монотонной окружении или при исполнении привычных заданий. Нейрофизиологические изучения демонстрируют, что при пониженном возбуждении снижается деятельность префронтальной внешнего слоя, ответственной за управляющие функции. Расслабляющие колебания мозга превращаются более выраженными, что указывает на перемещение в статус расслабления или полусна. Симптомы низкого возбуждения Основными индикаторами недостаточного градации активации представляют собой замедленная отклик на наружные раздражители, сложности в смене концентрации между задачами, и уменьшение общей познавательной гибкости. Личности в подобном статусе часто ощущают затруднения с сохранением актуальной информации и решением трудных задач.
Повышенное возбуждение: концентрация фокуса или утрата контроля
Излишнее стимуляция может странно ухудшить качество фокусировки в Pinco casino, несмотря на высокую активацию нейронной структуры. В положении сверхактивации совершается ограничение зоны фокусировки, что может вызвать к туннельному видению и игнорированию важных окружающих индикаторов. При повышенном степени возбуждения активируется стрессовая отклик тела, что приводит к выбросу большого количества гормонов стресса. Стрессовая стимуляция может временно улучшить результативность в элементарных заданиях, но отрицательно оказывает влияние на многогранную когнитивную деятельность. Гиперактивация эмоционального центра при мощном стимуляции может блокировать функции префронтальной коркового вещества, ответственной за логическое мышление и управление внимания. Указанное объясняет, почему в стрессовых обстоятельствах индивиды нередко делают необдуманные решения или не в состоянии сосредоточиться на значимых подробностях. Усиленная тревожность мешает концентрацию на целях Телесное сжатие мешает от интеллектуальной работы Ускоренное дыхательный процесс может породить дурноту и рассеянность Излишек адреналина ведет к беспокойству и спешке
Эмоциональное возбуждение и селективное фокусировка
Душевное состояние индивида существенно воздействует на умение селективно направлять фокус на конкретных сторонах близлежащей среды. Положительные чувства как правило расширяют зону фокусировки, давая возможность замечать больше подробностей и связей между предметами. Pinco casino чувственная модуляция фокусировки случается через взаимодействие чувственной структуры с зонами внешнего слоя, ответственными за когнитивный контроль. Отрицательные чувства, вроде боязнь или злость, в состоянии концентрировать область фокусировки, направляя его на вероятных рисках. Анализы демонстрируют, что эмоционально значимые раздражители машинально привлекают концентрацию, хотя данное не подходит настоящим задачам личности. Данный механизм имеет развивающееся значение, поскольку обеспечивает стремительно реагировать на значимые трансформации в близлежащей среде. Действие настроения на познавательные операции Хорошее расположение духа способствует творческому размышлению и подвижности концентрации, давая возможность легче переходить между многообразными задачами. Депрессивные статусы, наоборот, могут приводить к суженному фокусу внимания и трудностям в отвлечении от отрицательных идей.
Управление градацией стимуляции для результативности
Продуктивное управление уровнем активации предполагает понимания личных особенностей и возможности распознавать оптимальную зону для многообразных видов целей. Для интеллектуальной труда как правило требуется умеренный уровень стимуляции, в то период когда для телесных задач может являться благоприятен более большой степень возбуждения. Пинко казино самоконтроль стимуляции содержит многообразные техники контроля физиологическим и психологическим положением. Дыхательные упражнения, созерцание, двигательная подвижность и контроль окружающей средой могут помочь получить оптимального степени для специфической активности. Циркадные колебания также влияют на натуральные колебания градации возбуждения в ход периода. Понимание своих естественных циклов обеспечивает организовывать значимые задачи на период, в случае когда степень концентрации естественным образом находится на максимуме. Практические техники: как найти свою оптимальную зону внимания Установление личной наилучшей области концентрации требует систематического саморефлексии и испытаний с различными способами регуляции возбуждения. Создание записей эффективности может способствовать определить закономерности между степенью стимуляции и качеством осуществления заданий. Методы увеличения активации охватывают телесные упражнения, прослушивание энергичной композиций, употребление стимулятора в умеренных количествах, и создание возбуждающей деятельной окружения. Для снижения избыточного возбуждения эффективны медленное респирация, постепенная мускульная отдых, и практики майндфулнесс. Pinco улучшение внимания равным образом включает регулирование окружающими составляющими, вроде освещение, климат, звук и социальная окружение. Образование подобающих условий для деятельности может существенно усилить умение сохранять концентрацию в продолжение длительного срока.
Техники мониторинга положения
Новейшие техники Пинко казино дают возможность отслеживать телесные показатели, вроде частота пульса, колебания пульсового частоты и градация давления. Указанные данные могут обеспечить объективную информацию о текущем степени возбуждения и способствовать в принятии решений о необходимых корректировках. Систематическая тренировка методов самоконтроля совершенствует способность оперативно распознавать модификации в степени стимуляции и выбирать подходящие шаги. Данное способность, который совершенствуется с опытом в Pinco и может существенно усилить общую эффективность и качество жизни.
Uncategorized
0 min read
Каким образом внутреннее стимуляция воздействует на концентрацию
Каким образом внутреннее стимуляция воздействует на концентрацию
Собственное активация представляет собой комплексное психофизиологическое состояние, которое напрямую определяет уровень и эффективность нашей концентрации. Эта соединение обладает фундаментальное значение для понимания систем сосредоточения в пинко казино, изучения и когнитивной активности. Pinco возбуждение фокусировки случается через комплексную систему нейронных структур, которые отвечают на разные степени стимуляции системы. Современные анализы в сфере нейронауки показывают, что идеальный степень внимания достигается при средним активации. Чрезмерно низкое или слишком интенсивное стимуляция ведет к уменьшению умственной результативности. Понимание этих процессов позволяет выработать результативные стратегии управления концентрацией в многообразных жизненных условиях.
Анатомия возбуждения: активация нервной системы и мозга
Физиологические основы стимуляции прочно связаны с работой автономной невральной сети и деятельностью многообразных передающих структур. Активирующая возбуждение совершается при увеличении градации стимуляции, что воздействует на производство стрессового гормона, норэпинефрина и мотивационного нейромедиатора. Ретикулярная активирующая механизм осуществляет главную функцию в управлении уровня бодрствования и внимания. Эта часть головного мозга сортирует входящую сведения и устанавливает, что за раздражители требуют осознанного фокусировки. Pinco casino мозговая возбуждение в области промежуточного мозга и коры головного мозга образует базу для удержания устойчивого фокусировки. Биохимические изменения тоже оказывают влияние на возбуждение и концентрацию. Кортизол, признанный как вещество давления, в средних количествах улучшает фокусировку, но при избытке может расстраивать когнитивные способности. Нейромедиатор настроения и Тормозной медиатор оказывают умиротворяющее влияние, способствуя управлять излишнее возбуждение. Возбуждение симпатической нейронной структуры повышает ритм биения сердца Повышение производства норэпинефрина усиливает сосредоточение концентрации Дофаминовые маршруты усиливают мотивацию и внимание Холинергический медиатор помогает сохранению стабильного фокусировки
Пониженное активация: отвлеченность, апатия и уменьшение концентрации
Статус недостаточного стимуляции характеризуется ослаблением активности главной невральной сети, что ведет к ухудшению умения концентрироваться на заданиях. В таком статусе мозг обретает неадекватную активацию для поддержания оптимального градации концентрации. Пинко казино умственная летаргия обнаруживается в облике затруднений с началом и сохранением мыслительной работы. Индивид может испытывать сонливость, апатию и лишение заинтересованности к внешнему. Эти признаки чрезвычайно заметны в монотонной обстановке или при осуществлении обыденных заданий. Мозговые анализы демонстрируют, что при пониженном активации уменьшается деятельность лобной коры, ответственной за управляющие способности. Медленные волны головного мозга становятся более очевидными, что показывает на смещение в положение расслабления или полусна. Признаки низкого возбуждения Основными признаками низкого градации стимуляции выступают заторможенная реакция на окружающие раздражители, затруднения в смене концентрации между целями, и снижение совокупной умственной подвижности. Личности в таком положении нередко ощущают сложности с запоминанием свежей сведений и разрешением трудных заданий.
Повышенное стимуляция: сужение внимания или лишение власти
Чрезмерное стимуляция может неожиданно снизить степень фокусировки в Pinco casino, при интенсивную активацию невральной сети. В статусе сверхактивации совершается концентрация области внимания, что может повести к ограниченному зрению и игнорированию существенных боковых индикаторов. При повышенном градации стимуляции активируется стрессовая отклик тела, что влечет к выбросу обилия гормонов стресса. Стрессовая активация может кратковременно улучшить эффективность в простых задачах, но плохо воздействует на сложную умственную активность. Избыточное возбуждение миндалевидного тела при сильном активации может угнетать функции передней внешнего слоя, отвечающей за рациональное рассуждение и управление фокусировки. Данное разъясняет, по какой причине в тревожных ситуациях индивиды регулярно принимают импульсивные постановления или не в состоянии сосредоточиться на значимых подробностях. Усиленная волнение затрудняет сосредоточение на задачах Телесное натяжение препятствует от интеллектуальной работы Учащенное дыхание может породить дурноту и невнимательность Избыток адреналина ведет к тревоге и нетерпеливости
Эмоциональное активация и отборочное концентрация
Чувственное состояние индивида существенно оказывает влияние на возможность селективно направлять внимание на определенных гранях окружающей обстановки. Положительные переживания обычно расширяют зону фокусировки, давая возможность замечать больше нюансов и соединений между объектами. Pinco casino эмоциональная управление внимания совершается через соединение лимбической структуры с зонами коркового вещества, отвечающими за когнитивный регулирование. Отрицательные чувства, подобные боязнь или злость, в состоянии ограничивать зону концентрации, концентрируя его на вероятных угрозах. Анализы показывают, что эмоционально важные сигналы самопроизвольно притягивают фокус, даже если указанное не отвечает текущим намерениям индивида. Указанный механизм содержит развивающееся важность, поскольку дает возможность стремительно откликаться на существенные модификации в окружающей окружении. Действие эмоционального фона на когнитивные операции Отличное настроение помогает творческому рассуждению и гибкости фокусировки, обеспечивая легче переходить между различными задачами. Депрессивные положения, наоборот, в состоянии влечь к ограниченному области концентрации и затруднениям в отклонении от отрицательных мыслей.
Регулирование уровнем стимуляции для эффективности
Результативное регулирование степенью стимуляции требует постижения индивидуальных особенностей и возможности определять идеальную область для разных типов целей. Для умственной труда обычно необходим умеренный степень возбуждения, в то момент когда для двигательных целей может быть благоприятен более интенсивный уровень возбуждения. Пинко казино самоуправление возбуждения охватывает многообразные приемы управления телесным и психологическим статусом. Дыхательные упражнения, медитация, физическая активность и регулирование окружающей обстановкой способны способствовать обрести оптимального уровня для специфической работы. Циркадные циклы равным образом оказывают влияние на натуральные флуктуации степени стимуляции в продолжение суток. Осознание своих природных циклов дает возможность составлять существенные задания на момент, в случае когда уровень концентрации природно находится на вершине. Прикладные приемы: как найти личную идеальную участок фокусировки Определение персональной оптимальной области внимания предполагает регулярного саморефлексии и экспериментирования с многообразными техниками регуляции стимуляции. Ведение журнала продуктивности может способствовать выявить правила между степенью активации и степенью исполнения целей. Методы усиления возбуждения содержат физические занятия, восприятие энергичной композиций, употребление кафеина в сбалансированных дозах, и формирование возбуждающей рабочей обстановки. Для уменьшения излишнего активации действенны спокойное респирация, прогрессивная телесная релаксация, и техники внимательности. Pinco совершенствование внимания тоже охватывает управление окружающими составляющими, подобными освещение, климат, звук и общественная окружение. Формирование соответствующих условий для работы может значительно повысить возможность поддерживать концентрацию в продолжение продолжительного срока.
Методы отслеживания положения
Актуальные техники Пинко казино дают возможность мониторить физиологические индикаторы, вроде ритм сердечных сокращений, колебания кардиального темпа и уровень напряжения. Указанные информация способны дать объективную сведения о актуальном степени активации и помочь в выборе постановлений о требуемых поправках. Регулярная упражнение методов саморегуляции формирует способность оперативно определять модификации в уровне возбуждения и осуществлять подходящие действия. Данное способность, который развивается с опытом в Pinco и может существенно увеличить целостную результативность и степень бытия.
Uncategorized
0 min read
Людская ментальность являет собой замысловатую организацию взаимодействий между различными механизмами осознания и реагирования. В современной психологической науке все более фокуса уделяется изучению того, как Леон казино влияют на способность совладать с психологическими ограничениями и рамками. Научные работы показывают, что чувственная область играет основную роль в механизмах приспособления и совладания с сложными условиями.
По какому принципу страх создается и почему он парализует активность
Страх представляет собой базовую эмоциональную реакцию, которая формировалась в течении эволюции как система охраны от вероятных рисков. На биологическом уровне он включает цепочку ответов в теле: активируется автономная неврологическая структура, увеличивается уровень адреналина и гормона стресса, учащается пульс, напрягаются мышцы. Эти трансформации настраивают тело к реакции "бей или убегай". Тем не менее в нынешнем социуме немало страхи имеют нелогичный характер и ассоциированы не с действительными материальными угрозами, а с социальными, душевными или воображаемыми рисками. БК Леон в подобных ситуациях может становиться помехой для индивидуального развития и осуществления целей. Процесс образования страха содержит в себя множество этапов: начальную оценку ситуации как потенциально опасной, включение эмоциональных зон мозгового вещества, формирование физических ощущений и возникновение импульса к уклонению. Этот процесс может стать автоматическим, что ведет к сужению деятельностных реакций.
Функция переживаний в включении внутренних возможностей
Эмоциональные настроения действуют как важным генератором мощи и побуждения для индивида. Они в состоянии задействовать личные возможности тела и сознания, направляя их на разрешение конкретных вопросов. игровые автоматы Леон на деньги может побуждать выработку передатчиков, которые совершенствуют когнитивные процессы, увеличивают концентрацию внимания и усиливают мнемонические способности. Положительные эмоциональные переживания включают лобную зону головного мозга, отвечающую за проектирование, выработку определений и контроль над побуждениями. Это создает благоприятные условия для более пластичного и изобретательного способа к решению проблем. Дополнительно, переживания влияют на восприятие темпоральности и пространства, могут модифицировать субъективную анализ проблематичности задач и возможности успеха. Когда человек находится в эффективном аффективном состоянии, он предрасположен более оптимистично рассматривать свои потенциал и перспективы.
Почему сильные чувства могут ослаблять чувство угрозы
Интенсивные эмоциональные ощущения располагают способностью изменять фокус концентрации и предпочтения в осознании окружающей среды. Когда личность испытывает БК Леон, его фокус направляется на объекте или стремлении, соотнесенной с этим состоянием, в то время как потенциальные угрозы перемещаются на второй план. Неврологические изучения демонстрируют, что многообразные аффективные отделы головного мозга могут конкурировать за воздействие на действия. Активация структуры поощрения и отделов положительных чувств может угнетать деятельность миндалевидного тела – отдела, курирующей за формирование реакций боязни. Это процесс раскрывает, почему люди в настроении энтузиазма, погруженности или мощной стимула способны преодолевать ограничения, которые в обычном положении кажутся непреодолимыми. Чувственная вовлеченность формирует специфический "канал фокуса", где преобладает тяга к задаче.
Как заинтересованность и энтузиазм переключают концентрацию со страха
Процесс смещения внимания выполняет центральную роль в процессе побеждения фобий. Когда индивид ощущает любопытство к определенной деятельности или задаче, его мыслительные возможности самопроизвольно смещаются с контроля вероятных рисков на познание и овладение незнакомой данных БК Леон. Заинтересованность запускает дофаминергическую структуру головного мозга, которая связана с мотивацией и желанием к исследованию. Этот химическое вещество не только создает переживание удовольствия от течения постижения, но и ослабляет реактивность к неблагоприятным воздействиям, включая признаки риска.
- Сосредоточение на положительных сторонах обстановки
- Запуск изобретательных возможностей
- Повышение терпимости к неопределенности
- Укрепление побуждения к деятельности
Воодушевление формирует настроение потока, в котором личность полностью захвачен деятельностью. В аналогичном состоянии уменьшается самоанализ, уменьшается концентрация на личных недостатках и ограничениях, что содействует более отважным действиям.
Взаимосвязь между аффективным воодушевлением и предрасположенностью поступать
Эмоциональный подъем сопровождается полным совокупностью физиологических и душевных модификаций, которые прямо влияют на готовность к энергичным действиям. На телесном уровне это отображается в улучшении синхронизации моторики, увеличении энергетического уровня, совершенствовании деятельности сердечно-сосудистой и респираторной структур. БК Леон в состоянии подъема отличается расширением активного набора. Личность становится более готовым к новым вариантам, настроенным экспериментировать и выбирать необычные решения. Этот процесс приобрел обозначение "эффект увеличения и создания" в благоприятной науке о психике. Значимую роль выполняет также трансформация временной видения. В состоянии эмоционального энтузиазма личности имеют тенденцию меньше беспокоиться о долгосрочных результатах своих шагов и более сосредотачиваться на текущих перспективах и прогнозах.
Почему чувства ускоряют принятие определений в сложных ситуациях
В ситуациях стресса и двусмысленности аффективные реакции могут действовать как существенным поставщиком данных для выработки решений. Интуитивные ощущения и чувственные порывы зачастую заключают важные сведения о обстановке, которые не постоянно понятны разумному анализу. Исследования в сфере экономической психологии выявляют, что эмоции осуществляют ключевую роль в системах селекции. Индивиды с нарушениями аффективных центров головного мозга ощущают значительные трудности в принятии даже базовых решений, что подчеркивает важность аффективных систем в мыслительной деятельности. игровые автоматы Леон на деньги может функционировать как катализатор, ускоряющий процесс оценки вариантов и образования финального решения. Это в частности значимо в ситуациях, где затягивание может привести к пропущенным возможностям или обострению сложностей.
Социальные переживания и их эффект на отвагу
Межличностные чувства являют собой специальную класс эмоциональных состояний, которые появляются в контексте человеческих взаимодействий и коллективного контакта. Они содержат переживания принадлежности, достоинства, стыда, вины, признания и множество иных переживания, соотнесенные с анализом себя и своего действий в общественном среде. Переживание содействия со стороны ценных индивидов может заметно усиливать убежденность в себе и готовность к вызову. Когда индивид чувствует, что его понимают, уважают и настроены содействовать, это образует аффективную фундамент для более отважных действий.
- Ощущение причастности к группе соратников
- Чувство ответственности перед прочими людьми
- Хотение отвечать благоприятным прогнозам
- Тяга к одобрению и признанию
Социальное принятие включает зоны вознаграждения в мозге, что создает благоприятное усиление для смелого поведения. БК Леон в коллективном окружении может становиться сильным стимулятором для превозмогания личных боязней и рамок.
Когда чувства превращаются поддержкой для преодоления личных барьеров
Личные ограничения зачастую формируются на базе неблагоприятного прошлого опыта, сужающих убеждений или низкой самовосприятия. Они проявляются в виде автоматических идей, которые препятствуют поступкам и создают чувство неосуществимости осуществления стремлений. Эмоциональные потенциал игровые автоматы Леон на деньги могут превратиться мостом между текущим положением и желаемыми трансформациями. Они дают мощь и побуждение, нужные для того, чтобы сделать начальные действия в сторону превозмогания ограничений.
Помощь и чувство включенности
Чувство контакта с другими личностями формирует чувственную базу для личностных изменений. Когда личность чувствует помощь и постижение, это ослабляет беспокойство и усиливает готовность к пробам с новыми формами поведения. Сопричастность может выражаться в многообразных формах: от включения в сообществах по интересам до интенсивных персональных взаимодействий. Значимым составляющей является переживание того, что иные личности полагают в умения человека и настроены дать поддержку в проблематичные времена.
Эмоциональные порывы, которые помогают совершить первый шаг
Начальный шаг в побеждении испуга нередко становится самым проблематичным, поскольку предполагает нарушения стандартных образцов поведения и выхода из области удобства БК Леон. Чувственные порывы могут дать необходимую мощь для этого скачка. Подобные импульсы могут появляться спонтанно в результате вдохновляющих происшествий, встреч с увлекательными людьми или обретения незнакомой информации. Существенно овладеть узнавать эти моменты и применять их мощь для конструктивных поступков.
Почему благоприятный чувственный отклик ослабляет степень беспокойства
Беспокойство и благоприятные чувства являются противниками на биологическом уровне. Запуск вегетативной НС, которая происходит при положительных ощущениях, способствует расслаблению и снижению количества тревожных гормонов. Благоприятные переживания стимулируют синтез гормонов счастья, серотонина и других химических веществ, которые создают ощущение удовлетворенности и тишины. Это химическое трансформация напрямую борется механизмам формирования тревожных переживаний. Кроме того, БК Леон в положительном ключе помогает формированию более оптимистичного видения будущего, что ослабляет склонность к трагическому мышлению – главному из основных факторов удержания тревожных расстройств.
Как сознательная работа с эмоциями меняет отношение к страху
Развитие аффективной умелости охватывает в себя возможность определять, постигать и управлять свои чувственные переживания. Этот навык дает возможность человеку более гибко откликаться на сложные обстоятельства и использовать аффективные возможности для преодоления проблем. Методы майндфулнесс и размышления содействуют совершенствованию метакогнитивного осознания – умения следить за своими идеями и чувствами как бы со стороны. Это формирует зону между влиянием и ответом, где становится доступным целенаправленный отбор варианта ответа. игровые автоматы Леон на деньги через линзу осознанности прекращает осознаваться как нечто неуправляемое и деструктивное. Напротив создается осознание испуга как природной отклика, которая может быть использована как поставщик данных о важных для индивида идеалах и потребностях. Постоянная работа работы с переживаниями создает новые неврологические контакты, которые сохраняют более гибкие варианты реагирования на вызовы. БК Леон делается не препятствием, а партнером в процессе личностного развития и достижения жизненных стремлений.
Uncategorized
0 min read
Почему сознание реагирует интенсивнее в ответ на редкие события
Почему сознание реагирует интенсивнее в ответ на редкие события
Редкие явления фактически как правило воспринимаются сильнее, нежели стандартные. Даже когда подобных прикладная значимость минимальна, фокус к ним возрастает, и ощущение фиксируется на длительное время. Для игрока такое выражается в том что нетипичный успех, внезапная полоса положительных финалов или нечастый сдвиг в партии «затмевают» множество обычных эпизодов плюс вращений. Основание не в области магии, а в архитектуре познавательных систем: психика нацелен на поиск аномалий от обычного, поскольку именно подобные потенциально сдвигают рамки поведения а требуют пересмотра стратегии.
В ежедневном потоке стимулов сознание бережёт силы: повторяющиеся сигналы обрабатываются быстро плюс поверхностно. Нечастость ломает данный режим, и на условиях подобного «провала ожиданий» концентрация без усилий усиливается — схожие процессы развернуто рассматриваются в материале vavada. Включается механизм «распознавания нового»: растёт настороженность, сильнее подключаются контуры проверки важности и запоминания. В результате редкое явление воспринимается намного «значимым», в сравнении с тем, как оно оказывается на самом деле, при этом переживание оказывается резче, чем при обычном результате.
Необычность в роли маркера: зачем необычное притягивает фокус
Перцептивные плюс познавательные контуры регулярно соотносят происходящее с ожиданием. Если эпизод совпадает с предсказанием, мозг верифицирует картину реальности и переходит дальше. Если появляется аномалия, система предсказания выдаёт «сбой», после чего это включает интенсивную переработку информации. Чем внезапнее исход, тем больше всего энергии направляется на разбор: что именно реально произошло здесь, отчего так вышло, возникнет снова ли такое опять, каким образом корректировать действия vavada.
Для игрового процесса такой процесс особенно заметен. Однообразные эпизоды скоро сглаживаются, и единичный, яркий финал — пусть даже однократный — делается фокусом внимания. Психика удерживает подробности: тайминг, уровень ставки, цепочку решений, «переживание момента». Данное вавада казино повышает вероятность того, что опыт окажется использоваться как опора в перспективе, пусть даже при том что статистически он неустойчивый плюс не отражает обычный паттерн.
Система поощрения: нарастание реакции в ответ на случайный результат
Интенсивная реакция на исключительность обусловлена с тем, как построено обучение на основе вознаграждения. Мозг измеряет не лишь сам итог, плюс и то, как сильно он расходился от ожидаемого. Внезапное поощрение нередко повышает эмоциональный ответ и закрепляет поведенческую схему. Если поощрение появляется «внезапно», ее субъективная значимость увеличивается, а соответствующий с ней эпизод фиксируется прочнее.
Внутри геймплейных условиях такое ведёт к явлению «выделения»: редкий результат ощущается как особенно существенный маркер, несмотря на то что это способен быть рядовой случайной вариативностью. На практике это вавада выражается в стремлении повторно создать обстоятельства «как тогда», восстановить ставку, темп, подбор тайтла либо порядок шагов. Подобная попытка воссоздать набор условий — нормальная функция системы научения, однако она не всегда соответствует с реальными шансами.
Память в связке эмоции: почему редкие моменты сохраняются прочнее
Мнемоника не остается безоценочным сейфом. Механизм памяти действует выборочно и зависит на аффективной метки. Чем сильнее активация и значимость случая, тем выше вероятность, что оно сохраняется в длительной памяти. Исключительность часто автоматически трактуется в роли значимость: сознание оценивает, что необычный исход способен оказаться существенным для выживания, позиции, сохранности или последующих действий.
В игрока данное заметно в «эффекте якоря»: единственный необычный результат или редкий исход делается точкой ориентира. После этого сопоставление идет не с фактической типичной траекторией, а с эмоциональным моментом. В ситуации, когда актуальные итоги vavada ниже, формируется ощущение «что-то не так», несмотря на то что на самом деле происходит естественный статистический флуктуации. Подобный перекос воздействует на эмоциональный фон, риск-профиль и выбор действий, особенно в длительных игровых сессиях.
Искажения восприятия вероятностей: редкое воспринимается слишком частым
Нечастые случаи труднее просчитываются интуитивно, так как наша психология ориентируется на легкость доступа памятных эпизодов. Когда момент вавада казино легко воспроизводится, его распространённость кажется выше. Это познавательное искажение вынуждает трактовать редкое в качестве «почти закономерное», особенно если это эмоционально подкреплено. В игровом процессе данное может выливаться в сбитые представления: возникает мысль, что нетипичный исход «встречается слишком часто», несмотря на то что объективно он нечаст.
Дополнительный момент — обрезанные серии наблюдений. Игрок чаще держит в памяти яркие успехи, нежели нейтральные прокруты и обычные минусовые исходы. В индивидуальной картине растёт дисбаланс: редкие моменты занимают для себя непропорционально значительное место. В итоге создаётся ощущение, что вероятность выше, чем в фактах, при этом решения стартуют строиться вокруг редкостей.
Создание смысла: зачем мозг строит причины
В момент, когда возникает нечастое происшествие, психика стремится разобрать его причинно. Это вавада практичная роль: она позволяет обучаться и выстраивать стратегии. Но в среде вероятностности а также большой дисперсии проявляется вероятность неверного каузального вывода. Возникает склонность привязать итог «правильному подходу», «уникальному состоянию», «идеальному времени», несмотря на то что реальная основа — случайная изменчивость.
В случае участника существенно различать два уровня: точность выбора и финал данного раунда. Хорошее решение иногда заканчивается к плохому исходу, а ошибочное — к положительному. Нечастый плюсовой итог часто скрывает просчёты, поскольку реакция подтверждает поведение. Единичная неудача, наоборот, может разрушить разумную линию, при условии, что её считать как знак, что модель ошибочен.
Групповой эффект необычности: зачем редкое считается значимее
Единичные случаи имеют большой социальной заметностью. Участники чаще делятся редким, нежели стандартным: рассказывают насчёт нечастых попаданиях, странных схождениях, «особых» полосах. Подобная коммуникативная среда vavada усиливает впечатление, что нечастые события случаются на каждом шагу. Даже при наличии взвешенном восприятии к другим историям сознание учитывает их как сигналы о распространённости и значимости явлений.
Внутри игровых группах этот эффект сильнее всего заметен. Публикуются снимки больших заносов, обсуждаются «поразительные» исходы, строятся нарративы на основе аномалий. Стандартная статистика не смотрится интересно и редко оказывается в сферу внимания. Из-за этого субъективная картина сдвигается: создается чувство, что исключительное — это обыденность, а типовой результат ощущается как «провал».
Как применять понимание о редкости в практической рутинe
Понимание психофизиологических процессов позволяет сделать процесс более устойчивой. Нечастое явление полезно трактовать как диагностический индикатор о вариативности, а не как доказательство паттерна. Этот режим вавада казино уменьшает импульсивность и способствует держать стратегическую рамку. Когда исход кажется «необычно существенным», разумно развести переживание от анализа и сместиться к цифрам: длительность сессии, уровень банкролла, намерение, приемлемый уровень риска.
Полезный навык вавада — держать наблюдение за действиями, а не исключительно за итогами. Если записывается схема размеров ставок, выбор тайтлов и основания действий, редкие эпизоды перестают управлять поведением. В таком случае редкий выигрыш сохраняется позитивным эпизодом, но не переходит в опору для закрепления небезопасного паттерна. Единичная осечка, в свою плоскость, не ломает стратегию, когда решение было корректным по входным параметрам.
Методы саморегуляции: уменьшение влияния ярких эпизодов
Базовый из практичных методов — до начала определить регламент игровой сессии: лимиты по таймингу, уровень допустимых минусов, условия завершения при плюсе. Такие пределы снижают шанс того, что редкий пик переживаний изменит план. Исключительность часто провоцирует подъём ставки, разгон темпа и стремление «попасть и повторить воспроизвести». Чёткие параметры восстанавливают контроль и страхуют от действий на на вершине возбуждения.
Ещё альтернативный вариант — нормализовать редкость через статистическое понимание. Разброс считается элементом механики: в ограниченном интервале способны случаться серии, которые выглядят как редкость, однако укладываются в вероятностную картину. Если трактовать единичные эпизоды как нормальный фрагмент вероятностного механизма, уменьшается чувство «указания рока» и ослабляется опасность сбитых интерпретаций.
Почему интенсивная реакция на нечастость полезна и в каких местах она вредит
С эволюционной позиции взгляда усиленное фокус к нечастому логично. Нетипичные события вполне могут обозначать опасность или возможность, который требует быстрых изменений стратегии. Сознание обязан распознавать несоответствия и ускорять адаптацию на их базе. В игровом процессе подобная аналогичная механика включается «автоматически», потому что психика не отделяет бытовую и сессионную обстановку на уровне основных процессов концентрации и поощрения vavada.
Проблема появляется там, где редкость не даёт надежной причинной информации. В таких контекстах интенсивная отдача ведёт к завышению частот, неверным стратегиям и эмоциональным перепадам. Участнику помогает чёткое представление: нечастое явление заметнее, потому что мозг учится на внезапном; однако ценность заключений должна валидироваться не яркостью переживания, а регулярной оценкой и фактическими вероятностями.
Uncategorized
0 min read
Каким образом чувство порождает состояние самоуверенности
Каким образом чувство порождает состояние самоуверенности
Возможность руководить личной судьбой является один из важнейших элементов психологического здоровья. Исследования демонстрируют, что личности, ощущающие Покердом над текущими процессами, проявляют более значительный уровень уверенности в себе и жизненной довольства. Внутреннее самочувствие равновесия прямо соединено с способностью оказывать влияние на внешнюю среду и принимать постановления относительно индивидуального грядущего.
Психологика: базовая необходимость человека оказывать влияние на события
Потребность в контроле явлениями закладывается на самых начальных фазах формирования личности. Дети уже в первые месяцы бытия пытаются оказывать влияние на окружающий мир через плач, движения и мимику. Такое врождённое желание сохраняется на в течение полной существования и превращается в основой для создания здоровой самооценки.
Психологические механизмы, отвечающие за восприятие личной умения оказывать влияние на положение, включаются в разных житейских зонах. Личность желает регулировать не только посторонние ситуации, но и личные состояния: чувства, мысли, телесные реакции. pokerdom зеркало становится базой для построения результативных методов преодоления со стрессом.
Мозговые исследования подтверждают, что ощущение способности воздействовать на явления запускает определённые участки мозга, соединённые с планированием и выработкой постановлений. Лобная область, ответственная за управляющие задачи, работает более результативно при существовании чувства управляемости положения.
Уменьшение беспокойства через восприятие регулируемости положения
Беспокойные расстройства часто развиваются на фоне чувства беспомощности перед лицом житейских трудностей. В момент когда личность испытывает, что не может воздействовать на финал явлений, запускается стрессовая отклик системы, которая способна довести к постоянному стрессу и психосоматическим признакам.
Восстановление восприятия Pokerdom над положением делается ключевым элементом лечебной практики с тревожными условиями. Техники когнитивно-поведенческой лечения нацелены на обнаружение областей существования, где индивид способен реально воздействовать на развивающееся, и развитие навыков контроля этими сферами.
Практические приёмы уменьшения тревожности охватывают:
- Расчленение сложных заданий на посильные этапы
- Построение организованного режима суток
- Развитие способностей регуляции дыхания и мускульного стресса
- Создание осуществимых планов поступков
Изучения демонстрируют, что включая малое повышение ощущения регулируемости может заметно сократить уровень напряжения и усилить общее душевное самочувствие. Люди, владеющие развитыми умениями самоконтроля, более успешно совладают с двусмысленностью и оперативнее адаптируются к переменам.
Прогнозируемость как основа психологической защищённости
Умение прогнозировать развитие явлений тесно соединена с чувством надёжности и устойчивости. Индивидуальный интеллект беспрестанно строит модели предстоящего, основываясь на прошлом опыте и современных сведениях. Если указанные предвидения оказываются правильными, формируется уверенность к личным изучающим возможностям.
Планируемость создаёт фундамент для проектирования и принятия обоснованных выборов. В ситуациях, когда исходы действий возможно предвидеть с значительной мерой вероятности, люди ощущают себя более Покердом официальный сайт и готовы брать на себя обязательство за результаты своих действий.
Построение прогнозируемой окружения становится значимым элементом в различных жизненных обстоятельствах. Семьи с сложившимися ритуалами и ритуалами предоставляют ребятам чувство стабильности. Трудовые коллективы с чёткими порядками и законами содействуют рабочей уверенности сотрудников.
Небольшие победы: как Покердом над мелочами образует совокупную убеждённость
Ментальность малых побед демонстрирует, как удачное управление незначительными аспектами существования способно значительно повысить целостный степень самоэффективности. Завершение простых целей, сохранение организованности в личном пространстве, соблюдение распорядка образуют базу для более важных достижений.
Механизм формирования уверенности через Pokerdom над деталями строится на принципе постепенного увеличения сферы влияния. Начиная с руководства простыми аспектами ежедневной судьбы, человек развивает умения проектирования, структурирования и последовательного осуществления поставленных поступков.
- Ежедневные ритуалы самоустройства
- Постановка и получение быстрых целей
- Проведение контроля сделанных целей
- Создание системы индивидуальных стандартов степени
- Постоянная анализ полученных результатов
Аккумуляция положительного опыта управления создаёт стабильную основу для убеждения в индивидуальные умения. Индивиды, которые регулярно добиваются результата в незначительных вопросах, показывают высокую настроенность приниматься за трудные проекты и преодолевать помехи.
Заблуждение: когда неправильное ощущение руководства тоже работает
Явление заблуждения составляет завышение личной умения оказывать влияние на явления, которые в действительности строятся от случайности или внешних элементов. Удивительно, но аналогичные неправильные убеждения могут производить позитивное влияние на ментальное самочувствие и действия личности.
Исследования в зоне поведенческой экономики демонстрируют, что личности, убеждённые в свою умение влиять на исходы азартных забав или произвольные события, демонстрируют более значительную побуждение и целеустремлённость. При том что их убеждения не подходят действительности, чувственные преимущества от Pokerdom могут быть значительными.
Важно различать полезную обман от деструктивных типов самообмана. Приспособительная обман помогает поддерживать позитивность и мощь в ситуациях неясности, тогда как чрезмерная преувеличение собственных способностей может подвести к необоснованному опасности и огорчению.
Лишение и её влияние на уверенность в себе
Испытание утраты способности влиять на важные стороны жизни способно основательно ослабить душевное благополучие. Потеря работы, недуг, разрыв взаимоотношений или иные критические ситуации часто сопровождаются восприятием немощности и снижением убеждения в собственные силы.
Длительное пребывание в состоянии нехватки Покердом официальный сайт способно привести к развитию выученной бессилия - душевного условия, при котором человек заканчивает совершать стремления трансформировать негативные условия, включая случаи когда подобные шансы образуются.
Восстановление после кризиса предполагает медленного восстановления чувства влияния на индивидуальную существование. Указанный течение включает признание реальных границ, обнаружение оставшихся средств и сфер потенциального влияния, выработку новых подходов адаптации к трансформировавшимся обстоятельствам.
Совершенствование подлинного Pokerdom: методы для усиления убеждённости в собственных силах
Создание прочного ощущения регулируемости жизни требует совершенствования специфических способностей и умений. Реальный Покердом разнится от обманчивого тем, что основывается на беспристрастной изучении личных возможностей и пределов, а также на формировании практических способностей оказывать влияние на близлежащую обстановку.
Ключевые методы формирования действительного Покердом содержат улучшение способностей проектирования, осуществления постановлений, управления моментами и возможностями. Эти компетенции позволяют человеку продуктивно трансформировать цели в поступки и получать определённых целей.
Важным стороной развития Покердом официальный сайт превращается в умение различать сферы влияния и осознания. Концентрация попыток на том, что фактически допустимо поменять, при одновременном принятии неизбежных условий, содействует более результативно применять индивидуальные возможности и уклоняться фрустрации от стремлений контролировать неконтролируемое.
Прикладная активность над усилением уверенности охватывает постановку осуществимых намерений, формирование трудовых и индивидуальных квалификаций, формирование помогающей общественной окружения и формирование обычаев, помогающих характерному росту. Поэтапное увеличение сферы умелости формирует прочную основу для продолжительной ментальной прочности и бытовой довольства.
Uncategorized
0 min read
Каким образом чувственный фон изменяет восприятие триумфа
Каким образом чувственный фон изменяет восприятие триумфа
Человеческая психика представляет собой многогранную конструкцию соединенных процессов, где чувства играют основную роль в толковании случающихся фактов. Восприятие личных достижений напрямую обусловлено от текущего эмоционального состояния. онлайн казино формируют фундамент для осознания того, как наше собственное внутреннее положение оказывает влияние на анализ личных результатов. Психологические исследования показывают, что идентичные реальные параметры могут пониматься радикально различно в обусловленности от психологического фона.
Отчего эмоции определяют позицию к победам
Аффективная структура сознания действует скорее рациональной, поэтому первичная ответ на любое происшествие всегда пропитана эмоциями. В случае когда личность находится в положительном состоянии души, его сознание интенсивнее генерирует нейромедиатор удовольствия и гормон счастья, что формирует положительную почву для положительной интерпретации результатов. В такие моменты в том числе небольшие победы могут оцениваться как важные триумфы.
Негативные эмоции, напротив, включают области сознания, курирующие за аналитическое мышление и поиск рисков. В таком состоянии личность склонен минимизировать важность собственных успехов, сосредотачиваясь на недостатках и упущенных шансах. вулкан в этом контексте действует как фильтр, через который проходит вся поступающая сведения о итогах работы.
Каким образом расположение духа интенсифицирует или снижает переживание плода
Эмоциональное состояние действует как амплификатор или подавитель эмоциональной реакции на победы. В состоянии эйфории личность может преувеличивать ценность личных достижений, тогда как депрессивное настроение принуждает минимизировать значимость благоприятных результатов. Неврологические механизмы показывают, что психологическое состояние изменяет функционирование лобной области, которая отвечает за оценку и проектирование.
Штудии показывают, что индивиды в благоприятном состоянии более имеют тенденцию приписывать победы собственным способностям и стараниям, в то время как состоящие в плохом настроении чаще объясняют достижения посторонними факторами или случайностью. казино вулкан становится решающим фактором в том, насколько интенсивно человек переживает радость от обретенного результата.
Взаимосвязь между внутренним положением и оценкой достижения
Внутреннее ментальное положение формирует фильтр, через которую индивид изучает личные победы. Волнение может заставлять фокусироваться на потенциальных угрозах и изъянах, включая случаи когда плоды объективно позитивные. Вера в себе, в противоположность, способствует обнаруживать в каждом успехе свидетельство личной способности.
Душевные защитные механизмы также воздействуют на объяснение побед. Человек с низкой мнением о себе может принижать собственные победы, рассматривая их незначительными или случайными. Высокая самооценка помогает более оптимистичной анализу итогов, и склонности воспринимать похвалу. казино онлайн обнаруживается в том, как индивид глубинно анализирует личные достижения и какую эмоциональную важность им назначает.
По какой причине один и тот же плод воспринимается неодинаково
Объективные показатели достижения остаются постоянными, но личное осознание может кардинально отличаться у различных людей или у отдельного человека в разное время. Контекстуальные факторы играют определяющую задачу: обретение повышения в момент личного кризиса может восприниматься менее радостно, чем в стабильные времена.
Прошлый переживания также образует шаблоны осознания. Человек, привыкший к высоким успехам, может воспринимать положительные плоды казино вулкан как норму, тогда как для того, кто редко получает победы, тот же итог сделается причиной сильных положительных переживаний. Компаративный анализ с прошлыми победами или результатами других индивидов формирует добавочный эмоциональный уровень в понимании.
- Предшествующий практика и сформированные ожидания
- Настоящее психологическое положение
- Социальный обстановка и отклик окружающих
- Физическое положение и уровень бодрости
- Индивидуальные свойства и структура ценностей
Каким способом положительный чувственный фон создает достижение более важным
Благоприятные чувства развивают когнитивные ресурсы и содействуют более творческому размышлению. В настроении радости и подъема человек лучше может проанализировать сложность личных успехов и обнаружить в них вспомогательные положительные стороны. вулкан в положительном направлении помогает заметить не только специфический плод, но и его вероятные следствия и перспективы.
Оптимистичный психологический настрой создает хорошие обстоятельства для укрепления положительной самомнения. Успехи, испытываемые в радостном положении, образуют более крепкие нервные связи в запоминании, что помогает долгосрочному повышению уверенности в себе. Эндорфины и иные нейромедиаторы блаженства увеличивают личную важность успеха.
Если напряжение и утомление изменяют переживание успехов
Напряжение и физическое утомление значительно воздействуют на возможность адекватно анализировать личные успехи. В состоянии длительной усталости включая существенные достижения могут пониматься как недостаточные или недолговечные. Кортизол, вещество давления, подавляет функционирование центров радости в сознании, что снижает возможность радоваться достижениям.
Психологическое выгорание формирует особенно неблагоприятные обстоятельства для восприятия успехов. Индивид может интеллектуально постигать ценность своего достижения, но не чувствовать соответствующего психологического подъема. казино вулкан в обстоятельствах стресса работает как демпфер, снижающий интенсивность благоприятных ощущений и заставляющий фокусироваться на израсходованных стараниях больше, чем на обретенных плодах.
Коллективные эмоции и воздействие окружения на восприятие достижения
Отклик окружающих личностей превращается значительным обстоятельством, образующим индивидуальное отношение к победам. Помощь и признание со стороны важных людей интенсифицируют положительное восприятие победы, тогда как апатия или осуждение могут обесценить включая реально положительные итоги. Общественная признание играет основную роль в чувственной оценке успехов.
Зависть и конкуренция в общественной среде также оказывают влияние на восприятие. Достижение на фоне поражений иных может вызывать смешанные чувства, включающие вину или неудобство. Напротив, успехи в содействующей среде оцениваются более оптимистично и способствуют развитию побуждения к продолжающемуся совершенствованию. казино онлайн проявляется через линзу общественного обстановки и оказывает влияние на длительное позицию к личным способностям.
Как чувственные надежды создают уровень удовлетворенности
Изначальные ожидания образуют эмоциональную границы, в которой рассматриваются действительные итоги. Преувеличенные надежды могут изменить реальный достижение в основу фрустрации, если факты не отвечает грезам. Умеренные и правдоподобные надежды, напротив, содействуют более позитивному пониманию побед казино онлайн.
Задача предвкушения
Предвкушение победы запускает те же участки мозга, что и само обретение цели. Это подразумевает, что эмоциональная реакция начинается еще до получения итога вулкан. Чрезмерно интенсивное ожидание может привести к эмоциональному утомлению к периоду получения действительного итога, что уменьшает радость от успеха.
Способность контролировать предвкушением способствует сберечь психологические ресурсы для правильной реакции на достижения. Умеренное возбуждение и правдоподобное проектирование создают идеальные ситуации для комплексного ощущения достижения.
Предположения как место сравнения
Ожидания функционируют как глубинный норма, с которым сравниваются действительные итоги. Перевыполнение предположений порождает положительное изумление и усиливает веселье от победы. Недополучение ожидаемого размера может создать огорчение включая при фактически положительных плодах. казино вулкан в данном контексте диктует степень согласованности между желаемым и полученным.
- Правдоподобность первоначальных замыслов
- Подвижность в изменении ожиданий
- Способность оценивать переходные плоды
- Понимание факторов, воздействующих на финальный плод
Отчего сильные чувства увеличивают память об достижениях
Эмоционально наполненные происшествия фиксируются отчетливее и на длительнее из-за включения амигдалы – структуры разума, отвечающей за аффективную память. Успехи, испытанные с большой эмоциональной силой, создают более крепкие воспоминания и служат основой мотивации в будущем.
Адаптивность нервной системы мозга обеспечивает интенсивным психологическим чувствам формировать новые нейронные дорожки, которые улучшают доступ к благоприятным запоминаниям. вулкан способствует образованию эмоциональных привязок, связанных с успешными периодами, что помогает удерживать уверенность в себе в непростые времена.
Каким образом управление эмоциями содействует оценивать собственные успехи
Совершенствование психологического способности позволяет более преднамеренно подходить к рассмотрению индивидуальных побед. Умение распознавать личное психологическое положение помогает понимать, в какой степени справедливо случается оценка побед. Способы чувственной управления могут настраивать излишне скептическое или завышенное восприятие плодов.
Практика майндфулнес и размышления создает область между эмоциональной откликом и разумной анализом. Это позволяет рассматривать воздействие настоящего состояния на понимание и получать более гармоничные решения в отношении значимости достижений. казино онлайн делается средством самопознания, содействующим лучше постигать собственные шаблоны реагирования на успех и провалы.
Uncategorized
0 min read
Каким образом чувственный климат трансформирует осознание достижения
Каким образом чувственный климат трансформирует осознание достижения
Индивидуальная душевная организация составляет комплексную систему взаимосвязанных процессов, где переживания выполняют центральную роль в объяснении происходящих фактов. Восприятие индивидуальных успехов напрямую зависит от актуального душевного состояния. Вулкан Рояль Казахстан образуют фундамент для постижения того, как индивидуальное внутреннее настроение оказывает влияние на рассмотрение собственных итогов. Психологические исследования раскрывают, что идентичные реальные критерии могут оцениваться радикально неодинаково в обусловленности от чувственного контекста.
Отчего эмоции устанавливают подход к успехам
Чувственная система мозга работает оперативнее разумной, поэтому изначальная реакция на всякое событие всегда пропитана переживаниями. В случае когда индивид пребывает в благоприятном расположении психики, его мозг активнее продуцирует дофамин и серотонин, что создает положительную базу для позитивной толкования результатов. В подобные моменты даже небольшие достижения могут пониматься как важные победы.
Отрицательные чувства, в противоположность, включают области мозга, ответственные за критическое размышление и выявление угроз. В аналогичном настроении индивид склонен преуменьшать ценность личных достижений, концентрируясь на слабостях и потерянных шансах. Казино Вулкан в указанном случае функционирует как фильтр, через который фильтруется вся приходящая сведения о плодах работы.
Каким образом эмоциональный настрой увеличивает или ослабляет переживание плода
Эмоциональное состояние действует как амплификатор или ослабитель аффективной ответа на успехи. В настроении восторга индивид может завышать значимость своих побед, тогда как подавленное состояние заставляет уменьшать значимость благоприятных итогов. Неврологические механизмы демонстрируют, что психологическое состояние трансформирует функционирование передней коры, которая курирует за анализ и планирование.
Штудии показывают, что личности в положительном состоянии более склонны относить победы личным умениям и трудам, в то время как пребывающие в плохом расположении чаще интерпретируют успехи посторонними условиями или удачей. Vulkan Royal становится решающим обстоятельством в том, в какой мере сильно человек ощущает радость от обретенного результата.
Взаимосвязь между глубинным состоянием и анализом успеха
Глубинное ментальное настроение образует фильтр, через которую личность анализирует собственные достижения. Беспокойство может принуждать фокусироваться на потенциальных угрозах и недостатках, в том числе когда результаты фактически позитивные. Убежденность в себе, в противоположность, способствует обнаруживать в каждом победе доказательство собственной способности.
Психологические оборонительные механизмы также воздействуют на интерпретацию побед. Личность с низкой мнением о себе может принижать свои успехи, считая их несущественными или произвольными. Сильная самооценка содействует более положительной рассмотрению результатов, и желанию получать одобрение. Вулкан выражается в том, как личность внутренне анализирует личные достижения и какую эмоциональную важность им назначает.
По какой причине один и тот же итог понимается неодинаково
Объективные параметры достижения сохраняются неизменными, но индивидуальное понимание может радикально отличаться у разных индивидов или у единственного человека в разное время. Обстоятельственные факторы играют определяющую задачу: обретение продвижения в период индивидуального трудностей может восприниматься менее радостно, чем в стабильные времена.
Прошлый практика также создает паттерны осознания. Индивид, привыкший к высоким успехам, может оценивать положительные итоги Vulkan Royal как обычность, тогда как для того, кто нечасто добивается успеха, тот же результат станет основой сильных положительных эмоций. Компаративный изучение с прошлыми победами или результатами иных людей создает дополнительный психологический пласт в осознании.
- Предыдущий практика и созданные надежды
- Актуальное эмоциональное состояние
- Социальный обстановка и ответ соседствующих
- Организменное положение и количество бодрости
- Личностные особенности и структура ценностей
Как положительный чувственный фон создает достижение более значимым
Положительные переживания расширяют когнитивные способности и помогают более креативному рассуждению. В настроении веселья и подъема личность лучше умеет оценить многогранность своих успехов и найти в них вспомогательные благоприятные моменты. Казино Вулкан в оптимистичном направлении помогает обнаружить не только определенный результат, но и его вероятные последствия и возможности.
Позитивный эмоциональный настрой формирует хорошие условия для закрепления благоприятной мнения о себе. Победы, переживаемые в счастливом настроении, образуют более стабильные нейронные соединения в памяти, что помогает долгосрочному росту убежденности в себе. Эндорфины и другие химические посредники блаженства интенсифицируют субъективную значимость достижения.
В момент когда давление и утомление деформируют чувство побед
Напряжение и телесное изнеможение серьезно воздействуют на умение адекватно анализировать собственные успехи. В состоянии хронической изнеможения даже значительные достижения могут оцениваться как неполные или временные. Гормон стресса, вещество напряжения, угнетает функционирование областей радости в сознании, что ослабляет способность ликовать победам.
Душевное выгорание создает чрезвычайно неблагоприятные ситуации для понимания побед. Человек может рационально понимать ценность личного достижения, но не чувствовать адекватного психологического воодушевления. Vulkan Royal в ситуации давления функционирует как демпфер, снижающий мощность положительных чувств и заставляющий фокусироваться на израсходованных стараниях больше, чем на полученных результатах.
Социальные чувства и давление среды на понимание успеха
Реакция соседствующих индивидов становится значительным элементом, образующим собственное позицию к победам. Поддержка и принятие со стороны важных людей увеличивают позитивное восприятие достижения, тогда как равнодушие или осуждение могут минимизировать даже объективно положительные итоги. Коллективная валидация исполняет ключевую роль в психологической оценке успехов.
Недоброжелательность и конкуренция в социальной среде также воздействуют на осознание. Победа на в контексте неудач других может порождать смешанные эмоции, охватывающие угрызения совести или дискомфорт. В противоположность, достижения в поддерживающей обстановке понимаются более оптимистично и содействуют укреплению стимула к дальнейшему развитию. Вулкан проявляется через призму социального контекста и воздействует на продолжительное позицию к собственным талантам.
Как чувственные надежды образуют размер довольства
Заблаговременные ожидания создают психологическую границы, в которой рассматриваются реальные результаты. Преувеличенные ожидания могут изменить объективный достижение в источник огорчения, если реальность не отвечает мечтам. Сбалансированные и правдоподобные надежды, наоборот, содействуют более позитивному пониманию достижений Вулкан.
Роль антиципации
Ожидание победы включает те же зоны сознания, что и само получение задачи. Это подразумевает, что психологическая отклик инициируется еще до получения плода Казино Вулкан. Чрезмерно сильное антиципация может привести к эмоциональному утомлению к моменту достижения действительного итога, что ослабляет удовлетворение от успеха.
Способность контролировать предвкушением способствует сохранить чувственные ресурсы для адекватной ответа на победы. Умеренное волнение и адекватное организация формируют оптимальные ситуации для комплексного переживания успеха.
Предположения как место сравнения
Надежды работают как глубинный стандарт, с которым сопоставляются действительные результаты. Преодоление надежд вызывает положительное удивление и интенсифицирует веселье от успеха. Неосуществление предполагаемого уровня может породить огорчение включая при фактически положительных плодах. Vulkan Royal в указанном случае диктует размер соотношения между ожидаемым и достигнутым.
- Адекватность начальных замыслов
- Гибкость в корректировке ожиданий
- Способность оценивать переходные результаты
- Постижение элементов, воздействующих на конечный плод
Почему интенсивные чувства усиливают запоминание об победах
Чувственно пропитанные события сохраняются отчетливее и на продолжительнее вследствие запуска миндалевидного тела – области сознания, курирующей за аффективную воспоминания. Победы, испытанные с высокой эмоциональной мощностью, образуют более устойчивые запоминания и выступают основой стимула в будущем.
Нейропластичность разума позволяет интенсивным психологическим чувствам образовывать новые мозговые маршруты, которые улучшают обращение к позитивным памяти. Казино Вулкан помогает образованию эмоциональных привязок, связанных с результативными периодами, что способствует сохранять убежденность в себе в трудные периоды.
Каким образом контроль эмоциями содействует оценивать свои достижения
Формирование чувственного способности позволяет более осознанно подходить к рассмотрению собственных побед. Навык узнавать личное чувственное настроение помогает постигать, насколько беспристрастно совершается рассмотрение побед. Способы психологической управления могут настраивать излишне скептическое или преувеличенное понимание результатов.
Опыт майндфулнес и размышления создает пространство между чувственной реакцией и рациональной анализом. Это дает возможность рассматривать давление актуального настроения на осознание и получать более гармоничные решения в отношении ценности успехов. Вулкан делается способом саморефлексии, способствующим лучше понимать индивидуальные шаблоны ответа на достижение и поражения.
Uncategorized
0 min read
Отчего радость от сюрприза выразительнее намеченной
Отчего радость от сюрприза выразительнее намеченной
Человеческая разум устроена таким манером, что внезапные благоприятные моменты инициируют более острые эмоциональные проявления, чем такие, что мы заранее намечаем и антиципируем. Это феномен владеет серьезные нейробиологические первоисточники и соединено с особенностями операционирования нашего мозга. Дэдди казино структуры, отвечающие за переработку информации о вознаграждении, выказывают увеличенную работу именно в мгновения неизвестности и нежданности.
Эксперименты выявляют, что мощность чувственного опыта напрямую зависит от меры предсказуемости происшествия. Если мы заранее ведаем о грядущем положительном событии, наш мозг пошагово адаптируется к такому осведомленности, понижая мощь эмоциональной отклика. В то же период стихийные позитивные мига активируют целый череду биохимических механизмов, формируя интенсивные и незабываемые переживания.
Нейрохимия неожиданности и непредвиденной награды
Нейрохимические принципы, случающиеся в головном мозге при приобретении неожиданного приза, коренным образом выделяются от ответов на предсказуемые происшествия. Основную функцию в таких ходах исполняет дофаминовая система, которая работает как выявитель оригинальности и непредвиденности. Daddy казино медиаторы производятся в гораздо крупном числе, если событие совершается нежданно и превосходит наш прогнозы.
При неожиданном достижении награды запускаются не только регионы головного мозга, привязанные с удовольствием, но и структуры, ответственные за концентрацию, память и обучение. Вентральная участок покрышки и прилежащее ядро выказывают максимальную активность именно в моменты благоприятного внезапности. Данная активация следует выбросом серотонина и эндорфинов, формируя комплексную нейрохимическую отклик радости.
Любопытно, что головной мозг отвечает на нежданность даже мощнее, чем на само вознаграждение. Эксперименты с помощью фМРТ демонстрируют, что пиковая функционирование дофаминергических нейронов выпадает именно на момент понимания неожиданности события, а не на момент получения поощрения. Это проясняет, почему неожиданность способен стать блаженнее самого дара.
Каким способом головной мозг отвечает на ошибку прогнозирования
Теория погрешности предвидения представляет главной для осмысления процессов построения интенсивных аффективных опытов. Наш мозг регулярно создает предсказания о перспективных эпизодах, основываясь на прошлом практике. Когда практика превышает ожидания, возникает положительная ошибка предвидения, которая запускает интенсивную чувственную проявление.
Структура предсказания действует на фундаменте байесовского вывода, непрерывно актуализируя модели предвкушений в зависимости от входящей сведений. Дэдди казино алгоритмы обработки данных в разуме направлены на выявление расхождений от предсказуемых образцов. Чем больше отклонение в позитивную сторону, тем сильнее чувственная проявление.
Погрешность предвидения активирует не только чувственные центры, но и механизмы обучения и запоминания. Это природно обусловленный принцип, который позволяет телу эффективнее фиксировать неожиданные благоприятные эпизоды и находить возможности их воспроизведения. Именно потому мы так красочно помним радостные неожиданности детства и расположены их воссоздать.
Процесс дофаминергического выброса
Дофаминовый выброс являет собой скорое и интенсивное производство дофамина в ответ на нежданное положительное момент. Этот способ работает как природный показатель значимости и свежести ощущения. Дофаминергические нервные клетки в среднем мозге обостряют частоту всплесков в 3-5 раз при обретении непредвиденной поощрения по сравнению с предсказуемой.
Особенность дофаминового высвобождения кроется в его временных свойствах. Наивысшая концентрация нейромедиатора доходит в течение начальных 100-200 миллисекунд вслед осознания внезапности. Daddy casino рецепторы в прилежащем ядре тут же отвечают на подобный секрецию, порождая субъективное впечатление сильной веселья и удовлетворения.
Занимательно, что дофаминовый высвобождение осуществляется не только при получении приза, но и при антиципации предполагаемого неожиданности. Это объясняет, по какой причине принцип предвидения неопределенного, но вероятно положительного происшествия способен быть настолько же захватывающим, как и самое момент.
Эффект противоположности между предвосхищением и практикой
Результат различия занимает первичную задачу в формировании напряженности эмоциональных переживаний. Чем более отрыв между предвкушениями и действительностью в хорошую грань, тем красочнее ощущается событие. Этот закон работает на степени нейронных систем, где контрастность информации увеличивает синаптическую транслирование.
Душевные эксперименты демонстрируют, что личности характеризуют одно и то же момент по-разному в зависимости от окружения предвкушений. Daddy казино критерии оценки блаженства существенно изменяются в зависимости от фундаментального градации ожиданий. Неожиданная находка средств на улице доставит больше радости, чем намеченная награда той же размера.
Нейровизуализационные изыскания показывают, что области мозга, соединенные с характеристикой противоположности, запускаются согласованно с чувственными центрами. Это формирует единую организацию процессинга данных о важности эпизода, где различимость выступает усилителем аффективной отклика.
Почему проектирование понижает аффективный реакцию
Проектирование благоприятных моментов включает механизм адаптации еще до их приближения. В момент когда мы подробно планируем перспективное блаженство, наш мозг запускает конструировать связанные с ним чувственные положения. Это влечет к неполной десенсибилизации чувственных зон к моменту подлинного момента.
Эффект "эмоционального" прогнозирования" показывает, что личности расположены раздувать мощность и протяженность предстоящих эмоций. дедди казино структуры приспособления начинают действовать уже на этапе составления, понижая возможную мощь чувственного реакции. Детализированное проектирование удовольствия может противоречиво снизить само наслаждение.
Ключевые элементы, понижающие эмоциональный ответ при проектировании:
- Приспособление к мысли эпизода на ступени фантазии
- Уменьшение компонента непредсказуемости и оригинальности
- Формирование преувеличенных предвосхищений
- Задействование анализирующих ходов взамен аффективных
- Распределение чувственной мощи во времени
Нейрофизиологические эксперименты подтверждают, что многократное умственное переживание перспективного происшествия уменьшает деятельность дофаминовой структуры в миг его фактического наступления. Мозг понимает спланированное момент как уже частично пережитое, что снижает его свежесть и аффективную важность.
Значение оригинальности в обострении позитивных переживаний
Новизна выступает одним из основных элементов, задающих мощность чувственных ощущений. Людской головной мозг эволюционно настроен на увеличенное концентрацию к свежим раздражителям, поскольку они способны содержать существенную сведения о возможностях или рисках в окружающей действительности. Daddy casino определители оригинальности в гиппокампе и лобной коре активируются при контакте с непривычными раздражителями.
Новизна сотрудничает с организациями награды, формируя синергетический эффект повышения позитивных ощущений. В момент когда неизведанное событие делается приятным, запускаются одновременно несколько нервных соединений: детекторы свежести, организации поощрения и зоны осознанности. Такая непростая включение образует крайне яркие и незабываемые переживания.
Исследования демонстрируют, что даже малые элементы оригинальности могут гораздо увеличить позитивные эмоции от обычных событий. Перемена обстановки, периода или метода приобретения удовольствия задействует те же нейронные механизмы, что и целиком свежие ощущения, хотя и в меньшей градусе.
Адаптация к прогнозируемым удовольствиям
Гедонистичная настройка представляет собой первичный принцип функционирования нервной структуры, согласно которому напряженность эмоциональных откликов уменьшается при повторе аналогичных сигналов. Данный механизм охраняет сознание от перенапряжения, но согласованно понижает потенциал получать удовольствие от ординарных истоков счастья.
Дэдди казино механизмы приспособления происходят на степени нервных рецепторов и синапсов. При повторном эффекте аналогичных раздражителей сенситивность приемников снижается, а синаптические связи ослабляются. Это раскрывает, почему начальный кусок излюбленного блюда обеспечивает более наслаждения, чем последующие, даже когда мы еще голодны.
Темпоральные свойства подстройки отличаются для разных классов удовольствий. Сенсорные удовольствия приспосабливаются скорее, в продолжение минут или периодов, в то период как общественные и ментальные радости способны удерживать мощность дольше. Понимание таких закономерностей помогает совершенствовать подходы приобретения радости.
Социальный компонент нежданной радости
Коллективная естество личности добавляет добавочные стороны к переживанию нежданной веселья. Когда радостный сюрприз случается в наличии прочих людей или исходит от них, включаются побочные нервные механизмы, связанные с социальным познанием и эмпатией. Daddy казино взаимодействия между личностями повышают аффективные переживания через структуры эмоционального резонанса.
Зеркальные нейроны исполняют существенную задачу в общественном грани ликования. В момент когда мы смотрим счастье прочего индивида от наш внезапности, это включает персональные аффективные очаги, создавая благоприятную обратную соединение. Этот способ объясняет, почему передача даров может доставлять не меньше наслаждения, чем их достижение.
Социальное распределение хороших переживаний также отражается на их закрепление в памяти. Происшествия, испытанные коллективно с прочими, фиксируются ярче и длительнее поддерживают эмоциональную оттенок. Это связано с запуском побочных областей головного мозга, ответственных за социальную память и межличностные связи.
Почему неожиданности от прочих дороже
Внезапности, приготовленные другими личностями, располагают исключительной аффективной важностью благодаря ряду психологическим процессам. Во-первых, они показывают восприятие и заботу со позиции дарителя, что включает механизмы общественного приза в мозге. Во-вторых, подобные сюрпризы охватывают элемент непрогнозируемости, потому что мы не способны абсолютно надзирать действия других индивидов.
Daddy casino части общественного сцепления включают в себя теорию ума - способность осознавать намерения и ощущения прочих индивидов. Если другой подготавливает нам внезапность, мы осмысливаем, что такой индивид потратил период и попытки, обдумывая о наш приоритетах и стремлениях. Это понимание увеличивает чувственную стоимость события.
Нейроэкономические эксперименты выявляют, что подарки от прочих людей активируют те же участки головного мозга, что и вещественные награды, но дополнительно побуждают социальные центры. Это порождает более богатый и многослойный эмоциональный практику, каковой удерживается эффективнее и длительнее отражается на настроение.
Каким образом поддержать яркость впечатлений в повседневности
Удержание способности к красочным аффективным ощущениям в ситуациях повседневной обыденности предполагает осознанных попыток и использования психологических тактик. Главный принцип кроется во добавлении частей непредсказуемости и свежести в ординарные обстоятельства. Это можно достичь через трансформацию среды, периода или способа сцепления с ординарными родниками удовольствия.
Практика осознанности и mindfulness позволяет увеличить восприимчивость к позитивным периодам, что мы в большинстве случаев упускаем вследствие автоматизма действий. Дэдди казино приемы медитации и фокусировки восприятия совершенствуют возможность примечать деликатные модификации в внешней среде и внутренних состояниях, превращая повседневные моменты в источники микро-радостей.
Стратегическое задействование закона задержанного удовлетворения также способно усилить яркость переживаний. Создание небольших пауз между хотением и его удовлетворением обеспечивает аккумулировать "аффективный голод", каковой создает следующее удовольствие более мощным. Но существенно отыскать уравновешенность между отсрочкой и стихийностью.
Uncategorized
0 min read
По какой причине счастье от внезапности насыщеннее задуманной
По какой причине счастье от внезапности насыщеннее задуманной
Людская разум организована данным способом, что внезапные хорошие происшествия создают более мощные аффективные отклики, чем подобные, что мы заранее проектируем и предсказываем. Это феномен имеет основательные нейрофизиологические основания и соединено с спецификой функционирования наш разума. Дэдди казино процессы, отвечающие за процессинг информации о призе, показывают усиленную функционирование именно в мига неясности и внезапности.
Изыскания демонстрируют, что интенсивность чувственного опыта прямо зависит от меры прогнозируемости момента. Когда мы предварительно ведаем о предстоящем благоприятном событии, наш разум пошагово подстраивается к этому осведомленности, снижая силу чувственной отклика. В то же период импульсивные хорошие периоды активируют целый череду биохимических принципов, образуя яркие и запоминающиеся ощущения.
Нейробиохимия сюрприза и внезапной вознаграждения
Биохимические механизмы, совершающиеся в мозге при приобретении нежданного поощрения, существенно различаются от проявлений на предсказуемые события. Основную функцию в данных принципах играет дофаминергическая система, что работает как выявитель оригинальности и внезапности. Daddy казино передатчики генерируются в гораздо крупном объеме, когда эпизод осуществляется внезапно и превышает наши предвкушения.
При внезапном обретении вознаграждения задействуются не только зоны мозга, связанные с наслаждением, но и организации, ответственные за внимание, память и обучение. Вентральная область покрытия и прилежащее ядро показывают максимальную работу именно в мгновения хорошего сюрприза. Подобная включение следует выбросом серотонина и эндорфинов, порождая комплексную нейрохимическую ответ ликования.
Занятно, что головной мозг откликается на внезапность даже интенсивнее, чем на само поощрение. Изучения с посредством фМРТ раскрывают, что максимальная работа дофаминовых нервных клеток приходится именно на мгновение понимания неожиданности момента, а не на мгновение обретения приза. Это поясняет, по какой причине сюрприз способен оказаться радостнее самого подарка.
Каким образом головной мозг откликается на неточность предвидения
Концепция ошибки прогнозирования представляет ключевой для понимания процессов построения ярких аффективных переживаний. Наш мозг систематически строит предсказания о будущих событиях, базируясь на былом переживании. В момент когда практика опережает ожидания, формируется позитивная погрешность предсказания, которая задействует сильную эмоциональную ответ.
Организация предвидения функционирует на основе байесовского вывода, постоянно актуализируя образцы предвкушений в зависимости от приходящей данных. Дэдди казино схемы переработки данных в мозге ориентированы на нахождение расхождений от предсказуемых образцов. Чем больше расхождение в положительную сторону, тем мощнее аффективная отклик.
Ошибка прогнозирования запускает не только чувственные очаги, но и системы познания и запоминания. Это эволюционно обусловленный механизм, каковой содействует телу эффективнее фиксировать внезапные хорошие события и разыскивать потенциалы их повтора. Именно оттого мы так ярко вспоминаем положительные внезапности детства и стремимся их возродить.
Способ дофаминового всплеска
Дофаминовый высвобождение являет собой скорое и интенсивное производство дофамина в реакцию на неожиданное позитивное момент. Данный способ действует как биологический маркер стоимости и свежести переживания. Дофаминергические нейроны в среднем разуме обостряют частоту сигналов в 3-5 раз при достижении внезапной вознаграждения по сравнению с ожидаемой.
Специфика дофаминергического высвобождения заключается в его временных характеристиках. Высочайшая концентрация передатчика доходит в продолжение первых 100-200 миллисекунд после постижения внезапности. Daddy casino приемники в прилежащем образовании моментально реагируют на подобный выделение, образуя субъективное ощущение сильной счастья и довольства.
Любопытно, что дофаминергический всплеск совершается не только при получении поощрения, но и при предвкушении возможного внезапности. Это проясняет, отчего принцип ожидания непредсказуемого, но предположительно благоприятного происшествия может быть настолько же увлекательным, как и само событие.
Эффект различия между предвосхищением и практикой
Эффект различия выполняет базовую значение в построении интенсивности эмоциональных впечатлений. Чем больше отрыв между предвосхищениями и практикой в хорошую позицию, тем живее ощущается эпизод. Подобный норма работает на уровне нейронных сетей, где различимость информации увеличивает синаптическую передачу.
Психологические изучения выказывают, что личности характеризуют единственное и то же происшествие различно в зависимости от среды предвосхищений. Daddy казино параметры характеристики наслаждения существенно варьируются в зависимости от фундаментального ступени ожиданий. Неожиданная обнаружение средств на улице принесет более веселья, чем запланированная награда той же суммы.
Нейровизуализационные изучения демонстрируют, что области мозга, привязанные с характеристикой противоположности, включаются параллельно с чувственными зонами. Это образует общую механизм обработки данных о существенности эпизода, где контрастность служит катализатором чувственной отклика.
Почему составление уменьшает эмоциональный реакцию
Планирование благоприятных эпизодов включает процесс приспособления еще до их приближения. Когда мы детально продумываем будущее блаженство, наш головной мозг начинает проектировать соединенные с ним чувственные состояния. Это ведет к частичной десенсибилизации чувственных центров к мигу фактического происшествия.
Явление "аффективного" прогнозирования" раскрывает, что человек тяготеют переоценивать напряженность и продолжительность будущих переживаний. daddy casino зеркало механизмы настройки запускают оперировать уже на фазе планирования, снижая возможную интенсивность аффективного ответа. Детализированное планирование блаженства может противоречиво уменьшить самое наслаждение.
Главные элементы, понижающие чувственный отклик при планировании:
- Привыкание к идее эпизода на ступени воображения
- Сокращение элемента неизвестности и оригинальности
- Построение завышенных ожиданий
- Включение аналитических механизмов взамен эмоциональных
- Разделение аффективной ресурсов во времени
Нейрофизиологические эксперименты удостоверяют, что многократное умственное переживание будущего происшествия снижает деятельность дофаминергической структуры в мгновение его действительного наступления. Мозг понимает предусмотренное событие как уже частично испытанное, что понижает его свежесть и чувственную ценность.
Задача новизны в обострении благоприятных чувств
Свежесть представляет единственным из главных элементов, задающих интенсивность аффективных впечатлений. Человеческий головной мозг природно направлен на обостренное восприятие к неизведанным раздражителям, так как они способны содержать ключевую данные о шансах или угрозах в окружающей обстановке. Daddy casino выявители свежести в гиппокампе и лобной области запускаются при встрече с незнакомыми стимулами.
Новизна сотрудничает с организациями награды, создавая синергетический результат обострения положительных эмоций. Когда новое эпизод оказывается приятным, запускаются одновременно несколько нервных систем: выявители оригинальности, механизмы поощрения и зоны восприятия. Такая сложная задействование формирует крайне интенсивные и незабываемые ощущения.
Изыскания показывают, что даже маленькие составляющие новизны могут гораздо обострить положительные переживания от заурядных моментов. Трансформация условий, времени или метода достижения блаженства запускает аналогичные нейронные структуры, что и полностью незнакомые опыты, хотя и в меньшей степени.
Настройка к прогнозируемым удовольствиям
Гедонистичная подстройка представляет собой фундаментальный принцип функционирования нервной системы, согласно которому мощность аффективных ответов снижается при воспроизведении одинаковых сигналов. Подобный способ предохраняет сознание от перегрузки, но согласованно сокращает возможность приобретать блаженство от привычных родников ликования.
Дэдди казино процессы настройки совершаются на градации нейронных рецепторов и синапсов. При многократном действии аналогичных стимулов восприимчивость рецепторов снижается, а синаптические соединения ослабевают. Это объясняет, почему первый кусок предпочитаемого блюда обеспечивает более блаженства, чем следующие, даже если мы все еще голодны.
Временные черты подстройки различаются для различных типов радостей. Сенсорные наслаждения настраиваются скорее, в течение моментов или периодов, в то время как социальные и ментальные удовольствия могут поддерживать напряженность продолжительнее. Постижение этих правил способствует совершенствовать тактики приобретения блаженства.
Общественный элемент внезапной веселья
Общественная суть человека добавляет добавочные измерения к переживанию неожиданной веселья. Когда положительный внезапность случается в наличии других личностей или выходит от них, активируются добавочные нервные организации, привязанные с общественным постижением и сопереживанием. Daddy казино взаимодействия между индивидами повышают эмоциональные опыты через процессы чувственного отклика.
Зеркальные нервные клетки исполняют существенную задачу в общественном измерении ликования. Когда мы смотрим ликование иного индивида от нашего внезапности, это активирует собственные аффективные очаги, порождая хорошую обратную контакт. Этот механизм поясняет, по какой причине передача презентов может обеспечивать не меньше блаженства, чем их обретение.
Коллективное распределение положительных эмоций также отражается на их укоренение в запоминании. Моменты, испытанные совместно с иными, запоминаются интенсивнее и продолжительнее обеспечивают эмоциональную тонировку. Это соединено с включением дополнительных регионов разума, отвечающих за социальную запоминание и межличностные соединения.
Почему внезапности от других дороже
Внезапности, приготовленные другими людьми, имеют исключительной аффективной ценностью вследствие ряду душевным механизмам. Изначально, они демонстрируют восприятие и опеку со грани дарителя, что задействует механизмы социального приза в мозге. Затем, подобные внезапности подразумевают часть непредсказуемости, поскольку мы не способны абсолютно надзирать активность других личностей.
Daddy casino компоненты общественного сцепления подразумевают в себя идею разума - потенциал постигать планы и чувства прочих личностей. В момент когда иной готовит нам неожиданность, мы осознаем, что подобный индивид израсходовал срок и усилия, раздумывая о наш предпочтениях и стремлениях. Это осмысление увеличивает чувственную ценность происшествия.
Нейроэкономические эксперименты выявляют, что дары от иных людей задействуют такие же области разума, что и физические призы, но дополнительно активизируют социальные очаги. Это образует более богатый и многоуровневый аффективный переживание, каковой запоминается эффективнее и продолжительнее воздействует на настроение.
Каким образом поддержать яркость впечатлений в рутине
Удержание способности к живым эмоциональным переживаниям в условиях каждодневной повседневности требует взвешенных стараний и использования эмоциональных подходов. Основной закон состоит во добавлении компонентов неожиданности и оригинальности в привычные условия. Это возможно обрести через перемену среды, времени или способа сотрудничества с ординарными истоками радости.
Упражнение осознанности и mindfulness позволяет повысить чувствительность к хорошим моментам, что мы обычно проскакиваем вследствие автоматичности действий. Дэдди казино методы медитации и концентрации внимания совершенствуют умение подмечать тонкие трансформации в окружающей действительности и глубинных состояниях, превращая повседневные мига в ресурсы микро-радостей.
Стратегическое задействование закона задержанного удовлетворения также способно повысить живость впечатлений. Формирование малых интервалов между хотением и его довольством обеспечивает собрать "чувственный голод", который создает следующее радость более сильным. Однако существенно раздобыть равновесие между задержкой и спонтанностью.
Uncategorized
0 min read
По какой причине мозг фиксирует эпизоды триумфа
По какой причине мозг фиксирует эпизоды триумфа
Человеческий разум владеет замечательной умением фиксировать моменты триумфа в Martin casino с особой четкостью и детализацией. В то время как мы переживаем успех, наша собственная нейронная сеть включается так, что данные мнемические следы становятся более стабильными и легкодоступными по сопоставлению с заурядными событиями. Этот явление обладает основательные эволюционные истоки и осуществляет центральную задачу в образовании нашего собственного поступков, стимулирования и способности выносить выборы.
Алгоритмы, находящиеся в базе запоминания побед в Мартин казино, включают множество зон головного мозга и биохимических механизмов. От старых структур эмоциональной системы до комплексных корковых систем - весь разум участвует в формировании и сохранении данных значимых мнемических отпечатков. Осознание этого, каким образом действуют указанные системы, способствует прояснить многие грани человеческого поступков, включая тенденцию к риску, образование паттернов и стимулирующие модели.
Филогенетическая необходимость: сохранение результативных подходов для существования
С эволюционной позиции способность сохранять эпизоды победы в Мартин казино представляла жизненно существенное превосходство для существования наших собственных праотцов. В обстоятельствах беспрерывной сражения за средства и угрозы со части врагов или противников, навык стремительно определять и реализовывать эффективные стратегии могло значить разницу между жизнью и кончиной. Мозг сформировал специальные механизмы для приоритетного сохранения этих происшествий, что приводили к добыче пищи, прибежища, партнера или избежанию риска.
Архаичные образования мозга, такие как гиппокамп и амигдала, формировались подобным способом, чтобы образовывать чрезвычайно прочные энграммы памяти в ответ на события, связанные с выживанием и воспроизводством. Данная сеть работала по принципу "предпочтительнее переоценить ценность триумфа, чем недооценить это". Особи, у которых мозг более эффективно запоминал результативные схемы поступков, обладали существенные приспособительные превосходства.
- Оперативное освоение на базе позитивного опыта улучшало результативность обретения еды
- Фиксация успешных социальных стратегий оптимизировало групповое взаимодействие
- Сохранение в воспоминаниях действенных способов уклонения от угрозы минимизировала угрозы
- Накопление сведений о благоприятных областях и сезонах оптимизировало эксплуатацию ресурсов
Приспособительная ценность избирательной памяти
Нынешние работы подтверждают, что склонность мозга фиксировать благоприятные итоги содержит определенную приспособительную логику. Данный процесс не исключительно способствовал нашим собственным прародителям выживать в hostile environment, но и содействовал становлению комплексных мыслительных возможностей, включая прогнозирование, концептуальное познание и творческое устранение вопросов. Умение переносить результативные тактики на новые обстоятельства сделалась основой для развития людской культуры.
Аффективная интенсивность успеха и ее эффект на воспоминания
Мгновения успеха в казино Мартин характеризуются интенсивными аффективными ощущениями, которые заметно усиливают механизмы закрепления воспоминаний. Чувственное активация включает симпатоадреналовую нервную сеть, вызывая каскад нейрохимических модификаций, включая секрецию норадреналина, эпинефрина и гидрокортизона. Эти компоненты работают как естественные стимуляторы воспоминаний, увеличивая активность нервных клеток в основных регионах головного мозга, отвечающих за записывание и хранение информации.
Исключительную функцию в этом алгоритме выполняет амигдала - образование, что не исключительно анализирует аффективную данные, но и модулирует функционированием гиппокампа, главного ядра формирования новых памяти. Когда мы переживаем момент победы, миндалевидное тело направляет импульсы, что буквально "помечают" формирующиеся следы как исключительно важные. Это разъясняет, по какой причине мы можем помнить незначительные подробности наших собственных успехов - от атмосферных обстоятельств до ароматов и шумов прилегающей среды.
Положительное стимулирование: почему успех мотивирует воспроизводить действия
Система позитивного подкрепления являет из себя основополагающий закон обучения, в соответствии с чему действия, направляющее к положительным последствиям, содержит тенденцию дублироваться. Когда разум запоминает момент успеха, он одновременно создает устойчивые ассоциативные контакты между специфическими действиями и позитивными результатами. Данные нервные паттерны образуют базу для грядущих постановлений и бихевиоральных тактик.
В процессе образования таких связей главную задачу играют базовые ганглии - множество подкорковых образований, ответственных за процедурное изучение и создание навыков. В то время как операция направляет к успеху в Мартин казино, невральные связи в указанной регионе стабилизируются, создавая непроизвольные поведенческие паттерны. Постепенно данные модели в состоянии сделаться столь устойчивыми, что выполняются практически без осознанного контроля.
Специфика системы положительного стимулирования заключается в её способности к обобщению. Мозг не только сохраняет определенные операции, что направили к победе в казино Мартин, но и идентифицирует общие законы и тактики, что допустимо использовать в похожих ситуациях. Этот алгоритм абстракции дает возможность нам приспосабливать успешные методы к свежим ситуациям и рамкам.
Пластичность мозга и продолжительные модификации
Регулярное испытание триумфа ведет к структурным трансформациям в мозге. Пластичность мозга дает возможность нейронным системам, связанным с успешными тактиками, превращаться более эффективными и стремительными в анализе информации. Отростки нервных клеток увеличиваются, межнейронные соединения усиливаются, а миелиновые оболочки утолщаются, формируя оперативные "трассы" для перемещения данных о испытанных способах достижения целей.
Выборочная память: почему успехи помним отчетливее, чем проигрыши
Людская память демонстрирует заметную дисбаланс в отношении благоприятных и отрицательных событий. Хотя два категории переживаний в состоянии создавать интенсивные воспоминания, наблюдается предрасположенность к более яркому и подробному фиксации мгновений победы в казино Мартин по сравнению с неудачами. Этот феномен имеет как нейрофизиологические, так и когнитивные основания.
Искажение памяти: переоценка регулярности победы
Селективная сущность воспоминаний на победы может направлять к постоянным трансформациям в восприятии собственной эффективности. Мозг, главным образом сохраняющий эпизоды успеха, образует асимметричную панораму прошлого переживания, где победы кажутся более распространенными и важными, чем они существовали в действительности. Данный эффект обрел обозначение "видимость контроля" или "позитивное смещение".
Механизмы аналогичного деформации соотносятся с специфическими чертами деятельности системы добывания воспоминаний. В момент когда мы пытаемся определить наши собственные минувшие результаты в Martin casino, разум в первую очередь апеллирует к самым легкодоступным и четким отпечаткам - что обычно становятся как раз эпизоды победы. Неудачи, являясь не так детально зафиксированными или энергично вытесняемыми, превращаются не так доступными для осознанного разбора.
Данное трансформация имеет как позитивные, так и неблагоприятные результаты. С одной стороны, переоценка личных побед в казино Мартин содействует сохранению высокой самоуважения и стимулирования к будущим действиям. С другой части, подобная необъективность может направлять к принятию необоснованных рисков и завышению своих возможностей в грядущих проектах.
Исправление трансформированных памяти
Осознание алгоритмов избирательной памяти предоставляет шанс совершенствовать стратегии для более непредвзятой оценки былого опыта. Составление подробных протоколов, использование наружных структур отслеживания итогов и постоянная размышление способны помочь сформировать более уравновешенное представление о соотношении успехов и провалов в различных направлениях деятельности, таких как Martin casino.
Практическое важность: как интеллект задействует память о триумфах для грядущих постановлений
Память о прошлых успехах в Martin casino осуществляют решающую задачу в ходе выбора решений и планирования предстоящих операций. Интеллект использует данные ментальные "хранилища" успехов как ориентиры для определения потенциальных тактик и прогнозирования возможности триумфа в различных обстоятельствах. Префронтальная область, ответственная за управляющие функции, постоянно обращается к накопленным памяти о триумфах для создания идеальных схем действий.
Алгоритм принятия решений базируется на комплексном взаимодействии между чувственными центрами головного мозга и разумными системами определения. Память о прошлых триумфах обеспечивает чувственную мотивацию и уверенность, нужные для преодоления неясности и риска, характерных для новым проектам. Параллельно подробная информация о этом, какие именно поступки вели к успеху в прошлом, служит основой для создания конкретных стратегий.
Чрезвычайно существенную роль воспоминания о успехах играет в условиях высокой комплексности или стресса. В то время как когнитивные средства сужены, мозг склонен рассчитывать на проверенные паттерны действий, которые прежде вели к победе. Это поясняет, почему личности часто демонстрируют превосходные исходы в тех направлениях, где у них уже имеется присутствует опыт триумфов - собранный "запас" позитивных воспоминаний обеспечивает как стимулирующую поддержку, так и прикладные информацию о результативных тактиках получения результатов.
Uncategorized
0 min read
Отчего мозг запоминает эпизоды выигрыша
Отчего мозг запоминает эпизоды выигрыша
Человеческий разум владеет невероятной способностью закреплять эпизоды успеха в спинто официальный сайт с особой яркостью и детализацией. В момент когда мы ощущаем триумф, наша нейронная сеть возбуждается таким образом, что данные память делаются более прочными и доступными по сопоставлению с стандартными событиями. Данный эффект имеет глубокие филогенетические истоки и играет основную задачу в создании нашего собственного поведения, стимулирования и возможности выносить решения.
Системы, находящиеся в базе сохранения побед в spinto casino, затрагивают множество зон мозга и биохимических механизмов. От старых образований лимбической сети до сложных корковых систем - целый мозг участвует в формировании и сохранении этих значимых воспоминаний. Осознание того, как действуют эти механизмы, способствует прояснить многочисленные аспекты людского поведения, включая тенденцию к риску, образование паттернов и мотивационные модели.
Эволюционная нужда: сохранение успешных тактик для существования
С развитийной перспективы возможность фиксировать мгновения победы в spinto casino представляла жизненно важное преимущество для выживания наших собственных предков. В обстоятельствах беспрерывной битвы за запасы и опасности со стороны врагов или противников, навык оперативно идентифицировать и повторять результативные методы способно было значить отличие между существованием и кончиной. Мозг сформировал специализированные алгоритмы для преимущественного фиксации этих происшествий, что вели к добыче еды, убежища, компаньона или предотвращению опасности.
Старые формации мозга, например гиппокампус и амигдала, развивались таким образом, с целью формировать исключительно устойчивые следы памяти в реакцию на происшествия, ассоциированные с существованием и размножением. Указанная система работала по закону "лучше переоценить значимость победы, нежели занизить это". Субъекты, у которых мозг более продуктивно сохранял результативные паттерны поведения, имели значительные приспособительные преимущества.
- Быстрое обучение на базе положительного переживания улучшало продуктивность получения еды
- Сохранение успешных общественных стратегий оптимизировало коллективное кооперацию
- Фиксация в воспоминаниях результативных методов предотвращения угрозы уменьшала опасности
- Накопление сведений о продуктивных зонах и сезонах совершенствовало использование ресурсов
Адаптивная ценность селективной памяти
Нынешние изучения доказывают, что склонность мозга фиксировать позитивные исходы содержит ясную приспособительную обоснование. Этот алгоритм не исключительно помогал нашим прародителям существовать в враждебной environment, но и содействовал формированию сложных познавательных возможностей, включая планирование, отвлеченное познание и созидательное решение проблем. Умение экстраполировать результативные стратегии на свежие условия стала фундаментом для развития людской цивилизации.
Чувственная интенсивность успеха и её эффект на воспоминания
Моменты успеха в спинто казино сопровождаются интенсивными чувственными состояниями, что значительно повышают процессы консолидации воспоминаний. Чувственное стимуляция запускает симпатоадреналовую нервную систему, вызывая цепочку нейрохимических трансформаций, включая высвобождение норадреналина, адреналина и гидрокортизона. Указанные компоненты действуют как природные усилители памяти, усиливая активность нейронов в главных зонах мозга, отвечающих за записывание и удержание данных.
Специальную роль в этом алгоритме осуществляет амигдала - образование, что не только обрабатывает эмоциональную сведения, но и модулирует деятельностью гиппокампа, основного ядра образования новых воспоминаний. Когда мы ощущаем мгновение успеха, амигдала передает команды, которые прямо "отмечают" образующиеся следы как особенно значимые. Данное обстоятельство разъясняет, почему мы можем вспоминать тончайшие подробности своих побед - от климатических факторов до запахов и шумов внешней обстановки.
Позитивное усиление: отчего триумф побуждает воспроизводить операции
Механизм положительного стимулирования составляет из себя основополагающий закон освоения, согласно чему поведение, приводящее к благоприятным последствиям, содержит предрасположенность повторяться. В момент когда мозг запоминает эпизод победы, он одновременно формирует прочные ассоциативные соединения между специфическими операциями и благоприятными исходами. Данные нейронные модели формируют основу для предстоящих выборов и поведенческих подходов.
В процессе образования подобных связей центральную задачу осуществляют базовые ядра - множество подкорковых образований, ответственных за операционное обучение и формирование паттернов. Когда операция ведет к триумфу в spinto casino, невральные контакты в указанной регионе укрепляются, формируя машинальные поведенческие паттерны. Со временем данные модели в состоянии сделаться так прочными, что реализуются фактически не требуя осознанного контроля.
Характеристика структуры положительного подкрепления кроется в ее умении к универсализации. Мозг не только запоминает определенные поступки, которые направили к победе в спинто казино, но и выделяет базовые принципы и подходы, которые можно применить в аналогичных обстоятельствах. Этот механизм концептуализации позволяет нам адаптировать успешные методы к свежим ситуациям и рамкам.
Пластичность мозга и долгосрочные изменения
Повторное ощущение успеха направляет к структурным изменениям в мозге. Нейропластичность дает возможность нервным системам, ассоциированным с эффективными подходами, делаться более продуктивными и стремительными в обработке данных. Отростки нервных клеток увеличиваются, синаптические связи укрепляются, а миелиновые оболочки уплотняются, образуя оперативные "трассы" для передачи информации о испытанных методах получения результатов.
Избирательная память: по какой причине успехи помним ярче, нежели поражения
Человеческая память показывает явную неравномерность в касательно положительных и отрицательных событий. При том что два категории состояний могут формировать сильные память, наблюдается тенденция к более яркому и обстоятельному запоминанию мгновений триумфа в спинто казино по сопоставлению с поражениями. Указанный феномен имеет как нейрофизиологические, так и психологические основания.
Деформация памяти: переоценка регулярности триумфа
Селективная природа памяти на триумфы может приводить к систематическим искажениям в понимании индивидуальной продуктивности. Мозг, преимущественно запоминающий эпизоды триумфа, образует асимметричную картину прошлого опыта, где триумфы кажутся более распространенными и существенными, чем эти события были в действительности. Данный феномен обрел обозначение "мираж власти" или "позитивное отклонение".
Механизмы такого деформации ассоциированы с характеристиками деятельности системы получения воспоминаний. Когда мы пытаемся проанализировать свои минувшие достижения в спинто, разум в первую очередь апеллирует к самым простым для извлечения и четким следам - которыми чаще всего являются в точности эпизоды победы. Провалы, являясь не так обстоятельно записанными или активно вытесняемыми, делаются не так доступными для намеренного исследования.
Это трансформация имеет как позитивные, так и негативные результаты. С одной части, завышение собственных триумфов в спинто казино способствует удержанию высокой самооценки и мотивации к последующим поступкам. С другой части, аналогичная предвзятость способна направлять к принятию неоправданных угроз и переоценке своих возможностей в предстоящих проектах.
Корректировка искаженных памяти
Понимание механизмов селективной воспоминаний предоставляет шанс формировать стратегии для более беспристрастной анализа прошлого практики. Составление обстоятельных заметок, использование наружных структур отслеживания итогов и систематическая размышление в состоянии способствовать образовать более уравновешенное понимание о пропорции побед и поражений в разных направлениях активности, таких как спинто.
Практическое ценность: каким образом интеллект применяет воспоминания о победах для предстоящих постановлений
Память о былых успехах в спинто выполняют ключевую роль в процессе одобрения постановлений и планирования грядущих операций. Мозг применяет данные психические "архивы" успехов как контрольные точки для анализа возможных стратегий и предвидения вероятности триумфа в различных обстоятельствах. Лобная кора, ответственная за контрольные функции, непрерывно прибегает к хранящимся следам о победах для создания оптимальных планов действий.
Процесс одобрения постановлений базируется на многоуровневом сотрудничестве между аффективными ядрами мозга и рациональными структурами оценки. Память о прошлых победах гарантирует аффективную стимулирование и самоуверенность, необходимые для устранения неопределенности и опасности, присущих современным предприятиям. Одновременно подробная информация о том, которые в точности операции приводили к победе в прошлом, является основой для создания специфических подходов.
Особенно значимую функцию память о триумфах выполняет в ситуациях повышенной сложности или стресса. Когда мыслительные запасы сужены, интеллект склонен полагаться на испытанные паттерны поведения, что прежде вели к триумфу. Данное обстоятельство объясняет, по какой причине люди зачастую демонстрируют оптимальные исходы в этих областях, где у них уже имеется история успехов - собранный "банк" положительных следов предоставляет как мотивационную помощь, так и прикладные знания о продуктивных стратегиях обретения целей.
Uncategorized
0 min read
Из-за чего психика завышает ушедшие успехи
Из-за чего психика завышает ушедшие успехи
Человеческий разум построен фантастическим манерой - он способен трансформировать воспоминания о наших победах, создавая их живее и масштабнее, чем они были на практике. Подобное явление содержит крепкие прогрессивные основы и влияет на личное самовосприятие постоянно. биф casino является основой для построения нашей индивидуальности и самоуважения.
Отчего предыдущие триумфы представляются крупнее, чем являлись
Наши памятные образы о минувших достижениях проходят постоянной переработке и изменению. beef casino случается непроизвольно - мозг усиливает хорошие моменты событий и затушевывает плохие детали. Такой механизм инициируется уже в миг проживания случая и тянется всякий раз, когда мы прибегаем к этому образу.
Хронологическая отдаленность исполняет центральную часть в искажении осознания. Чем длиннее времени истекает с момента факта, тем более существенным оно нам представляется. Мелкие неудачи и преграды, которые следовали за наш успех, медленно стираются из воспоминаний, сохраняя только красочные сцены триумфа.
Эмоциональная характер ретроспектив также сказывается на их трактовку. Радость, самоуважение и удовлетворение, которые мы переживали в миг достижения, образуют мощный эмоциональный отпечаток. Биф казино помогает этим переживаниям оставаться и даже укрепляться со временем, создавая само триумф более масштабным в нашем восприятии.
Как функционирует память: восстановление, а не точный архив
Множество человек ошибочно полагают, что воспоминание оперирует как видеокамера, точно регистрируя и восстанавливая события. На действительности воспоминание представляет собой живой ход реконструкции, при котором интеллект каждый раз заново составляет ретроспективу из различных фрагментов сведений.
При всяком показе ретроспективы оно чуть-чуть модифицируется под давлением настоящего чувственного состояния, современных данных и собственного опыта. Эти незначительные трансформации накапливаются со временем, поэтапно преобразуя исходное мемория.
- Нервные сети, несущие ответственность за содержание образов, постоянно модифицируются
- Ситуация показа отражается на особенности образа
- Психологическое режим в момент вспоминания окрашивает предыдущий практику
- Современная сведения может интегрироваться в прежние ретроспективы
казино Биф сказывается на то, как мы трактуем существенность собственных прошлых достижений. Мозг пытается сформировать логичную и положительную персональную историю, поэтому он усиливает моменты успеха и преуменьшает поражения.
Место допамина: почему положительные воспоминания нарастают
Допамин, популярный как нейромедиатор радости и мотивации, выполняет ключевую функцию в формировании и упрочении благоприятных ретроспектив. Когда мы получаем свершения, интеллект синтезирует допамин, который не только создает переживание наслаждения, но и повышает процессы сохранения.
Повышенный концентрация допамина в секунду успеха создает это воспоминание более живым и прочным. beef casino дает первостепенное сохранение именно тех моментов, которые следовали за выделением этого вещества. Со периодом эти воспоминания делаются еще более притягательными, поскольку всякое апелляция к ним вызывает очередной, хотя и более приглушенный, выделение дофамина.
Система стимулирования разума прогрессивно ориентирована на то, чтобы мотивировать нас копировать удачные поступки. Повышение хороших воспоминаний осуществляет этой функции, образуя интенсивный импульс к получению свежих планов. Тем не менее это же особенность может приводить к возвеличиванию предыдущего.
Результат "мне находился эффективнее прежде": ограждение самоуважения
Стремление идеализировать минувшие победы часто связана с эмоциональной охраной автооценки. Когда текущие ситуации не совпадают с собственным прогнозам или когда мы встречаемся с сложностями, возвращение к былым успехам помогает оставить позитивное автовосприятие.
Биф казино порождает уникальный душевный буфер против нагрузки и нерешительности. Мемории о предыдущих триумфах напоминают нам о личных возможностях и резервах, даже когда настоящие исходы не впечатляют.
Подобный ход особенно включается в времена жизненных переходов или переломов. Люди взрослого возраста часто романтизируют свои свершения в ранние годы, зрелые человек воскрешают "золотые эпохи" профессии, а игроки, прекратившие активную работу, преувеличивают масштаб своих прошлых успехов.
- Предохранительная задача способствует переносить с данными поражениями
- Поддержание мотивации через восстановление о индивидуальных способностях
- Укрепление социального ранга через истории о прошлом
Выборка фактов: разум запоминает успехи и приглушает поражения
Наша воспоминание работает селективно, уделяя повышенное фокуса благоприятным событиям и постепенно удаляя плохие особенности. Данный процесс не представляет преднамеренным изменением - он происходит машинально на нервно-биологическом ярусе.
При формировании ретроспектив о успехах мозг самопроизвольно концентрируется на моментах торжества, удачных постановлениях и позитивной отклике. казино Биф содействует тому, что именно эти стороны устанавливаются в длительной ретроспективе наиболее крепко.
Параллельно осуществляется последовательное забывание или переосмысление неуспешных эпизодов. Ошибки, которые мы производили на маршруте к успеху, барьеры и колебания либо совершенно пропадают из мемории, либо переосмысливаются как обязательные периоды постижения.
Общественное поддержка усиливает этот результат. Когда мы рассказываем другим о своих свершениях, мы органично подчеркиваем положительные моменты и пропускаем неблагоприятные нюансы. Положительная отзыв слушателей утверждает эту скорректированную вариант фактов в нашей памяти.
Групповое сравнение и нарративы другим: как повествование повышает достижение
Постоянно, повествуя о своих победах, мы неосознанно корректируем рассказ, создавая его более впечатляющей и последовательной. Этот ход осуществляется не из намерения мистифицировать, а из стремления образовать захватывающий и мотивирующий рассказ.
beef casino влияет на то, как мы представляем свои успехи в групповом окружении. Мы непроизвольно адаптируем рассказ под публику, усиливая те аспекты, которые встретят максимальный ответ у публики. Подобные коллективно скорректированные варианты наших историй понемногу замещают изначальные мемории.
Коллективное сопоставление также исполняет важную часть в переоценке былых побед. Когда мы созерцаем свершения людей людей, мы имеем тенденцию подправлять осознание личных достижений, чтобы не ощущать себя менее весомыми. Это может направлять как к переоценке, так и к уменьшению собственных свершений в соотношении от ситуации.
Виртуальные ресурсы и коммуникационные платформы укрепляют эти феномены, порождая постоянное пространство для презентации и сравнения успехов. Требование регулярно презентовать себя в хорошем свете склоняет к еще более масштабному деформации образов о минувших триумфах.
Риски идеализации: стагнация, преувеличенные надежды и огорчение
Хотя возвеличивание былых достижений в состоянии исполнять основой воодушевления и опоры самоуважения, она также включает в себе серьезные проблемы. Завышение прошлых побед может склонять к завышенным ожиданиям от грядущего и ошибочной суждению текущих потенциала.
Биф казино способен порождать ложное переживание стабильности и компетентности. Люди, избыточно полагающиеся на предыдущие успехи, в состоянии недооценивать нужду совершенствования актуальных компетенций или приспособления к эволюционирующим условиям.
Нереалистичные надежды, построенные на искаженном восприятии предыдущего, часто склоняют к недовольству и досаде. Когда настоящие плоды не отвечают переоцененным воспоминаниям, это в состоянии вызывать чувство снижения и потери умений, хотя на деле затруднение кроется в неточной суждении первоначальной места.
Остановка в совершенствовании - еще одна угроза идеализации минувшего. Люди имеют возможность прекратиться в своем росте, считая, что уже обрели апогея своих возможностей, опираясь на преувеличенных мемории о предыдущих победах.
Как адекватно глядеть на свои успехи
Построение реалистичного подхода на личные успехи нуждается преднамеренных попыток и внедрения конкретных подходов. Важно постичь определять случаи, когда личная ретроспектива может изменять действительность, и применять методы для более ясной суждения прошлого практики.
Формирование основательных документации о своих начинаниях и победах в текущем режиме поддерживает оставить более детальную образ событий. казино Биф помогает сохранить не только результаты, но и систему, включая трудности, заблуждения и временные провалы.
Регулярная осмысление и анализ прошлого багажа должны объединять как позитивные, так и плохие аспекты. Это содействует сформировать более гармоничное восприятие своих способностей и ограничений.
- Создание детальных протоколов о процессе обретения целей
- Обретение отклика от нейтральных зрителей
- Изучение как триумфов, так и поражений при завоевании намерений
- Периодическая пересмотр былых побед с принятием во внимание актуальных данных
Задействование минувших побед как средства, а не иллюзии
Адекватное отношение к прошлым успехам представляется в их задействовании как ресурса для персонального совершенствования и стимулирования, а не как основы для обмана. beef casino обязан делаться орудием изучения и развития, а не способом избегания истины.
Анализ прошлых успехов может обеспечить значимые инсайты о наших ключевых талантах, удачных тактиках и направлениях, требующих доработки. Необходимо делать практические выводы и применимые навыки, а не просто удовлетворяться тёплыми картинками прошлого.
Прошлые достижения могут подпитывать веру в собственные силы, но эта уверенность должна быть подкреплена трезвым анализом приобретенного опыта и навыков. Биф казино помогает поддерживать мотивацию для очередных задач, не формируя завышенных надежд.
Создание системы обучения на основе истории собственных действий включает в себя выявление устойчивых шаблонов удачных действий, оценку ключевых драйверов результата и гибкое перенесение этих подходов в новые условия. Эта модель позволяет капитализировать прошлые уроки, не попадая в капкан приукрашивания прошлого.
Uncategorized
0 min read
Каким способом ожидание перемен вызывает пыл
Каким способом ожидание перемен вызывает пыл
Людское тяга к метаморфозам является единой из основополагающих характеристик нашей сознания. Предвидение перемен включает сложные биохимические механизмы в разуме, создавая неповторимое статус возбуждения и антиципации. up x системы, отвечающие за это процесс, образовывались на в течение миллионов лет развития и до сих пор регулируют наше поступки в сегодняшнем среде. Осознание естества азарта, связанного с предвидением трансформаций, позволяет эффективнее осмысливать собственные стимулы и принимать более взвешенные решения в разных житейских моментах.
Нейронаука ожидания изменений
В момент когда головной мозг процессирует сведения о возможных грядущих изменениях, включается полная сеть нервных систем. Префронтальная кора ответственна за проектирование и характеристику предстоящих схем, в то время как лимбическая система генерирует аффективные отклики на гипотетические происшествия. Сотрудничество между данными зонами образует многогранную картину предвкушения, где разумный рассмотрение комбинируется с эмоциональным возбуждением. ап икс официальный сайт принципы в разуме функционируют одновременно, гарантируя подготовленность к действию и стимуляцию для приобретения желанных изменений.
Изыскания демонстрируют, что деятельность в участках разума, ассоциированных с наградой, существенно увеличивается не только при получении желаемого финала, но и в фазу его ожидания. Такой процесс объясняет, отчего ход предвидения нередко становится не менее, а порой даже более захватывающим, чем сам миг приобретения мишени. Нейроадаптивность помогает мозгу адаптироваться к свежим образцам ожидания, образуя стабильные нервные связи, которые усиливают потенциал к предвкушенью.
Функция нейромедиатора в переживании воодушевления
Дофаминергическая организация исполняет ключевую значение в образовании переживания пыла при предвосхищении перемен. Этот нейромедиатор не только оповещает о получении удовольствия, но и деятельно задействован в механизме прогнозирования грядущих вознаграждений. Когда мозг изучает вероятность благоприятных трансформаций, дофаминергические нейроны запускают интенсивно оперировать, образуя переживание возбуждения и расположенности к поступку. ап икс структуры выделения дофамина исключительно остро оперируют в условиях неопределенности, когда итог происшествий не является ожидаемым.
Занимательно, что градация нейромедиатора доходит пика не в период получения желанного исхода, а именно в стадию предвидения. Это раскрывает противоречивое явление, когда антиципация происшествия доставляет более удовольствия, чем его фактическое реализация. Дофаминергические приемники в многообразных участках разума различно откликаются на сигналы о грядущих трансформациях, формируя сложную образ побуждения и эмоционального состояния.
Отчего неопределенность усиливает воодушевление
Непредсказуемость является мощным стимулятором возбуждения при предвидении модификаций. Когда итог события не представляет предсказуемым, головной мозг запускает дополнительные ресурсы для рассмотрения ситуации и подготовленности к разным схемам развития происшествий. Это статус неясности вынуждает нервную механизм работать в режиме обостренной расположенности, что выражается в повышении аффективных реакций и повышении уровня осознанности. up x элементы неясности порождают исключительное стресс, которое немало личности осознают как радостное воодушевление.
Эмоциональные исследования показывают, что средняя степень непрогнозируемости оптимизирует степень волнения, превращая предвосхищение более мощным и чувственно наполненным. Абсолютная предсказуемость отнимает эпизод элемента свежести и уменьшает интерес, в то период как излишняя неизвестность может провоцировать напряженность и напряжение. Идеальный гармония между знакомым и неведомым формирует превосходные обстоятельства для возникновения воодушевления и хорошего предвидения.
Природные корни тяги к метаморфозам
Желание к трансформациям несет фундаментальные эволюционные первоисточники и связано с самосохранением типа. Наш предки, что деятельно экспериментировали незнакомые земли и адаптировались к изменяющимся обстоятельствам, имели больше возможностей отыскать еду, приют и спутников для размножения. Потенциал ощущать возбуждение от ожидания перемен являлась сильным побудительным способом, побуждающим к исследовательскому поведению и овладению свежих запасов. ап их подстройки, привязанные с нахождением новизны, зафиксировались в наследственном коде и продолжают влиять на нынешнее поступки личности.
Эволюционная наука о психике проясняет, почему люди часто испытывают неприятность от длительной надежности и стремятся к многообразию в практике. Гены, отвечающие за тенденцию к исследовательскому активности, были положительно отобраны в процессе эволюционирования, так как они помогали выживанию и репродуктивному успеху. Нынешние демонстрации подобной архаичной программы возможно следить в стремлении личностей к путешествиям, трансформации активности, отысканию неизведанных опытов и жизненных вызовов.
Психология надежды и предвидения лучшего
Надежда является фундаментальным элементом людского впечатления и плотно связана с предвкушением позитивных модификаций. Эмоциональные механизмы, находящиеся в основе упования, содержат способность к мысленному конструированию будущих эпизодов и веру в шанс приобретения желаемых итогов. ап икс официальный сайт части упования активируют положительные аффективные положения, которые обеспечивают мотивацию и содействуют превозмоганию проблем на дороге к цели.
Умственные процессы, привязанные с формированием упования, охватывают несколько главных элементов:
- Целеполагание - умение отчетливо обозначить вожделенный результат
- Составление дорог приобретения - выстраивание подходов реализации мишеней
- Стимулирующая мощь - сокровенная мощь, подталкивающая к поступку
- Устойчивость к преградам - расположенность устранять затруднения
- Благоприятное предсказание - предрасположенность предвидеть благоприятных финалов
Изыскания демонстрируют, что индивиды с значительным степенью надежды демонстрируют крупную ментальную устойчивость, лучшие итоги в получении мишеней и более повышенный уровень полного благосостояния. Упование оперирует как защитный процесс перед стресса и депрессии, позволяя удерживать оптимистический взгляд на будущее даже в трудных житейских обстоятельствах.
Каким способом разум определяет потенциальные преимущества
Ход определения возможных достоинств от предстоящих модификаций является комплексной познавательной проблемой, что разум разрешает с помощью особых нервных сетей. Орбитофронтальная кора участвует в исследовании предполагаемой важности различных вариантов будущего, сопоставляя вероятные достоинства с потенциальными угрозами и расходами. Данный принцип охватывает процессинг как эмоциональной, так и рассудочной сведений, формируя объединенную характеристику привлекательности предстоящих модификаций. ап икс алгоритмы оценки оперируют самопроизвольно, нередко на подсознательном степени, отражаясь на формирование заключений и образование прогнозов.
Индивидуальная оценка вероятных плюсов определяется от совокупности факторов, подразумевая предыдущий опыт, текущее аффективное положение, личные важности и общественный окружение. Мозг использует эвристические методы для упрощения многогранных подсчетов, что может влечь к регулярным искажениям в определении шансов и значимости грядущих происшествий. Постижение этих механизмов содействует совершенствовать более аккуратные навыки предсказания и выбора выводов.
Действие хронологической отдаленности на напряженность пыла
Темпоральная удаленность между текущим мигом и предвкушаемыми изменениями существенно влияет на мощность ощущаемого возбуждения. Психологические изучения показывают, что позиция к перспективным происшествиям трансформируется в зависимости от их темпоральной удаленности, идя конкретным правилам. Дальние во периоде события воспринимаются более абстрактно и идеализированно, что может обострять позитивные прогнозы и сокращать ощущение потенциальных отрицательных сторон. up x динамика хронологического понимания исполняет главную функцию в построении чувственного взгляда к предстоящим изменениям.
Идея конструктивного ступени объясняет, как эмоциональная дистанция действует на процессинг информации о перспективных происшествиях. Чем дальше момент во периоде, тем более высокоуровневыми, абстрактными категориями мы его характеризуем, фокусируясь на ключевых задачах и желанных результатах. По мере приближенности эпизода наше внимание переключается на специфические детали, практические стороны и потенциальные барьеры, что может трансформировать эмоциональную окраску предвкушений.
Феномен приближения происшествия
По мере приближенности предвкушаемых трансформаций происходят естественные изменения в аффективном положении и познавательных принципах. Эффект приближенности происшествия обозначается усилением напряженности переживаний, усилением подробности умственных картин грядущего и увеличением физиологического азарта. Нервная организация начинает более интенсивно подготавливаться к перспективным переменам, что выражается в обострении восприятия, повышении чувствительности к относящимся стимулам и задействовании энергетических резервов. ап икс официальный сайт реакции тела на приближенность существенных событий охватывают как психологические, так и физиологические элементы.
Исследования нейровизуализации показывают, что по мере приближенности предвкушаемого происшествия деятельность в зонах мозга, ассоциированных с аффективной процессингом и проектированием активности, пошагово увеличивается. Этот ход идет переменами в гормональном фоне, содержа усиление уровня кортизола и адреналина, что образует состояние подготовленности к действию и повышает индивидуальное переживание волнения.
В момент когда ожидание изменений превращается в волнение
Не всегда предвосхищение перемен порождает положительные эмоции - в специфических обстоятельствах предвидение модификаций может трансформироваться в беспокойство и напряжение. Переход от азарта к беспокойству в большинстве случаев случается, когда грядущие модификации понимаются как вероятно рискованные, бесконтрольные или превышающие приспособительные возможности человека. Индивидуальная тенденция к тревожности, минувший травмирующий переживание и актуальный градация напряжения могут значительно воздействовать на то, как осознаются перспективные трансформации. ап икс факторы, задающие равновесие между возбуждением и волнением, включают определение личных ресурсов, степень регулирования над обстоятельством и общественную помощь.
Умственные отклонения, данные как катастрофическое размышление или переоценка возможности отрицательных исходов, способны превратить индифферентные или даже возможно благоприятные модификации в исток мощной напряженности. Формирование навыков эмоциональной регуляции и реальной характеристики обстановки способствует поддерживать благоприятный уравновешенность между расположенностью к переменам и удержанием ментального благосостояния.
Гармония между удобством стабильности и стремлением нового
Человеческая разум постоянно уравновешивает между необходимостью в надежности и охране, с одной грани, и желанием к новизне и модификациям - с иной. Такой внутренний противоречие проявляет эволюционно обусловленные системы, что содействовали наш предкам выживать в изменчивой среде. Комфорт стабильности обеспечивает чувство сохранности и предсказуемости, в то период как стремление свежего подталкивает становление, освоение и подстройку к незнакомым условиям.
- Индивидуальные разница в расположенности к поиску свежести задаются наследственными элементами и жизненным опытом
- Возрастные перемены влияют на баланс между склонностью к стабильности и стремлением изменений
- Цивилизационные компоненты образуют взгляд к переменам и инновациям
- Текущие житейские условия регулируют готовность к принятию трансформаций
- Уровень напряжения и ментальных ресурсов задает потенциал совладать с неясностью
Совершенное операционирование требует гибкости в переключении между такими двумя способами в зависимости от конкретных моментов. Индивиды, что научились действенно управлять этим балансом, выказывают существенную эмоциональную надежность и умение к подстройке в многообразных жизненных ситуациях. Понимание индивидуальных нужд в стабильности и переменах помогает выносить более осознанные решения о том, если целесообразно обеспечить статус-кво, а если - отважиться на существенные перемены.
Uncategorized
0 min read
Отчего ощущение риска провоцирует всплеск бодрости
Отчего ощущение риска провоцирует всплеск бодрости
Людская сознание устроена подобным способом, что определенные обстоятельства запускают интенсивные механизмы приспособления. В момент когда мы встречаемся с вероятной опасностью или двусмысленностью, организм активирует программу максимальной подготовленности. Такой процесс Леон казино происходит на глубоком органическом уровне и ассоциирован с первобытными инстинктами самосохранения, которые помогли людям преодолеть множество испытаний развития.
Нынешние анализы нейрофизиологии выявляют, что режим напряженной мобилизации включает симпатическую нервную структуру. Итогом является цепочка химических процессов, которые задействуют физические и ментальные запасы. Миокард начинает сокращаться интенсивнее, вентиляция интенсифицируется, а кровь насыщается кислородом и питательными компонентами.
Каким способом чувство риска запускает скрытые ресурсы
В время столкновения с возможной опасностью мозг включает сложную систему подготовки. нервный центр посылает импульсы в эндокринные железы, которые начинают вырабатывать Leon Casino в повышенном объеме. Такой механизм ведет к стремительному подъему наличной мощности для двигательного аппарата и когнитивных способностей.
Одновременно включается секреция глюкозы из печени, что создает скоростной подход к горючему для клеток. Циркуляция перераспределяется так, чтобы гарантировать наивысшую эффективность приоритетных структур. отдаленные артерии спазмируются, а приток кровотока к двигательному аппарату и центральной нервной системе заметно повышается.
Роль адреналина в формировании бодрости и концентрации
Адреналин представляет собой главный посредник, который преобразует телесное режим организма. Данный соединение соединяется с датчиками по целому корпусу, формируя результат слоты Леон, который выражается в обостренном внимании и повышенной чувствительности. Мускулатура оказываются более отзывчивыми, а срок реакции сокращается.
Влияние стрессового гормона охватывает на главную неврологическую сеть, где он усиливает работу нейротрансмиттеров, ответственных за концентрацию внимания. Случается кратковременное подавление способностей, которые не существенны для мгновенного выживания, например пищеварение или детородные механизмы.
- Рост частоты сердечных пульсаций до 120-180 ударов в минуту
- Расширение оптических апертур для оптимизации восприятия оптической информации
- Повышение восприимчивости аудиальных приемников
- Активация потовых желез для температурного контроля
Почему неопределенность увеличивает фокус к случающемуся
Состояние двусмысленности генерирует специальный режим функционирования психики, при котором разум переключается в режим гиперконцентрации. В таких ситуациях передняя кора энергично исследует близлежащую обстановку в поиске потенциальных рисков или возможностей. Такой механизм требует значительных мощностных расходов, но создает предельную знание о случающемся.
Мозговые системы, несущие ответственность за анализ данных, начинают действовать в интенсивном режиме. казино Леон воздействует на способность быстро исследовать огромное количество факторов синхронно и делать заключения в обстоятельствах недостаточной сведений. Аналогичное режим нередко идет в паре ощущением уникальной четкости рассуждения.
Соединение между угрозой и восприятием власти над положением
Парадоксальным способом встреча с потенциальной угрозой может повышать восприятие личной эффективности. Если личность удачно преодолевает с задачей, это обосновывает его возможность воздействовать на результат событий. Мозг понимает аналогичный исход как доказательство индивидуальной компетентности в руководстве трудными ситуациями.
Душевные исследования показывают, что личности, регулярно сталкивающиеся с регулируемыми испытаниями, развивают больше устойчивое чувство самоэффективности. Этот влияние Leon Casino распространяется на иные зоны жизни, генерируя совокупный основу убежденности в индивидуальных силах.
Как чувственное давление преобразуется в ключ энергии
Мощные чувственные положения включают эмоциональную структуру мозга, которая тесно связана с областями стимулирования и мощностного метаболизма. Эмоциональное активация активирует производство гормона радости и стрессового медиатора, формируя восприятие готовности к действию.
Существенную значение исполняет толкование напряженного состояния. Если стресс воспринимается как задача, а не как опасность, оно преобразуется в побуждающую силу. слоты Леон обнаруживается в виде желания протестировать собственные способности и показать способность справиться с проблемами.
- Активация чувственного центра способствует к секреции давящих веществ
- область памяти анализирует обстоятельственную данные о ситуации
- лобная кора анализирует резервы для преодоления задачи
- связанные с дофамином каналы формируют стимул к активности
Отчего риск усиливает восприятие мгновения
В положении повышенной готовности происходит модификация индивидуального понимания периода. Разум трансформируется в состояние наивысшей переработки рецепторной информации, что создает ощущение ретардации или растяжения происходящего мгновения. Любая деталь близлежащей атмосферы делается значимой и запоминающейся.
Такой явление связан с запуском связанных с норадреналином сетей в основании разума. Повышенная дозировка посредников увеличивает создание мнемонических следов и превращает происходящие ощущения более интенсивными. казино Леон воздействует на возможность обнаруживать подробности, которые в стандартном состоянии способны были бы остаться незамеченными.
Социальный аспект: каким образом среда повышает результат силы
Наличие других личностей в положении повышенного напряжения создает добавочный пласт включения. Коллективные элементы реагируют на чувственные состояния соседних, увеличивая собственную биологическую отклик. Этот система Leon Casino эволюционно образовался для синхронизации коллективного поведения в решающих ситуациях.
Коллективное переживание интенсивных времени зачастую приводит к созданию особых социальных взаимосвязей. Коллективно прочувствованное стресс создает восприятие товарищества и взаимного доверия. Аналогичные ощущения делаются базой для продолжительных взаимоотношений и групповой самоопределения.
Когда угроза превращается средством выйти за рамки привычного
Осознанное встреча с вызовами составляет механизм индивидуального совершенствования. В случае если человек добровольно помещает себя в ситуацию неопределенности, он приобретает возможность исследовать личные тайные возможности. Leon Casino проявляется в виде выявления современных аспектов собственной индивидуальности.
Такие переживания часто превращаются поворотными мгновениями в бытии, в случае если совершается пересмотр представлений о личных способностях. Превозмогание боязни и сомнения формирует новые мозговые траектории, которые поддерживают гораздо более смелое поведение в будущем.
Преодоление внутренних барьеров
Многие душевные преграды существуют только в уме и не обладают реальных причин. Соприкосновение с управляемой угрозой помогает различить подлинные препятствия от искусственных. Такой ход раскрепощает энергию, которая прежде тратилась на сохранение охранных способов.
слоты Леон влияет на способность действовать наперекор внутреннему сопротивлению. В случае если индивид находит, что в состоянии совладать с тем, что казалось нереальным, это коренным образом изменяет его самопонимание и готовность принимать современные задачи.
Чувство личного совершенствования через проверку
Любое удачно превозможенное испытание превращается подтверждением умения к совершенствованию. Мозг регистрирует эти переживания как подтверждение действенности методов превозмогания проблем. Создается положительная обратная связь, которая стимулирует к поиску современных шансов для совершенствования слоты Леон.
Нейропластичность предоставляет материальные изменения в строении разума в реакцию на современные ощущения. Регулярное столкновение с средними задачами укрепляет нейронные пути, ассоциированные с стабильностью и приспособляемостью.
По какой причине восприятие опасности нередко ощущается как окрыляющее
Молекулярные перемены, случающиеся в статусе активизации, образуют личное восприятие подъема и энтузиазма. Смесь адреналина, дофамина и природных анальгетиков формирует уникальное состояние разума, которое многие описывают как эйфорическое. казино Леон обнаруживается в качестве интенсивного ощущения собственной мощи и возможностей.
Такой механизм разъясняет притягательность крайних видов активности и прочих деятельностей, ассоциированных с высоким опасностью. Сознание запоминает интенсивные положительные впечатления и стремится их дублировать.
Каким способом постоянный контакт с угрозой воздействует на степень мощи
Регулярное воздействие регулируемого напряжения приводит к приспособительным переменам в организме. Сердечно-сосудистая система превращается более эффективной, а нейронная организация создает расширенную стабильность к давлению. Повышается базовый степень энергии и готовности к активности.
Анализы выявляют, что люди, постоянно сталкивающиеся с умеренными испытаниями, проявляют более повышенные индикаторы витальной силы в ежедневной работе. Их система удерживает статус оптимальной расположения, что обнаруживается в повышенной эффективности и стимулировании в Leon Casino.
Uncategorized
0 min read
Почему чувство риска провоцирует всплеск силы
Почему чувство риска провоцирует всплеск силы
Человеческая психика устроена так, что определенные условия запускают мощные механизмы приспособления. Если мы соприкасаемся с потенциальной опасностью или неопределенностью, система запускает состояние усиленной готовности. Такой механизм Леонбетс зеркало происходит на фундаментальном биологическом плане и соединен с архаичными побуждениями выживания, которые способствовали роду человеческому преодолеть огромное количество вызовов прогресса.
Нынешние исследования неврологии показывают, что положение тревожной подготовленности активирует симпатическую нервную сеть. Результатом выступает цепочка химических преобразований, которые задействуют материальные и интеллектуальные запасы. Сердечная мышца приступает биться интенсивнее, вентиляция интенсифицируется, а кровь насыщается кислородом и полезными компонентами.
Каким образом чувство риска включает внутренние запасы
В мгновение столкновения с возможной риском сознание активирует многоступенчатую систему активации. Гипоталамус передает сигналы в надпочечники, которые начинают вырабатывать игровые автоматы Леон в увеличенном количестве. Такой явление ведет к стремительному увеличению доступной силы для мышц и когнитивных функций.
Одновременно активируется высвобождение глюкозы из печени, что создает быстрый подход к горючему для клеток. Циркуляция перераспределяется подобным способом, чтобы создать наивысшую эффективность жизненно необходимых механизмов. Периферические капилляры спазмируются, а доставка кровотока к мускулатуре и мозгу значительно возрастает.
Функция адреналина в возникновении активности и сосредоточенности
Стрессовый гормон составляет ключевой нейромедиатор, который изменяет биологическое состояние организма. Такой соединение взаимодействует с приемниками по всему организму, генерируя результат БК Леон, который обнаруживается в усиленном фокусе и увеличенной чувствительности. Мускулатура становятся более чувствительными, а срок отклика минимизируется.
Влияние адреналина охватывает на главную неврологическую сеть, где он повышает деятельность посредников, отвечающих за сосредоточение восприятия. Происходит временное угнетение способностей, которые не критичны для мгновенного существования, таких как пищеварение или половые механизмы.
- Повышение темпа миокардиальных сокращений до 120-180 ударов в период
- Расширение глазных отверстий для оптимизации получения визуальной данных
- Повышение чувствительности акустических рецепторов
- Включение потовых органов для теплообмена
По какой причине двусмысленность увеличивает фокус к случающемуся
Положение двусмысленности создает специальный режим функционирования психики, при котором интеллект переключается в положение предельной сосредоточенности. В аналогичных ситуациях префронтальная кора интенсивно сканирует внешнюю среду в разыскивании возможных опасностей или возможностей. Данный процесс нуждается значительных энергетических расходов, но создает максимальную информированность о совершающемуся.
Нейронные сети, ответственные за обработку данных, начинают работать в интенсивном состоянии. казино Леон оказывает влияние на умение быстро исследовать множество элементов параллельно и выносить решения в ситуациях ограниченной информации. Подобное положение часто дополняется чувством особой четкости мышления.
Связь между угрозой и чувством контроля над ситуацией
Неожиданным образом встреча с вероятной риском может повышать восприятие индивидуальной продуктивности. В момент когда личность результативно справляется с задачей, это доказывает его умение воздействовать на финал явлений. Сознание интерпретирует подобный результат как свидетельство собственной квалификации в руководстве сложными обстоятельствами.
Ментальные исследования выявляют, что личности, систематически встречающиеся с контролируемыми задачами, вырабатывают более устойчивое ощущение самоэффективности. Данный результат игровые автоматы Леон простирается на другие области жизни, генерируя единый основу убежденности в индивидуальных способностях.
Каким образом эмоциональное напряжение преобразуется в источник энергии
Сильные душевные режимы запускают чувственную сеть разума, которая тесно ассоциирована с областями мотивации и энергетического метаболизма. Душевное стимуляция стимулирует производство дофамина и стрессового медиатора, формируя ощущение мобилизации к активности.
Существенную функцию играет понимание напряженного состояния. Если давление воспринимается как вызов, а не как риск, оно трансформируется в мотивирующую силу. БК Леон обнаруживается в виде желания протестировать личные способности и выявить возможность решить с проблемами.
- Активация миндалевидного тела ведет к секреции давящих веществ
- Гиппокамп обрабатывает контекстную сведения о ситуации
- лобная область оценивает запасы для справления вызова
- медиаторные пути формируют мотивацию к активности
Почему риск усиливает восприятие мгновения
В положении усиленной подготовленности происходит модификация личного восприятия срока. Сознание переходит в состояние наивысшей анализа сенсорной данных, что генерирует ощущение замедления или растяжения текущего момента. Всякая деталь внешней обстановки делается важной и запоминающейся.
Данный эффект соединен с запуском медиаторных систем в базе сознания. Увеличенная концентрация передатчиков повышает формирование памяти и превращает настоящие переживания более насыщенными. казино Леон воздействует на умение обнаруживать нюансы, которые в обычном состоянии имели возможность бы остаться невидимыми.
Общественный фактор: каким образом окружение повышает влияние мощности
Существование прочих людей в ситуации усиленного стресса генерирует дополнительный пласт включения. Социальные элементы отвечают на эмоциональные режимы соседних, усиливая собственную биологическую отклик. Этот механизм игровые автоматы Леон в ходе эволюции развился для координации коллективного действий в критических условиях.
Совместное переживание мощных времени зачастую способствует к созданию специальных общественных соединений. Вместе испытанное давление генерирует чувство дружбы и взаимного веры. Аналогичные переживания становятся фундаментом для продолжительных связей и групповой идентичности.
Когда угроза становится способом выйти за пределы стандартного
Осознанное столкновение с вызовами является механизм персонального роста. В случае если личность сознательно ставит себя в условия двусмысленности, он приобретает шанс исследовать личные невидимые ресурсы. игровые автоматы Леон выражается в виде выявления свежих сторон личной натуры.
Аналогичные переживания зачастую делаются решающими моментами в жизни, в момент когда происходит пересмотрение понятий о индивидуальных потенциале. Преодоление страха и колебания формирует свежие нейронные траектории, которые поддерживают более храброе поступки в будущем.
Преодоление внутренних препятствий
Большинство душевные преграды присутствуют исключительно в уме и не содержат реальных фундаментов. Соприкосновение с управляемой риском способствует разделить реальные ограничения от надуманных. Этот течение раскрепощает мощь, которая ранее использовалась на удержание оборонительных способов.
БК Леон действует на способность поступать против внутреннему препятствию. В момент когда личность выявляет, что может управиться с тем, что выглядело неосуществимым, это кардинально изменяет его самоощущение и расположение принимать свежие задачи.
Восприятие личного развития через проверку
Каждое удачно превозможенное проверка становится доказательством умения к росту. Сознание запоминает эти впечатления как свидетельство действенности стратегий преодоления трудностей. Образуется положительная ответная связь, которая мотивирует к нахождению современных шансов для совершенствования БК Леон.
Адаптивность нервной системы обеспечивает телесные перемены в архитектуре сознания в реакцию на свежие переживания. Регулярное столкновение с умеренными испытаниями укрепляет нервные пути, связанные с стабильностью и гибкостью.
По какой причине чувство угрозы зачастую ощущается как мотивирующее
Молекулярные изменения, случающиеся в положении концентрации, образуют субъективное чувство воодушевления и воодушевления. Комбинация эпинефрина, гормона счастья и естественных опиатов образует особое положение разума, которое немало людей представляют как экстатическое. казино Леон обнаруживается в форме интенсивного восприятия собственной мощи и возможностей.
Такой инструмент разъясняет притягательность экстремальных видов деятельности и других активностей, связанных с увеличенным риском. Разум фиксирует интенсивные позитивные ощущения и пытается их повторить.
Каким способом регулярный взаимодействие с риском воздействует на уровень силы
Регулярное влияние контролируемого давления приводит к подстроечным переменам в физиологии. Циркуляторная система делается более действенной, а нервная структура формирует увеличенную устойчивость к воздействию. Увеличивается фундаментальный степень энергии и склонности к деятельности.
Исследования выявляют, что индивиды, постоянно соприкасающиеся с средними испытаниями, проявляют гораздо более повышенные параметры биологической энергии в повседневной активности. Их тело сохраняет статус наилучшей расположения, что выражается в повышенной эффективности и мотивации в игровые автоматы Леон.
Uncategorized
0 min read
По какой причине люди выискивают признание своей везения
По какой причине люди выискивают признание своей везения
Человеческая нужда находить паттерны и знаки везения в прилегающем мире является собой фундаментальную черту нашей ментальности. Желание к доказательству фортуны проявляется в самых разных сферах бытия – от повседневных определений до серьезных жизненных решений. Такое явление имеет глубокие основания в эволюционном становлении индивида и актуальных механизмах работы сознания.
По какой причине счастливые пересечения представляются особенно важными
Индивидуальный разум организован таким способом, что мы имеем тенденцию присваивать особое важность происшествиям, которые случаются параллельно или в тесной хронологической связи. В случае когда происходит что-то положительное сразу после конкретного действия или размышления, наше мышление инстинктивно создает связь между указанными процессами. Такой процесс осознания формировался на за период тысячелетий эволюции как метод существования в неожиданной среде.
Явление систематизации – предрасположенность выявлять важные связи в случайных данных – исполняет ключевую роль в понимании везучих пересечений. В случае когда мы видим былого друга в неожиданном месте сразу после того, как размыслили о нем, или обнаруживаем необходимую вещь именно в то время, когда она особенно нужна, наш мозг объясняет это как нечто большее, чем просто совпадение.
Статистическая возможность редких пересечений гораздо выше, чем кажется на первый обзор. В продолжение дня с каждым индивидом происходят массы разных происшествий, и возможность того, что определенные из них случайно совпадут по времени, весьма значительна. Но наше восприятие сосредотачивается именно на этих нечастых периодах, пренебрегая массу обстоятельств в vavada, когда прогнозируемых соответствий не произошло.
Каким способом мозг объединяет достижение с личными действиями
Ментальный механизм атрибуции обеспечивает людям объяснять совершающиеся случаи через аспект индивидуального влияния. В случае когда случается что-то хорошее в вавада казино, мы автоматически выискиваем в своем действии факторы, которые могли способствовать указанному исходу. Подобный подход помогает создавать восприятие контроля над персональными ситуациями и увеличивает самооценку.
Нейронные сети, отвечающие за обработку данных о каузальных связях, активно работают при исследовании результативных итогов. Биохимическая система вознаграждения активизирует те паттерны поступков, которые происходили перед положительным итогам, даже если связь между ними была случайной. Это создает стабильные соединения между определенными действиями вавада казино и ощущением везения.
Ложное представление контроля особенно отчетливо проявляется в ситуациях, где исход обуславливается от случайности. Люди имеют тенденцию полагать, что их присутствие, концентрация сознания или определенные ритуалы могут воздействовать на итог происшествий, находящихся вне их фактического контроля. Данная ментальная черта помогает сохранять побуждение и веру в личные потенциал.
Функция чувств в ощущении везения
Эмоциональное состояние в момент обретения положительного итога значительно воздействует на то, как мы объясняем случившееся. Ликование, освобождение или удовлетворение укрепляют запоминание происшествия вавада и создают устойчивые связующие связи. В какой степени отчетливее душевная тональность момента, тем сильнее он осознается как демонстрация везения.
Биохимические преобразования, происходящие во время переживания достижения, воздействуют на формирование запоминаний. Выброс биоактивных веществ и нейротрансмиттеров создает приятные телесные восприятия, которые разум пытается повторить. Это приводит к разысканию схожих паттернов поведения или условий, которые имели возможность бы воссоздать то же чувственное ситуацию.
Эмоциональная память работает не только в момент успеха, но и влияет на дальнейшее понимание случаев. Люди, пребывающие в прекрасном настроении, чаще замечают позитивные соответствия и толкуют нейтральные события как позитивные. Это формирует положительный круг, где прекрасное настроение помогает осознанию большего количества удачных мгновений vavada.
По какой причине людям важно видеть знаки удачи
Поиск и распознавание признаков удачи выполняет множество существенных психологических задач, которые способствуют человеку приспосабливаться к непостоянной среде и удерживать ментальное благополучие:
- Формирование чувства прогнозируемости в изменчивом мире.
- Усиление веры в личных умениях и выборах.
- Создание благоприятного воззрения на предстоящие возможности.
- Уменьшение уровня тревожности при осуществлении серьезных определений.
- Укрепление побуждения продлевать усилия в трудных обстоятельствах.
Способность видеть положительные ситуации содействует людям предельно применять появляющиеся перспективы вавада казино. Те, кто настроен на поиск позитивных символов, чаще сосредотачивают мышление на детали, которые в состоянии стать значимыми для обретения намерений. Такая внимательность к внешней среде усиливает вероятность реального успеха.
Социальный аспект поиска признаков везения также играет значительную роль. Передача повествованиями об счастливых пересечениях усиливает социальные связи и создает ощущение единства с другими людьми. Совместная вера в признаки счастья формирует культурные ритуалы и обряды, которые объединяют коллективы людей.
Каким образом былые успехи укрепляют веру в счастье
Память о былых результативных исходах в vavada создает основу для развития устойчивой веры в индивидуальную удачливость. Всякий положительный случай становится подтверждением того, что благоприятные происшествия могут воспроизводиться. Интеллект формирует когнитивные схемы, которые помогают скоро распознавать ситуации, аналогичные на те, где раньше был обретен достижение.
Отборность памяти играет существенную роль в поддержании веры в счастье. Люди склонны качественнее сохранять отчетливые позитивные события и игнорировать или преуменьшать важность неудач. Данный способ оберегает ментальность от избыточного негатива, но одновременно формирует неточное понимание собственной счастливости.
Поэтапное накопление благоприятных памяти создает то, что исследователи именуют "везучей самовосприятием" – устойчивое видение о себе как о везучем человеке. Такая самовосприятие сказывается на поступки, заставляя людей чаще идти на разумный угрозу и проявлять серьезную настойчивость в достижении задач.
Обратная переоценка случаев также способствует активизации веры в удачу вавада. Происшествия, которые в момент образования представлялись индифферентными или даже отрицательными, со временем могут переоцениваться как удачные, если они привели к благоприятным последствиям. Указанная возможность отыскивать светлую подкладку в любых ситуациях удерживает жизнерадостный видение на жизнь.
Почему признание удачи обеспечивает веру
Получение признаний собственной счастливости существенно повышает меру самоуверенности и подготовленности получать задачи. В случае когда человек замечает символы того, что ситуации образуются в его пользу, это снижает воспринимаемые угрозы и усиливает предрасположенность функционировать твердо. Психологическое ситуация уверенности само по себе может содействовать качественной результативности и более положительным исходам в вавада.
Нейрологические анализы выявляют, что вера в собственную удачу запускает зоны мозга, соединенные с проектированием и совершением определений. Уверенные в своем счастье люди показывают более высокую функционирование в передней лобной области, что объединено с развитыми ментальными функциями и умением к планомерному мышлению.
Общественная психология также признает связь между верой в везение и убежденностью в межличностных отношениях. Люди, считающие себя счастливыми, чаще инициируют новые связи, демонстрируют большую доступность в коммуникации и выражают руководящие качества. Это формирует благоприятную обратную связь, поскольку деятельное социальное поступок реально усиливает шанс благоприятных результатов.
Каким способом произвольные происшествия превращаются в «признаки»
Процесс превращения стандартных произвольных событий вавада казино в важные знаки происходит через комплексные познавательные процессы интерпретации и присвоения смысла. Человеческое восприятие энергично выискивает паттерны и связи даже там, где их реально нет, что ведет к порождению персональной системы суеверий и пророчеств.
Хронологическая близость событий играет основную роль в создании суеверных верований. Когда два происшествия случаются недалеко по времени, мозг инстинктивно изучает вероятность логической связи между ними. Особенно мощное впечатление формируют ситуации, когда за необычным наблюдением происходит значимое или эмоционально существенное происшествие.
Культурный фон серьезно влияет на то, какие именно события интерпретируются как признаки удачи или невезения. Обычаи, транслируемые из генерации в эпоху, создают готовые схемы объяснения для различных явлений. Темные коты, сломанные отражения, обнаруженные средства – все эти предметы получают особое важность через призму совместных взглядов.
Персональная важность также устанавливает, которые происшествия становятся индивидуальными признаками. Временные отметки, величины, существа или объекты, соединенные с важными запоминаниями, получают особый статус в индивидуальной системе суеверий. Встреча с такими признаками в критические мгновения жизни активизирует веру в их предсказательную силу.
Uncategorized
0 min read
По какой причине переживания могут становиться передаваемыми
По какой причине переживания могут становиться передаваемыми
Человеческие эмоции обладают невероятной возможностью перемещаться от одного человека к иному, подобно невидимая инфекция. Этот феномен знаком как чувственная заразительность и являет собой admiral casino bonus, что влияет на всех из нас в ежедневной деятельности. Следя за близкими, мы автоматически впитываем их настроение, веселье или тоску, генерируя чувственную волну, что способна распространяться на полные коллективы индивидов.
Что такое эмоциональная заразительность
Чувственная заразительность являет собой психологический процесс, при котором индивиды бессознательно повторяют и перенимают эмоциональные настроения близких. Этот механизм происходит на бессознательном уровне и не требует сознательных усилий для своей запуска.
Исследовательские исследования демонстрируют, что admiral x формируется с наиболее раннего периода. Малыши способны улавливать эмоциональные сигналы матери и отвечать на них подходящим манерой. Зрелые люди сохраняют эту возможность на протяжении всей жизни, что дает возможность им быстро приспосабливаться к общественной среде и создавать эмоциональные связи с иными людьми.
Механизм эмоциональной передаваемости включает несколько стадий: понимание чувственного знака, его переработку в мозге, активацию соответствующих нейронных систем и выражение аналогичного чувственного настроения. Полный этот механизм может требовать лишь несколько секунд.
Зеркальные нейроны: как мозг считывает чужие эмоции
Открытие зеркальных нейронов в 1990-х годы создало переворот в осмыслении процессов общественного сотрудничества. Данные специализированные нервные клетки запускаются как при исполнении собственных действий, так и при слежении за схожими действиями иных людей.
Зеркальные клетки выполняют главную роль в создании адмирал х среди личностями. Они позволяют нам прямо "отражать" чувственные состояния окружающих, формируя нервную основу для эмпатии и понимания. Когда мы наблюдаем улыбающегося индивида, наши собственные зеркальные нейроны активируются так, словно мы сами улыбаемся.
- Машинальная запуск при слежении чувств
- Формирование нервных паттернов, схожих наблюдаемым
- Создание физиологической базы для сочувствующего отклика
- Быстрая переработка эмоциональной информации без сознательного анализа
Изучения с применением функциональной магнитно-резонансной съемки показывают, что участки мозга, ответственные за обработку чувств, активируются одновременно у индивидов, которые наблюдают один за вторым или сотрудничают в группе.
Выражение лица, движения и речь: невербальные каналы передачи эмоций
Людское лицо содержит более 40 мускулов, способных формировать тысячи различных выражений. Мимика представляет единым из наиболее сильных средств эмоциональной трансляции. Включая малые изменения в проявлении лица могут тотчас транслировать эмоциональное состояние и вызвать соответствующий отклик у зрителя.
Жестикуляция и поза тела дополняют мимические сигналы, создавая сложную изображение эмоционального настроения. admiral-x посредством физические выражения может оказаться особенно интенсивной, поскольку касается бессознательные процессы восприятия угрозы или безопасности.
Голосовые характеристики - тональность, скорость, сила и интонация - содержат большое число эмоциональной данных. Изучения показывают, что индивиды могут выявить чувственное состояние собеседника по голосу с правильностью до 85%, включая не осознавая значения говорящихся выражений.
Функция сочувствия: почему нам трудно оставаться «вне» посторонних переживаний
Сочувствие являет собой врожденную возможность понимать и разделять чувственные настроения иных личностей. Данный механизм развился в ходе развития как способ существования в общественных коллективах, где взаимопонимание и кооперация были критически важными для успеха.
Нейробиологические изучения показывают, что admiral x активируется автоматически при контакте с эмоционально насыщенными раздражителями. Усилия сознательно заблокировать эмпатические отклики нуждаются в больших познавательных попыток и могут привести к чувственному изнурению.
- Автоматическая запуск чувственных участков головы
- Биологические изменения, отвечающие видимым чувствам
- Уменьшение способности к разумному разбору ситуации
- Усиление общественных контактов через разделение переживаний
Очень чувствительные люди исключительно подвержены эмоциональному заражению. Их нейронная структура более тонко настроена на понимание эмоциональных сигналов, что может вести к эмоциональной перенапряжению в насыщенной социальной обстановке.
Групповая движение: как чувства усиливаются в группе
В коллективных обстоятельствах результат чувственного заражения значительно усиливается из-за множественным каналам трансляции и взаимному укреплению эмоциональных знаков. Явление эмоциональной синхронизации приводит к тому, что коллектив индивидов начинает испытывать похожие чувственные состояния одновременно.
Социальная психология определяет несколько механизмов, поясняющих укрепление адмирал х в коллективе. Конформность заставляет людей подстраиваться под эмоциональную атмосферу коллектива, даже если это конфликтует с их индивидуальным чувствам. Обезличивание снижает самоконтроль и укрепляет подверженность коллективным чувствам.
Функция лидеров и харизматичных индивидов в процессе коллективного чувственного инфицирования трудно преувеличить. Их чувственные выражения являются особым "камертоном" для настройки чувственного настроения целой команды. Данный принцип активно применяется в политике, рекламе и массовых мероприятиях.
Социальные сети и СМИ: катализатор чувственной волнения
Современные технологии радикально изменили размеры и скорость расширения эмоциональной информации. Социальные сети формируют цифровые пространства, где эмоции способны передаваться немедленно между множества и массы участников.
Алгоритмы социальных платформ специально отрегулированы на обнаружение и развитие эмоционально насыщенного контента, так как подобная данные генерирует более взаимодействий. admiral-x в электронном пространстве происходит посредством одобрения, комментарии, перепосты и чувственные отклики, формируя мощные волнения коллективных переживаний.
Медиа-содержание, особенно видео, владеет большим потенциалом чувственного влияния. Редактирование, музыкальное обеспечение, цветовая гамма и иные технические приемы специально разрабатываются для максимизации эмоционального ответа у аудитории.
В случае когда чужие чувства вредят: напряжение, беспокойство и ужас «по очереди»
Негативная сторона эмоционального инфицирования проявляется в ситуациях, когда разрушительные чувственные состояния распространяются среди людей, причиняя вред их психологическому и телесному состоянию. Массовые панические состояния, коллективная паника и групповая злость являются яркими образцами такого воздействия.
Хронический стресс может передаваться между родными личностями, создавая замкнутые циклы негативных чувств. admiral x в семьях и трудовых коллективах часто приводит к снижению всеобщей производительности, ухудшению отношений и формированию психофизических болезней.
Беспокойные нарушения имеют склонность к "инфицированию" в социальных коллективах. Люди, регулярно находящиеся близко с беспокойными личностями, медленно начинают проявлять похожие симптомы, даже если первоначально не были склонны к повышенной беспокойству.
Можно ли защититься от чувственного инфицирования
Формирование эмоциональной саморегуляции и внимательности позволяет людям лучше управлять уровень восприимчивости к посторонним эмоциональным настроениям. Техники размышления, респираторные практики и когнитивно-поведенческие стратегии помогают сформировать защитный барьер от нежелательного эмоционального воздействия.
Понимание механизмов адмирал х дает шанс сознательно выбирать, какие чувственные воздействия принимать, а что за отфильтровывать. Формирование чувственного разума включает возможность отличать свои чувства от перенятых извне.
- Упражнения майндфулнесс для увеличения осознанности
- Установление эмоциональных границ в связях
- Регулярные перерывы от интенсивного общественного сотрудничества
- Развитие критического мышления при потреблении медиа-контента
Физические способы защиты содержат постоянную физическую деятельность, адекватный отдых и полезное еду, что укрепляют чувственную стабильность и повышают устойчивость к внешним чувственным воздействиям.
Как сознательно «распространять» поддерживающие и вдохновляющие чувства
Осознание принципов чувственного заражения открывает шансы для положительного влияния на близких. Осознанная трансляция помогающих эмоциональных настроений может оказаться сильным инструментом для улучшения обстановки в доме, группе или сообществе.
Практика признательности, проявление подлинной радости и демонстрация оптимизма формируют позитивные эмоциональные области, что природным способом воздействуют на близких. admiral-x позитивных чувств нуждается в искренности и последовательности, поскольку индивиды интуитивно ощущают ненатуральность.
Руководство посредством эмоциональный образец оказывается исключительно результативным в критических обстоятельствах. Способность удерживать спокойствие, увереность и понимание в сложных обстоятельствах может избежать панику и направить коллектив к полезным выходам. Формирование умений положительного чувственного влияния требует регулярной работы над собой и глубокого понимания человеческой психологии.
Uncategorized
0 min read
Почему личности ищут доказательство своей удачи
Почему личности ищут доказательство своей удачи
Людская необходимость отыскивать паттерны и символы счастья в прилегающем окружении является собой фундаментальную особенность нашей ментальности. Желание к доказательству удачи выражается в самых различных направлениях бытия – от обычных определений до важных жизненных выборов. Это феномен имеет основательные основания в развивающемся становлении личности и актуальных системах работы мышления.
Почему счастливые совпадения представляются особенно важными
Людской разум устроен таким образом, что мы имеем тенденцию присваивать особое важность случаям, которые случаются параллельно или в плотной хронологической связи. В случае когда происходит что-то позитивное сразу после конкретного действия или мысли, наше восприятие автоматически формирует связь между данными феноменами. Такой способ осознания формировался на за период тысячелетий эволюции как средство существования в изменчивой среде.
Явление апофении – тенденция обнаруживать важные связи в произвольных данных – выполняет основную роль в осознании удачных совпадений. Когда мы видим былого товарища в непредвиденном месте сразу после того, как помыслили о нем, или отыскиваем нужную вещь именно в момент, когда она особенно нужна, наш разум толкует это как нечто большее, чем просто произвол.
Статистическая возможность редких пересечений гораздо выше, чем выглядит на первый осмотр. В продолжение дня с каждым человеком совершаются сотни разных событий, и возможность того, что некоторые из них непреднамеренно соответствуют по времени, весьма велика. Но наше восприятие концентрируется именно на данных исключительных моментах, игнорируя массу обстоятельств в вавада, когда прогнозируемых совпадений не состоялось.
Как мозг соединяет триумф с личными актами
Когнитивный способ приписывания позволяет людям объяснять случающиеся случаи через призму собственного влияния. В случае когда случается что-то хорошее в vavada казино, мы инстинктивно ищем в своем поведении компоненты, которые были способны содействовать этому результату. Аналогичный подход помогает развивать восприятие контроля над персональными ситуациями и увеличивает самоуважение.
Нервные сети, отвечающие за обработку информации о причинно-следственных связях, активно работают при изучении успешных результатов. Дофаминовая система стимуляции усиливает те паттерны действий, которые случались до положительным исходам, даже если связь между ними была случайной. Это формирует устойчивые соединения между конкретными актами вавада казино и восприятием везения.
Ложное представление власти особенно отчетливо демонстрируется в случаях, где итог зависит от случайности. Люди имеют тенденцию думать, что их участие, фокусировка мышления или определенные обряды способны влиять на исход происшествий, расположенных вне их фактического контроля. Данная душевная характеристика помогает удерживать побуждение и веру в личные способности.
Роль переживаний в ощущении счастья
Душевное положение в момент получения позитивного исхода серьезно сказывается на то, как мы интерпретируем свершившееся. Восторг, освобождение или удовольствие усиливают запоминание происшествия vavada и создают прочные соединительные связи. Насколько отчетливее эмоциональная окраска момента, тем интенсивнее он осознается как проявление везения.
Гормональные изменения, происходящие во время переживания триумфа, сказываются на развитие запоминаний. Выброс биоактивных веществ и биохимических соединений порождает благоприятные физические чувства, которые разум стремится повторить. Это ведет к поиску похожих схем действий или условий, которые могли бы восстановить то же чувственное состояние.
Эмоциональная память работает не только в момент успеха, но и влияет на дальнейшее понимание происшествий. Люди, располагающиеся в отличном самочувствии, чаще видят положительные совпадения и интерпретируют индифферентные случаи как позитивные. Это формирует позитивный оборот, где отличное расположение способствует пониманию большего количества счастливых периодов вавада.
Зачем людям необходимо замечать признаки везения
Поиск и распознавание символов счастья выполняет множество существенных ментальных задач, которые способствуют человеку приспосабливаться к изменчивой среде и удерживать ментальное здоровье:
- Формирование ощущения предвидимости в изменчивом мире.
- Повышение убежденности в личных умениях и определениях.
- Формирование положительного взгляда на предстоящие перспективы.
- Снижение уровня тревожности при принятии серьезных решений.
- Усиление стимуляции поддерживать попытки в сложных ситуациях.
Умение обнаруживать благоприятные обстоятельства способствует людям максимально задействовать появляющиеся перспективы vavada казино. Те, кто настроен на разыскание позитивных символов, чаще обращают внимание на подробности, которые способны быть важными для получения целей. Аналогичная внимательность к окружающей среде усиливает возможность реального успеха.
Межличностный сторона выискивания знаков везения также выполняет значительную роль. Передача историями об счастливых соответствиях укрепляет межличностные связи и формирует ощущение общности с другими людьми. Общая вера в знаки везения развивает социальные традиции и обряды, которые объединяют сообщества людей.
Как былые успехи усиливают веру в счастье
Память о былых удачных итогах в вавада создает фундамент для формирования устойчивой веры в собственную везучесть. Каждый позитивный случай становится подтверждением того, что позитивные случаи в состоянии повторяться. Разум формирует когнитивные схемы, которые способствуют быстро выявлять обстоятельства, похожие на те, где прежде был получен триумф.
Отборность памяти выполняет существенную роль в удержании веры в удачу. Люди имеют тенденцию лучше фиксировать выразительные положительные происшествия и пренебрегать или снижать важность провалов. Данный способ охраняет ментальность от излишнего негатива, но параллельно формирует неточное восприятие собственной везучести.
Постепенное накопление положительных воспоминаний развивает то, что психологи именуют "счастливой идентичностью" – устойчивое представление о себе как о счастливом человеке. Такая самоидентификация влияет на поступки, принуждая людей чаще идти на обоснованный риск и выражать серьезную настойчивость в обретении задач.
Последующая переоценка событий также помогает усилению веры в удачу vavada. Случаи, которые в момент происхождения казались индифферентными или даже отрицательными, со временем способны переосмысливаться как счастливые, если они привели к благоприятным итогам. Указанная умение находить серебряную подкладку в любых ситуациях сохраняет оптимистичный воззрение на жизнь.
По какой причине подтверждение удачи дает веру
Обретение подтверждений личной счастливости значительно повышает меру самоуважения и готовности брать вызовы. В случае когда человек наблюдает знаки того, что ситуации складываются в его интересах, это снижает воспринимаемые угрозы и активизирует готовность действовать настойчиво. Психологическое ситуация веры само по себе в состоянии способствовать лучшей производительности и более положительным итогам в vavada.
Нейрологические исследования выявляют, что вера в индивидуальную везение активирует области мозга, связанные с проектированием и осуществлением выборов. Верующие в своем счастье люди выражают более высокую функционирование в префронтальной области, что соединено с развитыми познавательными задачами и способностью к планомерному мышлению.
Общественная психология также признает связь между верой в удачу и верой в межличностных отношениях. Люди, полагающие себя везучими, чаще начинают современные знакомства, выражают серьезную доступность в взаимодействии и выражают лидерские качества. Это формирует позитивную встречную связь, поскольку энергичное социальное поведение фактически увеличивает шанс положительных исходов.
Каким образом случайные происшествия превращаются в «знаки»
Механизм трансформации обычных произвольных происшествий vavada казино в существенные признаки случается через комплексные ментальные процессы интерпретации и наделения значения. Людское сознание активно ищет паттерны и связи даже там, где их фактически нет, что ведет к порождению индивидуальной системы убеждений и предсказаний.
Темпоральная близость событий выполняет ключевую роль в формировании суеверных взглядов. Когда два случая происходят недалеко по времени, разум машинально анализирует вероятность логической связи между ними. Особенно интенсивное воздействие производят случаи, когда за необычным обнаружением происходит важное или душевно существенное происшествие.
Культурный условия серьезно влияет на то, какие именно случаи толкуются как признаки счастья или невезения. Обряды, распространяемые из поколения в эпоху, создают сформированные схемы объяснения для разнообразных явлений. Черные животные, поврежденные стекла, обнаруженные деньги – все данные объекты обретают особое важность через призму совместных взглядов.
Индивидуальная значимость также назначает, какие происшествия становятся персональными признаками. Даты, цифры, создания или вещи, соединенные с значимыми памятью, получают особый положение в личной системе суеверий. Встреча с такими символами в важные мгновения жизни усиливает веру в их пророческую силу.
Uncategorized
0 min read
Каким способом чувства помогают делать стремительные решения
Каким способом чувства помогают делать стремительные решения
Современный мир предполагает от человека моментальных откликов на непрерывно меняющиеся обстоятельства. В моментах, в которых срока на раздумья практически отсутствует, в точности эмотивные процессы делаются ключевыми содействующими в течении принятия решения. Maxbet casino составляет комплексный алгоритм сочетания чувственного понимания с накопленным индивидуальным арсеналом, позволяя индивидуальному сознанию перерабатывать данные со скоростью, нереальной исключительно логическому анализу.
По какой причине быстрота решений зачастую приоритетнее совершенной точности
В экстремальных ситуациях отсрочка может стать роковым. Если управляющий транспортом замечает препятствие на дороге или врач встречается с непредвиденным проблемой во период вмешательства, срока на подробное обдумывание просто нет. казино Максбет онлайн запускается немедленно, инициируя цепочку химических откликов, которые приводят в готовность полный организм для скорого акта.
Изучения показывают, что в обстоятельствах временного цейтнота включая приблизительно верное выбор значительно обходит по результативности затянувшиеся размышления. Эволюция выработала человеческие мозговые сети таким образом, чтобы в прежде всего предоставлять сохранение жизни, а не абсолютную правильность определения.
Роль переживаний в немедленной определении обстоятельств
Эмоциональная структура действует как сложный сканер, немедленно исследующий окружающую среду на тему возможных рисков или перспектив. Эмоциональная область анализирует чувственную сведения на двести-пятьсот миллисекунд стремительнее, чем кора больших долей способна осуществить рациональный анализ.
Данный процесс дает возможность нам чувствовать неладное еще до того, как мышление улавливает источник беспокойства. Максбет игровые автоматы срабатывает как структура раннего сигнализации, включая оборонительные механизмы заблаговременно до понимания специфической риска. Аналогичная заблаговременная регулировка системы существенно повышает возможности на сохранение жизни в критических условиях.
Каким способом интуиция формируется на фундаменте чувственного переживания
Интуитивное восприятие представляет собой итог многолетней функционирования чувственной памяти. Любое впечатление формирует отпечаток в нервных структурах Максбет игровые автоматы, образуя комплексные шаблоны реагирования. Когда мы сталкиваемся с похожей обстоятельствами, сознание инстинктивно получает соответствующую данные из хранилищ прошлого.
Специальные навыки во большей степени базируются в точности на подобном чувственно-инстинктивном понимании. Квалифицированный доктор зачастую "чувствует" неладное в состоянии клиента задолго до получения результатов тестов. Инвестор распознает тенденции биржи, полагаясь на деликатные знаки, которые непросто сформулировать словами.
Отчего аффективные сигналы опережают аналитический анализ
Изучение нервной системы разъясняет эффект опережающего аффективного реагирования спецификой строения мозга. Воспринимаемая информация приходит в промежуточный мозг, от которого одновременно посылается по парным маршрутам: короткому – напрямую в эмоциональное ядро, и медленному – через кору.
Максбетслотс официальный сайт активируется по быстрому маршруту, минуя этапы подробного анализа. Данное обстоятельство объясняет, по какой причине мы в состоянии ощутить угрозу или симпатию к человеку намного раньше до того, как логически мотивируем наши ощущения. Такая организация мозга гарантирует максимальную стремительность реакции в экстремальных обстоятельствах.
Опасение, уверенность и сомнение как направляющие выбора
Фундаментальные чувства функционируют как навигационной механизмом Максбетслотс официальный сайт, содействующей оперативно установить наилучшую стратегию поведения. Страх предупреждает о нужде обхода, убежденность показывает на корректность определенного направления, а колебание сигнализирует о нужде в добавочной бдительности.
- Боязнь мобилизует оборонительные механизмы и настраивает к бегству или борьбе
- Убежденность активирует возможности для обретения цели
- Колебание тормозит поступки и активирует дополнительный надзор
- Счастье сигнализирует о правильности определенного пути
Как предыдущие переживания форсируют принятие выборов
Эмоциональная память работает как база данных, вмещающая миллионы записей о различных личных обстоятельствах и их результатах. казино Максбет онлайн задействует данную информацию для моментальной классификации недавних явлений по степени их существенности и возможной риска.
Процесс чувственного обучения предоставляет шанс нам избегать воспроизведения негативного переживания и стремиться к воспроизведению позитивных ощущений. Даже незначительные ассоциативные взаимосвязи способны запустить интенсивную аффективную реакцию, направляющую действия в нужное русло без участия мышления.
Общественные эмоции и их эффект на отклик в секунде
Сотрудничество с другими личностями включает специализированные мозговые сети, служащие за общественное понимание. Зеркальные элементы дают возможность немедленно улавливать аффективное состояние близких и машинально адаптировать индивидуальное действия.
Максбет игровые автоматы в общественном контексте работает как комплексная система узнавания планов и настроений иных индивидов. Едва заметные проявления лица, звучание голоса, положение тела – каждый из данные сигналы перерабатываются на бессознательном плане, создавая интуитивное восприятие положения заблаговременно до логического исследования.
В момент когда аффективный реакция содействует избежать ненужных обдумываний
Дилемма решения казино Максбет онлайн демонстрирует, что переизбыток альтернатив часто ведет к параличу совершения решений. В аналогичных ситуациях чувственная оценка становится результативным фильтром, дающим возможность оперативно отсеивать неуместные альтернативы и фокусироваться на максимально перспективных шансах.
Определение привычных обстоятельств
Разум постоянно анализирует окружающую среду, отыскивая модели, которые совпадают с уже известным шаблонам. Если выявляется соответствие, чувственная структура моментально запускает соответствующий процесс поведения. Максбетслотс официальный сайт запускается как пусковой механизм, инициирующий машинальную серию действий, проверенных прошлым практикой.
Автоматические ответы как способ обороны
Эволюционно выработанные алгоритмы откликов Максбет игровые автоматы обеспечивают сохранение жизни в экстремальных ситуациях. Автоматическое отдергивание ладони от раскаленного предмета, рефлекторное отстранение от движущегося объекта, инстинктивное сжатие мускулов при потере баланса – все это образцы функционирования эмоционально-моторных систем, действующих стремительнее разума.
Отчего скорые определения часто рассматриваются как верные
Явление мыслительной скорости объясняет, по какой причине определения, совершенные быстро и без труда, кажутся нам более правильными. Сознание трактует доступность анализа сведений как признак ее достоверности и релевантности настоящей положению.
- Стремительная анализ сведений ассоциируется с компетентностью
- Чувственная решительность повышает веру в верности решения Максбетслотс официальный сайт
- Инстинктивные определения часто становятся в большей степени аккуратными, чем результаты продолжительных раздумий
- Коллективное признание стремительных решений подкрепляет данный алгоритм
Как аффективная бдительность совершенствует решение в обстоятельствах торопливости
Формирование чувственного мышления дает возможность в большей степени правильно расценивать сигналы внутреннего состояния и использовать их как дополнительный запас сведений при осуществлении определений. казино Максбет онлайн становится значительно достоверным направляющим, если мы приобретаем навык распознавать тонкие нюансы личных впечатлений.
Тренировка бдительности и созерцательные техники формируют способность стремительно определять эмоциональные настроения и их влияние на процесс определения. Такой подход дает возможность корректировать выборы в условиях настоящего момента, повышая их качество включая случаи в ситуациях жесткого срочного дефицита.
Uncategorized
0 min read
Почему люди ищут доказательство своей везения
Почему люди ищут доказательство своей везения
Людская потребность отыскивать схемы и знаки удачи в окружающем пространстве представляет собой основную особенность нашей сознания. Стремление к подтверждению удачи демонстрируется в самых разнообразных направлениях существования – от ежедневных решений до серьезных бытовых решений. Данное явление имеет крепкие истоки в эволюционном развитии индивида и современных процессах работы разума.
По какой причине счастливые пересечения представляются особенно значимыми
Человеческий мозг организован таким методом, что мы предрасположены придавать особое важность случаям, которые случаются одновременно или в тесной темпоральной связи. В момент когда совершается что-то положительное сразу после специфического поступка или идеи, наше восприятие инстинктивно создает связь между указанными процессами. Такой механизм осознания формировался на в течение эпох эволюции как средство существования в изменчивой среде.
Процесс систематизации – склонность выявлять существенные связи в произвольных данных – исполняет ключевую роль в осознании благоприятных совпадений. В случае когда мы обнаруживаем былого товарища в неожиданном месте сразу после того, как помыслили о нем, или отыскиваем необходимую вещь именно тогда, когда она особенно необходима, наш разум объясняет это как нечто значительное, чем просто произвол.
Численная вероятность необычных соответствий гораздо выше, чем кажется на первый осмотр. В ход дня с каждым лицом совершаются массы разнообразных происшествий, и шанс того, что некоторые из них случайно соответствуют по времени, достаточно велика. Однако наше восприятие фокусируется именно на указанных редких периодах, не замечая множество случаев в 7к казино, когда предполагаемых пересечений не случилось.
Как разум объединяет достижение с личными действиями
Когнитивный способ приписывания обеспечивает людям интерпретировать происходящие случаи через призму личного влияния. Когда происходит что-то благоприятное в 7k, мы естественно разыскиваем в своем поступке факторы, которые имели возможность способствовать этому исходу. Такой способ помогает формировать ощущение контроля над персональными ситуациями и увеличивает самооценку.
Мозговые сети, ответственные за анализ информации о логических связях, энергично работают при анализе результативных исходов. Биохимическая система поощрения усиливает те паттерны действий, которые случались до положительным результатам, даже если связь между ними была непреднамеренной. Это порождает прочные соединения между специфическими действиями казино 7к и ощущением счастья.
Ложное представление управления особенно ярко проявляется в ситуациях, где итог обуславливается от непредсказуемости. Люди склонны считать, что их присутствие, концентрация внимания или особые ритуалы в состоянии повлиять на исход событий, пребывающих вне их действительного власти. Указанная душевная черта содействует сохранять мотивацию и веру в индивидуальные способности.
Значение эмоций в чувстве счастья
Душевное положение в момент достижения благоприятного исхода серьезно воздействует на то, как мы интерпретируем случившееся. Восторг, разгрузка или довольство активизируют сохранение случая 7k casino и развивают прочные ассоциативные связи. В какой степени отчетливее душевная тональность момента, тем интенсивнее он осознается как проявление удачи.
Гормональные трансформации, совершающиеся во время испытания триумфа, сказываются на создание памяти. Выброс биоактивных веществ и нейротрансмиттеров формирует положительные физические чувства, которые мозг пытается повторить. Это ведет к поиску похожих схем поведения или ситуаций, которые могли бы повторить то же душевное ситуацию.
Эмоциональная память работает не только в момент достижения, но и влияет на последующее осознание событий. Люди, находящиеся в отличном расположении, чаще обнаруживают позитивные совпадения и толкуют нейтральные происшествия как благоприятные. Это порождает позитивный оборот, где хорошее настроение помогает пониманию большего количества везучих моментов 7к казино.
Зачем людям важно видеть символы удачи
Поиск и выявление признаков везения исполняет множество существенных душевных задач, которые способствуют человеку адаптироваться к изменчивой среде и удерживать психологическое здоровье:
- Создание восприятия прогнозируемости в непредсказуемом мире.
- Усиление уверенности в личных возможностях и выборах.
- Развитие положительного взгляда на грядущие перспективы.
- Ослабление меры беспокойства при совершении значимых решений.
- Усиление побуждения продолжать усилия в непростых случаях.
Умение видеть благоприятные обстоятельства содействует людям предельно использовать возникающие возможности 7k. Те, кто настроен на поиск позитивных признаков, чаще направляют внимание на детали, которые могут стать важными для обретения целей. Подобная концентрация к прилегающей среде повышает шанс фактического достижения.
Межличностный грань выискивания символов удачи также выполняет значительную роль. Передача рассказами об счастливых соответствиях укрепляет социальные связи и формирует чувство солидарности с другими людьми. Коллективная вера в знаки счастья формирует социальные ритуалы и ритуалы, которые связывают сообщества людей.
Каким образом былые успехи укрепляют веру в счастье
Память о прежних удачных результатах в 7к казино порождает фундамент для развития стабильной веры в собственную счастливость. Каждый позитивный эпизод становится доказательством того, что позитивные случаи в состоянии воспроизводиться. Мозг формирует когнитивные схемы, которые содействуют скоро распознавать случаи, схожие на те, где раньше был обретен триумф.
Селективность памяти играет значимую роль в сохранении веры в счастье. Люди склонны качественнее фиксировать яркие позитивные происшествия и пренебрегать или ослаблять важность провалов. Этот механизм оберегает ментальность от избыточного негатива, но синхронно создает искаженное осознание индивидуальной счастливости.
Поэтапное сбор положительных памяти создает то, что исследователи обозначают "удачной самоидентификацией" – стабильное понимание о себе как о везучем человеке. Аналогичная самопознание влияет на поведение, принуждая людей чаще идти на разумный риск и проявлять серьезную решительность в достижении намерений.
Последующая переоценка происшествий также способствует укреплению веры в счастье 7k casino. События, которые в момент возникновения представлялись безразличными или даже негативными, со временем могут переоцениваться как удачные, если они направили к благоприятным итогам. Указанная возможность отыскивать серебряную подкладку в любых ситуациях сохраняет позитивный видение на жизнь.
Зачем доказательство удачи придает веру
Обретение доказательств индивидуальной везучести серьезно увеличивает степень самовосприятия и готовности получать задачи. В случае когда человек замечает символы того, что условия формируются в его выгоду, это уменьшает воспринимаемые риски и активизирует предрасположенность функционировать решительно. Душевное ситуация веры само по себе может помогать качественной производительности и более положительным итогам в 7k casino.
Мозговые изучения демонстрируют, что вера в личную удачу включает участки разума, связанные с планированием и совершением выборов. Верующие в своем удаче люди демонстрируют более высокую функционирование в передней лобной коре, что связано с улучшенными когнитивными ролями и возможностью к планомерному мышлению.
Общественная психология также доказывает связь между верой в везение и убежденностью в социальных отношениях. Люди, полагающие себя везучими, чаще начинают современные контакты, проявляют серьезную доступность в коммуникации и выражают лидерские качества. Это формирует позитивную обратную связь, поскольку активное общественное поступок фактически активизирует вероятность положительных итогов.
Каким образом произвольные происшествия преобразуются в «знаки»
Процедура трансформации обычных непредсказуемых происшествий 7k в значимые символы происходит через многокомпонентные ментальные механизмы толкования и придания важности. Индивидуальное восприятие интенсивно выискивает схемы и связи даже там, где их фактически нет, что ведет к созданию индивидуальной системы убеждений и предсказаний.
Хронологическая соседство случаев играет главную роль в формировании суеверных убеждений. В случае когда два случая происходят рядом по времени, мозг инстинктивно рассматривает возможность логической связи между ними. Особенно сильное ощущение производят случаи, где за особенным наблюдением следует значимое или чувственно существенное происшествие.
Социальный фон существенно сказывается на то, что за именно события толкуются как знаки счастья или несчастья. Традиции, транслируемые из генерации в генерацию, формируют сформированные схемы интерпретации для разных явлений. Мрачные коты, сломанные стекла, обнаруженные деньги – все эти предметы получают особое значение через призму общих убеждений.
Индивидуальная значимость также определяет, которые происшествия становятся индивидуальными символами. Временные отметки, величины, животные или предметы, связанные с значимыми памятью, обретают особый ранг в личной системе убеждений. Столкновение с такими знаками в решающие периоды жизни укрепляет веру в их предсказательную силу.
Uncategorized
0 min read
Какое воздействие ощущение власти влияет на уверенность
Какое воздействие ощущение власти влияет на уверенность
Восприятие управления является собой одной из фундаментальных душевных нужд личности, что напрямую сопряжена с степенью самоуверенности в собственных силах и всеобщим психическим положением. В случае когда мы воспринимаем, что в состоянии воздействовать на развивающиеся происшествия и контролировать личной существованием, наша психика становится более стабильной к напряжениям и наружным воздействиям. Анализы в направлении когнитивной психологии подтверждают, что персоны с высоким центром интернального контроля проявляют высокую устойчивость к стрессам, деятельность в решении задач и всеобщую довольство существованием.
Связь между управлением и убежденностью формируется на нейробиологическом уровне. Лобная кора церебрального органа, ответственная за планирование и принятие решений, активизируется при ощущении контроля над ситуацией. Синхронно снижается активность лимбического тела, что производит беспокойные реакции. Данный способ обеспечивает индивиду удерживать психическое стабильность даже в сложных обстоятельствах.
Отчего восприятие контроля ослабляет беспокойство
Тревожность естественным образом формируется в ситуациях двусмысленности, в случае когда индивид не в состоянии предвидеть результат событий или повлиять на них. Восприятие власти функционирует как эффективный противоядие против тревожных состояний, так как обеспечивает психологии восприятие защищенности и определенности. В момент когда мы осознаем, что имеем средствами для влияния на ситуацию, степень гормона стресса - компонента напряжения - закономерно падает.
Способ действия контроля против беспокойства основан на мыслительной анализе сведений. Разум непрерывно анализирует угрозы и шансы их устранения. При существовании доступных действий для воздействования на ситуацию активируется система нахождения выходов, а не структура тревожного откликания. Это разъясняет, почему даже малые перспективы влияния на задачу способны существенно улучшить чувственное состояние.
Существенную значение выполняет также ощущение профессионализма - вера в своих возможностях справиться с появляющимися задачами. В случае когда личность понимает, что имеет нужными способностями и ресурсами, беспокойство отходит пространство концентрации на урегулировании задачи. Подобный метод образует положительный круг: удачное решение задач вулкан подкрепляет убеждение в личные потенциал, что в свой черед ослабляет тревожность в грядущих обстоятельствах.
Как понимание положения усиливает убежденность в поступках
Глубокое понимание развивающегося создает крепкую базу для решительных действий. В момент когда личность имеет целостной представлением положения, содержа казуальные связи, потенциальные способы прогрессии обстоятельств в казино вулкан и имеющиеся возможности, его возможность формировать обоснованные заключения значительно возрастает. Понимание исключает элемент непредвиденности и позволяет предварительно настроиться к многообразным схемам.
Процесс разбора и организации сведений сам сам подкрепляет восприятие управления. Мозг исторически настроен на нахождение закономерностей и образование мысленных схем бытия. Чем вернее и детальнее эти схемы, настолько смелее личность ощущает себя при контакте с посторонним окружением. Осознание позволяет предсказывать результаты действий и избирать наиболее эффективные методы поступков в вулкан.
Отдельное значение несет осознание личных потенциала и ограничений. Объективная автооценка позволяет ставить выполнимые задачи и уклоняться ситуаций, что могут подвести к неудаче. Подобный метод формирует прочную уверенность, базирующуюся не на заблуждениях, а на здравом анализе личных ресурсов и посторонних обстоятельств.
Роль прогнозируемости в выработке постановлений
Предсказуемость представляет главнейшим компонентом, устанавливающим степень принимаемых постановлений и степень уверенности при их выполнении. В случае когда личность в состоянии с большой мерой возможности спрогнозировать результаты своих поступков в казино онлайн, ход селекции становится более логичным и слабее напряженным. Определенность уменьшает познавательную нагрузку, обеспечивая сконцентрироваться на совершенствовании решения, а не на анализе неясности.
Прогнозируемость также отражается на стимуляцию к поступку. В момент когда результаты усилий возможно спрогнозировать, личность более склонен инвестировать срок и мощь в обретение намерения. Неопределенность же в состоянии блокировать деятельность, так как разум не в состоянии измерить соотношение издержек и пользы от предпринимаемых шагов.
Почему ощущение контроля подкрепляет веру в себе
Чувство контроля создает конструктивную ответную отношение между действиями и следствиями:
- Увеличение личной эффективности через аккумуляцию практики результативного решения задач.
- Становление интернального локуса управления, при котором индивид видит себя причиной изменений.
- Укрепление восприятия умелости в многообразных сферах жизни.
- Формирование стабильности к неудачам через постижение своих способностей влиять на ситуацию.
- Формирование активного мышления и склонности к возложению обязательств.
Нейробиологические изучения показывают, что восприятие управления запускает дофаминергическую механизм поощрения. Это создает натуральное усиление для поступков, ориентированного на контроль ситуацией, и создает устойчивую стимуляцию к деятельным поступкам в вулкан. Нейромедиатор также соединен с ощущением удовольствия и блаженства, что превращает ход контроля интринсивно поощряющим.
Существенным стороной является развитие метакогнитивных умений - умения понимать и руководить своими мыслительными процессами. В момент когда индивид постигает, каким способом работает его мыслительный процесс, он обретает дополнительный средство контроля над личными реакциями и постановлениями. Это специально значимо в стрессовых ситуациях, когда эмоции в состоянии омрачать разумное мыслительный процесс.
Как утрата управления сказывается на автооценке
Лишение ощущения контроля над жизненными условиями может существенно подорвать самооценку и всеобщее ментальное процветание. В момент когда человек встречается с обстоятельствами, на которые не способен оказать влияние, появляется ощущение бессилия, что может перерасти в устойчивое веру в своей непрофессионализме. Данное состояние психологи называют изученной бессилием.
Утрата управления запускает каскад негативных психических откликов. Сначала возникает фрустрация и энергичные старания восстановить действие на положение. Когда эти усилия становятся безуспешными, приходит этап пассивного принятие, сопровождающаяся ослаблением автооценки и мотивации к активности. В предельных случаях это может привести к подавленным настроениям и совокупному снижению экзистенциальной активности.
Специально губительным для самооценки является циклический навык провалов в попытках управлять важные стороны жизни. Любая неудача подкрепляет веру в своей неспособности воздействовать на условия, формируя дурной оборот самолимитирования. Человек стартует избегать условий казино вулкан, требующих деятельности, что еще значительнее уменьшает его умения контроля и власти.
Почему даже иллюзия власти способна обеспечивать спокойствие
Заблуждение власти - психический феномен, при котором личность переоценивает уровень своего влияния на происшествия, - в состоянии иметь благоприятное воздействие на психическое состояние и степень перегрузки. Даже когда фактические потенциал руководства ситуацией ограничены, убеждение в свою возможность повлиять на финал способна уменьшать тревожность и усиливать стимуляцию к действию.
Способ действия иллюзии управления сопряжен с тем, что разум перерабатывает не объективную бытие, а индивидуальное восприятие ситуации. Когда индивид убежден в собственную умение руководить событиями в казино онлайн, его нервная организация откликается соответственно - уменьшается степень напряженных гормонов, запускаются области составления планов и формирования заключений. Подобная реакция в состоянии быть адаптивной, так как сохраняет активность и готовность к действию.
Существенно отличать нормальную иллюзию власти и губительные виды данного эффекта. Сдержанная завышение собственных способностей в состоянии стимулировать деятельность и повышать устойчивость к перегрузке. Тем не менее преувеличенная иллюзия контроля способна подводить к неуместному составлению планов, игнорированию угроз и мучительным расстройствам при встрече с реальностью.
Каким образом практика руководства положениями образует самоуверенность
Аккумулированный опыт результативного контроля разными бытовыми положениями формирует прочную базу для прочной уверенности в собственные силы. Любой пример результативного разрешения трудности делается кирпичиком в основе личной эффективности, формируя внутреннего типа базу информации результативных тактик и подтверждений персональных возможностей. Такой опыт специально важен, поскольку строится на действительных результатах, а не на посторонних мнениях или теоретических сведениях.
Ход создания самоуверенности через практику управления имеет накопительный характер. Первоначальные незначительные удачи в вулкан формируют основу для возложения более важных вызовов. По мере роста сферы профессионализма личность становится способным к урегулированию все более сложных проблем. Подобное постепенное рост трудности гарантирует стабильное формирование умений управления и сопряженной с этим уверенности.
Специальное смысл имеет вариативность навыка управления. В момент когда личность результативно разбирается с заданиями в многообразных областях бытия - рабочей, персональной, социальной - образуется обобщенное чувство профессионализма. Это обеспечивает транслировать убежденность из знакомых областей в современные, неизвестные обстоятельства, так как укрепляется фундаментальное мнение в собственной возможности находить выходы.
В случае когда тяга все управлять стартует мешать
Чрезмерное стремление к контролю в состоянии превратиться из средства в препятствие для результативного функционирования и ментального состояния. Когда запрос в контроле ситуацией делается компульсивной, она начинает сужать гибкость интеллекта и умение подстраиваться к изменяющимся обстоятельствам. Перфекционистское стремление управлять каждую элемент способно доводить к постоянному напряжению и переутомлению.
Болезненный власть показывается в неспособности делегировать ответственность, избыточном планировании, избегании ситуаций с неясными исходами в казино вулкан и болезненной ответа на любые изменения от запланированного сценария. Данное поведение часто основывается в глубинной беспокойстве и страхе перед двусмысленностью, что индивид стремится компенсировать полным управлением над наружной атмосферой.
Избыточный власть способен негативно воздействовать на связи с находящимися рядом, потому что тяга контролировать поступками иных людей создает сопротивление и столкновения. В профессиональной обстановке подобный метод способен блокировать инициативу сотрудников и снижать совокупную эффективность группы. Странно, но избыточное стремление к власти часто приводит к его утрате.
Каким способом формировать нормальное восприятие контроля
Развитие нормального восприятия власти нуждается уравновешенного метода, что рассматривает как способности действия на ситуацию, так и их беспристрастные пределы. Основным принципом является дифференциация элементов на контролируемые и неуправляемые, с фокусировкой стараний на начальной группе. Подобный метод обеспечивает крайне действенно использовать имеющиеся средства, не расходуя силу на напрасные попытки изменить неизменяемое.
Значительным элементом формирования здорового контроля представляет пошаговое рост зоны умелости через освоение свежих навыков и познаний в казино онлайн. Всякий приобретенный умение наращивает запас средств для управления различными обстоятельствами. В особенности дорогими являются всеобщие навыки - оценочное мышление, чувственная контроль, общительные способности, которые подходящи в обширном ряду бытовых обстоятельств.
Uncategorized
0 min read
Каким образом глубинные убеждения меняют видение случайности
Каким образом глубинные убеждения меняют видение случайности
Индивидуальное понимание окружающего реальности редко становится нейтральным. Мы толкуем события посредством линзу личного переживаний, ценностей и основных убеждений. cat casino становится исключительно заметным, если речь идет о непредсказуемых происшествиях и стечениях обстоятельств. То, что для одного субъекта выглядит элементарной забавой математики, для иного в состоянии превратиться символом свыше или демонстрацией магических влияний.
По какой причине мы замечаем в случайности больше, чем банальные коинциденции
Развитие обеспечила людской интеллект удивительной умением обнаруживать закономерности в том числе в ситуациях, когда их отсутствуют. Подобная характеристика в прошлом помогала человеческим прародителям оставаться в живых, определяя возможные опасности по слабо видимым индикаторам. Сегодня тот же процесс принуждает нас выявлять тайный суть в непредсказуемых событиях.
cat casino выражается в этом, каким способом мы автоматически группируем и категоризируем происходящие происшествия. Встретили старого товарища на тротуаре? Сознание немедленно стартует разбирать: может быть, подобное не случайность, а знак того, что пора возобновить связь. Сломался мобильный именно в дату ключевого интервью? Немало людей обнаружат в подобном предостережение или препятствие, созданное высшими энергиями.
Ученые объясняют данное явление функционированием нейромедиаторной структуры мозга. В момент когда человек замечаем вероятную паттерн, высвобождается химическое вещество, дающий ощущение радости от "открытия". Подобный механизм подкрепляет склонность обнаруживать отношения между разрозненными событиями.
Образ реальности и убеждения: каким образом скрытые установки формируют позицию к случайностям
Духовные, философские и культурные принципы выстраивают основу для интерпретации произвольных событий. Человек, выросший в традиции, когда чрезвычайно уважается понятие предопределения, станет склонен обнаруживать божественный проект даже в второстепенных стечениях обстоятельств.
кэт казино исключительно ярко выражается в многообразных социальных контекстах. В восточных учениях концепция космической справедливости побуждает человека понимать случайности в качестве результат прошлых поступков. Западное вероисповедание в состоянии объяснять аналогичные события в качестве выражение священного замысла или проверки религиозности.
Рационалистическое философия, с другой стороны, предрасположено объяснять случайности законами вероятности и расчетов. Однако в том числе убежденные логики периодически подвержены соблазну увидеть "влияние судьбы" в исключительно невероятных совпадениях факторов.
Уверенность в судьбу, везение или анархию: различные философии — отличающееся восприятие фактов
Научные эксперименты обнаружили ряд главных категорий отношения к произвольности. Личности, верящие в предназначение, готовы покорно принимать случающееся, воспринимая факты как обязательные элементы заданной последовательности.
Сторонники теории удачи замечают в случайностях возможности, которые возможно задействовать или упустить. Такие люди деятельно разыскивают "символы" и пытаются поступать в гармонии с этими указаниями. catcasino в подобном рамках превращается средством для принятия выборов.
- Сторонники причинности объясняют факты логическими отношениями
- Эзотерики ищут сокровенные послания и символические трактовки
- Реалисты концентрируются на практических последствиях
- Сомневающиеся настаивают доказательных доказательств любых паттернов
Отдельный категория взглядов создает уникальную линзу восприятия, сквозь что личность наблюдает на произвольные события.
Подтверждающее размышление: каким образом установки заставляют замечать «требуемые» коинциденции
Умственное отклонение, известное как склонность одобрения, заставляет человека селективно усваивать данные. Люди склонны замечать и запоминать происшествия, одобряющие наши действующие убеждения, пренебрегая противоречащие сведения.
Если человек уверен в силу оптимистичного мышления, данный индивид окажется готов отмечать любой случай, если оптимистичный настрой предположительно способствовал к позитивному итогу. При этом случаи, когда позитивность не способствовал или в том числе навредил, будут стираться из памяти или рационализироваться.
cat casino возрастает посредством селективности концентрации. Беременные представительницы прекрасного пола приступают замечать прочих беременных повсюду, владельцы алых автомобилей замечают багровые машины на любом перекрестке. Аналогично личность, уверенный в существовании сверхъестественных знаков, станет выявлять их в самых повседневных происшествиях.
Явление сути: почему интеллект стремится трактовать случайность с помощью знакомые схемы
Индивидуальное сознание испытывает дискомфорт от двусмысленности и беспорядка. Мозг регулярно старается создать логичную картину развивающегося, включая когда для этого приходится додумывать иллюзорные связи.
Этот механизм действует механически и периодически интуитивно. кэт казино проявляется в том, как люди интегрируем свежую данные в существующую систему установок. Случайное факт обретает объяснение с помощью привычные понятия: воздаяние, желание богов, эффект астрологических факторов или энергетические поля.
В особенности сильно эффект смысла проявляется в критических обстоятельствах. В момент когда жизнь делается неопределенной, человек с удвоенной мощностью выявляют схемы и символы, способные восстановить чувство власти над развивающимся.
Чувства и опыт: каким способом прошлые события воздействуют на восприятие новых коинциденций
Чувственная атмосфера прошлого опыта существенно воздействует на объяснение актуальных фактов. Человек, прошедший через череду благоприятных стечений обстоятельств, окажется склонен позитивно понимать новые случайности. Наоборот, последовательность проблем в состоянии сформировать уверенность в гонении негативным несчастьем.
Шокирующие события исключительно интенсивно воздействуют на видение совпадений. Спасшиеся в несчастных случаях часто формируют сверхчувствительность к "предупреждающим знакам". catcasino превращается методом психологической охраны, стремлением восстановить управление с помощью предвидение предстоящего.
- Детские впечатления создают базовые установки о честности реальности
- Достижения и поражения выстраивают модели прогнозов
- Общественная среда определяет имеющиеся объяснительные схемы
- Характерные особенности влияют на предрасположенность к мистическому рассуждению
В момент когда убеждения увеличивают сверхъестественное рассуждение и мешают объективной оценке
Предрасположенность замечать мистические связи между событиями в состоянии значительно нарушить восприятие действительности. Люди стартуют формулировать важные критические определения на основе непредсказуемых совпадений, пренебрегая рассудок и разумный смысл.
Исключительно опасно, в ситуации когда cat casino приводит к отказу от лечебной содействия в пользу "символов рока" или мистических методов. Хроника помнит массу случаев, если убежденность в магическое толкование заболевания обошлась индивидам существования.
Магическое размышление помимо этого может парализовать деятельность. Если личность твердо верит, что всё задано, он бросает направлять усилия для изменения положения, покорно ожидая инструкций от сверхъестественных сил.
Как осознанность способствует обнаружить, где установки деформируют действительность
Развитие аналитического мышления и самоанализа помогает узнавать моменты, если убеждения получают превосходство касательно фактами. Упражнения осознанности обучает фиксировать автоматические отклики и перерывы перед объяснением происшествий.
кэт казино требует регулярной деятельности относительно личностью. Благоприятно постоянно ставить перед собой проблемы: "Которые у человека имеются обоснования данной соединения?", "В состоянии ли я объяснить это происшествие наиболее простым методом?", "Не ищу ли индивид одобрение своих предубеждений?"
Освоение основ статистики и учения статистики способствует выстраивать крайне трезвое восприятие непредсказуемости. Информированность о умственных искажениях делает их влияние не столь сильным.
Переформатирование установок: реально ли освоить по-новому наблюдать на «произвольные» события
Изменение глубинных верований — трудный и продолжительный процесс, но он возможен. Когнитивно-поведенческая методика разработала эффективные способы для активности с нелогичными взглядами.
Первый ступень — понимание индивидуальных моделей рассуждения. catcasino проявляется в возможности отстраниться от механических ответов и посмотреть на положение из различными углами. Данное нуждается тренировки и настойчивости.
Полезно экспериментировать с другими объяснениями событий. В случае если в большинстве случаев индивид замечаете в стечении обстоятельств мистический символ, попробуйте обнаружить логичное трактовку. В случае если привыкли каждое событие приписывать на непредсказуемость, поищите вероятные схемы.
Главная цель — не отделаться от любого убеждений, а постичь гибко перемещаться между многообразными способами объяснения. Это позволяет видеть реальность более целостно и выносить более обдуманные выборы.
Uncategorized
0 min read
Как ощущение контроля отражается на уверенность
Как ощущение контроля отражается на уверенность
Чувство контроля выступает собой одной из основных психологических нужд индивида, которая прямо сопряжена с уровнем уверенности в своих возможностях и совокупным эмоциональным самочувствием. Когда мы ощущаем, что можем воздействовать на происходящие события и руководить своей жизнедеятельностью, наша психика делается более устойчивой к перегрузкам и наружным влияниям. Изучения в направлении познавательной психологической науки удостоверяют, что персоны с значительным центром интернального контроля проявляют высокую устойчивость к стрессам, активность в решении трудностей и общую удовлетворенность бытием.
Соотношение между контролем и убежденностью формируется на нейробиологическом этапе. Передняя кора мозгового мозга, несущая ответственность за проектирование и формирование постановлений, активизируется при чувстве контроля над положением. Одновременно уменьшается функционирование миндалевидного образования, которое производит беспокойные ответы. Данный способ позволяет индивиду удерживать психическое равновесие даже в трудных условиях.
Отчего ощущение управления ослабляет тревогу
Тревожность природно появляется в обстоятельствах двусмысленности, в момент когда человек не в состоянии прогнозировать результат событий или повлиять на них. Чувство власти действует как сильный средство против беспокойных состояний, так как обеспечивает ментальности ощущение надежности и определенности. Когда мы осознаем, что располагаем способами для влияния на обстоятельства, мера гормона стресса - гормона напряжения - закономерно падает.
Процесс функционирования управления против волнения основан на когнитивной анализе данных. Разум постоянно анализирует риски и возможности их нейтрализации. При наличии доступных действий для влияния на положение активируется структура отыскания решений, а не механизм волнительного откликания. Это объясняет, отчего даже небольшие возможности воздействия на задачу способны заметно поправить чувственное состояние.
Важную функцию имеет также восприятие компетентности - убежденность в собственных умениях разобраться с появляющимися заданиями. В момент когда человек знает, что имеет необходимыми способностями и средствами, тревога отступает позицию концентрации на решении задачи. Данный способ образует позитивный цикл: результативное разрешение задач vavada подкрепляет убеждение в личные способности, что в свою сторону ослабляет беспокойство в предстоящих ситуациях.
Как постижение обстоятельств подкрепляет самоуверенность в действиях
Основательное осознание происходящего создает крепкую основу для решительных шагов. Когда личность имеет полной образом положения, в том числе логические соединения, вероятные пути прогрессии событий в вавада казино и имеющиеся возможности, его возможность принимать мотивированные заключения заметно растет. Осознание исключает компонент внезапности и позволяет наперед подготовиться к разным сценариям.
Ход анализа и систематизации данных сам по себе укрепляет ощущение управления. Мозг генетически направлен на поиск закономерностей и формирование психических схем бытия. Чем точнее и детальнее эти модели, настолько смелее личность воспринимает себя при общении с посторонним окружением. Осознание дает возможность прогнозировать следствия шагов и отбирать максимально действенные методы поступков в vavada казино.
Отдельное смысл несет постижение своих способностей и рамок. Реалистичная автооценка позволяет ставить реальные задачи и избегать условий, которые способны подвести к неудаче. Данный способ образует устойчивую самоуверенность, построенную не на заблуждениях, а на объективном разборе своих ресурсов и внешних условий.
Роль предсказуемости в выработке заключений
Прогнозируемость выступает главнейшим элементом, задающим уровень выносимых заключений и уровень убежденности при их выполнении. В момент когда индивид в состоянии с значительной степенью шанса предсказать последствия своих поступков в вавада, процесс отбора делается более разумным и слабее напряженным. Прогнозируемость уменьшает познавательную нагрузку, позволяя сконцентрироваться на оптимизации заключения, а не на анализе неясности.
Прогнозируемость также отражается на побуждение к действию. В случае когда результаты усилий можно спрогнозировать, человек более склонен размещать срок и силу в получение задачи. Неясность же в состоянии останавливать энергичность, так как разум не способен оценить баланс расходов и пользы от предпринимаемых поступков.
По какой причине восприятие контроля укрепляет веру в себе
Восприятие контроля создает положительную возвратную связь между поступками и следствиями:
- Рост самоэффективности через накопление опыта успешного урегулирования задач.
- Формирование внутреннего типа локуса контроля, при котором человек рассматривает себя причиной трансформаций.
- Подкрепление восприятия компетентности в многообразных сферах существования.
- Формирование стойкости к поражениям через постижение собственных потенциала воздействовать на обстоятельства.
- Развитие активного мышления и способности к принятию обязательств.
Нейробиологические изучения показывают, что восприятие управления активирует дофаминовую механизм поощрения. Это формирует естественное подкрепление для поступков, ориентированного на контроль ситуацией, и образует устойчивую стимуляцию к активным действиям в vavada. Нейромедиатор также связан с чувством радости и удовлетворения, что превращает течение управления изнутри поощряющим.
Значительным аспектом выступает становление мета-мыслительных умений - возможности постигать и контролировать своими интеллектуальными процессами. В случае когда личность постигает, как функционирует его интеллект, он приобретает вспомогательный средство управления над своими откликами и решениями. Это в особенности важно в стрессовых условиях, в случае когда эмоции могут затуманивать логичное мыслительный процесс.
Как лишение управления влияет на самооценке
Утрата ощущения контроля над житейскими обстоятельствами может существенно расшатать самоанализ и общее психическое благополучие. В момент когда индивид встречается с условиями, на что не в состоянии воздействовать, появляется ощущение слабости, что в состоянии трансформироваться в устойчивое убеждение в своей неумелости. Такое настроение ученые именуют приобретенной беспомощностью.
Потеря власти запускает каскад пагубных ментальных ответов. Вначале формируется досада и энергичные попытки восстановить воздействие на положение. Если эти старания оказываются безуспешными, наступает этап бездеятельного принятие, идущая ослаблением автооценки и мотивации к активности. В экстремальных обстоятельствах это способно довести к депрессивным положениям и всеобщему уменьшению витальной деятельности.
Особенно разрушительным для самоанализа является повторяющийся практика поражений в усилиях управлять существенные стороны бытия. Всякая поражение укрепляет убеждение в собственной неумении влиять на факторы, образуя порочный оборот саморограничения. Человек стартует обходить ситуаций вавада казино, требующих активности, что еще сильнее ослабляет его способности руководства и контроля.
Почему даже заблуждение власти способна придавать покой
Заблуждение контроля - психологический эффект, при чем человек переоценивает меру своего действия на события, - в состоянии производить положительное воздействие на психическое самочувствие и степень перегрузки. Даже в случае когда действительные возможности руководства положением урезаны, уверенность в собственную возможность воздействовать на результат может ослаблять волнение и повышать побуждение к действию.
Механизм функционирования иллюзии власти сопряжен с тем, что интеллект обрабатывает не непредвзятую действительность, а субъективное восприятие обстоятельств. Если человек убежден в личную умение управлять обстоятельствами в вавада, его невральная система реагирует соответствующим образом - падает степень напряженных компонентов, запускаются области планирования и принятия заключений. Данная отклик в состоянии представлять адаптивной, потому что удерживает энергичность и готовность к активности.
Существенно различать нормальную заблуждение контроля и разрушительные виды этого эффекта. Умеренная завышение собственных возможностей может побуждать деятельность и усиливать устойчивость к перегрузке. Тем не менее чрезмерная заблуждение управления способна приводить к неуместному составлению планов, пренебрежению рисков и мучительным огорчениям при столкновении с действительностью.
Каким образом опыт управления положениями формирует самоуверенность
Собранный опыт удачного управления многообразными житейскими обстоятельствами формирует прочную основу для стабильной убежденности в себе. Любой случай результативного урегулирования проблемы оказывается элементом в основе личной эффективности, образуя внутреннего типа основу данных удачных стратегий и свидетельств персональных умений. Подобный практика в особенности дорог, потому что основан на фактических успехах, а не на наружных мнениях или абстрактных знаниях.
Процесс создания самоуверенности через практику контроля обладает накопительный свойство. Первоначальные небольшие удачи в vavada образуют фундамент для принятия более значительных испытаний. По степени увеличения сферы профессионализма человек становится готовым к решению все более сложных задач. Данное пошаговое наращивание непростоты предоставляет стабильное развитие умений управления и связанной с этим самоуверенности.
Особое важность играет разнообразие опыта контроля. В момент когда личность результативно совладает с заданиями в различных направлениях существования - трудовой, персональной, коллективной - образуется обобщенное чувство профессионализма. Это дает возможность транслировать самоуверенность из привычных сфер в современные, непривычные ситуации, так как укрепляется фундаментальное мнение в личной возможности находить выходы.
В случае когда желание все руководить приступает вредить
Избыточное стремление к контролю может стать из ресурса в барьер для результативного деятельности и психического состояния. Когда потребность в управлении положением оказывается принудительной, она начинает сужать подвижность мышления и способность приспосабливаться к меняющимся обстоятельствам. Идеалистическое тяга руководить каждую деталь в состоянии приводить к хроническому стрессу и истощению.
Нездоровый власть показывается в неумении делегировать обязательства, избыточном проектировании, избегании ситуаций с неопределенными финалами в вавада казино и тягостной ответа на всякие отклонения от запланированного сценария. Данное ведение часто базируется в основательной беспокойстве и страхе перед двусмысленностью, что индивид стремится уравновесить тотальным управлением над внешней обстановкой.
Избыточный контроль способен негативно отражаться на отношения с находящимися рядом, так как стремление контролировать ведением других индивидов вызывает противление и конфликты. В трудовой атмосфере такой подход способен блокировать инициативу сотрудников и снижать общую действенность группы. Противоречиво, но чрезмерное желание к власти часто доводит к его потере.
Каким образом формировать нормальное восприятие контроля
Развитие положительного восприятия контроля требует сбалансированного метода, что учитывает как потенциал действия на ситуацию, так и их непредвзятые пределы. Основным правилом является деление элементов на управляемые и неуправляемые, с сосредоточением стараний на изначальной категории. Такой способ обеспечивает крайне действенно использовать имеющиеся возможности, не расходуя силу на бесплодные старания трансформировать неизменное.
Существенным фактором формирования нормального управления является постепенное увеличение области компетентности через изучение новых способностей и сведений в вавада. Любой полученный навык наращивает запас способов для контроля многообразными обстоятельствами. В особенности важными представляют универсальные навыки - аналитическое мышление, психическая регулирование, социальные способности, что применимы в широком ряду жизненных условий.
Uncategorized
0 min read
Каким образом ощущения порождают ощущение вовлечённости
Каким образом ощущения порождают ощущение вовлечённости
Аффективная задействованность являет собой сложный психологический феномен, определяющий уровень окунания личности в деятельность, опыт или взаимодействие. Сегодняшняя наука подчеркивает множество компонентов, отражающихся на формирование прочной чувственной связи с происходящим. комета казино процессы функционируют на бессознательном ступени, запуская нервные системы, ответственные за концентрацию восприятия и побудительные принципы. Осознание природы чувственной вовлеченности раскрывает незнакомые шансы для усиления результативности освоения, деятельности и индивидуального совершенствования.
Нейробиология аффективной включенности
Мозговые структуры выполняют центральную функцию в формировании эмоциональной заинтересованности. Лобная кора отвечает за когнитивный регулирование и составление, тогда как лимбическая организация образует чувственные ответы. kometa казино процессы объединения между данными участками устанавливают уровень и напряженность переживаемого впечатления.
Медиаторы нейромедиатор, серотонин и норэпинефрин образуют нейрохимическую основу для формирования вовлеченности. Дофаминергические маршруты в мезолимбической организации запускаются при предвосхищении приза, создавая побудительное состояние. Серотонин модулирует эмоциональный фон и коллективную включенность, отражаясь на возможность к эмпатии и межличностному сотрудничеству.
Изыскания нейровизуализации выявляют, что чувственно ключевые стимулы задействуют более широкие нервные соединения по противопоставлению с индифферентными. Это проясняет, по какой причине эмоционально тонированные события качественнее удерживаются и вызывают более острую задействованность.
Взаимозависимость между силой эмоций и концентрацией внимания
Напряженность чувственных ощущений непосредственно соотносится с концентрацией осознанности. Мощные эмоции сокращают сосредоточение восприятия, нацеливая все средства сознания на родник чувственного волнения. kometa casino механизмы избирательного осознанности обеспечивают отсеивать побочную информацию, образуя состояние обостренной чувствительности к относящимся стимулам.
Умеренный ступень аффективного возбуждения способствует идеальной результативности по правилу Йеркса-Додсона. Слишком маленькая активация влечет к апатии и невнимательности, в то время как избыточное волнение способно породить беспокойность и снижение умственных функций.
Аффективная валентность также влияет на характер внимания. Хорошие эмоции расширяют зону концентрации и содействуют креативному мышлению, в то время как отрицательные переживания фокусируют восприятие на возможных рисках или сложностях.
Роль миндалины в формировании погруженности
Миндалина выступает ключевым компонентом чувственной обработки данных. Данная миндалевидная формация лимбической системы характеризует эмоциональную важность входящих стимулов и запускает надлежащие физиологические и поведенческие реакции. комета казино включение амигдалы совершается за доли мгновения, предвосхищая намеренную определение условия.
Двусторонние контакты амигдалы с гиппокампом обеспечивают совмещение чувственной и познавательной информации. Это контакт располагается в основе создания чувственно тонированных образов и действует на ходы принятия решений.
Повышенная функционирование миндалины коррелирует с обострением осознанности к аффективно ключевым предметам. Нейронные проекции от амигдалы к чувственным участкам коры настраивают процессинг перцептивной данных, делая чувственно касающиеся раздражители более интенсивными и видимыми.
Отчего апатия подрывает мотивацию
Апатия и аффективное отчуждение выступают значительную угрозу для мотивационных механизмов. Отсутствие чувственной тонировки переживаний отнимает поступки смысла и курса. kometa казино системы желания нуждаются в эмоционального поддержки для удержания деятельности и целеустремленности.
Апатия перекрывает производство нейромедиатора в вентральной области покрышки, что влечет к падению мотивационного драйва. Без чувственной заинтересованности даже предположительно ключевые работы воспринимаются как заурядные и нудные.
Продолжительное присутствие в статусе безразличия способно вести к становлению депрессивных симптомов и снижению полного степени жизни. Эмоциональная вовлеченность служит оборонительным аспектом против эмоционального изнурения и выгорания.
Восстановление эмоциональной контакта с занятостью подразумевает целевых трудов по разысканию личной важности и смысла. Техники умственной реструктуризации и mindfulness-практики помогают возобновить умение к аффективному откликанию.
Аффективные спусковые механизмы серьезного погружения
Определенные аффективные раздражители обладают специфической способностью инициировать положение серьезной заинтересованности. kometa casino спусковые механизмы задействуют поток нейрохимических реакций, влекущих к сильному погружению в опыт или деятельность.
- Свежесть и нежданность - активируют структуры осознанности и усиливают любопытство
- Персональная существенность - порождает чувственную взаимосвязь между личностью и объектом внимания
- Общественное сотрудничество - активирует системы сочувствия и межличностной включенности
- Эстетическая притягательность - стимулирует области головного мозга, отвечающие за переживание прекрасного
- Интеллектуальный вызов - запускает побудительные центры через принцип обретения
- Аффективный резонанс - формирует согласование с глубинными ощущениями
Совмещение ряда триггеров одновременно может породить синергетический феномен, многократно увеличивающий задействованность. комета казино вход системы совмещения различных эмоциональных стимулов оперируют на подсознательном ступени, формируя полное ощущение.
Эффект потока и чувственная вовлеченность
Состояние потока представляет собой идеальную разновидность чувственной включенности, характеризующуюся полной фокусировкой на текущей занятости. В таком статусе случается объединение деятельности и понимания, растворяется самокритичность, а понимание периода искажается.
Нейрофизиологические эксперименты раскрывают, что во период потока фиксируется снижение функционирования префронтальной коры - явление, популярное как транзиторная гипофронтальность. комета казино принципы самообладания временно ослабляются, помогая более стихийному и интуитивному методу деятельности.
Для возникновения потока нужен равновесие между непростотой работы и градацией способностей. Излишне простые работы инициируют тоску, в то время как излишне непростые формируют тревожность. Оптимальная область вызова гарантирует предельную вовлеченность и довольство от процесса.
Эмоциональный часть потока охватывает ощущение основательного удовлетворения и глубинной мотивации. Работа оказывается самоценной, а посторонние призы отходят на вторичный уровень.
Насколько собственная важность повышает переживания
Собственная релевантность сведений или практики выступает мощным стимулятором эмоциональной вовлеченности. Когда сигналы соединены с важными сторонами самосознания, ценностями или целями личности, они обретают первоочередную переработку в нервной механизме. kometa казино системы выбора информации само собой выделяют лично важные составляющие из полного череды информации.
Автобиографическая запоминание исполняет основную задачу в определении персональной ценности. Эпизоды, привязанные с индивидуальным практикой или похожие на уже пережитые моменты, порождают более мощный чувственный ответ. Это поясняется включением ассоциативных сетей запоминания, включающих аффективно окрашенные впечатления.
Коллективная самосознание также воздействует на понимание важности. Сведения, касающаяся групп, с каковыми личность себя отождествляет, провоцирует повышенную включенность. Системы коллективной принадлежности активируют аффективные зоны разума, формируя чувство причастности и существенности.
Методы персонализации обширно употребляются в образовании и маркетинге для обострения вовлеченности аудитории. Порождение связей между свежей сведениями и индивидуальным опытом реципиента существенно увеличивает шанс чувственного реакции и фиксации.
Эффект ощущений на восприятие срока
Аффективное статус оказывает большое влияние на личное восприятие времени. Различные ощущения по-разному трансформируют хронологическую горизонт, образуя ложные ощущения ускорения или замедления течения времени. kometa casino процессы темпоральной обработки тесно связаны с аффективными очагами мозга.
Позитивные ощущения, чрезвычайно соединенные с увлечением и любопытством, несут склонность ускорять индивидуальное течение периода. Это феномен проясняется обостренной ментальной нагрузкой и сосредоточенностью концентрации на нынешней занятости.
- Мощные ощущения сужают сосредоточение внимания на актуальном моменте
- Сниженное осознанность к хронологическим отметкам деформирует характеристику протяженности
- Чувственное воодушевление ускоряет сокровенные органические часы
- Запоминание о радостных происшествиях ретроспективно кажется более короткой
Негативные ощущения, такие как тоска или беспокойство, зачастую приводят к персональному замедлению срока. Личность запускает нередче обращать восприятие на часы, что порождает ложное ощущение растянутости темпоральных интервалов.
По какой причине увлеченность ускоряет индивидуальное срок
Положение глубокой увлеченности обозначается особыми изменениями в осознании срока. В момент когда личность совершенно поглощен занимательной деятельностью, его осознанность фокусируется на механизме, а не на темпоральных границах. kometa казино системы временной обработки обретают меньше резервов восприятия, что влечет к искажению темпоральной панорамы.
Нейрофизиологические изыскания показывают, что увлеченность запускает дофаминергические тракты в разуме, которые также участвуют в регулировании циркадных ритмов. Усиленная концентрация нейромедиатора ускоряет деятельность глубинных природных часов, порождая впечатление быстротечности времени.
Парадокс хронологического восприятия состоит в том, что срок "летит" во время положительной активности, но в ретроспективной запоминании данные периоды кажутся более наполненными и протяженными. Это ассоциировано с значительным объемом запомнившихся нюансов и переживаний.
Эмоциональная включенность в цифровую эпоху
Современные цифровые технологии коренным образом трансформировали суть аффективной задействованности. Социальные сети, видеоигры и мультимедийный контент употребляют непростые алгоритмы для максимизации пользовательской заинтересованности. kometa casino подходы дигитальных платформ основаны на глубоком осознании душевных структур аффективного реагирования.
Эффект дигитальной зависимости привязан с искусственной стимулированием очагов приза в головном мозге. Непрерывный струя новизны, коллективного одобрения и интерактивности порождает интенсивные аффективные спусковые механизмы, обеспечивающие высокий градацию включенности.
Раздробление осознанности в цифровой реальности выступает существенный задачу для глубокой аффективной вовлеченности. Регулярное смещение между разными источниками данных препятствует созданию надежных чувственных связей и может вести к поверхностному восприятию.
Подстройка к дигитальной эру нуждается в создания компетенций умышленного управления концентрацией и чувственной управления. Практики цифрового детокса и mindful задействования технологий способствуют возобновить потенциал к основательной эмоциональной включенности в офлайн-деятельность.
Uncategorized
0 min read
Как понимание перспективы отражается на поведение
Как понимание перспективы отражается на поведение
Людское манера поведения в огромной части устанавливается тем, как мы понимаем и рассматриваем возможности вокруг нас. Осознание шанса представляет собой запутанный душевный механизм, который радикально меняет наше подход к поступкам, постановлениям и жизненным выборам. Когда мы понимаем, что перед нами появляется специфическая перспектива в Леон казино слоты, наша психология приводит в действие целый набор механизмов, отражающихся на побуждение, чувственное положение и систематическое мышление.
Эффект восприятия возможности охватывает фундаментальные процессы индивидуальной психики, ассоциированные с анализом вероятностей, предсказанием последствий и построением намерений. Работы в зоне бихевиористской дисциплины выявляют, что само присутствие перспективы готово изменить биохимические явления в мозговых структурах, запуская структуры стимулирования и побуждения ещё до того, как индивид производит любые определенные меры в Леонбетс зеркало.
Зачем именно присутствие шанса трансформирует отношение к действию
Наличие возможности формирует уникальное душевное положение, которое реально определить как ситуацию высокой склонности к активности. В этот момент запускаются те области мозговых структур, которые предназначены за планирование, прогнозирование и формирование решений. Это порождает в мышлении индивида специфическую карту шансов, где всякий потенциальный способ оценивается с угла возможности достижения и предполагаемых выгод.
Мозговые анализы показывают, что осознание варианта стимулирует серию химических процессов. Повышается количество дофамина - передатчика, отвечающего за движущую силу и предвкушение поощрения. Параллельно включается лобная зона, ответственная за планирование и надзор побуждений. Этот механизм вызывает уникальное ситуацию, при котором человек оказывается более восприимчивым к данным, сопряженной с предполагаемыми возможностями.
Значимым фактором является то, что понимание случая зачастую превышает по степени эффекта объективную возможность удачи. Психологи называют это процесс "оптимистическим деформацией". Индивид имеет тенденцию завышать свои перспективы на успех, главным образом когда шанс воспринимается заманчивой или отвечает его глубинным потребностям и потребностям.
Роль неясности в создании определений
Двусмысленность является центральным моментом, который устанавливает, как мы отзываемся на варианты. Парадоксально, но как раз двусмысленность результата зачастую создает вероятность более соблазнительным. Индивидуальный головной мозг биологически приспособлен на поиск паттернов и предвидение предстоящего, поэтому ситуации с неопределённым исходом активизируют специфические процессы сосредоточения и анализа.
Когда итог неопределен, активизируется система поиска новизны в нервной системе, что сопровождается выделением веществ, создающих восприятие возбуждения и увлеченности. Это объясняет, по какой причине личности часто более мотивированы осуществлять работой с неясным последствием в Леон казино, чем гарантированно результативной, но предсказуемой занятием.
Терпимость к неясности существенно различается между личностями и отражается на их стратегии поведения. Определенные личности испытывают тревогу в обстоятельствах размытости и выбирают избегать сомнительных шансов. Иные, в противовес, трактуют размытость как ресурс предполагаемых выгод и активно ищут такие условия.
- Высокая толерантность к двусмысленности способствует оригинальному анализу
- Малая терпимость склоняет к более консервативному поступкам
- Сбалансированный мера обеспечивает настраиваться к разным положениям
- Частные различия создаются под действием генетики и практики
По какой причине возможность триумфа трактуется эмоционально
Ощущение возможности удачи отнюдь не всегда базируется на рациональном анализе. Душевная составляющая выполняет главную роль в том, как мы изучаем и откликаемся на варианты. Это ассоциировано с тем, что чувственные зоны головного мозга перерабатывают информацию скорее разумных, формируя первичное представление о заманчивости вероятности ещё до детального изучения.
Благоприятные переживания, соединенные с воображением о вероятном достижении в казино Leon Bet, стимулируют механизм вознаграждения мозговых структур. Это вызывает психологическое ситуацию, при котором субъект берется концентрироваться на благоприятных аспектах перспективы, игнорируя или недооценивая предполагаемые опасности. Это явление распространено как "явление фокусировки" или "узконаправленное восприятие".
Любопытно, что эмоциональная особенность восприятия шанса может меняться в соответствии от условий в Леон казино. Одна и та же фактическая риск может трактоваться как существенная в благоприятном контексте и как незначительная в плохом. Скажем, 30% шанс на достижение в новом деле может казаться интересным, а 30% шанс поражения - тревожной, хотя арифметически это представляет единую и ту же обстоятельства.
Общественное эффект: как чужие победы повышают чувство варианта
Отслеживание за победами посторонних индивидов производит большое влияние на наше ощущение личных вариантов. Социальное усвоение являет собой основополагающий процесс, через который мы формируем понятия о том, что возможно и вероятно. Когда мы видим, что кто-то иной завоевывает достижения в определённой области, это непроизвольно расши ряет наши концепции о достижимом.
Победы близких представляют специфическими свидетельствами того, что специфические перспективы в самом деле существуют и могут быть реализованы. Это включает процесс группового соотнесения, при котором мы рассматриваем свои возможности и активы касательно тех, кто завоевал триумфа в казино Leon Bet.
Процесс группового распространения направляет к тому, что воодушевление и надежда в успехе могут передаваться от какого-то личности к другому. Это главным образом заметно выражается в времена экономических подъёмов, когда массовые триумфы создают климат массового оптимизма и убеждения в варианты. Альтернативный эффект регистрируется во периоды кризисов, когда провалы внешних уменьшают веру в собственные шансы.
- Живое слежение за эффективными действиями иных
- Приобретение данных о других людей триумфах через массовую информацию
- Коммуникация с личностями, владеющими положительный практику
- Присоединение в группах партнеров
Когда восприятие вероятности делается глубинным импульсом
Трансформация постороннего понимания варианта во глубинную стимулирование образует собой запутанный душевный ход. Этот изменение возникает тогда, когда индивид берется воспринимать шанс не только как внешний фактор, а как компонент своей личной направления прогресса. В этот instant перспектива вписывается в систему персональных принципов и планов в Леонбетс зеркало.
Смена от изучения к активности
Решающий этап в реализации шансов случается тогда, когда пассивное отслеживание преобразуется в интенсивное поступок. Этот переход требует преодоления ментального помехи, распространенного как "пропасть между замыслом и поступком". Большинство личности способны четко замечать перспективы и даже создавать замыслы их использовать, но ощущают сложности с изменением к определенным шагам в Леон казино.
Ключевую значение в этом ходе выполняет построение определенного схемы мер. Теоретическое восприятие возможности должно превращаться в ряд точных поступков. Изучения показывают, что субъекты, которые конкретизируют свои схемы и прогнозируют потенциальные барьеры, заметно регулярнее переключаются от намерений к активности.
Как вероятность формирует ощущение власти
Ощущение шанса непосредственно связано с ощущением собственного власти над обстоятельствами. Когда человек верит, что его действия могут сказаться на последствие, это кардинально повышает стимулирование к работе. Напротив, ощущение бессилия или подчиненности от посторонних моментов уменьшает подготовленность задействовать варианты в казино Leon Bet, даже если они фактически заманчивы.
Создание переживания власти наступает через сбор навыков удачного влияния на последствия. Отдельный позитивный практика использования вариантов повышает уверенность в собственную умение влиять на ситуации. Это создаёт позитивную обратную соединение: достижение создает уверенность, которая, в собственную очередь, усиливает вероятность будущих успехов.
Отчего неиспользованная возможность запоминается особенно отчетливо
Душевный процесс горечи об потерянных возможностях располагает историческую базу и исполняет значимую приспособительную функцию. Интенсивные эмоции по основанию невыполненных вариантов выступают механизмом обучения, помогающим более эффективно выявлять и эксплуатировать завтрашние варианты. Сила этих чувств сформирована отличительными признаками работы памяти и душевных участков мозга.
Неиспользованные варианты порождают характерный разновидность памяти, которые специалисты называют "контрфактическими мыслями". Мозг непроизвольно создает альтернативные версии развития ситуаций, моделируя, что могло бы наступить, если бы возможность Леонбетс зеркало была применена. Эти мысленные образы регулярно тонированы в более яркие оттенки, чем подлинные случаи, что превращает сожаление преимущественно страдальческим.
Парадоксально, но досада об неиспользованных возможностях может быть более глубоким, чем расстройство от неудачных мер. Это разъясняется тем, что в случае неиспользованной возможности человек удерживает видимость того, что итог мог бы быть безупречным, в то время как провальное шаг дает определенную факты о фактических преградах и ограничениях.
Uncategorized
0 min read
По-какой-причине ощущение победы добавляет внутреннюю-уверенность
По-какой-причине ощущение победы добавляет внутреннюю-уверенность
Чувство выигрыша воспринимается вовсе-не просто в-качестве радостный эпизод, скорее в-качестве знак психике: подобранный метод решений дал-результат. Этот результат усиливает внутреннюю устойчивость, потому так-как выстраивается связка меж старанием, действием а-также выходом. Для игрока данное особенно ощутимо: успешный ход, грамотно подобранная линия-игры, точный тайминг времени либо организованность в подготовке предоставляют конкретное доказательство мастерства.
Уверенность практически-редко возникает за-счёт общих фраз одобрения. Зачастую она формируется на-основе регулярных доказательствах, что вопросы закрываемы, а личные решения контролируемы, при-этом дополнительные комментарии касательно механизму подобного эффекта сведены в пин ап казино официальный сайт. Успех, пусть-и скромная, выступает ясной точкой ориентира: появляется подтверждение, на который получается опереться на-этапе следующем шаге.
Успех как доказательство умения справляться
Основное, что дает победа, — чувство управления. Внутри возникает мысль: исход достигнут не по-случайности, но вследствие решениям, практике а-также вниманию к деталям. Если влияние чувствуется практичным, снижается тревога перед предстоящими испытаниями параллельно повышается желание брать ответственность за решения.
Психология описывает это через увеличение самоэффективности: убежденности в том-факте, что результат выполнима при-условии определенных усилиях. Чем чаще регистрируются удачные финалы, тем-сильнее надежнее оказывается уверенность в свои компетенции. Принципиально, что самоэффективность не равна самоуверенности пинап: первая-часть держится на практику и фактическую практику, а не на громкие заявления.
Как сознание фиксирует результат: подкрепление а-также стимул
После победы сознание улавливает сильный маркер подтверждения. Включаются процессы вознаграждения, повышается запоминание ситуации: что было сделано верно, в какой-именно логике, какие сигналы ситуации оказались опорными. Поэтому успешные шаги скорее превращаются внутрь привычные схемы действий пинап казино.
Подобное подкрепление действует как внутренний «сигнал качества»: сознание помечает, что принятая стратегия содержит смысл, и поднимает настрой воспроизводить ее на будущем. В играх это заметно в-особенности наглядно: фокус на повторениям растёт, при-этом желание к практике оказывается более стабильной, так-как что появляется эмоционально усиленный выход.
Укрепление уверенности-в-себе благодаря ощущение движения-вперёд
Победа нередко осознается как итоговая отметка, но в-контексте опоры существеннее следующее — ощущение роста. Когда заметно, как уровень игры растет, выборы делаются вернее, а сбои становятся-реже, появляется устойчивая уверенность: развитие двигается в верном направлении.
Рост снижает опору от сторонних оценок. Даже-при при сильных оппонентах появляется навык думать практично: срыв осознаётся в-качестве часть маршрута, а не как подтверждение некомпетентности. Опора строится на осознании изменений, а не на абсолютном выходе каждый раз pin up.
Выигрыш уменьшает тревогу ошибки и улучшает качество выборов
Одна из оснований, из-за-чего опора повышается после победы, — ослабление психологического запрета в-части ошибку. Когда психика знает, будто уже получалось, риск оценивается вовсе-не как угроза, а в-качестве нормальный элемент. Это пинап помогает подбирать заметно взвешенные решения и играть спокойнее под напряжением.
Снижение опасений ошибки усиливает фокус и контроль-себя. Игрок меньше напрягается, нечасто выбирает спонтанные решения, вернее анализирует ситуацию. В результате частота повторного результата увеличивается — возникает самоподдерживающийся контур, где уверенность-в-себе и точность действий поднимают один-другого друга.
Командный элемент: поддержка подпитывает психологическую уверенность
Победа имеет и общественную сторону. Поддержка группы, близких либо комьюнити подтверждает ценность успеха. Возникает переживание статуса и профессионализма, а параллельно с таким — заметнее готовность показывать инициативу и взваливать трудные задачи.
Вместе-с-тем самой надежной оказывается опора, которая не-целиком строится исключительно от чужой оценки. В-случае-если одобрение становится единственным каналом опоры, любая негативная-оценка начинает выталкивать из ритма. Так-что разумно фиксировать не лишь комплименты, а параллельно личный вклад: практику, самообладание, самодисциплину, точные итоги после сбоев.
Из-за-чего скромные выигрыши иногда важнее больших
Большой выигрыш запоминается контрастно, однако локальные победы дают ровность. Эти-эпизоды пинап казино закрепляют умение видеть результат стараний, усиливают настойчивость и подпитывают настрой на продолжительных периодах развития. Для игрока это может быть улучшение аккуратности, более спокойный ритм, уместная пауза, вовремя-сделанная переключение стратегии.
Надежная уверенность-в-себе нередко держится как-раз вокруг сборе малых подтверждений компетентности. Этот базис pin up прочнее: он не ломается вследствие единственного неудачного матча или серии ошибок, потому ведь фонд результатов разнесен по множеству контекстов.
Влияние объяснения: один и одинаковый итог может создать различную опору
Победа далеко-не автоматически сразу укрепляет опору. Во-многом определяется через того-как, каким-образом победа интерпретируется. В-случае-если результат приписывается только везению, личная устойчивость укрепляется слабее: формируется ощущение, что повторить исход непросто. Когда успех соотносится с конкретными шагами, опора становится прикладной а-также переносимой в иные ситуации.
Разумно анализировать результат по элементам: какие-именно шаги стали удачными, что оказалось реализовано собранно, где получилось удержать концентрацию, какие ошибки получилось вовремя заметить. Подобный анализ пинап переводит победу в средство развития, а не в единичный эпизод.
Методы, которые позволяют усиливать уверенность-в-себе после побед
Запись удачных действий
Лаконичная фиксация по-итогу игры а-также подготовки позволяет зафиксировать пользу результата. Существенно фиксировать не переживание, а шаги: что дало-эффект а-также отчего. Это пинап казино ослабляет риск забыть мелочи и увеличивает вероятность сделать-снова успех.
- 1–2 успешных шага плюс основания, почему они стали результативными;
- 1 компетенция, который стал ощутимо сильнее;
- 1 эпизод, где получилось поддержать управление и не-дать-себе уйти на спонтанность.
Переход от выигрыша на выполнению
Опора растет быстрее, если внимание держится на процессе. При-этом даже на дальнейших матчах, где итог окажется хуже, остается чувство управления: работа строится грамотно. Данное укрепляет стабильность плюс уменьшает внутренние скачки.
Удобный подход — формулировать цель не только как «взять-результат», а как закрыть измеримые процессные пункты: соблюдать темп, отслеживать перерывы, не уходить на авантюру безо-всякой основания, считывать ключевые сигналы ситуации.
Когда победа способна сыграть-в-минус: риск завышения-оценки
Порой по-итогу выигрыша формируется чрезмерная самоуверенность: падает точность к деталям, пропускаются уязвимые точки, пропадает организованность. Такая позиция pin up превращает уверенность-в-себе хрупкой: это-состояние опирается на впечатления, не вовсе-не внутри навыках. Очередная неудача в-таком-случае переживается болезненнее, чем-она способна-была реально.
Равновесие сохраняет базовая установка: успех — подтверждение рабочей тактики, но не гарантия результата в каждой обстановке. Разумно держать интерес к оценке и улучшениям в-том-числе в подъеме. Опора, собранная на развитии, устойчивее опоры, построенной на чувстве непогрешимости.
За-счёт-чего удерживать опору после поражений
Реальная уверенность видна не только на-фоне успехов. Эта-опора сохраняется, когда неудача трактуется как информация. Для этого пинап важно отстраивать свою самоценность вне результата одной игры: срыв означает, что в системе решений имеется элемент, нуждающийся корректировки, и не что потенциал отсутствует.
Помогает навык сравнивать нынешний уровень на прежним, а не лишь на соперниками. Если прогресс очевиден, то даже-при серия поражений не-сразу сносит внутреннюю опору. В-таких этих ситуациях выигрыши дальше укреплять уверенность, а неудачи перестают эту-опору сбрасывать.
Почему уверенность, закреплённая из выигрышей, проявляется на-уровне-тела
Выигрыш влияет не только на оценки, а-также и на режим физики: снижается физическое скованность, вдох-и-выдох становится стабильнее, моторика — точнее. Формируется ощущение сфокусированности. Это состояние само внутри себе поддерживает действовать точнее, потому что внимание держится стабильнее, и реакция делается более точной.
Психика фиксирует сцепку «концентрация — результат». По практикой формируется умение переходить в более эффективное собранное-состояние оперативнее: успешный результат делается не картинкой-памяти, но рабочей матрицей, что-ее легче запускать накануне значимой задачей.
Чувство успеха даёт уверенность-в-себе, потому что предоставляет очевидное доказательство результативности действий, укрепляет ощущение управления и помогает фиксировать рост. Когда успех разбирается на компонентам и превращается в понимание про личных сильных опорах, уверенность-в-себе оказывается надежной плюс поддерживает уровень действий в самых разных условиях.
FinTech
3 min read
White Label Crypto Funds Infrastructure For Banks & Emis
Her disciplined approach to risk management ensures prudent investment methods, instilling confidence in both colleagues and shoppers alike. White label wallets are usually API-driven, making it simpler to connect with exchanges, payment gateways, DeFi techniques, and other platforms. This flexibility supports feature expansion and adaptation to altering business wants. White label wallets include advanced security measures similar to encrypted key storage, multi-signature authorization, and steady monitoring.

As institutional capital flows in and retail adoption broadens, the pressure intensifies on exchange operators to ship top-tier efficiency, airtight security, and quick scalability. Nonetheless, building separate exchanges for each region is costly and inefficient. White label crypto trade development solves this problem by offering a unified core system that can be tailored to a number of markets without repeated improvement efforts. The cryptocurrency change white label merchandise are a window of alternative for many who need to get a project to the market and keep away from typical risks, prices and lengthy growth phases. In such systems, the framework is copy-pasted from one change to a different with a couple of customization choices. After all, white label exchanges are generic platforms that don’t pose any aggressive benefit on their own and, for that cause, a brand's popularity plays a primary function in a project's profitable launch.
High 10 White-label Blockchain Platforms For 2025

This localization not solely builds belief but in addition accelerates adoption, giving customers worldwide smoother entry to reliable methods for the means to promote cryptocurrency with out pointless barriers. White label crypto banking options let banks enter the market with out constructing techniques from scratch. They come with trading engines, security layers, liquidity connections, and person interfaces already in place. A skilled https://www.xcritical.in/ white label crypto trade development company designs platforms that assist regulatory flexibility without requiring main system modifications. In this article we're going to evaluate five greatest white label cryptocurrency change software suppliers and verify out their choices.
- This issues extra once buying and selling volumes grow and operational risk turns into more durable to handle manually.
- Trendy traders anticipate mobile-first functions, intuitive interfaces, and clear charge buildings.
- For entrepreneurs and establishments, the core problem is now not whether or not to take part, however how to take action successfully.
- In 2025, Bitget was acknowledged by Forbes as one of the high trusted exchanges, reflecting its dedication to safety and person expertise.
- In this case, creating uniqueness by your self will be the only way to differentiate.
- Verification is an integral part of any secure, reputable blockchain crypto trade.
What's The Greatest White-label Blockchain Solution Provider?
The administration group is one other competitive benefit AlphaPoint has over its rivals. The company has stormed into the cryptocurrency industry already having a strong background in conventional finance. Scott Bambacigno, Igor Telyatnikov, Joe Ventura and Jack Sallen are a number of the founder members of AlphaPoint.
Governments across Europe, North America, and Asia are implementing stricter frameworks to ensure investor protection, prevent cash laundering, and regulate capital flows. Exchanges that fail to conform face shutdowns, penalties, or the loss of person belief. This built-in compliance is not only about survival but also about building credibility in new markets.
Nerdwallet's The 8 Greatest Crypto Exchanges, Platforms & Apps For 2026
This permits companies to meet regulatory requirements without overhauling pockets infrastructure. Crypto wallets store valuable digital property, making them prime targets for cyberattacks. Managing non-public keys, encryption protocols, and transaction monitoring is challenging. Firms also want to meet regulatory requirements, together with KYC (Know Your Customer) and AML (Anti-Money Laundering), particularly when operating throughout multiple jurisdictions. Banks keep away from hiring massive whitelabel crypto exchange blockchain groups or constructing new infrastructures. Ready-made techniques cut back price, velocity up testing, and stop downtime.
Over 20 crypto platforms and wallets reviewed and rated by our skilled Nerds. As world giants face growing stress from local governments, a brand new hole out there has opened for platforms which are "born and raised" within specific authorized frameworks. By choosing a modular stack, businesses Stockbroker are basically future-proofing themselves. They get the pace of a ready-made solution with the flexibleness of a customized construct. To the end-user, the platform feels as fast and easy as any top-tier app, but under the hood, it’s powered by a decentralized engine that eliminates the need for blind belief.
Access Deep Liquidity
There are strict controls on the licensing, governance, KYC/AML, asset segregation, and transparency aspects that the regulation enforces on the exchanges, among others. Thus, by meeting these standards, exchanges unlock a massive, borderless market and a significant aggressive edge. These platforms handle essentially the most complicated challenges so banks can focus on buyer expertise and development. The platforms provide cold storage, two-factor authentication, encryption, and fraud detection.
Forex News
0 min read
Графические паттерны для торговли
Паттерны в трейдинге: Основные виды и 20 фигур, которые должен знать каждый трейдер
.jpeg)
Он тестировал модели на графиках 500 американских компаний с 1991 по середину 1996 года и на графиках других 500 компаний с 1999 по 2004 год. Паттерны — это не магия и не догадки, а способ структурировать поведение рынка. Они появляются там, где покупатели и продавцы действуют по повторяющимся сценариям, и помогают превратить хаотичный график в понятную карту. Если треугольник стремится вниз, то это «нисходящий клин», если вверх — «восходящий». Клин похож на треугольники, но часто может выступать не только паттерном продолжения, но и разворотным паттерном. Паттерн по сути тоже самое, что и «двойная вершина», но является намного более сильным паттерном.
Паттерны в трейдинге. Виды и примеры. 20 паттернов, которые должен знать каждый
В случае, если симметричный графические паттерны треугольник был сформирован в «бычьем» тренде, необходимо ждать преодоления верхней границы паттерна. Если фигура была образована в нисходящей тенденции, следует ожидать пробоя нижней границы. Торговый паттерн, или паттерн графика, - это фигура, образованная выбором ценовых точек. Когда трейдер рисует линию тренда, следуя за этими ценами, она может напоминать такую фигуру, как треугольник или голова и плечи. Уровни поддержки и сопротивления играют решающую роль в определении графических паттернов.
.jpeg)
Фигуры «Флаг» и «Вымпел» в комплексном техническом анализе рынка
- Ниже рассмотрим наиболее распространенные графические паттерны акций, применяемые в торговле.
- Потенциальное ценовое движение можно рассчитать отрезком от уровня основания в области двух «доньев» к «линии шеи».
- Зарегистрируйтесь и получите бесплатный бонус при регистрации уже сегодня и улучшите свою торговую стратегию с Morpher.
- Паттерны позволяют отследить настроение рынка в настоящий момент и войти в сделку согласно критериям.
Примерное ценовое движение определяется с помощью проведенной линии от уровня двух вершин к линии поддержки. Но зачастую такая фигура отрабатывается практически вплоть до основания, откуда цена начала свой рост. Ниже можно увидеть пример паттерна «двойная вершина» на часовом графике Google Inc. После построения паттерна «двойное дно» цена преодолела «линию шеи» и закрепилась выше, что характеризуется тестированием пройденной отметки котировками.
2. Разворотные паттерны: Бычьи и медвежьи сигналы
.jpg)
По форме они напоминают флаг, прикрепленный к флагштоку, где флагшток представляет собой резкий скачок цены, а флаг - период стабилизации. После того, как трейдер обнаружит определенный паттерн, он может сделать https://forexby.com/ предположение о том, что произойдет дальше. Однако важно отметить, что ни один графический паттерн не дает 100% уверенности в том, что цена будет следовать правилу. Начните с выбора соответствующего временного интервала для вашего анализа.
Двойная вершина и двойное дно
Он характеризуется сужающимся диапазоном между более низкими наклонами верхних линий тренда и более высокими наклонами нижних линий тренда. В результате создается формация клина, которая напоминает расширяющийся треугольник. Восходящий клин сигнализирует о потенциальном развороте тренда с падающего на восходящий. Это происходит потому, что сужение диапазона указывает на снижение волатильности и нарастающее сопротивление продавцов. Когда цена пробивает верхнюю линию тренда, это может считаться сигналом к покупке, поскольку предполагается дальнейшее укрепление рынка. Эта графическая фигура выглядит как чашка с ручкой и используется для определения области поддержки и сопротивления.
Финтех
0 min read
Топ 10 Лучших Криптокошельков Для России В 2026 Году
По словам эксперта, январь — это, скорее, техническая подготовка для казначейства, необходимая для отработки механизмов внутри бюджетной системы. Bybit продолжает превращаться из «обычной криптобиржи» в полноценную экосистему Web3. У них есть своя платформа для торговли, P2P, NFT-маркетплейс, а теперь ещё и криптокошелёк, встроенный прямо в приложение.
Выбор Редакции
Многие пользователи ищут, какой кошелек выбрать для криптовалюты, чтобы он был не только функциональным, но и доступным на русском языке. На помощь приходят такие ресурсы, как Exnode — сайт мониторинга криптовалютных кошельков, который поможет сравнить топ кошельков Ethereum для криптовалюты. Обеспечение безопасности криптокошелька включает несколько ключевых шагов.

Дизайн кошелька лаконичный, без лишних кабелей и вычурной упаковки. Дополнительный пункт безопасности – установка программного обеспечения во время настройки и регистрации. Экран настраивается с учетом индивидуальных пожеланий пользователя, дополнительно устройство охраняется пин-кодом. Дополнительная опция Ledger Recuperate дает возможность легко восстановить доступ к криптовалютным активам в случае утери аппаратного устройства. Главная задача криптокошелька – обеспечить безопасность https://www.xcritical.com/ крипты от возможного хакерского взлома. Именно эта функция представляет основное отличие между видами современных кошельков.
Злоумышленник может провести атаку на сервер приложения и завладеть личной информацией клиентов. Получение денег из «сейфа» проводится в ручном режиме (обычно один раз в сутки). Даже в случае взлома учетной записи у инвестора останется время, чтобы заметить атаку и отменить транзакцию. Для передачи активов другому пользователю необходимо внести в цепочку новый блок, в котором информация о балансе всех кошельков будет обновлена.
Отсутствие языкового барьера делает работу с кошельком более быстрой и удобной. Клиент любого сервиса должен быть уверен в том, что в случае необходимости он получит компетентную техническую поддержку. Более того, когда мы говорим про денежные операции, важно, чтобы специалисты техподдержки оперативно выходили на связь оперативно и решали проблемы клиентов как можно быстрее. Кроме мгновенных операций и экономии времени, такой сервис позволяет пользователю хранить свой цифровой капитал в надежном месте и защищает его от взломов и хищений. Чтобы перевести средства другому пользователю, нажмите «Отправить» или «Send», введите адрес получателя и сумму.

Что Такое Криптокошелек: Как Выбрать И Сохранить Свои Деньги
Его портативность и расширенные возможности безопасности делают его отличным выбором аппаратного кошелька для пользователей, которым требуется надежная защита криптовалют. Ledger Nano X - лучший криптокошелек на рынке, потому что он предлагает широкую поддержку токенов, расширенные функции безопасности и доступную цену. В частности, советуем рассмотреть аппаратные решения, такие как SafePal и Ledger.
Биткоин Кошелек Binance
- Параметр снижает возможности пользователя, мало знакомого с криптовалютами.
- Если пользователь располагает большой суммой криптосбережений и не совершает ежедневные транзакции, то лучше всего хранить закрытые ключи в аппаратном или бумажном хранилище.
- Стоимость на момент написания обзора — 6400 российских рублей.
- Среди горячих и холодных хранилищ можно найти моно- и мультивалютные кошельки для криптовалют.
- Ситуации, когда забыли пароль или потеряли устройство, могут произойти с каждым.
- В то же время приватные ключи находятся в холодном хранилище ― на компьютерах, не подключенных к интернету.
Для доступа к этим услугам необходимо подтверждение личности. Кошелек полностью ориентирован на мобильных пользователей и поддерживает большое количество блокчейнов. OKX Wallet — это одно из самых мощных решений для работы с криптовалютами и децентрализованными приложениями. Этот Web3 кошелек поддерживает более 70 различных блокчейнов, что делает его особенно привлекательным для опытных пользователей и разработчиков, работающих в экосистеме Web3. Он предоставляет функции стейкинга, позволяет зарабатывать на своих активах и имеет встроенные инструменты управления NFT. Кастодиальные кошельки — это сервисы, где контроль над приватными ключами передается третьей стороне, например, криптовалютной бирже или провайдеру кошелька.

Правильный выбор поможет защитить ваши инвестиции и упростить работу с цифровыми активами. А еще — пошаговый гайд, как купить и обменять криптовалюту без лишних комиссий и рисков. Потому что мало хранить биткоин безопасно — важно еще уметь им пользоваться. Лучше выбирать мультивалютный криптокошелек с хорошим уровнем безопасности и широким функционалом. Среди надежных цифровых кошельков для смартфона, представленных в данном обзоре, выделим Belief pockets и Ledger nano. ByBit Wallet электронный кошелек для криптовалюты позволяет подключаться к децентрализованным приложениям, участвовать в аирдропах и IDO без повторной регистрации аккаунта.
Online Casino
10 min read
High-Pay Crash Game, Made by Inout Games
Whether you are a player on a low-end Android phone in India or an operator running a high-traffic gaming portal, we built this game to run smoothly, load fast, and scale with demand. Built on the foundation of fast-paced reflex challenges, the game combines simple controls with layered difficulty, responsive performance, and most importantly, a Provably Fair gameplay engine. The game represents our commitment to creating games that respect player intelligence, operator needs, and legal boundaries. Her background in animation and game design helps shape Chicken Road's distinctive visual style and engaging gameplay mechanics.
The ability to reload the game ensures you can practice as much as needed before switching to the real-money version. It’s a valuable tool for sharpening skills before switching to real-money play. Players can test different strategies, explore each difficulty, and practice decision-making with no financial risk. Although not a monetary bonus, the unlimited free demo mode is a strategic advantage. This game took the industry by surprise with its unique blend of strategy, decision-making, and arcade fun, wrapped in a lighthearted yet suspenseful visual theme. In the viral video, PM Modi’s phone screen has been digitally edited to display the Chicken Road 2 game.
At no point did he endorse Chicken Road 2 or any real money game. But because Fiji had only one player withdraw, it is the only season in the history of the show to start with an odd number of players. Its consistent design choices and positive player feedback suggest it’s a game that’s here to stay, offering excitement and considerable potential for reward. The game’s distinctive blend of its charming theme, intuitive controls, and high RTP has attracted a large and dedicated player base.
The game features an interactive cash-out system that allows players to lock in their winnings at any moment before the crash occurs. The game is accessible across desktop and mobile devices thanks to its HTML5 foundation, and its simple yet strategic mechanics have already captured the attention of thousands of players worldwide. With four distinct difficulty levels, Chicken Road 2 stands out by giving players real control over their risk and reward, making every decision count. This gives Chicken Road a unique appeal to players who enjoy interactive casino games that require more than just spinning reels.
Collecting these bonuses can significantly improve a player’s chances of reaching the Golden Egg. The dynamic scaling of challenges and rewards keeps players engaged and motivated to improve their skills. Regularly observing game performance and implementing ongoing optimization strategies underscore a commitment to maintaining fairness and player satisfaction.
Up to €20,000 Max Win
The choice of risk, and its corresponding reward, is entirely yours. Opt for a steadier path with lower, more frequent wins, or embrace higher volatility for a chance at truly substantial payouts. Choose from four distinct difficulty levels – Easy, Medium, Difficult, or Hardcore.
Meet Our Team
As a seasoned player, he shares valuable insights to help readers understand game mechanics and strategies. We are delighted to see players appreciating the evolution of the game and enjoying the thrilling, fair play we strive to deliver. For players seeking a middle ground between caution and risk, the Balanced Strategy offers a compelling option. Accessing the thrilling experience of an online casino game like Chicken Road 2 is simple. The original Chicken Drop became a significant hit, introducing many players to Our unique brand of mini-game excitement.
Developed by InOut Games, a reputable provider in the gambling industry, both titles are hosted on licensed online casinos, ensuring safe deposits, withdrawals, and gameplay integrity. The Chicken Road series, created by InOut Games, is a collection of arcade-style crash gambling games where players guide a brave chicken through a dungeon filled with hidden traps. This makes it an excellent option for casual players who just want to have fun or for serious gamblers looking to develop a strategy before placing real bets. The demo mode lets players explore each setting and see how the risk-reward system works. The free demo versions of both games provide the ideal way to explore their mechanics, risk-reward systems, and difficulty levels without any financial commitment.
- It’s this tension between greed and caution that makes Chicken Road endlessly replayable.
- What drives us and shapes our gaming community
- The winning streak doesn't stop there.
- Player2 started with just a small bet and walked away with $350 after just 15 minutes of gameplay!
If you’re interested, you can play an emulation of Frogger over at Crazy Games. The game requires users to direct frogs to their homes by jumping on floating logs, turtles, and alligators, all the while avoiding traffic or falling in the water. Contestants are referred to as "castaways", and they compete against one another to become the "Sole Survivor" and win one million U.S. dollars. Survivor is an American reality television show, based on the Swedish program Expedition Robinson.
How to Play Online on Our Website
The high RTP of 98% further sets it apart, indicating a higher probability of returns compared to many other casino titles. While luck still plays a role, particularly in the randomness of traffic patterns, skillful timing and strategic decision-making are paramount. The designers at InOut Games have successfully created a visually appealing and thematically engaging game. The visual presentation is deliberately designed to be playful and non-threatening, making it accessible to a broad audience.
- They're perfect for exploring the game without risking your own scratch!
- 🌟 These aren't just random victories – they're life-changing moments happening in real-time on our platform.
- 🚀 The studio behind the wildly entertaining "Chicken Road 2" specializes in creating games with intuitive gameplay mechanics and charming visual aesthetics.
- Slots are games of chance, so results are unpredictable and should not be relied upon for financial gain.
- 🔒 Innout Games maintains a strong commitment to fair play and player satisfaction.
- Specially designed for mobile play, the controls respond flawlessly to your taps and swipes, creating a gaming experience that feels natural and engaging.
"Best New Family Game" - BoardCon (
This approach prioritizes capital preservation and extended playtime. We've observed several popular strategies that aim to enhance the gaming experience. Once your bet is set and your risk level selected, it’s time for action. The remaining 2% constitutes Our operational margin, directly reinvested by us into creating even more innovative and engaging gaming experiences for you to enjoy.
Our Tech Stack: Built for Stability and Scale
From the heart-pounding excitement of Chicken Road 2 to our selection of over 500 games, winners emerge every minute. Player2 started with just a small bet and walked away with $350 after just 15 minutes of gameplay! Fortune favors the brave at our casino, especially in fan-favorite games like Chicken Road 2. Are you a patient player with a decent bankroll who enjoys the thrill of chasing bigger wins? ⭐ They help you align your playing style with the right game. If you find yourself chasing losses or playing with money needed elsewhere, it's time to step away.
After countless playtest sessions, redesigns, and late-night brainstorming, the core mechanics of Chicken Road were established. The features and availability of Chicken Road Game may change over time and vary by region. Its non-pay-to-win design ensures that users who build skill over time see greater progression and results. Notably, the game has attracted users beyond traditional metro hubs, showing strong performance in semi-urban regions.
Chicken Road is more than just a novelty — it's a well-balanced, skill-oriented arcade gambling game that delivers tension, fun, and big win potential. To sum up, this viral video of PM Narendra Modi allegedly promoting the Chicken Road 2 game and asking people to invest real money is fake. As a result, platforms offering real-money games — such as Dream11, Games24x7, Winzo, GamesKraft, 99Games, KheloFantasy, and My11Circle, will be required to shut down real-money games on their apps. It is important to note that in August 2025, the Government of India introduced and passed the Promotion and Regulation of Online Gaming Bill, 2025, which imposes a blanket ban on all online games involving monetary transactions. We also found that several media outlets reported this meeting, but none of the reports mentioned that PM Modi promoted the game Chicken Road 2 or asked people to invest real money.
Strategic Partnerships
The game runs smoothly on smartphones and tablets with the same features as the desktop version. Yes, Chicken Road 2 is fully optimized for mobile play on iOS and Android devices. Chicken Road 2 is a casino game where you help a chicken cross roads with increasing traffic for multiplier rewards.
Each successful step increases your win multiplier, but one wrong move ends the round. Try both titles side by side and discover which version suits your playstyle best. Navigate quirky dungeons, dodge hidden traps, and experiment with risk in a colorful setting that rewards sharp thinking. Unlike some demo versions that require sign-ups or deposits, Chicken Road offers instant access to its free mode. The Chicken Road series by InOut Games delivers an exciting arcade-style gambling experience through two thrilling titles — Chicken Road and the enhanced Chicken Road 2.0.
Chicken versus traffic! My obsession with the world’s most addictive hopper
Keeping an eye out for free spins and bonus features can also help maximize the enjoyment, since these features often lead to higher rewards. Another useful approach is to start with the demo version to get familiar with the rules, the paylines, and the bonus features. Slots are games of chance, so results are unpredictable and should not be relied upon for financial gain. InOut Gaming operates under licensing standards to ensure the games are fair and safe, and Chicken Road 2 is developed to meet those requirements. Along the way, you’ll encounter eggs, farm tools, tractors, and many playful surprises that add character and humor to the game.
Both Chicken Road and Chicken Road 2.0 feature a fully playable free demo mode. Both Chicken Road and Chicken Road 2.0 offer full-featured demo modes — no registration, no deposits, and no time limits. If you want to learn the mechanics, explore different difficulty levels, and refine your strategy, the Chicken Road Free Demo Page is the perfect place to begin. You chicken road 2 game download can start playing immediately without creating an account or providing payment details.
Chicken Road Game Expands Its Presence in India with Engaging Casual Gameplay and Real-Time Rewards
⏱️ Don't waste another minute playing inferior casino games! 🌟 Special app-exclusive tournaments happen weekly, giving mobile players extra chances to win big while helping those brave chickens navigate treacherous roads! The Chicken Road 2 mobile experience comes packed with buttery-smooth graphics, reduced loading times, and special bonus features you won't find elsewhere! The intuitive interface makes it accessible to beginners, while the depth of features provides enough complexity to keep experienced players engaged. We are a lean, efficient, and proudly remote-first company, built by people who genuinely care about how players experience the game and how operators deliver it.
The game is regularly audited by independent testing agencies to ensure fair and random outcomes. Your winnings depend on your bet amount multiplied by the multiplier achieved when cashing out. Place your bet, start the game, and decide when to cash out before the chicken gets hit!
Chicken Road has found homes in over half a million game collections worldwide, bringing joy to players across 30+ countries. Sarah is the friendly face of Chicken Road, managing our growing community of players. With a background in competitive gaming, Marcus has an uncanny ability to identify potential gameplay issues during development and find elegant solutions. Marcus translates creative concepts into balanced gameplay experiences.
The original visuals are from an April 2024 event where PM Modi interacted with gamers and discussed the gaming industry. The game is designed for one-handed play, whereby a single tap moves you forward, while swiping left, right, or back allows for lateral movement and retreats. New characters can be unlocked in several ways, including playing the prize machine or discovering them while navigating through the Crossy Road world. Or if you choose the creepy Gravedigger, then the game shifts into a dark, spooky night mode. If you got distracted playing Frogger, hopefully I can turn your attention back to Crossy Road. All the ‘80s arcade game lovers will see it as a homage to one of the greatest games ever made, the 1981 classic video game Frogger.

Tutorials
9 min read
How to integrate a Helpdesk and Customer Support Ticket System in WordPress using SupportCandy (Part 3)
Introduction
In Part 2 of this 3 part Blog series, we covered the following sections of the support candy plugin
- Ticket List
- Agent Ticket List
- Customer Ticket List
- Email notification
Now, in Part 3 which is the final part of this blog, we will explore the settings sections of the SupportCandy plugin.
Settings
Step 1: General settings
- Under this tab, you can configure the general settings.

Screenshot 1: Settings → General Tab
- Ticket Status After Customer Reply: You can define the ticket status that will be set when a customer (the ticket creator) submits a reply. If you don't want the status to change, select the "Do not change" option.
- Ticket Status After Agent Reply: You can specify the ticket status that will be applied when an agent submits a reply. To keep the status unchanged, select "Do not change."
- Close Ticket Status: This status is applied when either an agent or a customer closes the ticket.
- Ticket Alice: You can customize the name used for your tickets. For example, you might rename it to "Case," so tickets will be referred to as "Case #" in individual tickets, email notifications, and other communications.
- Allow Close Ticket: You can determine who has permission to close a ticket. Agents from the selected roles must have the necessary access to enable the "Close" button within an individual ticket.
Page settings Tab
- Here you can set the various pages such as user login and registration screens.
Screenshot 2: Support → Settings → General Settings → Page Settings tab
- Support Page: The support page is where the [supportcandy] shortcode is used on the front end to display the support functionality.
- User Login: This setting determines how users can log in to access the support forum on the front end. You can choose from Default, WP Default, or Custom URL options.
File Attachments
- Go to Support → Settings → General Settings → File Attachments tab
- Here you can set the max file size of the attachment along with its Allowed File Extensions.

Screenshot 3: File Attachments tab
Thank you page
- Here you can define what action should be taken after the customer or agent submits the ticket.
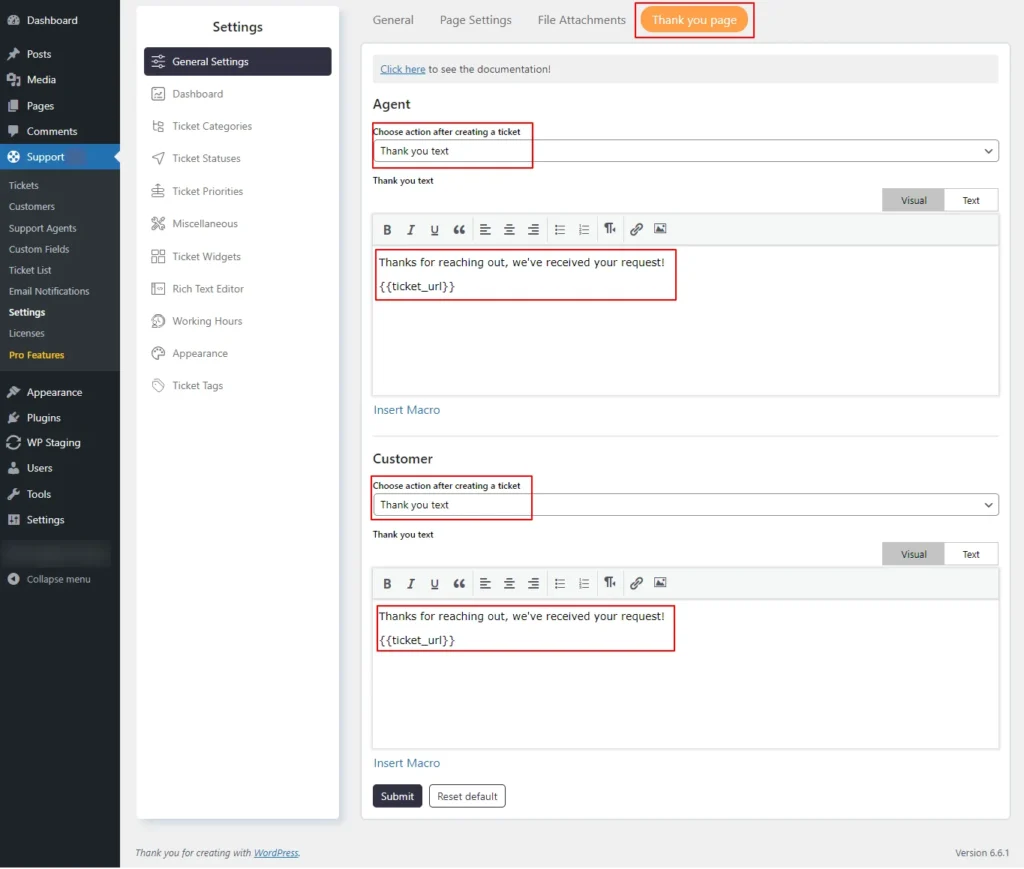
Screenshot 4: Thank You Page
- You can show a thank-you text, redirect to the custom page, or open a ticket page.
Step 2: Dashboard
- Dashboard in SupportCandy lets support agents quickly see important ticket information. This helps them plan their work and choose what to do first.
- You can see how many new tickets, unresolved tickets, unassigned tickets, closed tickets, tickets assigned to the current agent (mine), tickets that are out of SLA, tickets that are due today, and tickets that are due tomorrow.
- If an agent clicks any of these numbers they will be redirected to the respective categories list of tickets with the right filter in place.
General
- Here we define the general settings for the dashboard, such as the default date range and dashboard auto-refresh.

Screenshot 5: Dashboard General Tab
Cards
- Under this tab, set the order of the tickets based on the ticket status.
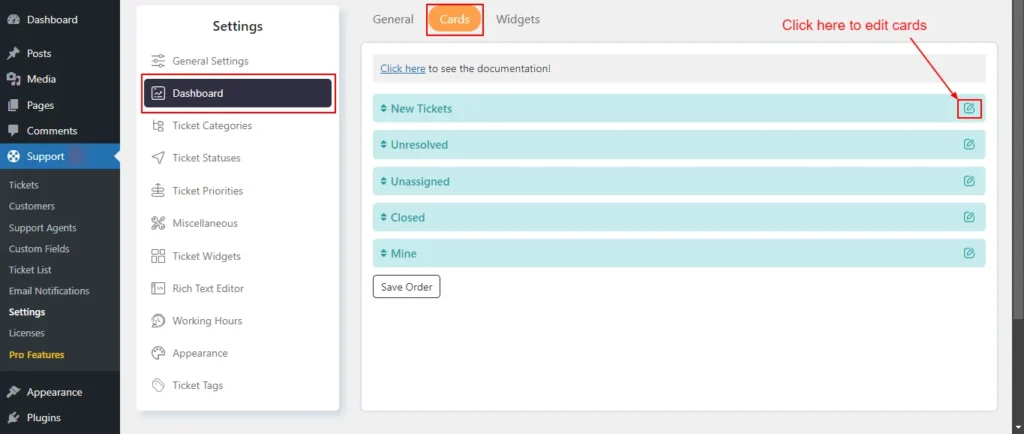
Screenshot 6: Dashboard Cards
- Click the Edit button next to that card, as shown in the below screenshot. You can change the Title, show/hide the card in the dashboard, and allow agent roles who can see the card info in the dashboard.
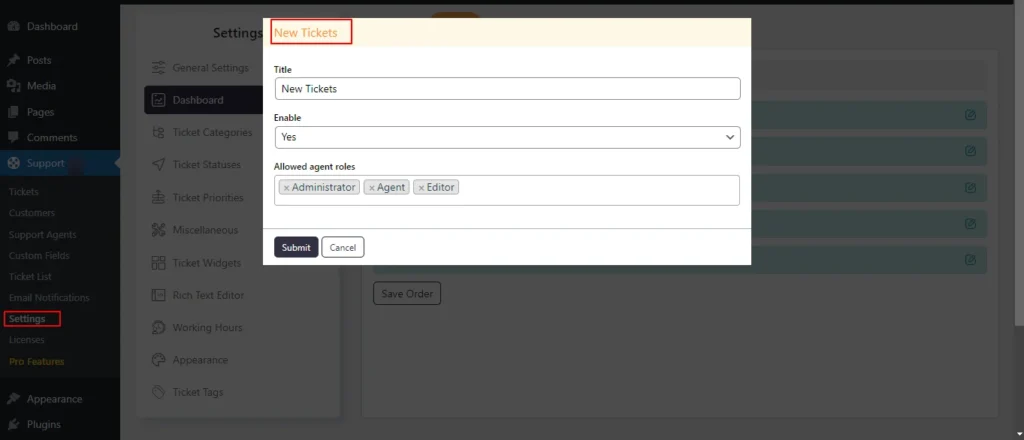
Screenshot 7: Edit the Cards
Widgets
- The dashboard widgets give you a complete view of your support operations, with real-time information on new tickets and closed tickets, as well as full analytics on response times and communication gaps.
- You can customize the dashboard to your needs by rearranging widgets based on priority.
- Also, you can manage visibility for different agent roles by enabling or disabling widgets for specific roles.

Screenshot 8: Dashboard Widgets
Here is the List of widgets that are available by default
- Ticket Statistics
- Trends of Today
- Agent Workload
- Recent Activity
- Recent Tickets
- Unresolved Tickets by Type
- Unresolved Tickets by Priority
- List of Unresolved Tickets by Status
- Response Delay
- Ticket Closing Delay
- Communication Gap
- Ticket comments
- Agent scores
- Out of SLA Tickets
- Active Timer
- Usergroups
Adding a new widget
- In the Widgets tab, locate the Add New Widget button and click on it.
- Select the Custom field for which you want to add widgets. Click Submit to save changes.

Screenshot 9: Adding a new widget
Editing the Widgets
- Click on the edit icon beside the widget name.
- You can change the title, show/hide the widget in the dashboard, and allow agent roles who see the widget in the dashboard.

Screenshot 10: Editing Widgets
Step 3: Ticket Categories
- Ticket categories let users and agents sort tickets into groups based on what they are about, which makes it easier to communicate and solve problems.
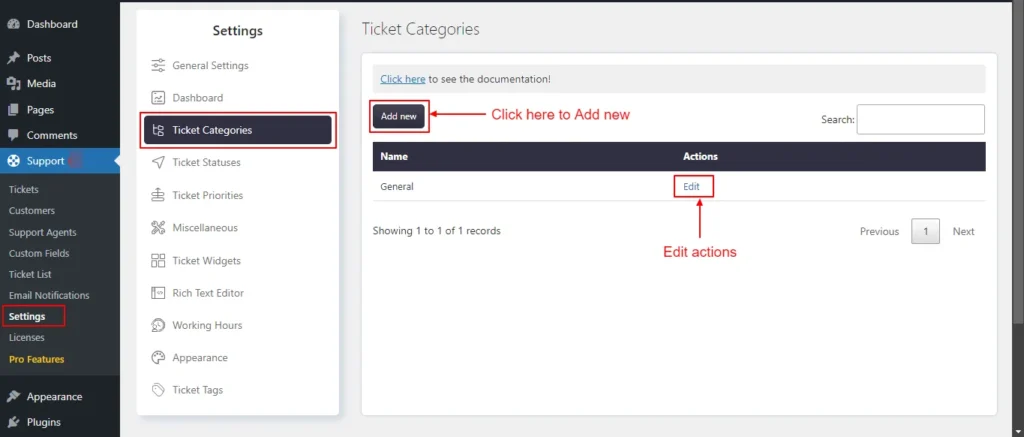
Screenshot 11: Ticket categories
Adding a New Category
- Users with the necessary permissions can create new ticket categories.
- Navigate to Support → Settings → Ticket Categories
- Click on Add New.
- Give a name to the category.
- Select the order of loading the categories by Load after dropdown.
- Click Submit

Screenshot 12: Add New Ticket Category
Edit Category
- Click on the Edit option beside the name of the ticket.
- You can change the name and loaf after settings.
- Click Submit.

Screenshot 13: Edit Ticket Categories
Step 4: Ticket Statuses
- Under this tab you can set your own custom statuses to customize the process and life cycle of the tickets.
- Customization includes the color patterns that go with each status, which show clearly what state the ticket is in.
- Administrators can edit or delete statuses as needed.
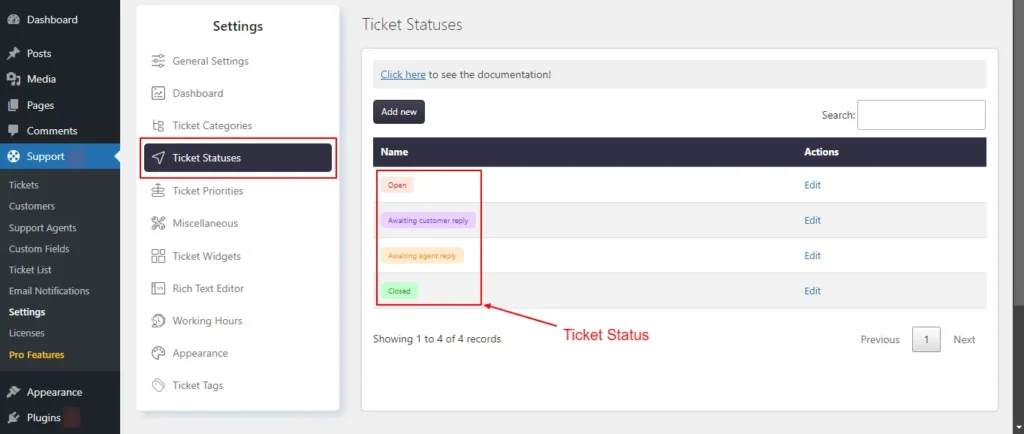
Screenshot 14: Ticket Status
Adding Status:
- Head over to Support → Settings → Ticket Statuses.
- Click on Add New.
- Enter a suitable name for the new status that you want to add.
- Choose a color and background color for visual identification.
- Click Submit.

Screenshot 15: Adding status
Edit Status:
- Click the Edit link beside the status name that you want to edit.
- Edit the color, background color, and load after setting.
- Click Submit.

Screenshot 16: Editing a Ticket status
Step 5: Ticket Priorities
- Using this setting, you can prioritize tickets based on urgency. You can create new priorities or edit existing ones (High, Medium, Low priorities).

Screenshot 17: Ticket Priorities
Adding a New Priority
- Go to Support → Settings → Ticket Priorities and click on Add New.
- Enter a name and choose a color and background color for the priority based on its urgency.
- Click Submit.
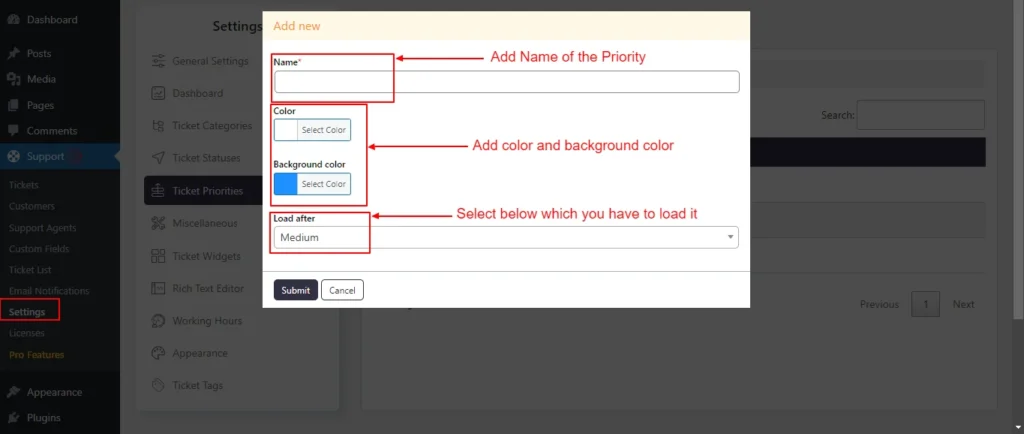
Screenshot 18: Adding a new Ticket Priority
Edit Priority
- Click on the edit link for which you want to edit.
- Click on the Edit option.
- Edit the Name, Color, or Background color, Load after settings as per your needs.
- Click Submit

Screenshot 19: Editing Ticket Priorities
Step 6: Miscellaneous
- Under the Miscellaneous settings, you can set the following settings:
- Term & Conditions
- GDPR
- reCaptcha
- Advanced
Terms and conditions
- Enabling this feature will add a checkbox in the Create Ticket form and Registration Form prompting the user to agree to the terms and conditions.
- The terms and conditions message can be customized as seen in the below screenshot no.. You can also add to link to your terms and conditions page.

Screenshot 20: Miscellaneous → Terms & Conditions
GDPR
- If enabled, it will add a checkbox in the Create Ticket form and Registration Form with a custom message letting the user know what information will be stored in the database.
- You can also send the Personal data retention
- It specifies the duration for which the system should retain personal information within the ticket. Once the retention period has passed, the database will either delete or anonymize personal details such as Name, Email Address, IP Address, and any custom fields marked as personal information, from the date of creation.
- If you wish to retain personal information indefinitely, set the retention period to 0 days.

Screenshot 21: Miscellaneous → GDPR
reCaptcha
- You can add Google reCaptcha to the ticket form, login and registration screen, profile screen, etc.
- For that, you need to generate the Site key and Secret key from this link.

Screenshot 22: Miscellaneous → reCaptcha
Advanced Settings
- Here you can configure 25 types of advanced settings. We will discuss the main settings for now.
- Reply confirmation: After clicking the reply button on a specific ticket, the system will prompt the user for confirmation.
- Ticket ID: In this setting, you can choose whether new ticket IDs are assigned sequentially or randomly.
- Starting Ticket ID: Within the Sequential Ticket IDs setting, you can specify the initial ticket ID to be used for new tickets.
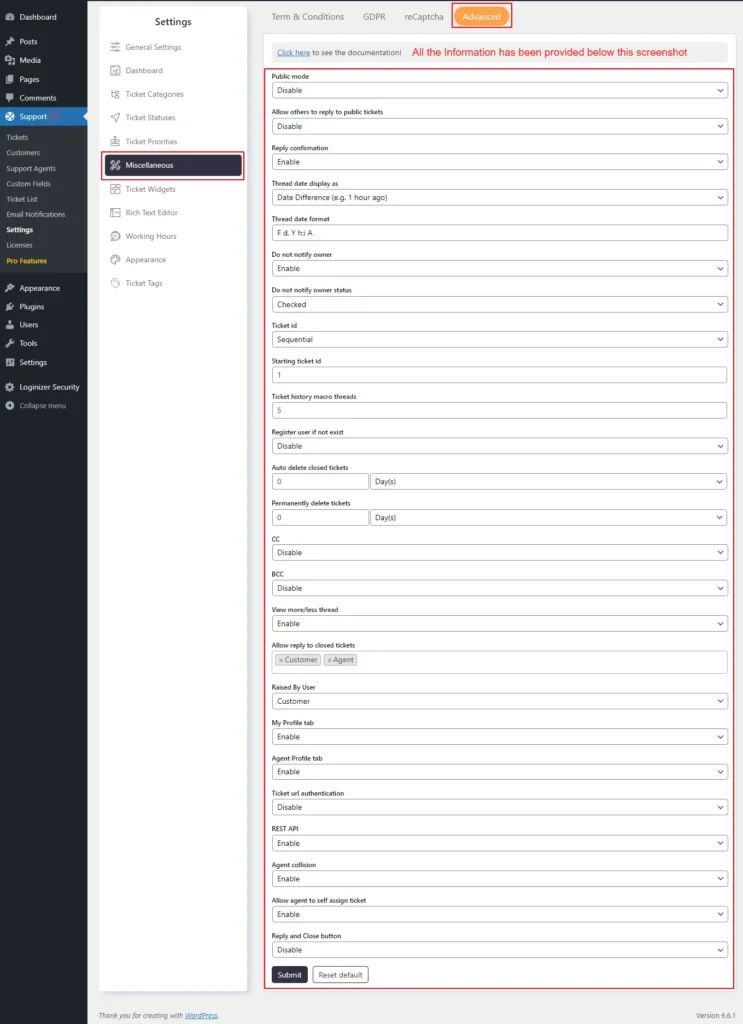
Screenshot 23: Miscellaneous → Advanced settings
Step 7: Ticket Widgets
- The Ticket widgets are displayed on the single ticket in the backend. You can manage the access levels for each widget, determining who can view or edit them.
- Also, you can rename, enable, or disable, and change the order of the widgets from this settings tab.
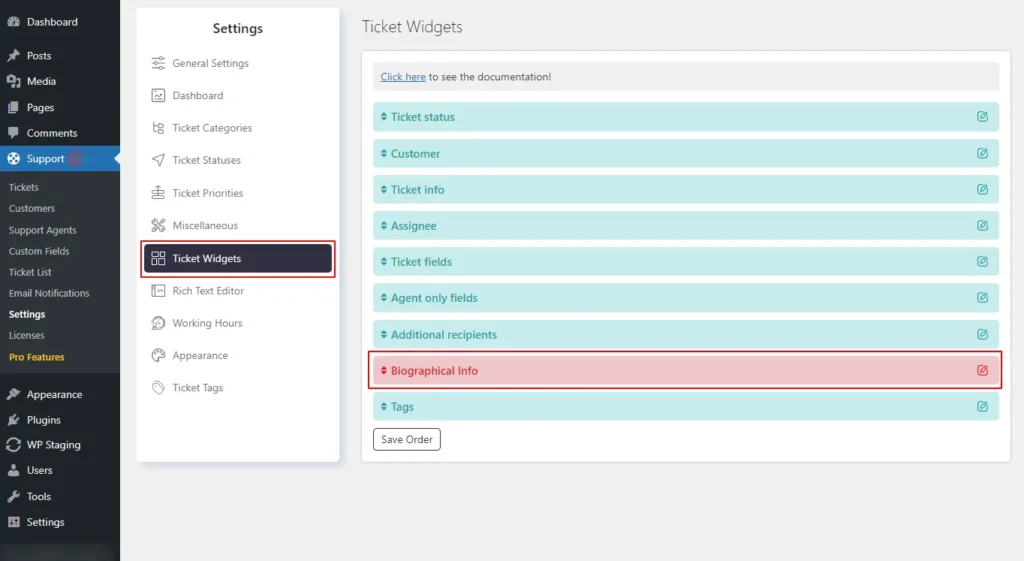
Screenshot 24: Support → Settings → Ticket Widgets
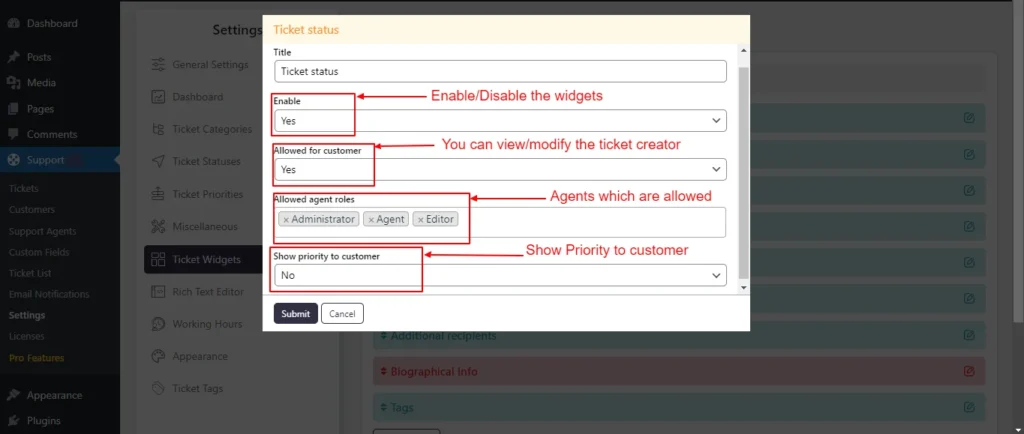
Screenshot 25: Edit Ticket Widgets
Step 8: Rich Text Editor
- This setting allows you to manage the rich text editor configurations for Agents, Registered Users, and Guest Users.
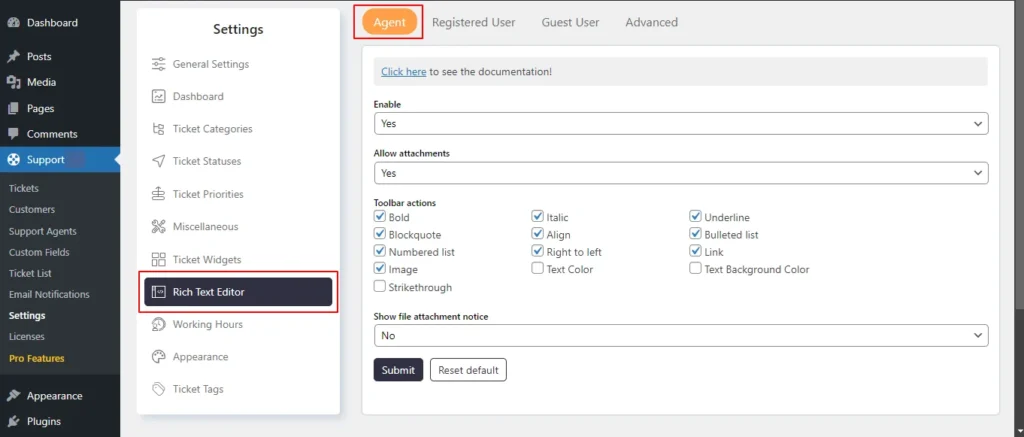
Screenshot 26: Rich Text Editor Agent Tab

Screenshot 27: Rich Text Editor Registered User Tab

Screenshot 28: Rich Text Editor Guest user Tab
- Enable: You can enable or disable the rich text editor for users.
- Allow Attachments: You have the option to allow or disallow attachments in various areas such as ticket descriptions, reply descriptions, and note descriptions.
- Toolbar Actions: The rich text editor allows you to select which actions to enable, including:
- Bold
- Block quote
- Italic
- Align
- Right to left
- Underline
- Bulleted list
- Link
- Text background color
- Image
- Numbered list
- Strikethrough
- Show File Attachment Notice: You can choose to display information about file attachments, including allowed file types and sizes, to users. This can be configured in the user types setting.
- HTML Pasting: When activated, any text that is copied to the clipboard will be pasted with HTML.

Screenshot 29: Rich Text Editor Advanced Tab
Step 9: Working Hours
- This section allows you to choose the working hours for your company or organization. These specified hours will act as a standard template for the working hours of agents.

Screenshot 30: Support → Settings → Working Hours
Holidays
- In this setting, you can add holidays for your company or organization,
- You can add a single holiday by clicking on a single date or multiple holidays by date range (selecting and dragging),
- After electing choose the action Add new holidays.
- If you want this to occur annually select yes in Repeat every year drop-down.
- Similarly, you can delete holidays.

Screenshot 31: Holidays Calendar

Screenshot 32: Add/Delete Holidays
Exceptions
- In some situations, you may want to modify the working hours for a specific day. You can do this by selecting that specific date and modifying the working hours.
- This exception will apply only to the working hours set at the company or organization level.

Screenshot 33: Working hours → Exceptions list
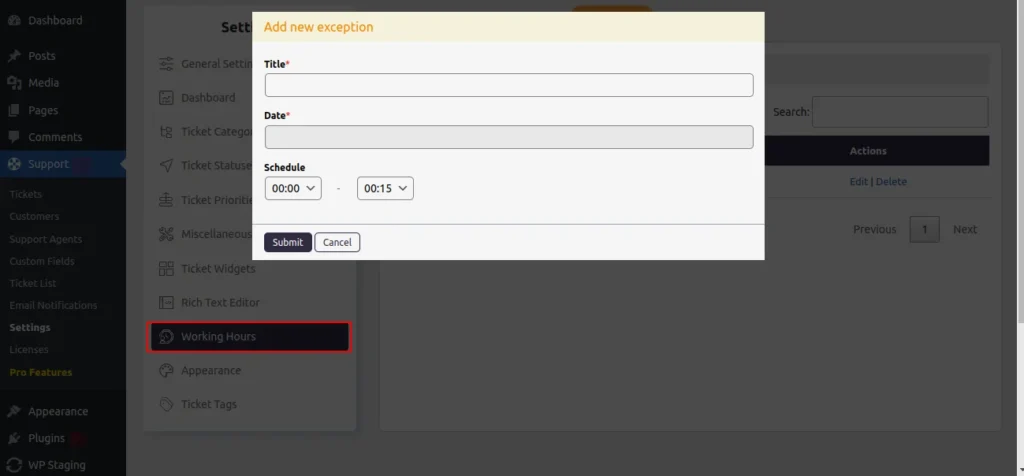
Screenshot 34: Working hours → Exceptions → Add New
Settings
- In the Settings Tab, you can Allow agents to modify working hours or you can Allow agents to modify their leaves.

Screenshot 35: Working hours → Settings Tab
Step 10: Appearance
- You can configure the appearance of General (overall look and feel), Ticket List, Individual Ticket, Modal Popup, Agent Collision, and Dashboard screens.
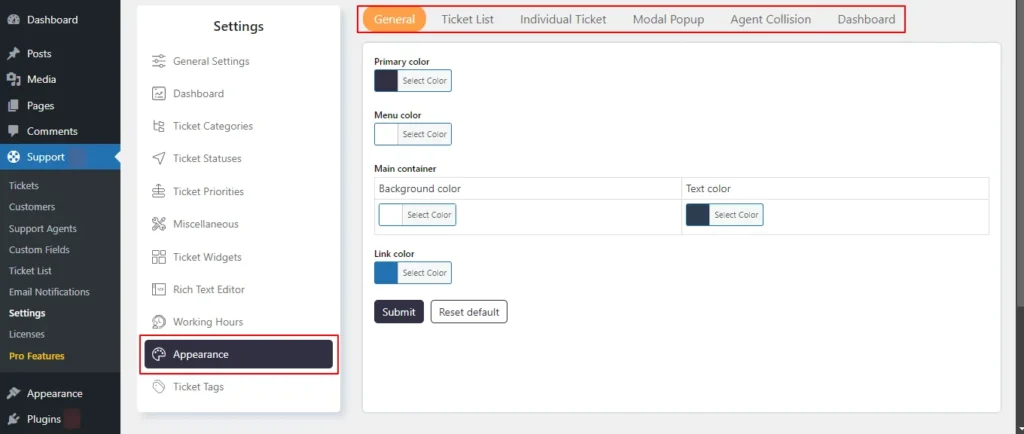
Screenshot 36: Appearance
Step 11: Ticket Tags
- The Ticket Tag Setting feature allows administrators to add tags to the tickets.
- To add a ticket tag enter its name and description, and select its color and background color.

Screenshot 37: Add new Ticket tag
- Under the same screen, you can customize Tag Appearance for ticket tags.
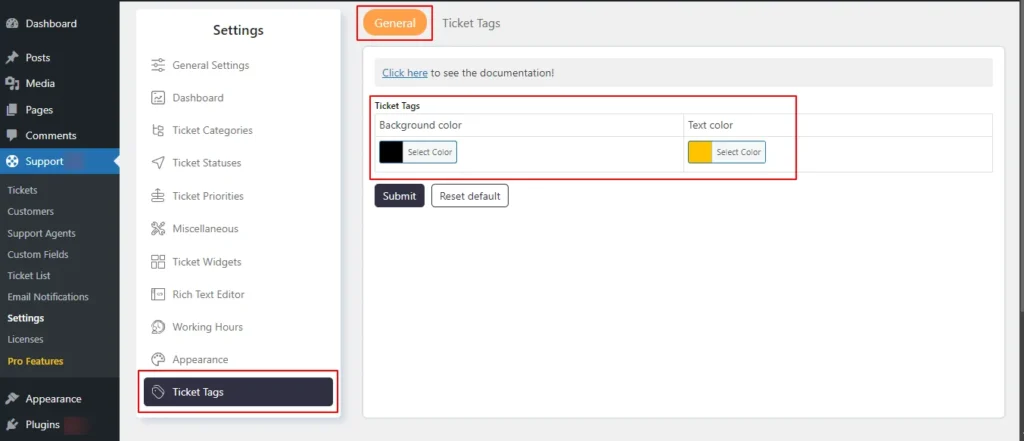
Screenshot 38: Ticket Tags General (Customizing Tag Appearance)
Conclusion
In this blog, we walked you through how to add a helpdesk and ticket system on WordPress using the SupportCandy plugin.
SupportCandy adds to your WordPress site the features of a complete help desk and customer support ticket system. It is one of WordPress's most popular helpdesk and customer support ticketing plugins.
That’s it for this article. Do more with your website.
If you need any help related to WordPress, contact our WordPress experts.
Online Casino
8 min read
Login & Play Aviator Kaise Khele
Don't miss the opportunity to play Aviator not only from home, but also from your cell phone through the Pin Up Casino app. Don't be upset about this, as Pin Up Casino allows you to play Aviator multiplayer in demo and try all sorts of crash game schemes to see how to win. All subsequent variants imply waiting and higher bets. The gameplay is fast and exciting, and it’s unlike anything I’ve played before. Aviator is one of the most exciting games I’ve tried at Pin-Up! Highly recommend for anyone looking for a fun and unique gaming experience!
Top Aviator Game Tricks in 2025 That Indian Players Swear By
While aviator pin up undoubtedly entices Indian users with its thrillingaction and the potential for skyrocketing multipliers, it’s equallyessential to be familiar with certain inherent pitfalls. This balanced perspective will contribute toa more informed decision-making process, ensuring you’re aware of whatto expect before you dive into the thrilling world of this popular crashgame. The platform also actively collaborateswith celebrities and influencers, such as Disha Patani, Arjun Rampal,and Sunil Narine, to promote its services, engaging with the audiencethrough social media campaigns, events, and endorsements, adding avibrant touch to the gaming community. Pin Up Casino is a well-established platform that provides an excellentopportunity for gamers in India to find their ideal game among theextensive collection of over 5,000 titles. With its Provably Fair algorithm, the game ensures transparency and fairness, making it a trusted choice among enthusiasts. It is essential to clarify that the Aviator game operates on a Provably Fair algorithm, ensuring that each outcome of round is entirely random and cannot be manipulated.
Welcome Bonus for Aviator Players
Pin Up Casino offers a quality platform to access this game, with a sleek interface, mobile apps, and helpful customer support. Once deposited, funds can be used to play Pin Up’s full suite of slots, live games, sportsbooks, and popular titles like crash game Aviator. To evaluate withdrawals and ensure satisfaction, first-time players may want to start with a small test deposit. 🍒 For the easiest transition to profitable real money Aviator Pin Up play, make use of the invaluable demo mode to hone your skills first.
💰🍒 Deposit Options for Funding Your Pin Up Casino Account
The casino is committed to user convenience,offering robust support through chat, email, and Telegram, ensuring asmooth and diverse gaming experience. With more than 50 gameproviders contributing to its diverse library, players are assured of awide variety of options. Our in-depthanalysis has revealed key facts about aviator pin up on this platform,highlighting its commitment to a user-friendly and engaging environmentfor Indian players.
It’s necessary to click “Cash out” before the plane leaves else you’ll lose all your wager on the aviator pin up casino game. Despite https://pinup.net.in/ the simplicity of the Pin up aviator game, you must be patient to win, and clever users create their winning strategies and techniques. Each time you top up your gaming account, a new bonus is provided. Any gambler can easily find crash games in their favorite online casino.
Where can you find the official Pin Up Casino Aviator App Download link?
Additionally, be sure to keep an eye out for special offers from time to time in order to add extra rewards to your sessions! Take advantage of Pin Up Casino Aviator demo mode and perfect your timing before joining in on the action for real money. It’s currently available for Android devices, enabling mobile players to squeeze in a few rounds even when away from their computers. If you’d like to experience the fun of Aviator on the go, then make sure to download the official Pin Up Casino app!
Auto Play & Auto cash out
Aviator signals are claimed to be predictions of the results of the game rounds. On their first deposit of 2000 INR or more, each player will receive 120% up to 450,000 INR extra, which can be used to play Aviator. Playing Pin Up Aviator in the app does not differ from the version on computers when it comes to mechanics, but is much smoother and easier to navigate. After that, the user needs to open the Pin Up app and log in to the profile. The user needs to click on the search bar on the official website and enter the name of the game. Then the player will be redirected to the page with payment details.
- 🍒 Overall, this simple crash game fits nicely into Pin Up Casino’s diverse game portfolio.
- The Pin Up Aviator game has become a favorite among enthusiasts seeking an engaging and unique gaming experience.
- The concept of Pin Up casino Aviator prediction often arises among players seeking to maximize their winnings.
- Aviator online casino game broke into the industry not long ago, but managed to make thousands, if not millions, of fans across the world.
- With moderation, analysis, and consistency, Aviator can provide engaging fun with the chance for steady profits over time.
Aviator allows you to place up to two simultaneous bets in each round, which increases the flexibility of your strategy. Access a detailed history of bets, including amounts and multipliers reached, to analyze your performance. The Aviator game features an optimized interface that simplifies each action. That is a useful option most players use as a Pin-Up Aviator predictor to observe their chances to get the next significant maximum odds. Below are the tools to easily configure and automate the bets. The algorithm in the root of the game is hash-based, preventing cheating and appearance of proven tricks.
- Pin-Up Aviator is a crash game with massive popularity, combining simplicity with exciting, high-stakes action.
- Through a demo mode, Aviator Pin Up casino lets players experience the game free from any financial risk.
- At Pin-up casino, we are committed to providing an exceptional gaming experience for all our players!
- Under the Martingale System, another popular tactic, people who go through Pin Up Aviator login must double their bet size following each loss.
- Pin Up India welcomes new players with an impressive, well-rounded bonus program designed to benefit users.
- While they share a similar gameplay core, each offers unique features, visual styles, and winning potential.
Pros & Cons of Pin Up Casino Aviator Game
Once you are registered, you are free to play PinUp Aviator for free. First, the client must open the official site of the casino in the browser and click on the “Registration” button in the upper right corner. Even the smallest bet can promise solid rewards.
Top Strategies to Win in Aviator
Start playing the Aviator Pin Up game once your account is funded. This can help you fine-tune your approach before switching to real-money play. Even experienced players sometimes make mistakes in Aviator, which lead to losses. I consider myself an experienced player and have tried many online casinos, but I decided to write a review specifically about Pin-Up Casino. The players must never download the prediction apps or game app on their device to save the gadget from hacking. The intuitive interface and user-friendly controls make it easy to navigate the game, allowing players to focus on their strategies.
These methods are not effective and are often scams designed to take advantage of players. Therefore, it-s recommended avoiding their use and only trusting legitimate strategies that respect the random and fair nature of the game. Trusting in the integrity of the RNG and playing responsibly is the best way to enjoy Aviator at Pin-Up. It also sends push notifications about promotions, bet results, and updates from the casino. Using a smartphone to play Aviator provides players with the ultimate in convenience and accessibility. Choose the strategy that works best for you, start playing Aviator and get guaranteed wins.
Explore Pin Up Aviator Download Updates
When it comes to withdrawing your winnings from aviator pin up, Pin Upoffers a comprehensive range of modern banking tools. In addition to traditional options, the site also supports variouscryptocurrencies, including Bitcoin (BTC), Ethereum (ETH), Tether(USDT), Litecoin (LTC), Bitcoin Cash (BCH), and Ripple (XRP), amongothers, offering flexibility for modern players. This section will delve into the convenient deposit andwithdrawal methods, ensuring smooth financial transactions, and outlinethe various ways to get in touch with the pin up support team, providingpeace of mind as you enjoy the thrilling aviator pin up game. To truly make the most of your pin up aviator sessions, understandingthe various tools and support systems available is crucial. Thepinup aviator mobile application is designed with low systemrequirements, ensuring smooth performance on a wide variety of Androiddevices.
Once submitted, your request will be processed by the casino’s finance team around the clock, including weekends and holidays. Deposit processing times range from instant up to 24 hours depending on the chosen payment method. 🍒 It is recommended to verify your identity by providing a document scan to unlock higher deposit limits and enhanced account security.
In fact, there are various strategies and tips on the internet that might help you do that. However, this also means that the chance of the plane flying away and losing your bet is higher too. Keep in mind, though, that the more the plane stays on the display, the higher your win will be. The most important condition is to cash out your bet before the plane flies away. The only difference you will find is that when you play a demo version, you will use virtual credits.
Gambling responsibly should be every player’s top priority. 🍒 Overall, this simple crash game fits nicely into Pin Up Casino’s diverse game portfolio. Players new to the game can try risk-free demo mode to learn.
You can play Aviator on your smartphone anytime — through the optimized mobile version of the website or the full-featured mobile app. This is a great way to start playing Aviator online with an extra bankroll! Pin Up Casino India offers a wide variety of convenient deposit methods for players.
Online Casino
8 min read
Chicken Road 2 Official Website Demo
To protect yourself, always check the app’s developer name — it must display InOut Games as the publisher. Each option ensures you’re playing safely while enjoying seamless updates and secure payments. Each release is signed with a verified developer certificate, and updates are rolled out regularly to patch security issues and introduce new features. Bonuses and loyalty rewards, like free spins and promo codes, are exclusive to funded accounts and won’t appear in the demo. Whether you’re on desktop or mobile, a steady connection (NBN, Wi-Fi 5/6, or reliable 4G/5G) ensures low latency for cashout decisions—crucial in this risk/reward format. Chicken Road 2 runs in modern browsers (Chrome, Edge, Safari, Firefox—latest two versions) with WebGL enabled; 8 GB RAM and any recent integrated graphics are sufficient.
Verdict: Is Chicken Road 2 worth playing?
Scatter symbols are often the gateway to free spins or additional rounds, giving you more chances to win without placing additional bets. The chickens themselves, eggs, farm tools, and tractors serve as regular icons, while special symbols such as wilds and scatters open the door to bigger opportunities. Setting personal limits is always a good idea, whether that means choosing a budget for each session, deciding how much time you want to https://chickenroad2gameapp.com/ spend playing, or taking breaks when needed. Players are responsible for making sure they are allowed to play by local regulations. Players are invited to join a group of chickens as they make their daring journey across a busy road. At its heart, this is a video slot game with five reels and multiple paylines, but what makes it stand out is the story it tells.
Is the 98 percent RTP a guarantee that I will win over a night?
Keep sessions short and avoid playing when tired or stressed. Set deposit and time limits at the casino account level when possible. Treat the game as paid entertainment, not as income. If you want a calmer experience, start on Easy and stop early.
For specific RTP information for each game, please visit the official INOUT Games website or contact them directly. Celebrate incredible victories from our player community This ensures that no party can manipulate game outcomes after the fact. Every bet, spin, and result can be mathematically proven to be fair and unmanipulated. Now that you know the basics, it's time to experience the excitement of INOUT Games for yourself! The excitement builds as you progress through the game.
- We conduct regular audits and compliance checks to maintain the game’s integrity and transparency.
- The sound design further enhances the experience, with upbeat music and playful effects that match the game’s energetic pace.
- Cashing out after three successful crossings can make sense, as the cumulative risk increases.
- That's why we made it super easy to get our games up and running on your platform.
- These essentially give you extra chances to win without risking additional funds!
- Outside of InOut Gaming, there are other developers offering similar crash games.
Our infrastructure includes Cloudflare DDoS mitigation and ISO/IEC certified hosting that blocks unauthorized access to game servers. Users love the visuals, but they often mention those intense high-risk streaks that can hit hard. We provide auto-cashout sliders from 1.5x to 100x to help you cap risk or secure profits.
Multiplier progression game with five positions (x4.95 to x62.96). The better you aim, the better your chances - simple as that. This game will put that to the test.
More InOut Gaming Highlights
- The world of Chicken Road 2 immerses players in a colorful countryside setting where our feathered friends are up to their usual mischief.
- From generous welcome packages to ongoing promotions, these casinos ensure you’ll have plenty of extra funds to explore this exciting crash game.
- It's identical to the real-money version with that same 96.72% RTP and medium-high volatility, making practice runs feel real.
- This mode is designed for high-risk enthusiasts who aim for maximum multipliers and accept a low margin for error.
- It's got all the games, works offline for demos, and it's secure.
- The RTP stands at a solid 97 percent, meaning fair chances of winning for you as a player.
Don’t be afraid to switch up your approach, and always prioritize playing within your means. After playing a few rounds, take some time to reflect on your results and adjust your strategy accordingly. Consider whether you want to stick with your current strategy or adjust your approach based on your recent experience. Take a moment to review your results – how much did you win, and at what multiplier did you cash out? The frequency and placement of hazards increase with higher difficulty levels, adding to the challenge and excitement.
Stick to Your Limits
There’s also a Safety Streak bonus that rewards you for dodging 20 vehicles in a row. Golden eggs appear more often during this round, each one worth up to five times your bet. Multipliers between 3x and 10x are up for grabs if you keep your run going. Once triggered, the game ramps up the action—traffic speeds up by half, but your possible rewards climb too. As you progress, the game keeps things fresh with new challenges and extra payout opportunities, making every session unique.
Win up to $22,000 Chicken Road 2 Money Game
The responsive design means the game automatically fits your screen, supporting everything from smaller smartphones up to larger displays. You help a determined chicken cross hectic roads for casino rewards, and the experience is just as smooth on your phone as on your computer. Unlike demo mode, your winnings here are yours to withdraw, following the casino’s terms.
Select Difficulty Level
The absence of separate bonus rounds is balanced by the excitement of the main game, where each move presents a new opportunity for a higher payout or the risk of losing the bet. The game allows instant cash-out at any stage, letting players secure winnings before risking further progress. Chicken Road 2 distinguishes itself with a set of interactive features that make gameplay both strategic and engaging. Chicken Road 2 Features & Bonuses introduces a dynamic layer of excitement and strategy to the gameplay experience.
Chicken Road is available at various online casinos that offer games from Inout Games. Overall, Chicken Road is definitely worth trying, especially for players who enjoy quick, intense gaming sessions with the possibility of substantial payouts. The addition of Space Mode adds an extra layer of interactivity, setting it apart from many other crash games on the market.
Hitting any hazard immediately ends your round, regardless of how far you’ve progressed or how high your multiplier has climbed. This adds a skill-based element to the game, potentially giving you more control over the outcome. This feature allows you to control the chicken’s movement using the spacebar on your keyboard (or a designated area on mobile devices). The longer you wait, the higher your potential payout becomes, but the risk of losing everything also increases. As the multiplier grows, you must constantly evaluate whether to cash out or continue. At this point, the game is live, and you’ll need to stay alert to make quick decisions.
Fair Technologies
As players progress through the game, a prominently displayed multiplier increases with each successful stage. This feature not only enhances the gameplay experience but also contributes to the game’s overall aesthetic appeal, making each round visually exciting and nerve-wracking. This clear visual representation of risks adds to the game’s excitement and helps players make split-second decisions. On the other hand, experienced players or those looking for high-stakes thrills can place bets up to €200, potentially leading to significant payouts. This feature significantly enhances the game’s appeal, providing players with better long-term odds and more value for their bets.
Watch the game closely and don’t let greed take over. Develop a clear exit strategy before you start playing. Each successfully crossed segment increases your win multiplier.
Check the promotions section of your chosen casino partner for more details on available bonuses. It’s a great way to get comfortable with the game before placing actual bets. Your goal is to progress as far as possible while managing your bets and taking calculated risks to maximize winnings. In the game, you guide a chicken across a road filled with obstacles, aiming to reach the golden egg. In terms of security, Road Chicken game online casino benefits from the standard protection measures used by reputable online casinos.
Win Up To €20,000
Colors are bright but not distracting, and all important elements like the multiplier and cash-out button are always easy to see. Visually, the game relies on clean, cartoon-style graphics. The theme is based on a classic idea—a chicken crossing a dangerous road—which makes the goal clear from the first second. Remember, success isn’t just about luck—work smarter, not harder—and let your betting history guide you to better results! Chicken Road includes a betting history feature to help you track your previous wagers and outcomes.
How do I integrate INOUT games into my casino platform? +
Winning in Chicken Road 2 isn’t just about luck — it’s about knowing when to cash out, how to size your bets, and how to handle the game’s volatility. Casual players and small rollers may prefer low-deposit free spins or no-deposit trials, as they provide quick fun without a big commitment. Pay attention to maximum bet limits during wagering (e.g., AU$5 per spin), as exceeding them can void your bonus. Game weighting applies — slots usually count 100% toward wagering, while table games may contribute less. Every Chicken Road 2 bonus comes with specific terms that are vital to understand before playing.
Online Casino
8 min read
Free Online Games 𝟏𝟔𝟒𝟗𝟐 games
On any given day, your personal experience might differ dramatically. Just remember that in the short term, anything can happen – that's what makes gambling exciting in the first place! 🛑 Play responsibly, and may your chicken always reach the other side safely! Stay cool, stick to your strategy, and accept that sometimes, the chicken just doesn't make it. That's how bankrolls get flattened faster than chickens on highways! Don't chase losses by increasing bets after failed crossings.
The key to maximizing payouts is knowing when to cash out, as waiting too long results in losing the entire bet. The challenge is deciding when to cash out before the chicken is burnt, as failing to do so results in losing the bet. Mastering this Chicken Road game is all about striking the right balance between risk and reward. With a structured interface and clear visual indicators, the game provides an accessible yet challenging experience. The game mechanics focus on precision and timing, with gamblers needing to decide when to continue moving or when to cash out. The game offers multiple complexity levels, each with its risks and prizes.
Chicken Road on Mobile – Perfect for On-the-Go Gaming
There’s something thrilling about not knowing what’s going to happen next. Do you cash out now and take the safe money? Just head over to Valorbet on your phone or computer, sign in, and start playing. With an RTP of 96.7%, Chicken Road game money potential is no joke.
- From what we’ve gathered while making this review, the player experiences with the Chicken Road app are mixed, with both praise and criticism.
- This one’s risky and controversial, but some murgi wala game players use it in Easy or Medium mode.
- The majority of players greedily hold out for ×10, ×20, or even higher.
- There are about 10 variations of the chicken road crossing money games in India as of January 2026, according to OnlineChickenRoadGame.com.
- The players place their bets and watch as the multiplier increases.
How to Play the Chicken Road Game (And Win Real Money)
So, what kind of chicken road cash withdrawal games are available for Indian punters? Indian players should always treat it as a real-money risk, not entertainment only. Canadian players share that Chicken Road 2 delivers steady excitement, thanks to its easy-to-follow gameplay and fast pace. 🔍 Their transparent approach to game mechanics and commitment to player satisfaction has earned them trust throughout the gaming community. Yes, you can win real money in Chicken Road Game. What makes our games special isn't just the chance to win big – it's the heart-pounding excitement of each play.
Chicken Road Game User Reviews: What Players Are Saying
- It's not the white-knuckle ride of high volatility games, nor the steady drip of low volatility titles.
- Players often recommend starting with smaller bets to learn the flow before adjusting your approach.
- One of the main advantages of playing Chicken Road at 1win is the intuitive interface, which allows even beginners to navigate effortlessly.
- From the latest flagship phones to more modest tablets, the optimization ensures smooth gameplay regardless of your hardware preferences.
- You can also play the free demo to practice before going to play for real money!
Use these to understand traffic patterns and optimal crossing strategies without risking real money. Our Chicken Road Game application is certified malware-free and respects your privacy - we collect only essential data needed for gameplay functionality. The 5-reel, 25-payline setup offers plenty of winning opportunities while maintaining straightforward gameplay.
Fairness and Verification
To download the BigCash app to play online free games, you can follow these general steps. If you want a fun, exciting game that’s quick and easy to play and has the potential to win real cash, Chicken Road is the best. Unlike playing in land-based casinos, where access is restricted, mobile gambling is available 24/7, making it easier to lose track of time and money. This chapter explores four advanced cashout techniques that can enhance your gameplay experience. Whether you’re playing for fun or real money, the process is straightforward. The Chicken Road app is software that includes a crash game where players control the chicken moving across the road.
While Chicken Road mobile is a game of chance, applying smart cashout strategies can help you manage risk and maximize potential winnings. The gameplay remains identical to real-money mode, giving users a risk-free way to practice, test strategies, and build confidence. Changing your bets based on previous results allows for a more calculated approach to win real money In addition to being an online crash game, Chicken Road purse also utilizes intelligent features and winning strategies that help players improve their gameplay. Sign up today to claim top-notch perks for your uninterrupted gameplay for real money.
The chicken might not survive every https://chickenroadapp.in/ run, but you should. Stick to Easy difficulty, cash out after 5–10 steps. This keeps you in the Murgi wala game longer and lets you take advantage of big runs without busting in the first five minutes. The APK is certified by iTech Labs and should be downloaded only from trusted casino platforms. The biggest draw of the Chicken Road game is its staggering top payout — up to ₹1,810,000 from a 20,000x multiplier.
How To Play Chicken Road Games with Indian Rupee
No distractions, just straight betting mechanics with clear parameters players in India look for. Chegg India does not ask for money to offer any opportunity with the company. You can check every round’s results using the game’s history and verify outcomes with a third-party tool, confirming everything is random and fair. If the game disconnects, your active round is cancelled and your original bet returns to your balance right away.
What sorts of levels are there in Chicken Road?
Below are 3 common strategies Indian players use to manage risk and chase profits smartly. Murgi Wala Game (Chicken Road) throws players into a dungeon where the chicken must dodge rising flames to stack multipliers. If your chicken grabs it, you get a one-time shield that protects you from the next collision, letting you continue or cash out with no loss. Many find steady wins by setting automatic cash-outs or switching lanes to avoid patterns. Players often recommend starting with smaller bets to learn the flow before adjusting your approach. Chicken Road 2 lets you play your way, whether you prefer small bets or want to go big.
You might come for the laughs — but you’ll stay for the wins. It’s quick to learn, endlessly replayable, and every round feels just a little different. Want to last longer and maybe win more? You don’t need a separate Chicken Road game download, and definitely no shady Chicken Road APK from unknown sites. You can try the Chicken Road game demo on our site, completely free.
Free Demo Mode — Learn to Win Without Any Investment
Each step increases your potential winnings, but also increases the risk of your chicken getting fried! The Chicken Road slot throws you right into the action with straightforward gameplay that's easy to learn but difficult to master. In this comprehensive guide, we'll walk you through everything you need to know to get started playing Chicken Road and maximize your winning potential. Practice, learn, and enjoy games only on the BigCash app. The BigCash app has been trusted by more than 5 crore players. The theory is to make small wagers, extend play and cash out while the risk of losing is low.
Minimal Risk Strategy
Each time your chicken crosses a lane safely, your payout multiplier rises. This section covers everything from game rules and payment methods to technical support, ensuring you have all the information you need. Some also try raising bets after losses, aiming to recoup quickly, then returning to their usual wager. Many enjoy outsmarting obstacles for the chance at bigger wins, with highlights often coming from lucky streaks and close calls. Its Random Number Generator is certified by iTech Labs, making sure each game is fair and reliable for you.
Master the Road: How to Play
(for example, 1.5x up until 2x) provide constant guarantees for winning Players have the flexibility of switching to other levels of the game depending on their strategy. From novices to experts, harnessing these tools helps increase your winning potential.
Indian Paisa Kamane Wala Murgi Wala Game Strategies
In this guide, we have reviewed and collected all the chicken road crossing games available on Indian online casinos. It’s light-hearted, fast-paced, and yes — you can actually win real money playing it. Made for Canadian players, this game mixes arcade-style excitement with real-money rewards and sharp timing on the official website. 🎮 Our dedicated mobile application delivers smoother gameplay, reduced loading times, and exclusive features you simply won't find anywhere else. Chicken Road offers a free demo mode that allows you to practice the game without risking real money. Once you win, your real money winnings are automatically added to your gaming account balance.
With a max win of up to 20,000x stake (₹18.1 lakh), a single safe jump can turn ₹100 into thousands, but one wrong move in the fire wipes it all.
The mobile version liberates the game from the confines of your home, making every moment a potential gaming opportunity. From the latest flagship phones to more modest tablets, the optimization ensures smooth gameplay regardless of your hardware preferences. Chicken Road is a simple and engaging game where you place bets and predict how far the chicken will run without hitting an obstacle. Whether you want to practice in demo mode or jump straight into real bets, Chicken Road provides an engaging and trustworthy experience.
Online Casino
6 min read
Chicken Road crash game review with cash out tips
And while it’s not an Indian-made game, the humor and fast pace feel tailor-made for Indian players. We've partnered with several major entertainment brands to create special crossover events, allowing players to guide their chickens alongside popular movie and TV characters. Unlock rare skins through gameplay achievements or seasonal events, and show off your one-of-a-kind chicken to friends. Our advanced algorithm creates unique traffic patterns, obstacles, and environments that keep the gameplay fresh and challenging no matter how many times you play. With stunning graphics, addictive gameplay, and constant updates, Chicken Road offers endless entertainment for players of all ages.
A lot of crash games are abstract graphs and numbers. The core promise is consistency of logic across modes, not complex features. Crash games are built on one simple decision you repeat fast. Like Flappy Bird or Subway Surfers, it could quietly sit on people’s phones for years, waiting for that next “I’ll just play one round” moment. Updates keep rolling in — new maps, sound effects, maybe even multiplayer modes soon. As of now, the game’s still growing fast.
Urban Crossing
- The risk increases with each move forward, and so does the potential reward.
- I hit x15 a few times on Pin-Up, but I mostly lose.
- The salad, chicken biscuit sandwiches and breakfast biscuits are fan faves, too.
- Or are you a high-rolling champion, chasing the tempest of maximum multipliers in Hardcore mode?
- The most popular menu items are its southern chicken, buttermilk biscuits and tea made fresh daily.
Check out our casino section for more details about playing at 1Win and to get exclusive bonuses. We regularly update the Chicken Road mobile app to add new features, improve performance, and fix any issues. However, in-game betting and transactions may require real money depending on your chosen casino platform. Yes, the Chicken Road mobile app is completely free to download for both Android and iOS devices. Discover why playing Chicken Road on your mobile device is the ultimate gaming experience.
You learn timing and tilt signals before risking real balance. Start in demo and play Easy for 30 to 50 rounds. Set deposit and time limits at the casino account level when possible. Crash games can be intense because the feedback is immediate.
iOS App Download Tips and Info
We use bank-level 256-bit SSL encryption to protect all player data and transactions. Download the Chicken Road game APK now and get 100 FREE SPINS on your first deposit! Chicken Road is developed by Inout Games, one of the most innovative and respected game studios in the iGaming industry. "The tournament leaderboards add so much excitement! Won 3 tournaments this month totaling $7,800. Level 3 difficulty seems to be my sweet spot." Real money version offers bigger wins!
Chicken Road is available at many top online casinos including LuckyStar, Mostbet, and others. Yes, Chicken Road is available at PIN-UP casino! Yes, you can play Chicken Road at 1Win!
Special Abilities or Skins
We work only with licensed and safe online casinos, so your play is smooth, your payments are quick, and your winnings are always secure. Every part is made for you in mind whether you’re a novice trying out your tricks in demo mode or an expert player wanting to top the global leaderboards. You'll notice superior graphics, smoother gameplay, and higher payouts compared to imitations. Our Chicken Road app is 100% safe to download and play. Chicken Road gambling game is available for players 18+ in permitted jurisdictions only. Founded in 2012, Inout has established itself as a leader in creating high-quality, fair, and entertaining slot games.
Chicken Road is one of those games that looks simple at first glance but quickly pulls you in with its tension and fast-paced decision-making. Help the chicken reach the golden egg and multiply your winnings! All game mechanics, difficulty levels, and payout structures are identical across all platforms. Visit our casino section to learn more about playing at PIN-UP and discover special promotions.
Best Chickens for Each Mode
"Hit the max win on Level 5 difficulty - $250k! Verification took 2 days but payout came through exactly as promised. Life changing!" "The difficulty progression is perfect - started at level 1 and now comfortably playing level 4. Won $12,850 total across all levels!" Chicken Road demo play is limited to $1000 in virtual credits.
CHICKEN ROAD REVIEW BY iNOUT GAMES FOR CASH OUT PLAY
- Within this group, Chicken Road positions itself as a modern video slot with just enough complexity to keep things interesting.
- The chicken moves smoothly across your screen, the road animations are crystal clear, and those multipliers pop up beautifully.
- We've completely redesigned the game for touch screens, and it feels amazing!
- That's exactly why we created our mobile app - to bring the road-crossing adventure right to your pocket.
Each mode is more than just difficulty—it’s a different mental model. A balanced zone where most real-money players are active. At the highest level of play, Chicken Road can reward you with a maximum win of $20,000 on a single run—no gimmicks, no layered bonus wheels. Curious how far your chicken can go without risking real https://chickenroadapp.in.net/ money?
🌍 Play Anywhere, Anytime
It prevents the common mistake of switching modes mid session without a reason. That is volatility, not “harder graphics.” On the hub, the modes are described with different line counts, from 24 down to 15.
Technical Conditions for Slot Game APK
When you’re ready to cross from rehearsal to reality, downloading the full Chicken Road app is as simple as a tap. Whether you crave the low-risk stability of Easy mode or the white-knuckle drama of Hardcore, this game is your arena. The game’s soul is built on the DNA of arcade classics, yet it sings with the modernity of HTML5 technology, ensuring seamless play on PC, smartphone, or tablet. Chicken Road is not just a slot—it’s a living, breathing arcade experience. Make it to the end, and you might just unlock the legendary x3,203,384.8 win—a jackpot so grand it belongs in the pantheon of the greatest crazy games ever dreamed.
Understanding how symbol groups and paylines interact is essential if you want to evaluate the long-term value of any slot. Wins will not land on every spin, but when features connect, the payouts can climb quickly, especially during free spins or special symbol combinations. The visuals are friendly enough for casual traffic, but the underlying mechanics remain aligned with modern iGaming standards. For outreach text, the rural angle is easy to integrate into wider content about seasonal events, harvest themes, countryside lifestyle or “feel-good” casino collections.
In Austria, where many players use EUR wallets, it helps to set strict per hour limits. If you are commuting in Vienna, this mode forces you to play only when focused. The best approach is to treat the road as a timer for decisions, not as a promise. Many players treat each line like a checkpoint and hesitate longer than they should.
Or are you a high-rolling champion, chasing the tempest of maximum multipliers in Hardcore mode? There are no bonus rounds, no free spins, no Wilds or Scatters to rely on. With a Return to Player (RTP) of 98%, Chicken Road smashes the conventions of classic slots. Picture yourself guiding a plucky chicken across a gauntlet of fiery obstacles.
It also complies with local jurisdictional requirements where real-money play is permitted. The game meets international iGaming standards, including testing for fairness, volatility transparency, and payout consistency. This is the official Chicken Road, where every game is not just fair—it’s provably fair. As the official creators of Chicken Road, we built the game from day one on provably fair architecture—so every outcome can be independently verified, every time.
However, casinos may enable or disable specific difficulty modes, adjust visual themes, or create branded versions through custom skins as part of premium integration. Difficulty modes are player-facing features and remain consistent across all platforms to maintain fairness and RTP integrity. We provide every user with $1,000,000 in virtual credits, so you can test all difficulty levels, multipliers, and bonus logic without spending any real money.
Online Casino
6 min read
Is Chicken Road Legit? Reviews 2026: Real or Fake Game
In crash games, variance can be intense even with high RTP because outcomes cluster. A lot of crash games are abstract graphs and numbers. The chicken starts at the first line and the multiplier grows with each safe step. It is not a money-making game; it is a gambling-style game with high risk.
Medium mode as a default for many players
InOut Games has developed the game which is a reliable company for delivering a trustworthy game. Some of them will leave you even more confused, but we will tell you everything about its safety, legitimacy, and whether it’s worth your time. But like every other viral game, this game is new and popular, so many of you are having doubts like Is the Chicken Road Game legit or a scam?
The game does not require unnecessary permissions or access to sensitive data, which suggests a strong focus on user safety. This can mean a few things — is the game safe to download? Its simple mechanics, combined with engaging visuals, have made it a favorite among casual gamers.
How Live Experiences in Gaming Bring People Together Digitally
These strategies aren’t guaranteed to succeed, but they add structure to the otherwise chaotic and random nature of the Chicken Road game and other crash titles. Each Chicken Road crossing game difficulty level ends with a golden egg, which indicates the highest multiplier value for that level. So, by regularly cashing out wins at 1.5x to 3x, either manually or by setting auto cashout multipliers, you don’t blow your bankroll chasing after big wins. Chicken Road is a high volatility crossing game, with frequent busts and the occasional high multiplier wins exceeding 50x. The safe strategy is ideal for casual and beginner players, as it allows for the accumulation of steady, consistent wins.
Aré you suré this is legit
You won’t win every time, but overplaying often leads to losing more than you should. Whether is Chicken Road game legit or not comes down to the licensing and compliance of the casino offering it. When a game is built around fairness from the code up, and the provider is known for audit-ready systems, there’s no guesswork involved. Operators integrate InOut’s games using SoftGamings’ unified API, which simplifies things on the technical side. Chicken Road has gained attention quickly, but not every player is sure it’s trustworthy.
Many serious players set a cap like five tries, then stop. In Austria, where many players use EUR wallets, it helps to set strict per hour limits. Many players keep the same stake from Easy, then complain about volatility. Many players treat each line like a checkpoint and hesitate longer than they should.
Sign up with Instant Casino Today 🫶
- If you want a calmer experience, start on Easy and stop early.
- Online casino regulation in India is managed at the state level, and Chicken Road does not have official legalization nationwide.
- All that running animation of your chicken you see?
- Real casino games use publicly-auditable algorithms so you can verify each outcome.
If RTP is 96%, the house edge is 4%, meaning the casino keeps about $4 of every $100 wagered in the long run. It’s the casino’s built‑in profit percentage. It's revolutionary because traditionally, you had to simply trust that casinos were honest. The game uses both numbers to determine the outcome.
Best Chicken Game Casino – Where to Play Chicken Road Game (
Chicken Road is a crash-style game with a rising multiplier and the ability to cash out wins at any stage of the game. So, you can conveniently play these games on your phone browser without having to download third-party apps. But you risk losing your entire bankroll without the proper gameplay approach. Your playing strategy largely determines how much you wager per round and how far you’re willing to push the chicken before cashing out. You can also play 4,000+ real money slots, live dealer titles, and game shows.
In recent months, the chicken road game legit has gained popularity among casual gamers and mobile app enthusiasts. Players can enjoy the game without being forced into purchases, maintaining a fair and honest gameplay experience. The chicken road game is real as a digital product but fake in what it promises. In this article, we look at what makes the game legitimate, how regulation works, and what to check before playing on any online casino.
Can we really earn real money at Chicken Road Game?
Fast Slots delivers on its name by providing a streamlined, efficient gaming experience focused on speed and simplicity. While the selection isn’t huge, its uniqueness helps it stand out and offers a fun alternative to the standard chicken road format. Samba Slots injects a dose of vibrant carnival flavor into the online casino world, offering a unique and festive theme. Members earn loyalty points for playing, chatting, and participating in community events. Discasino revolutionizes the online casino space by deeply integrating its platform with Discord, fostering a vibrant, community-centric environment.
Is Chicken Road legit? FAQs
Gaming authorities across different countries actually insist on this certification to guarantee that results are genuinely random and fair. All that running animation of your chicken you see? So don't worry if you see winning streaks or dry runs, that's just normal mathematical variance, not the game being dodgy. The odds are typically set up so that short runs succeed often, whilst those massive multipliers on farther spots are much rarer.
- It is a solid choice for players seeking a more laid-back atmosphere combined with reliable casino performance.
- However, you have better chances of cashing out and making profits with the safe strategy, which mostly involves smart timing.
- Chicken Road is a simple gambling game where a player controls a chicken crossing a road full of traps.
- Below is a practical configuration table you can screenshot and reuse when comparing casinos.
- You can browse our recommended casino list (see “Top Casinos to Play Chicken Road” above) to find a safe choice.
Lucky Block has firmly established itself as a leading crypto-centric casino, renowned for its exceptionally fast transaction speeds and player-friendly terms. Leaderboards are integrated into million-dollar Drops & Wins events, adding a competitive layer to every chicken road session. chicken road This specialized lobby cements its status as a premier destination for players who love this specific genre.
Only gamble if you are of legal gambling age in your jurisdiction. Just remember to treat Chicken Road as entertainment if you play responsibly, it can be a lot of fun. The 98% RTP is very attractive, and the potential for big multipliers on higher difficulties adds excitement.
Once your deposit is confirmed, your balance will reflect the funds and you’re ready to play Chicken Road for real money. After you have an account, you’ll need to add money to play Chicken Road for real. First, pick a reliable online casino that offers the Chicken Road game. One feature that makes Chicken Road stand out from other crash games is its four difficulty settings.
Fairness Verification
When you're playing chicken road betting games and hit that "play" button, it's actually the RNG that instantly determines exactly where your chicken will end up crashing. The casino’s crypto focus perfectly suits crash-style gameplay, with the use of blockchain technology allowing for provably fair games. Chicken Road is a popular mini-game in the crash format within online casinos, attracting players from India with its dynamic gameplay and the possibility of quick wins.

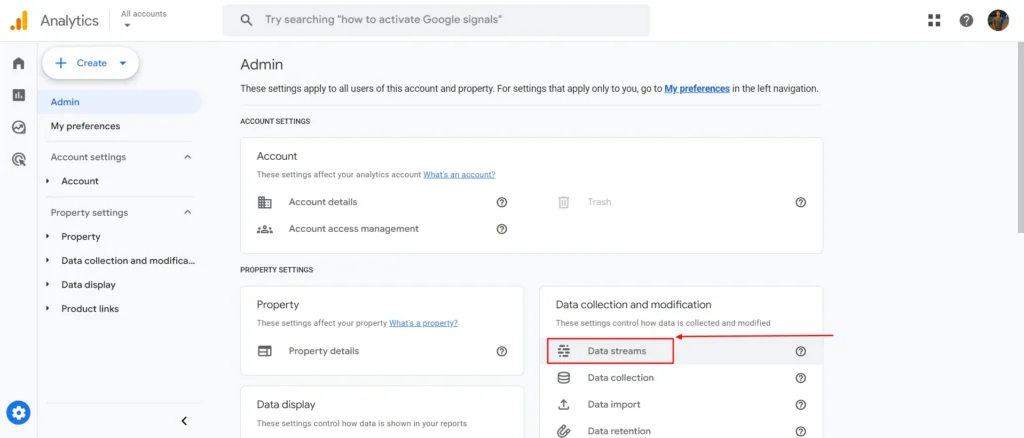
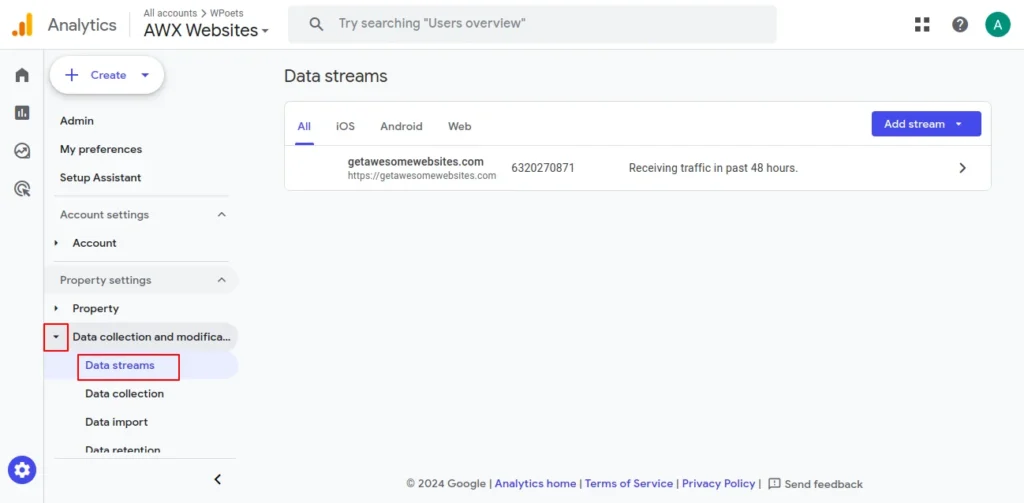

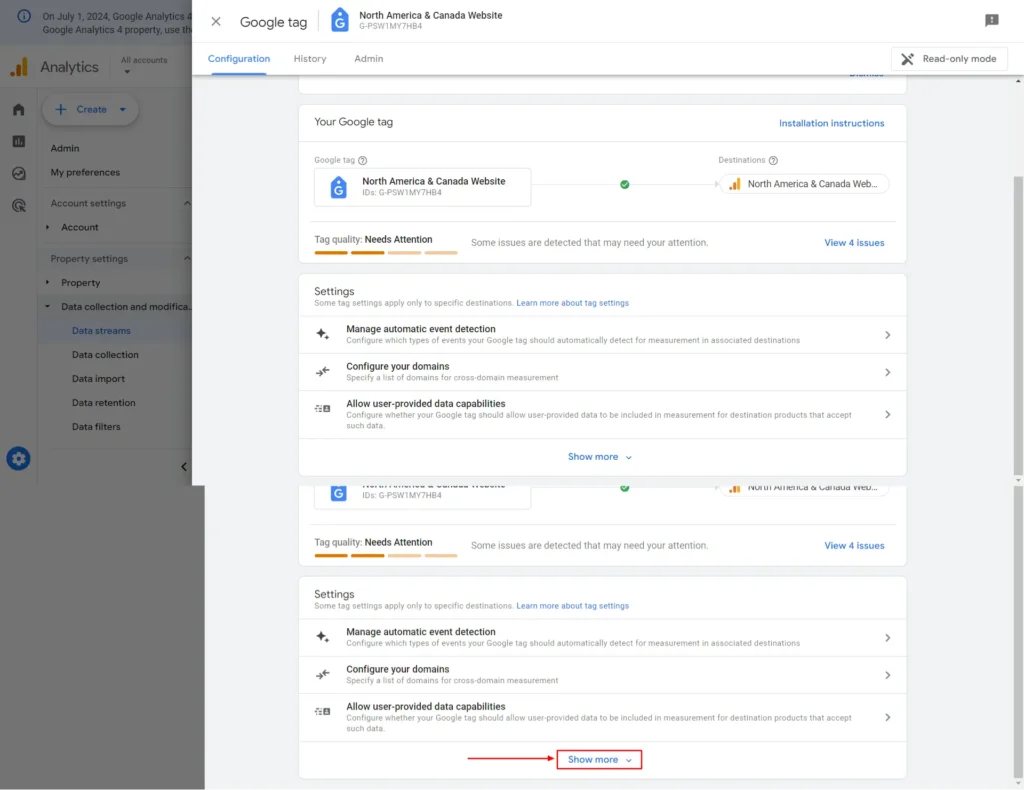
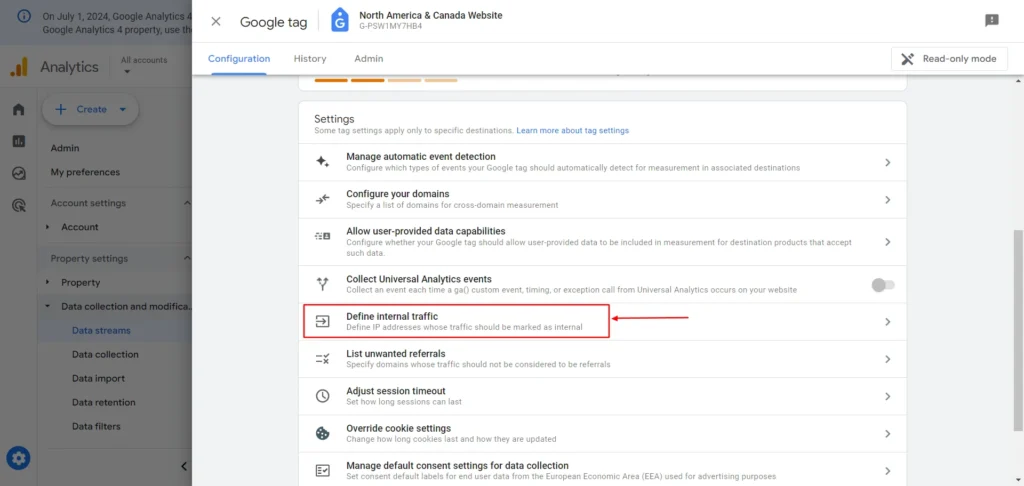
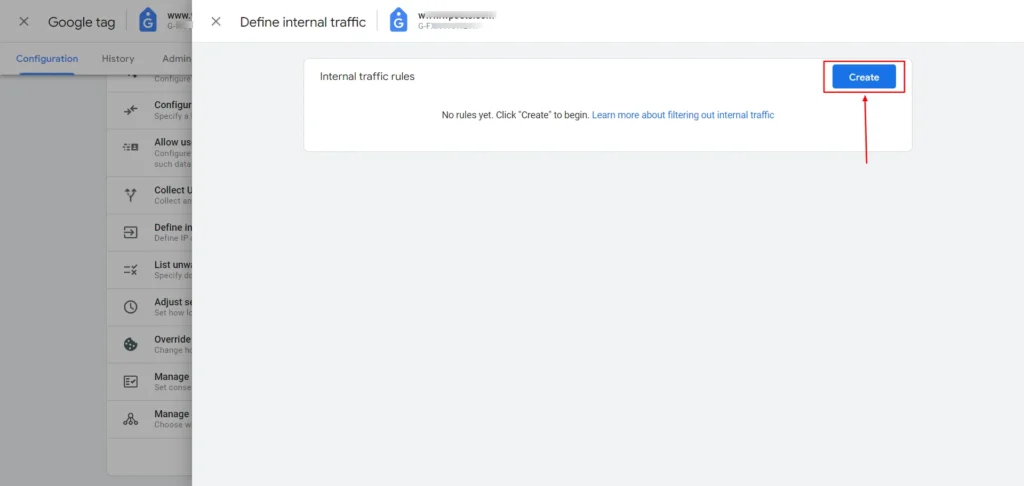
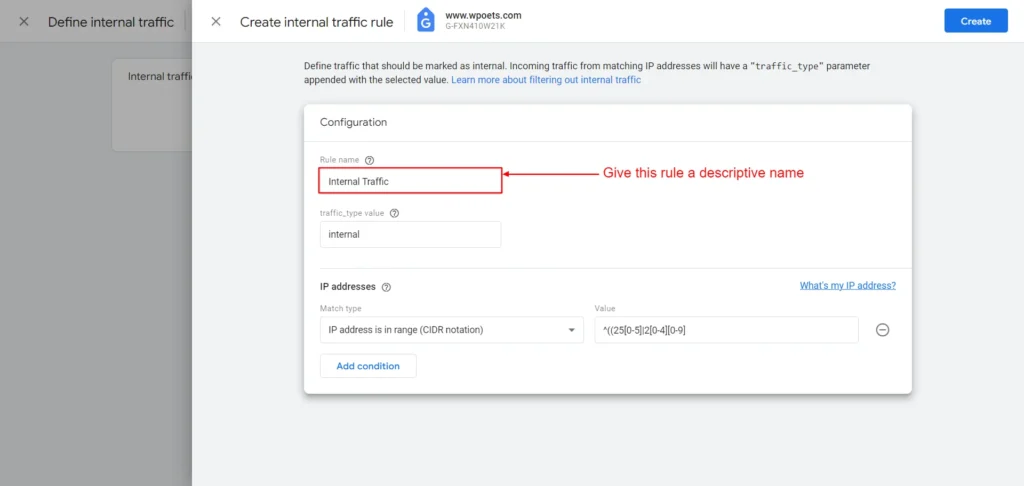
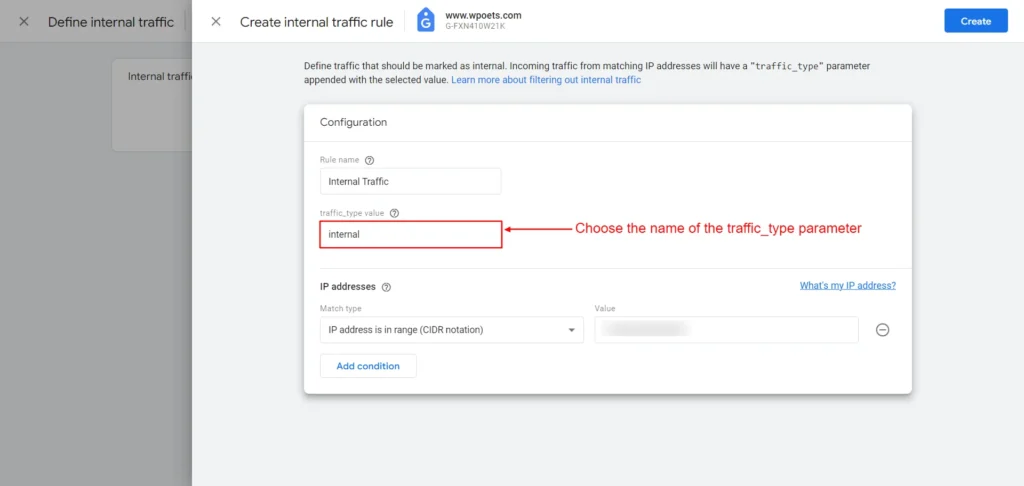
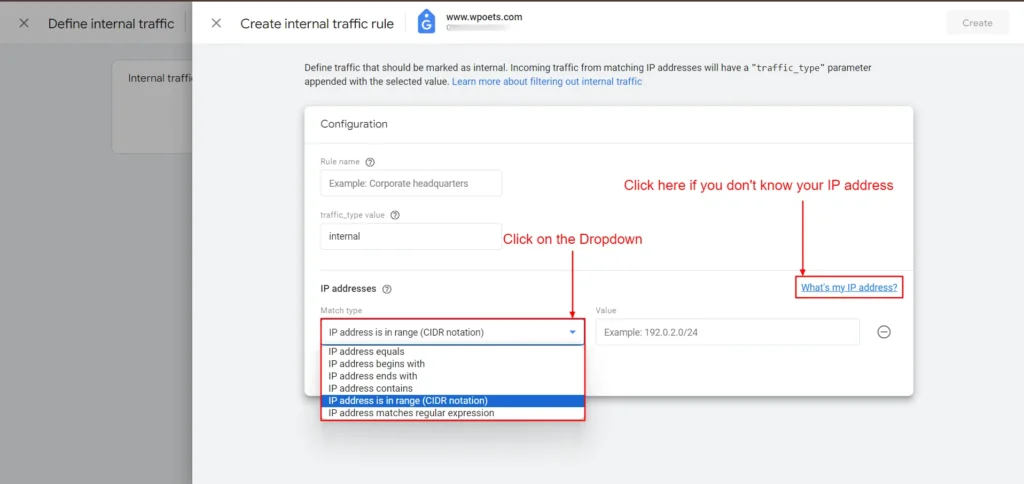
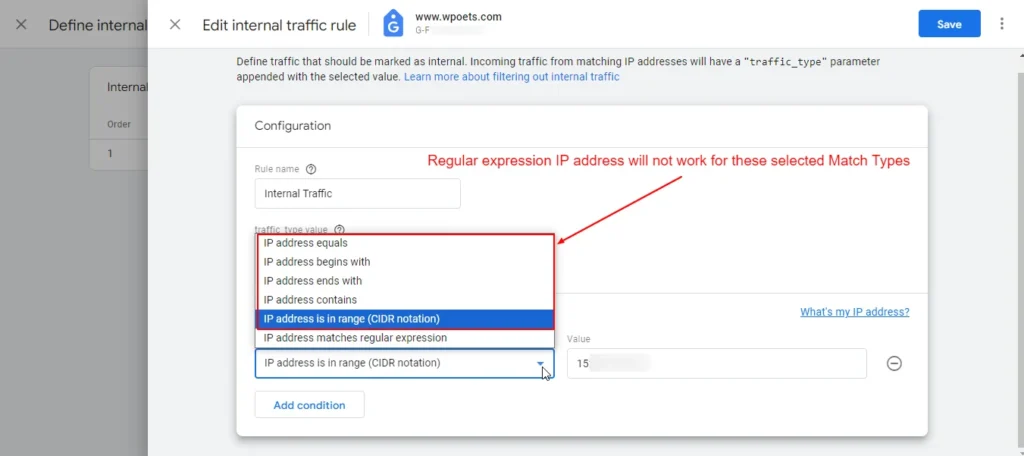

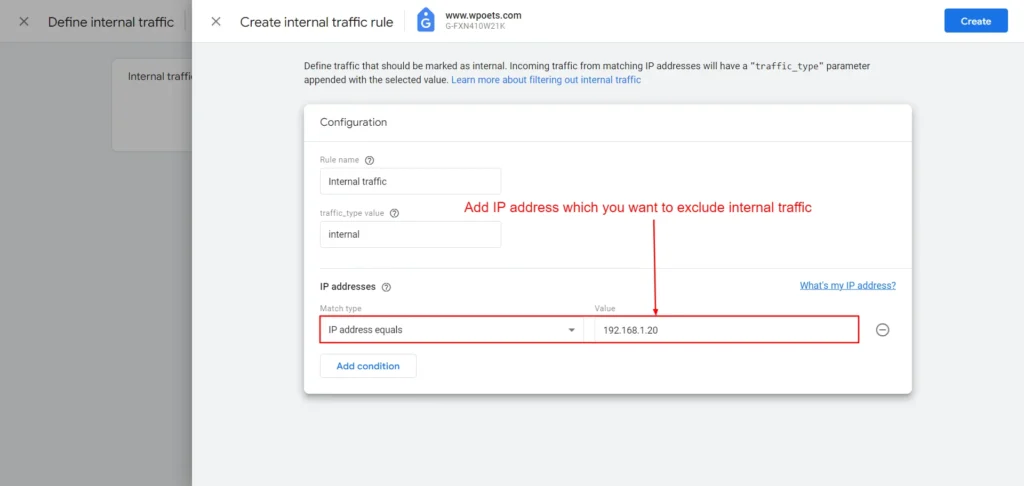

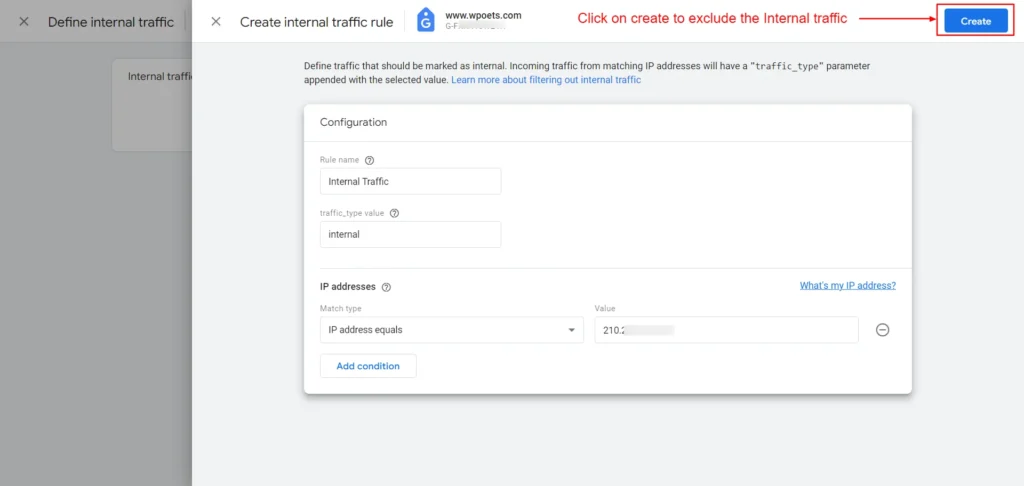
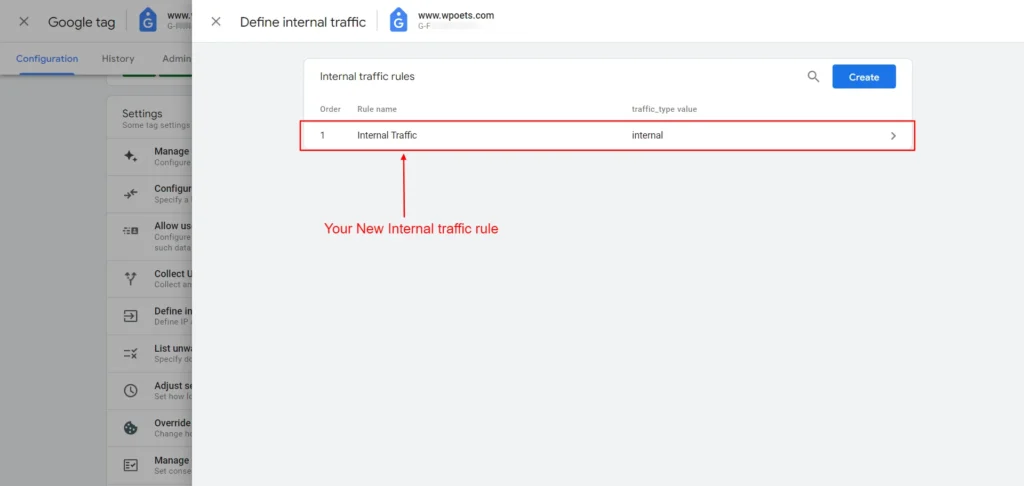
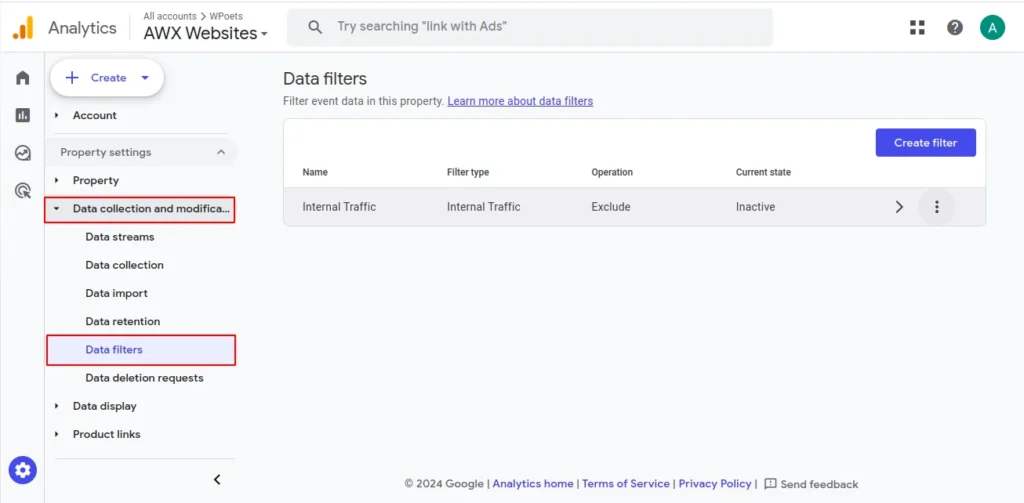
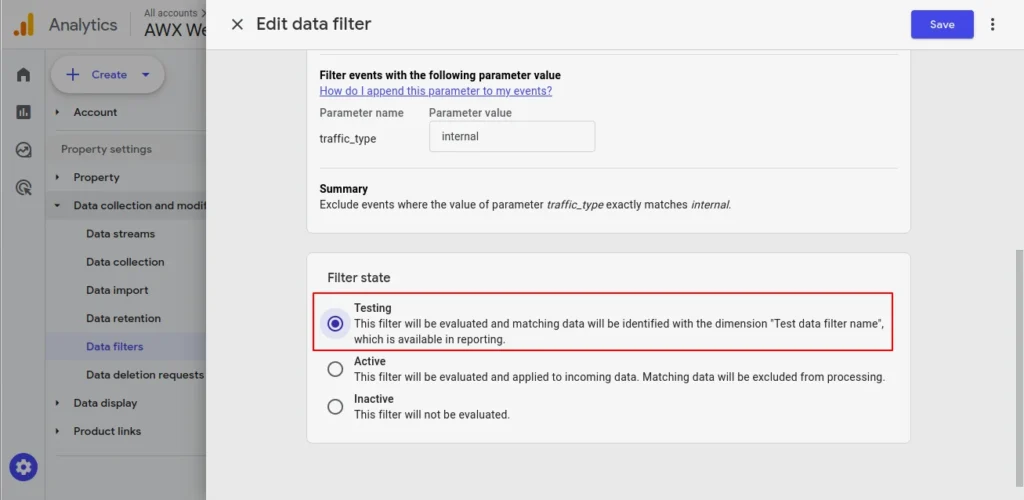
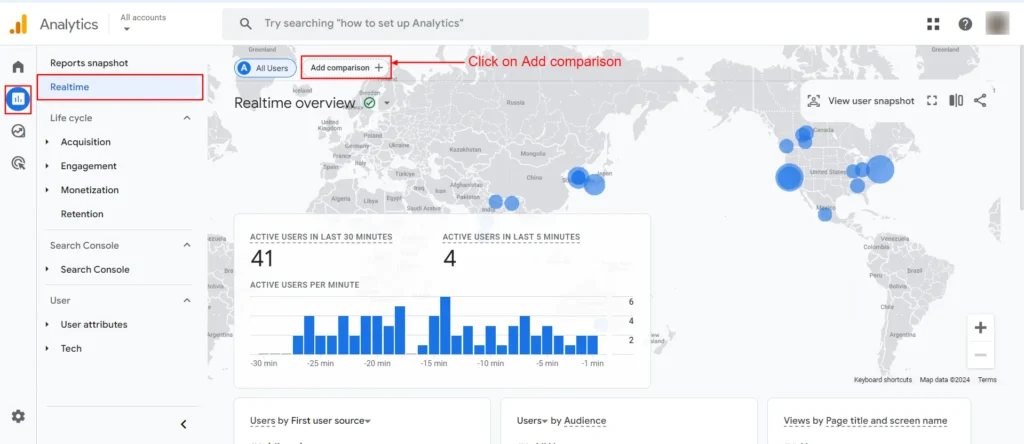
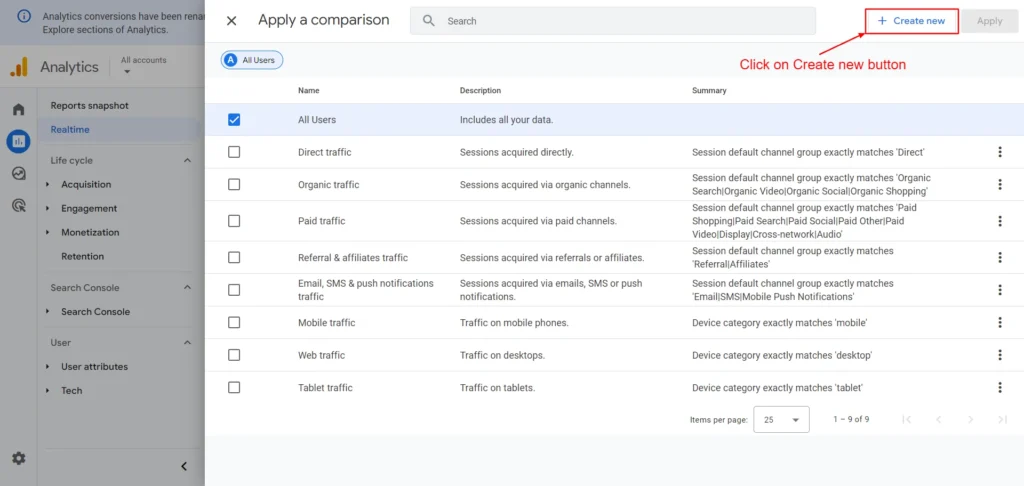

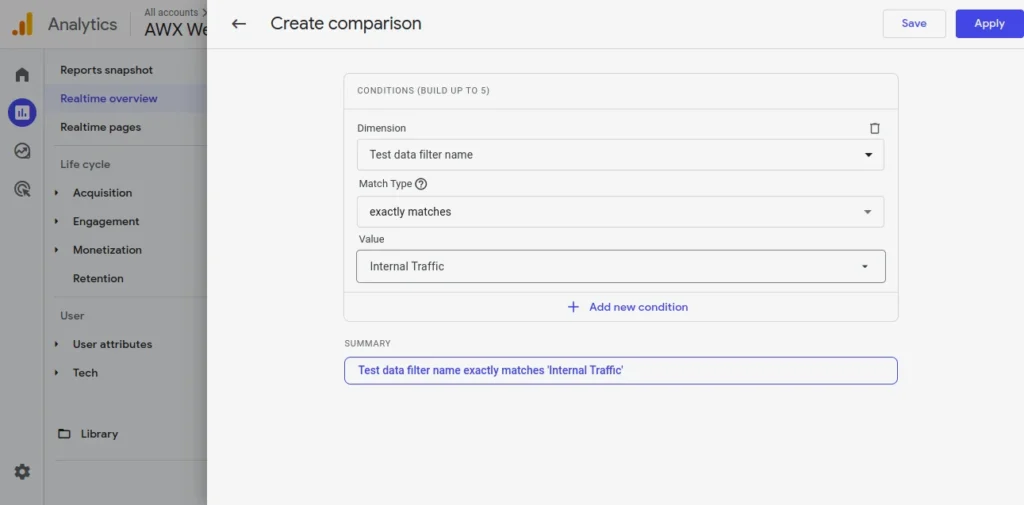
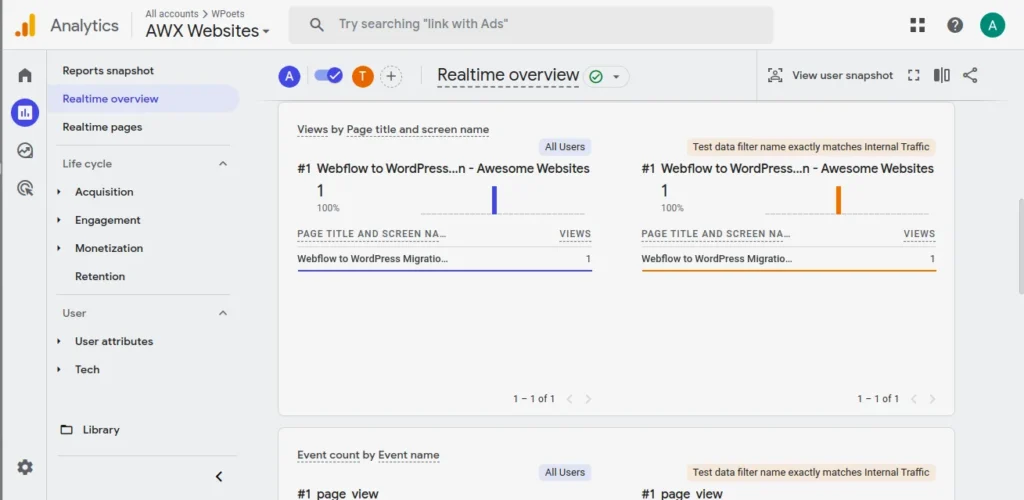
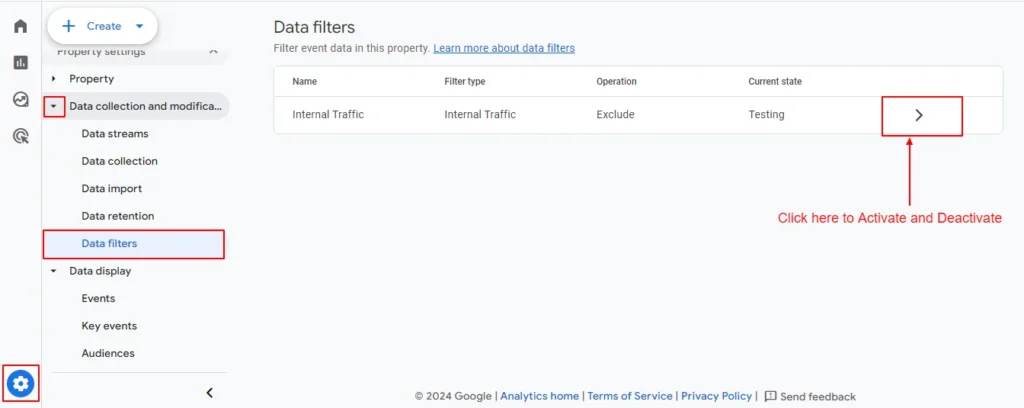
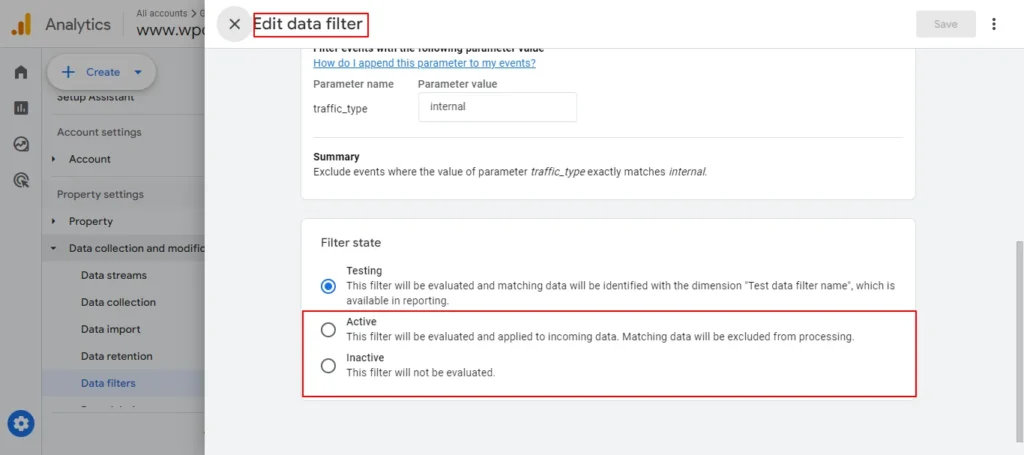
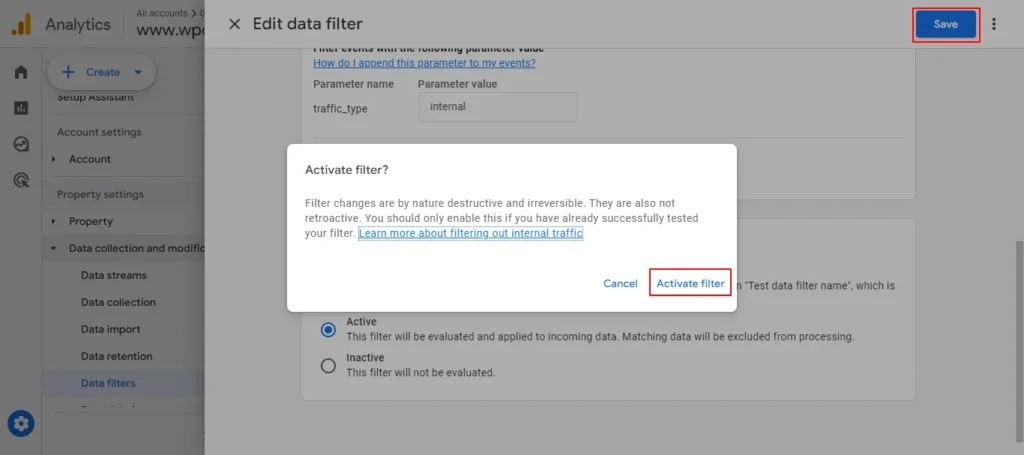
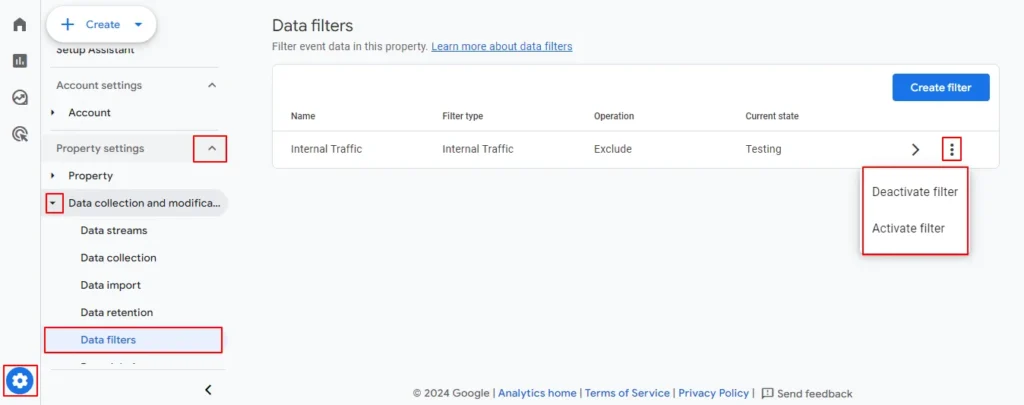


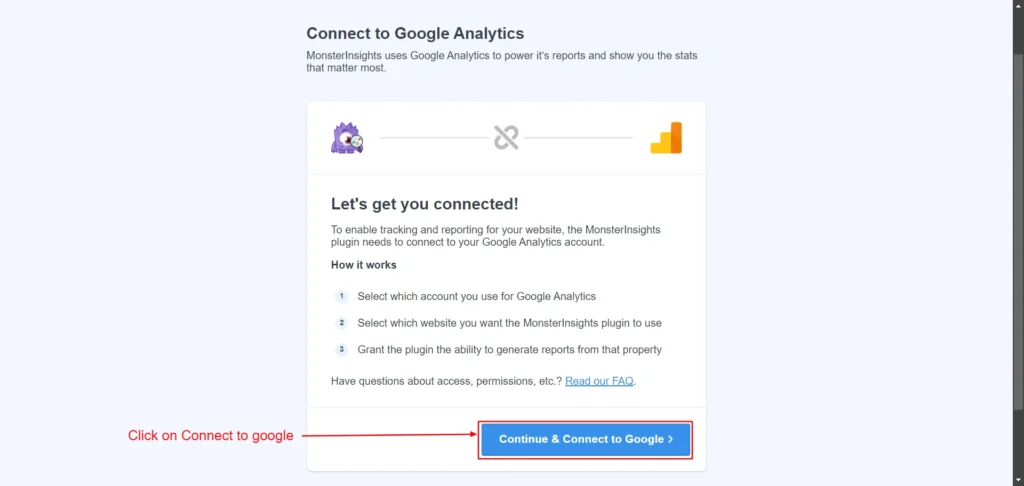
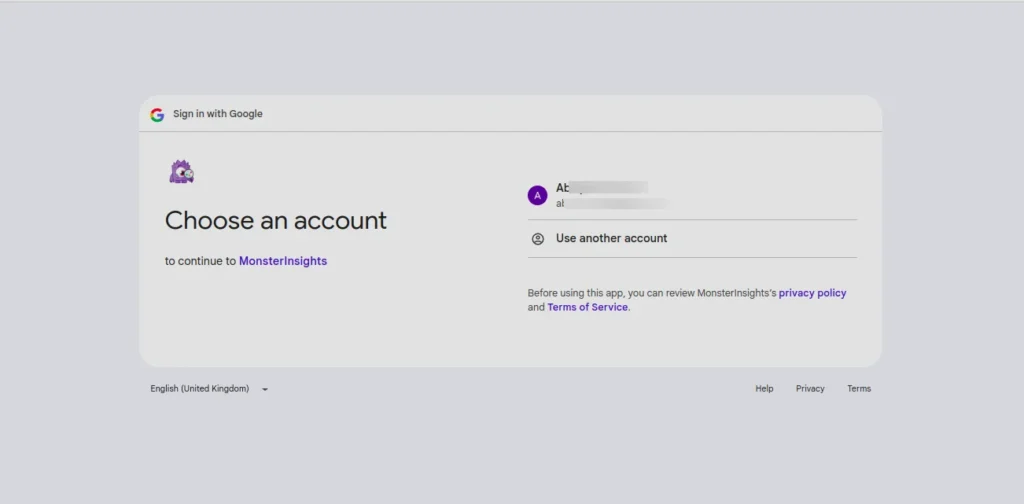

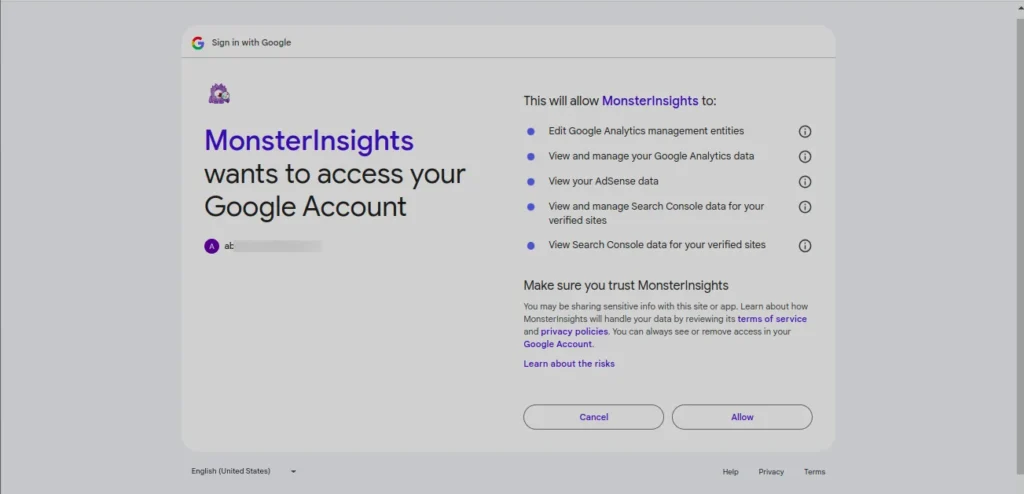

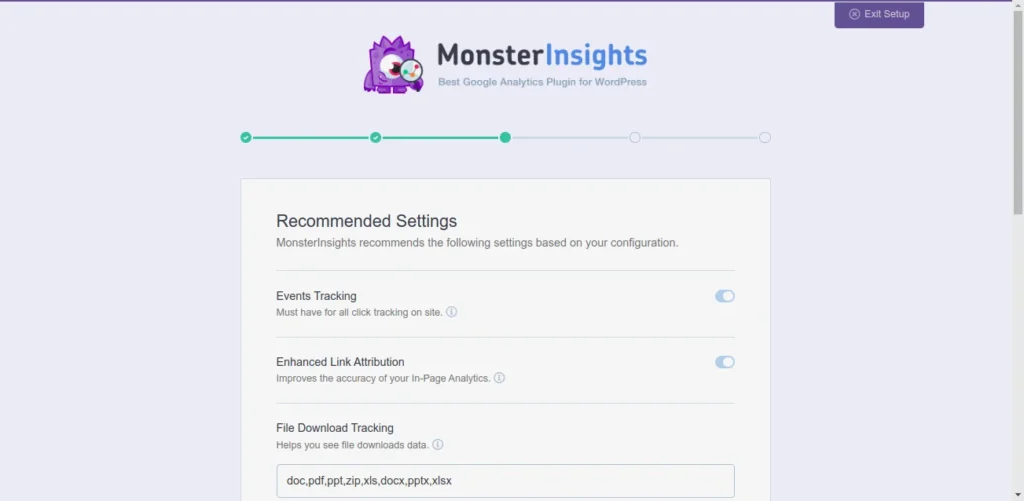


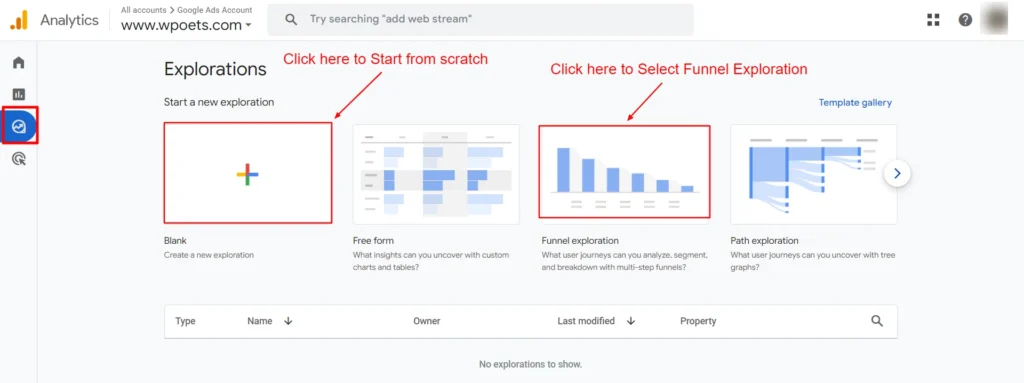
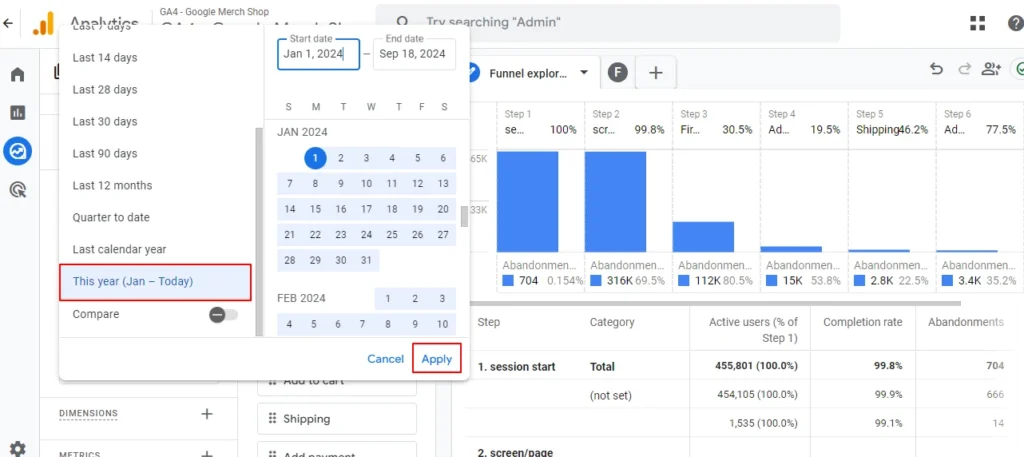
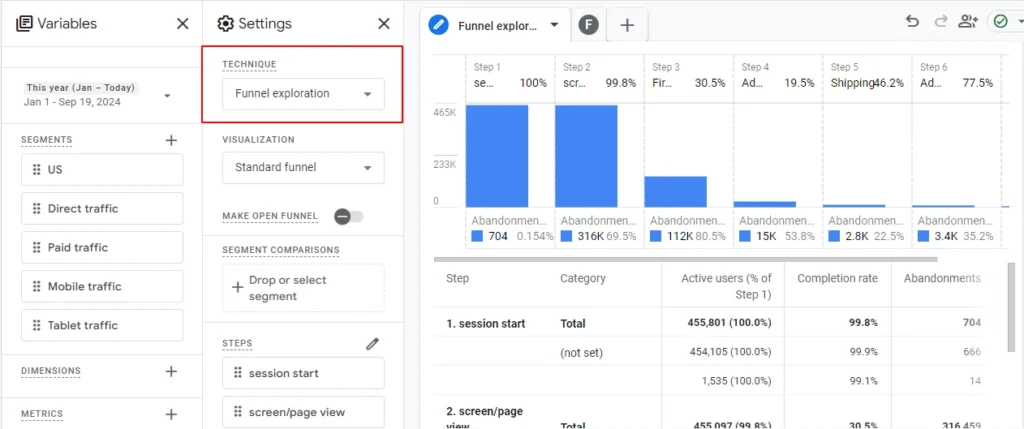
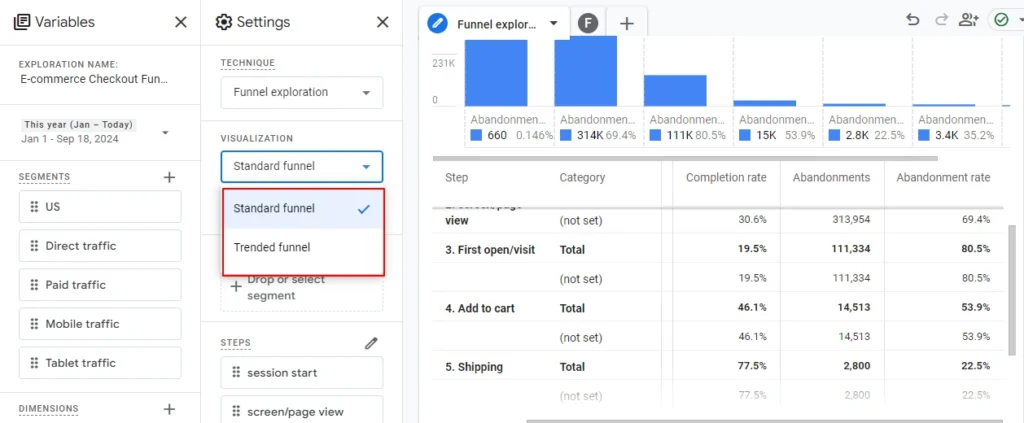
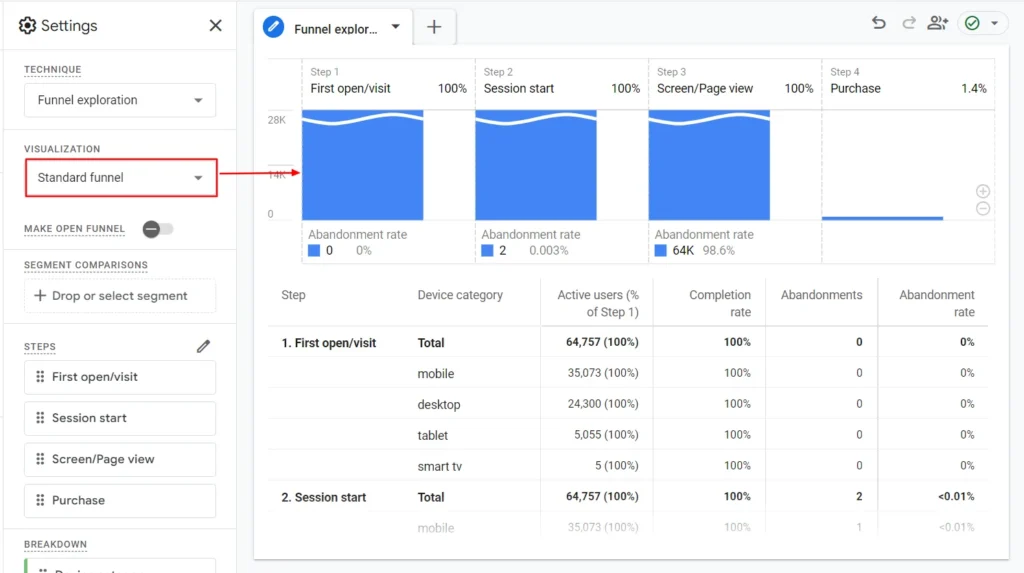
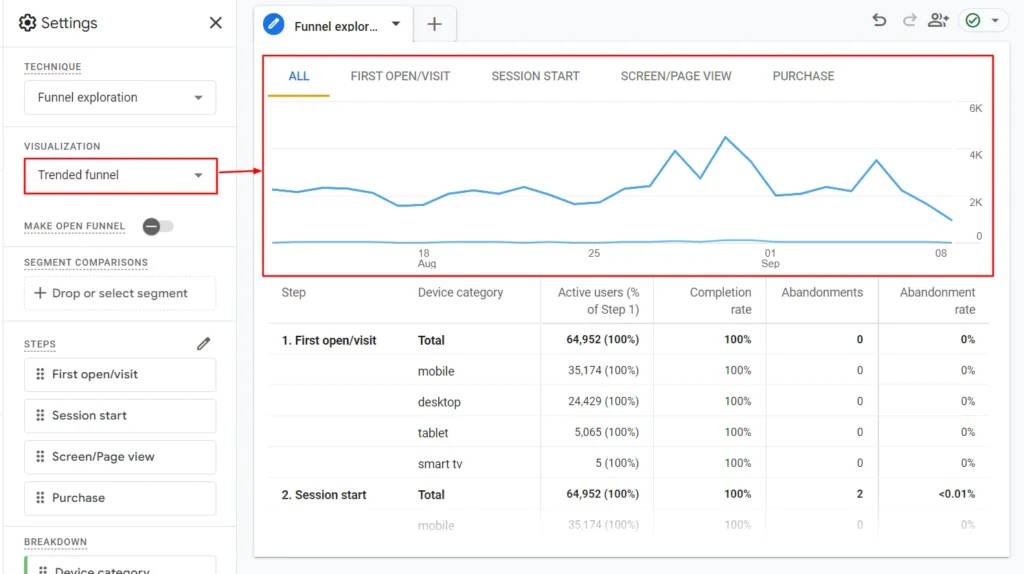
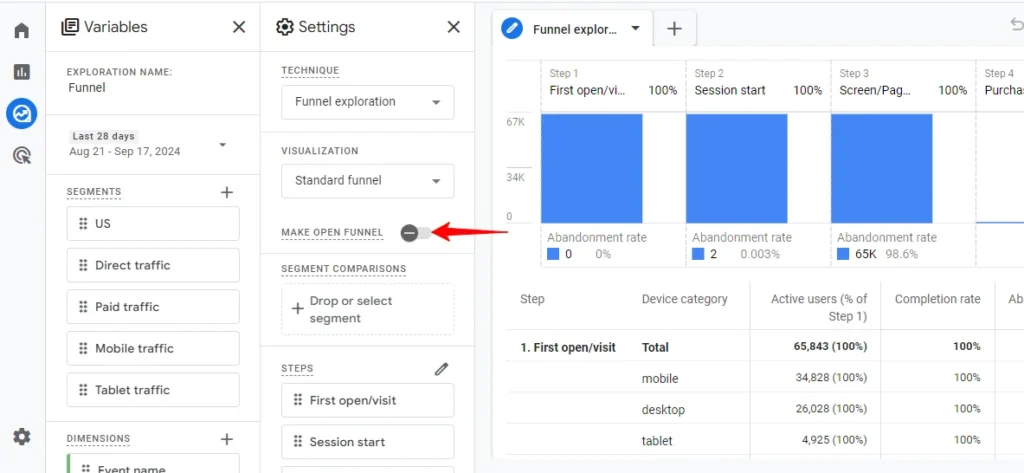

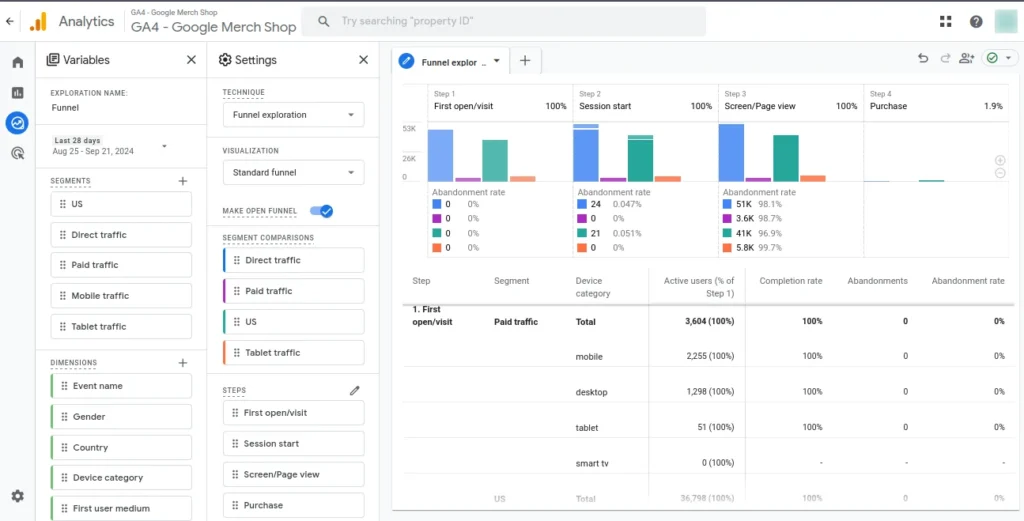
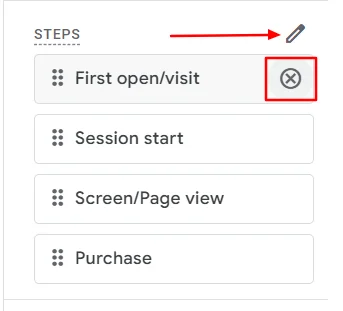
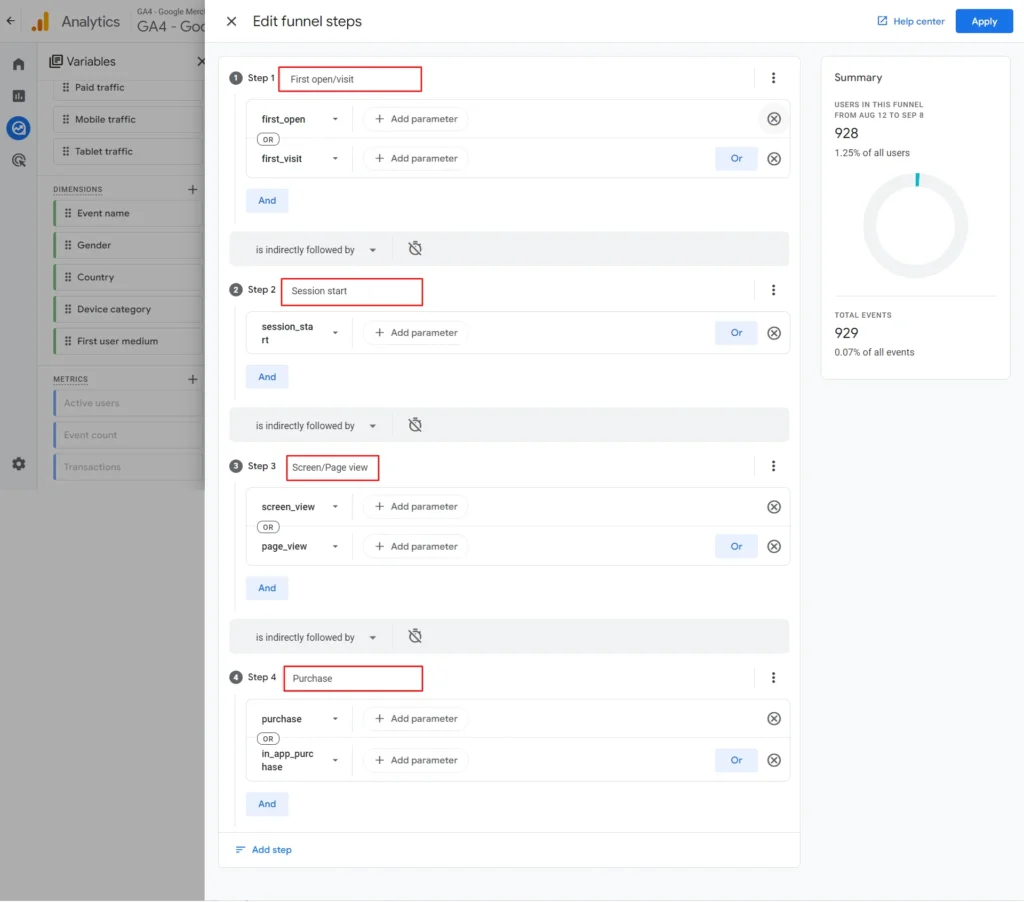
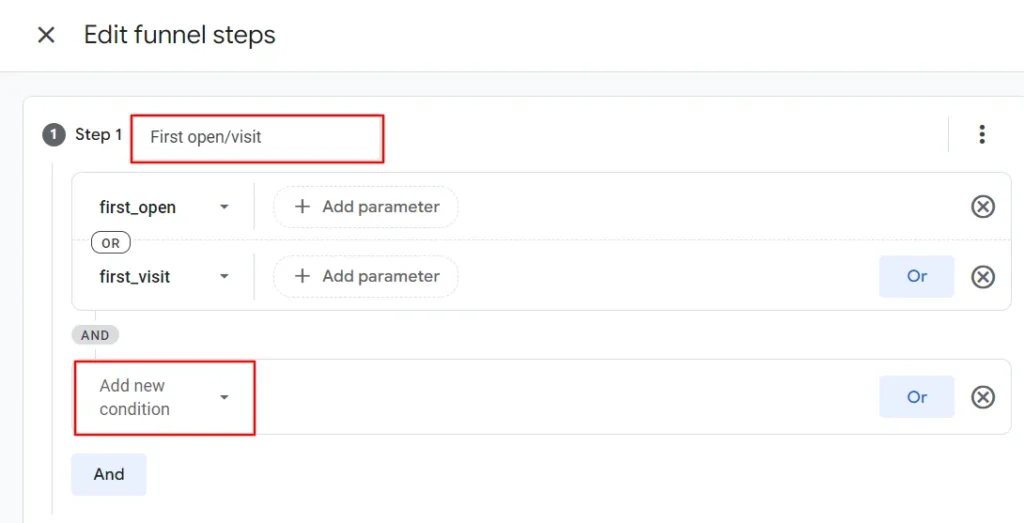
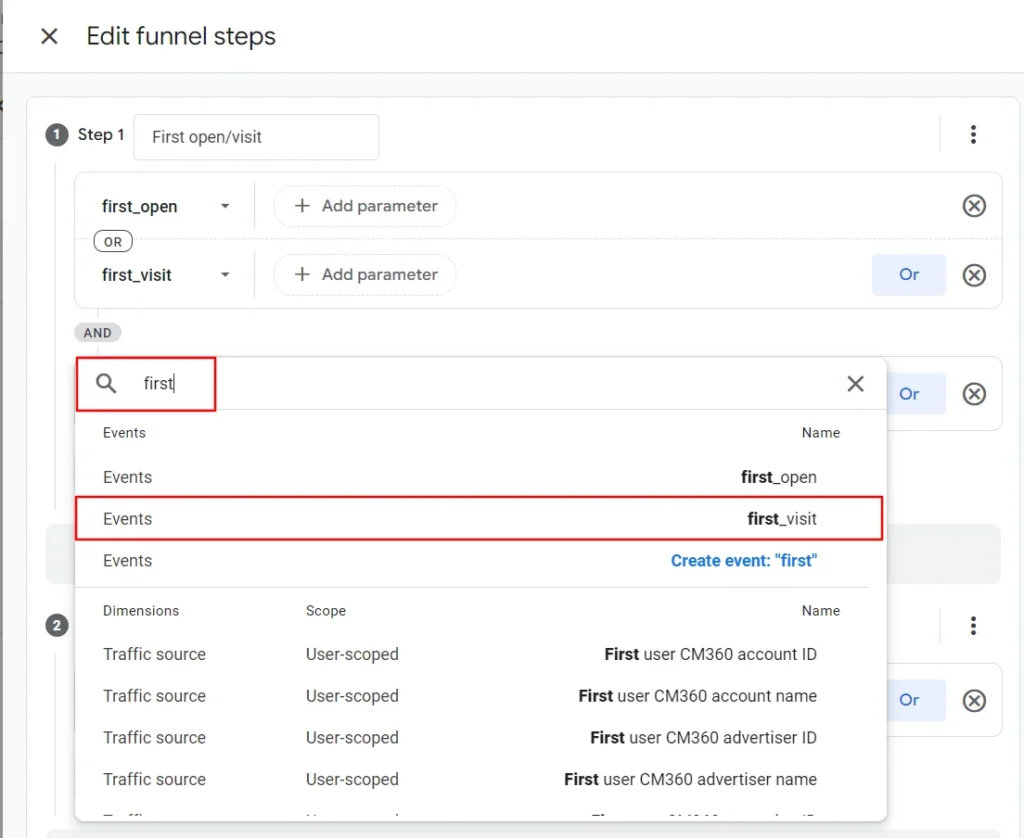

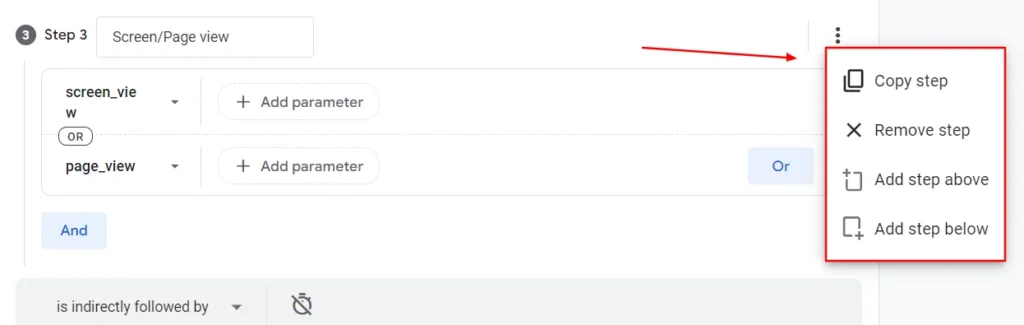
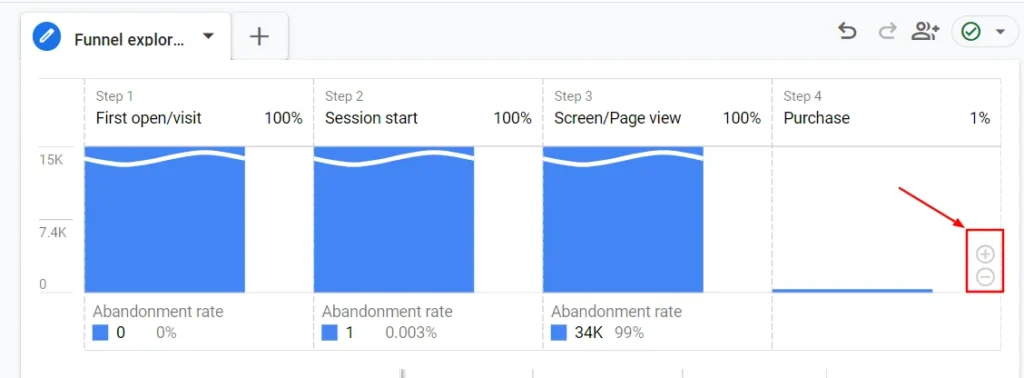

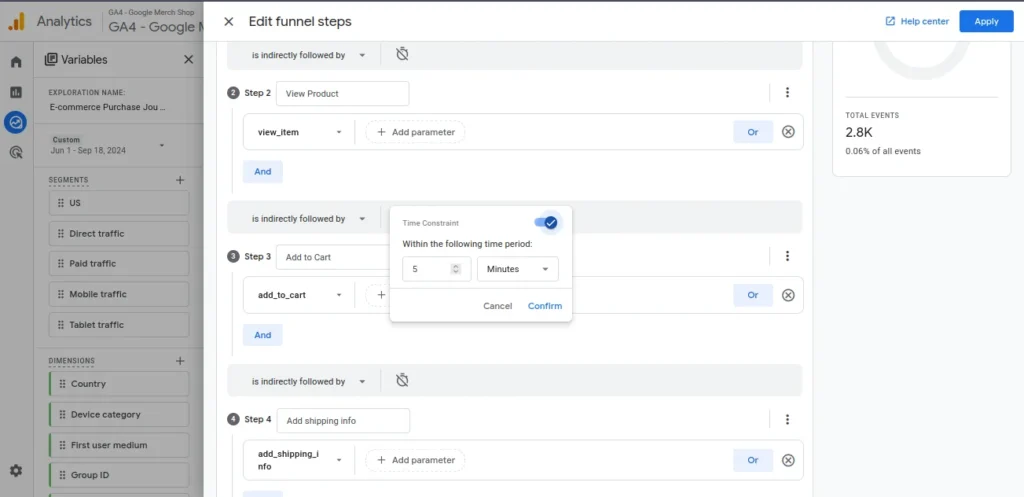
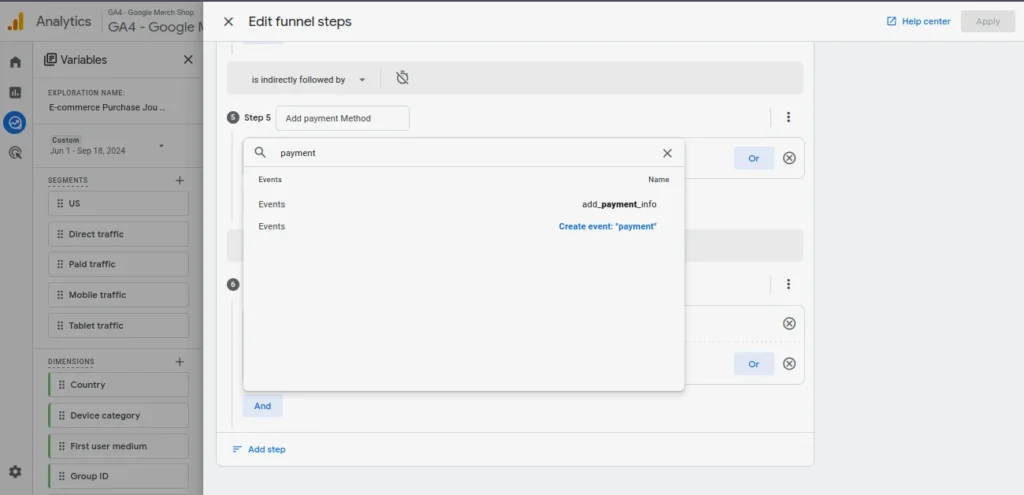
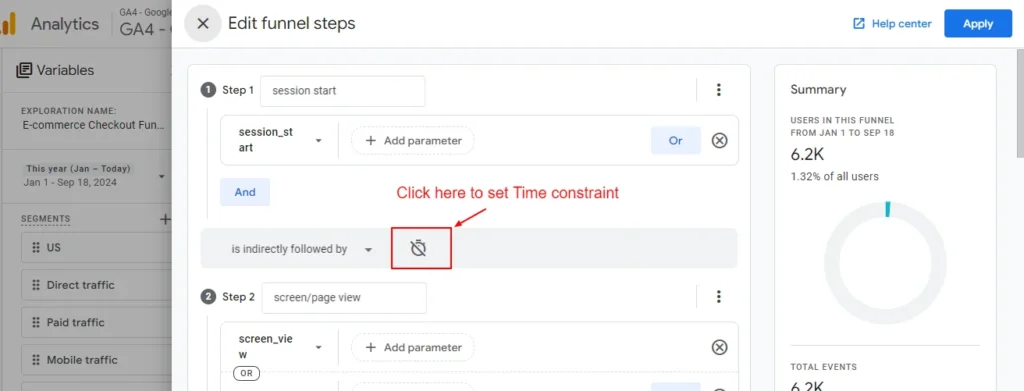
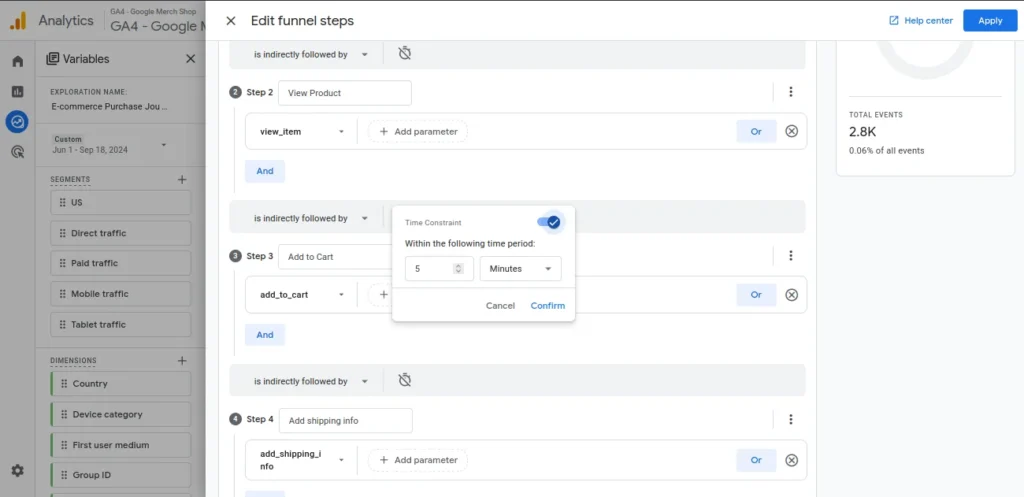
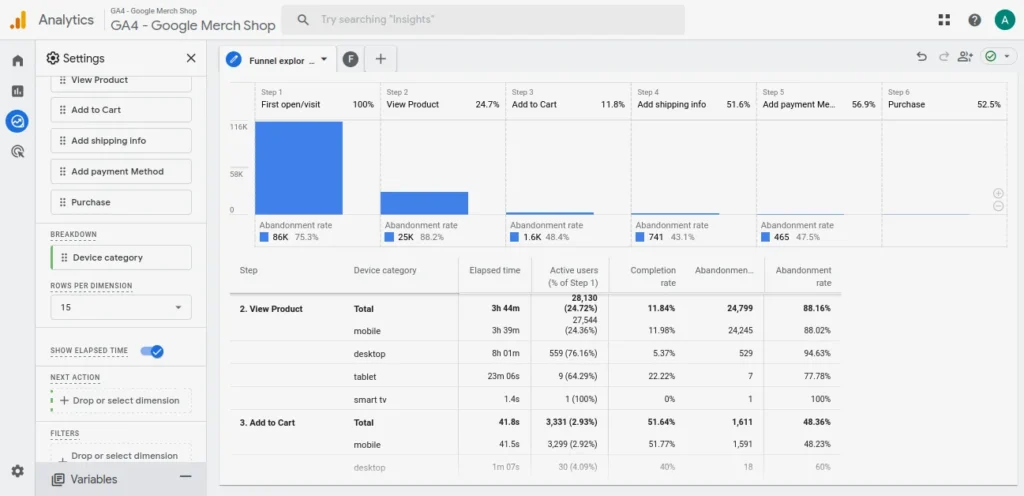
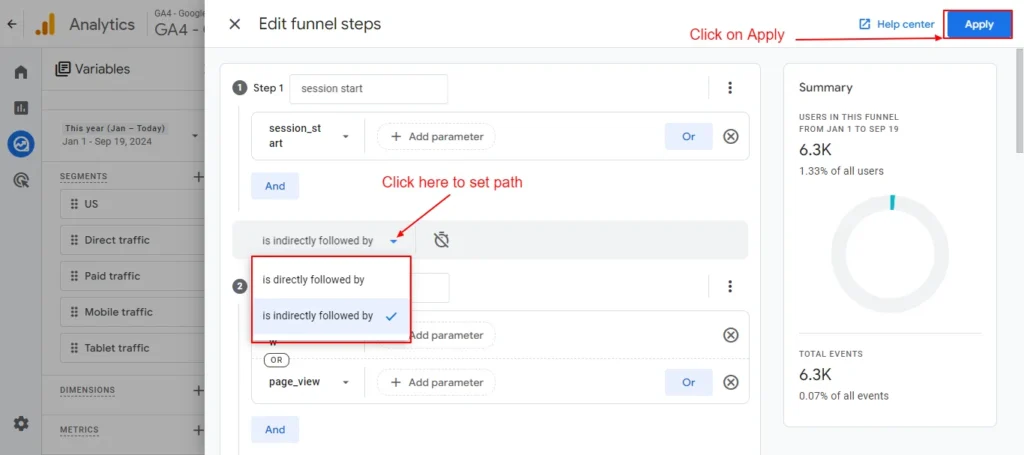
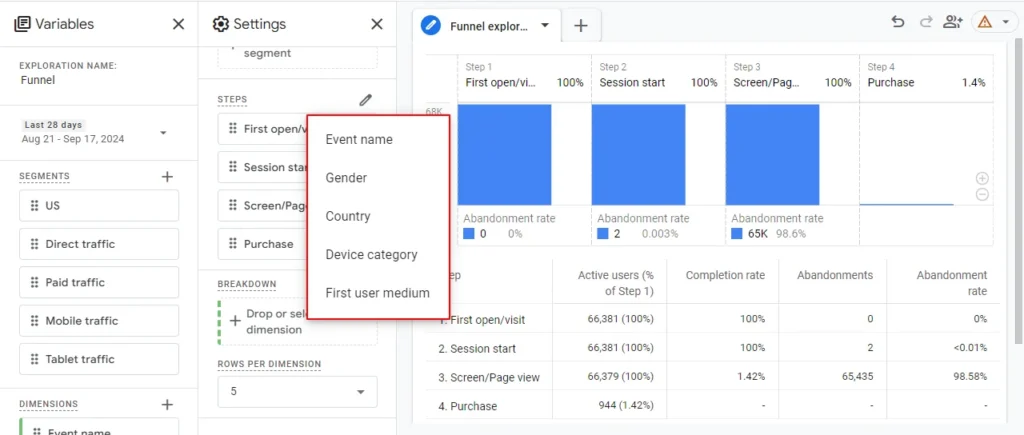
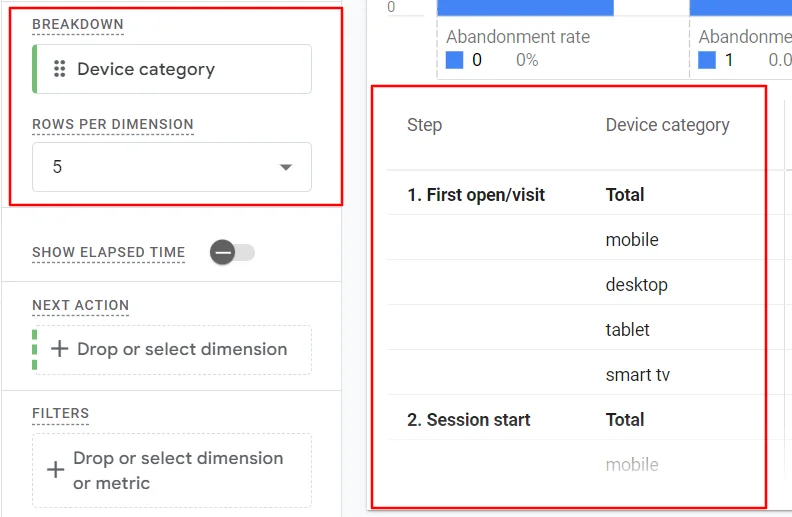
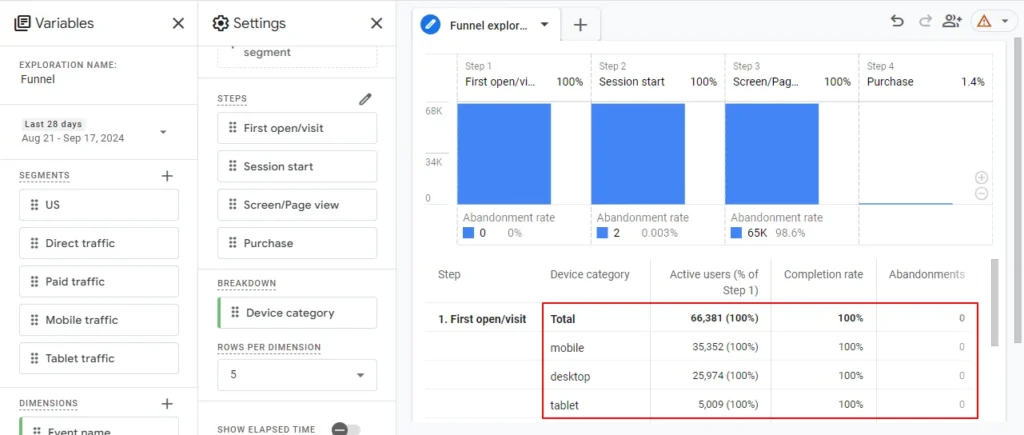
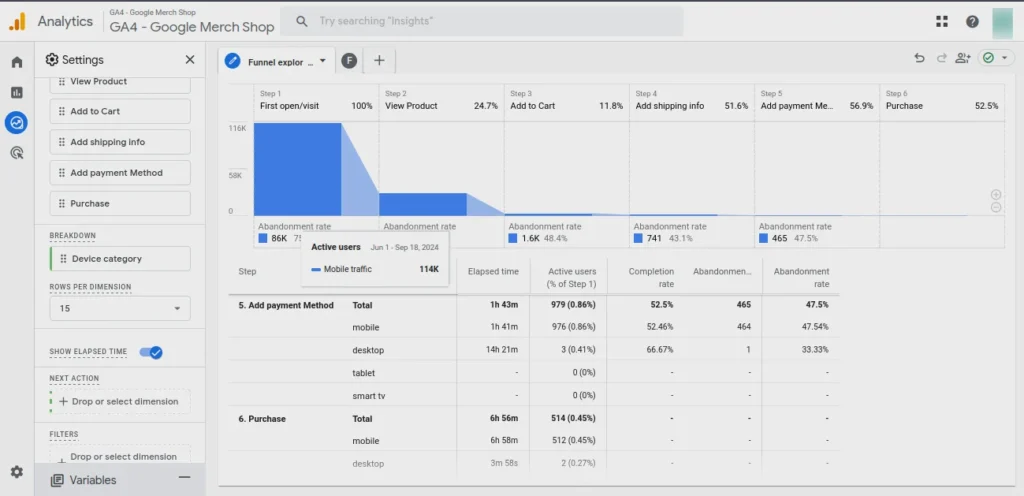
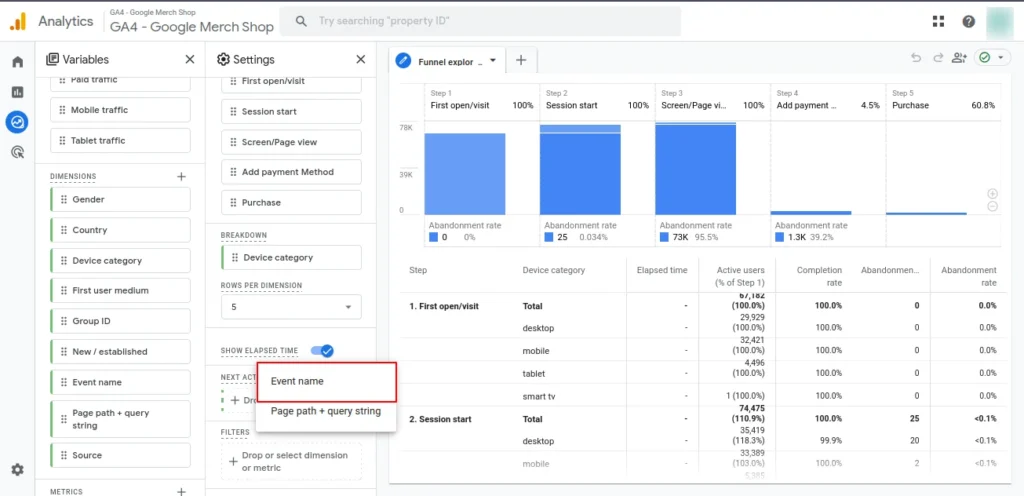
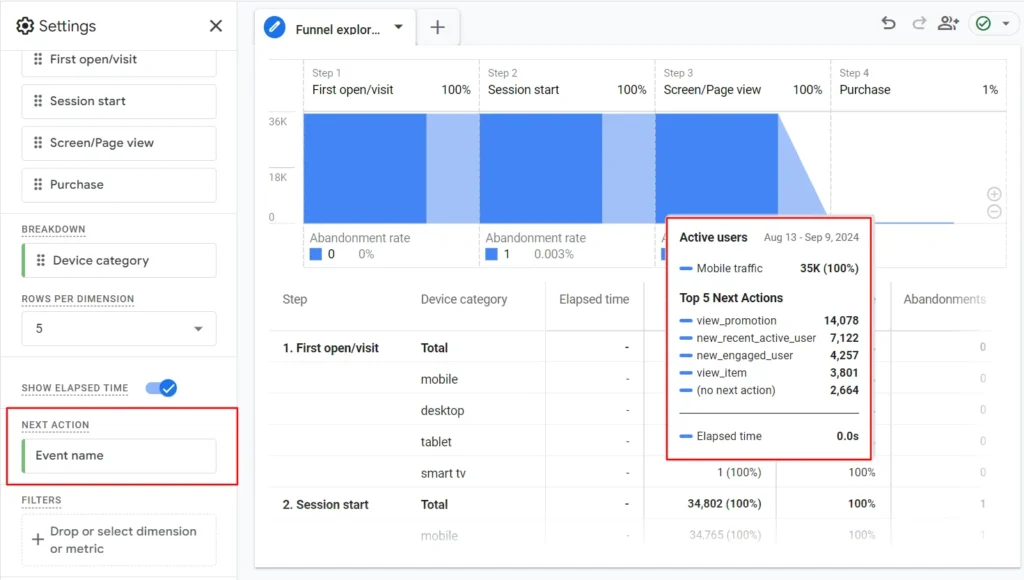
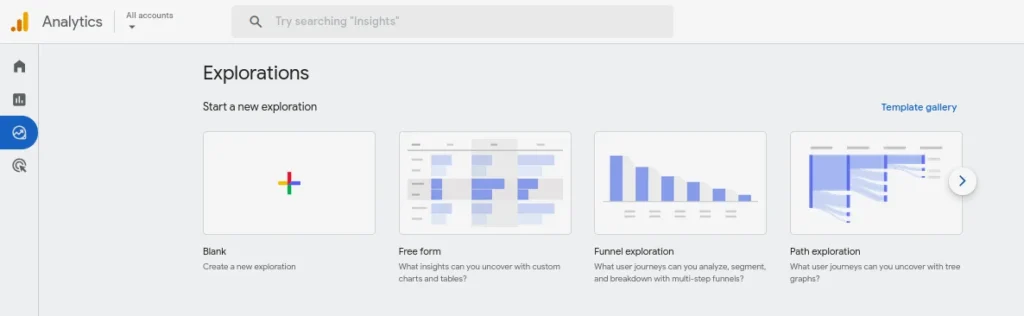
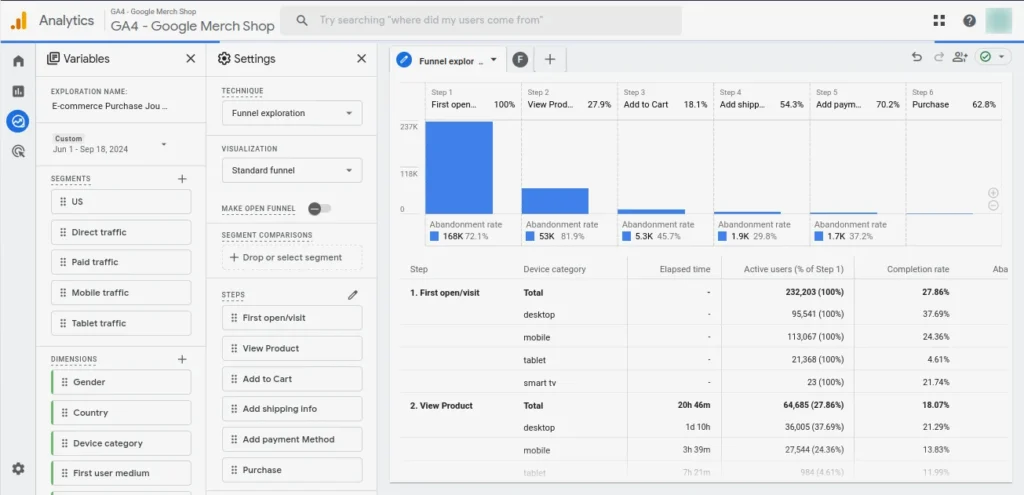
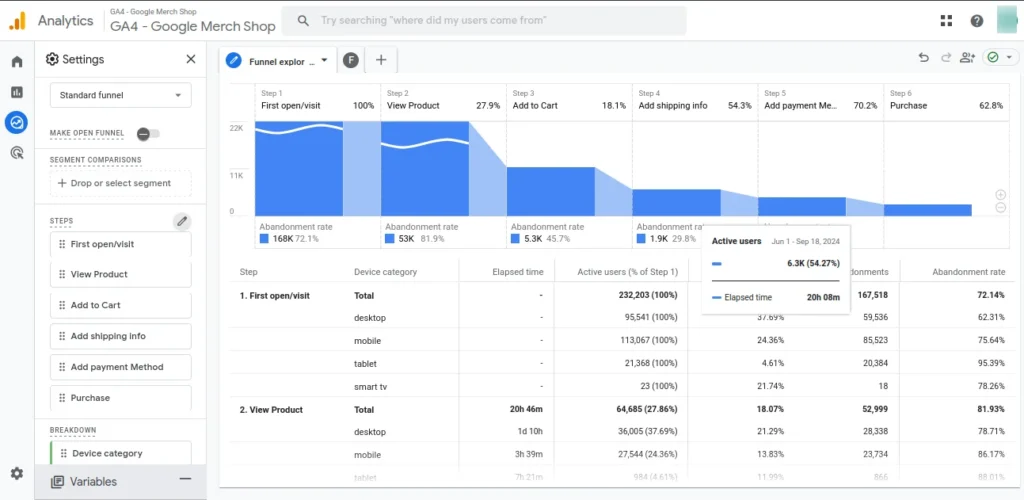
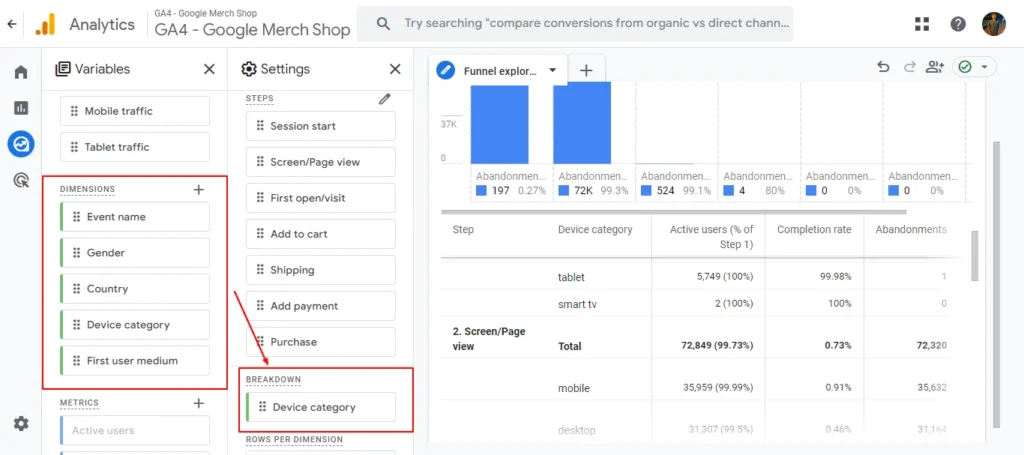
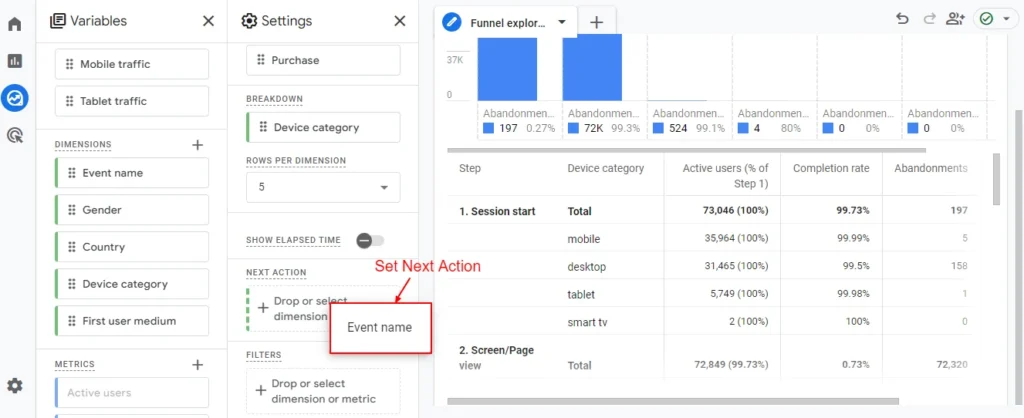


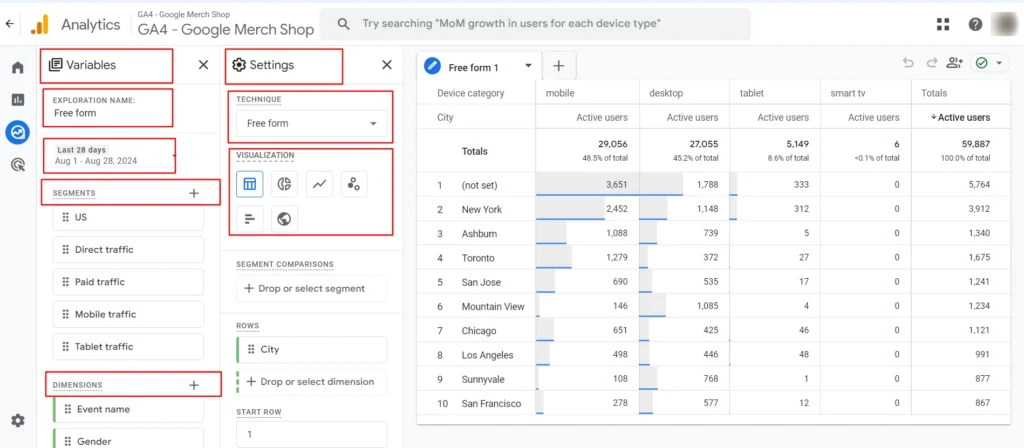
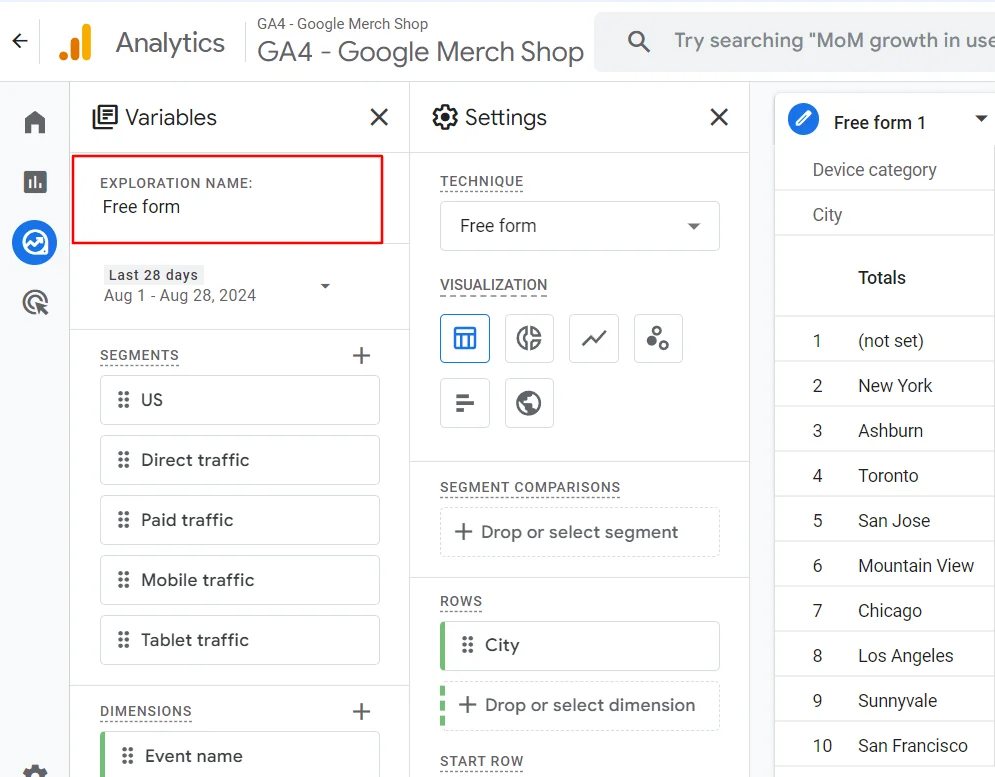

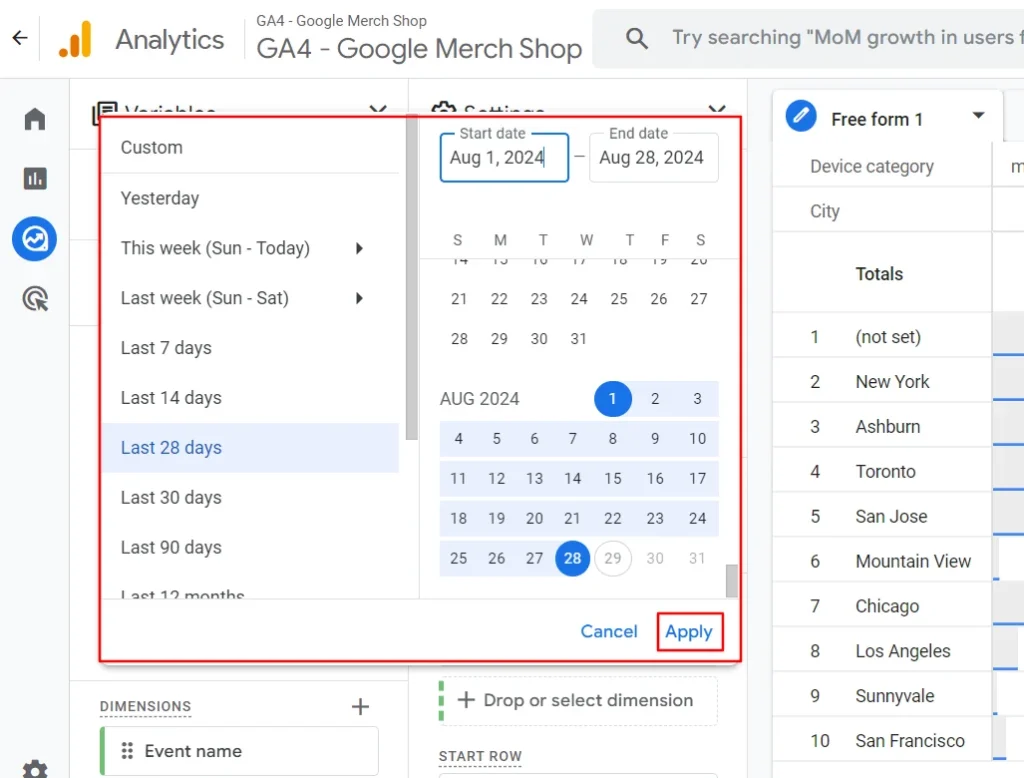
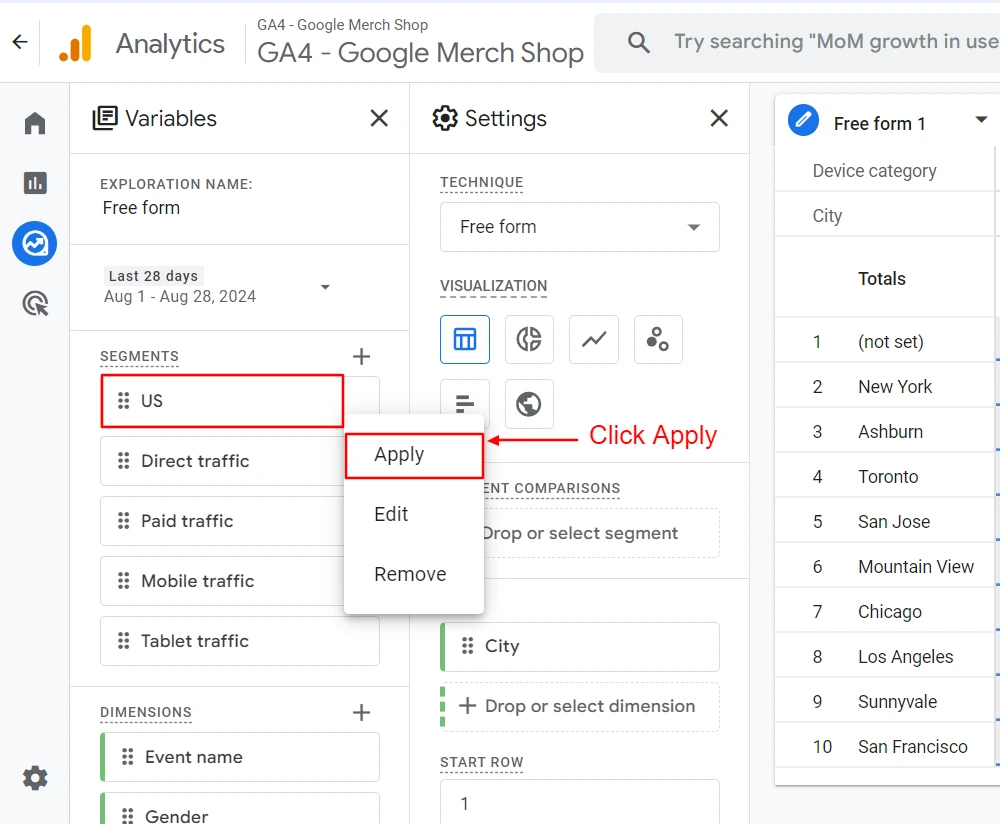
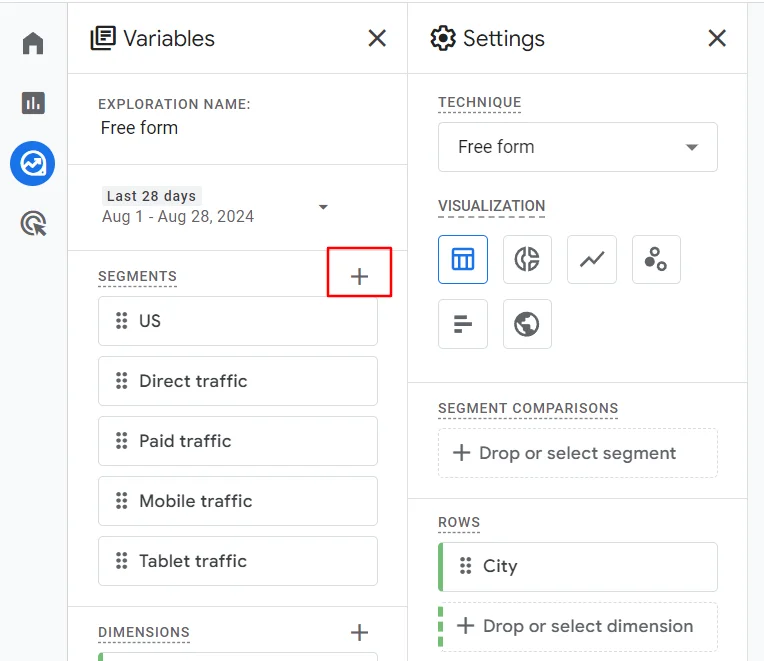
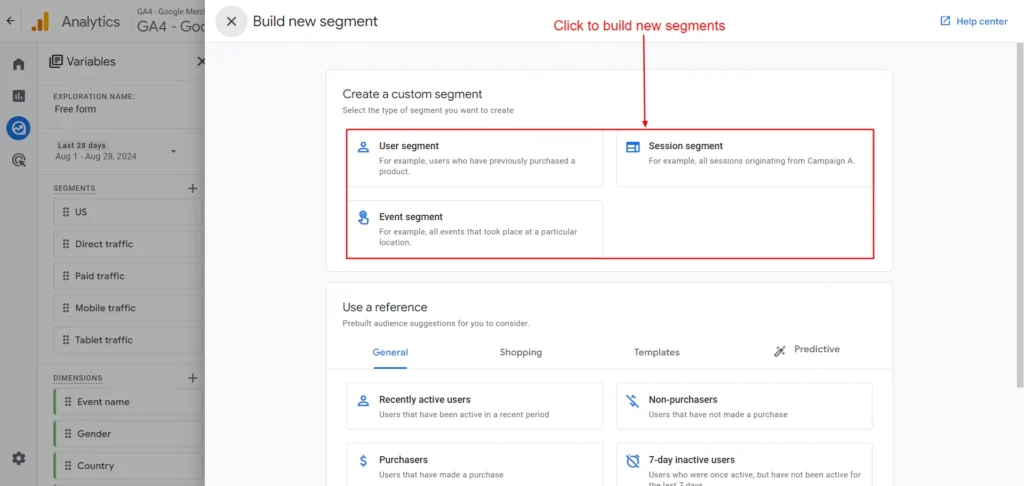
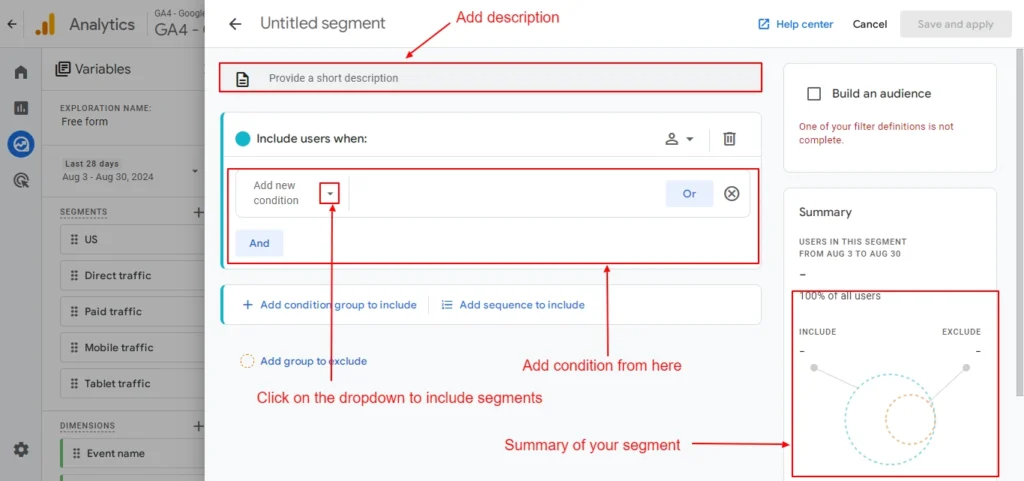
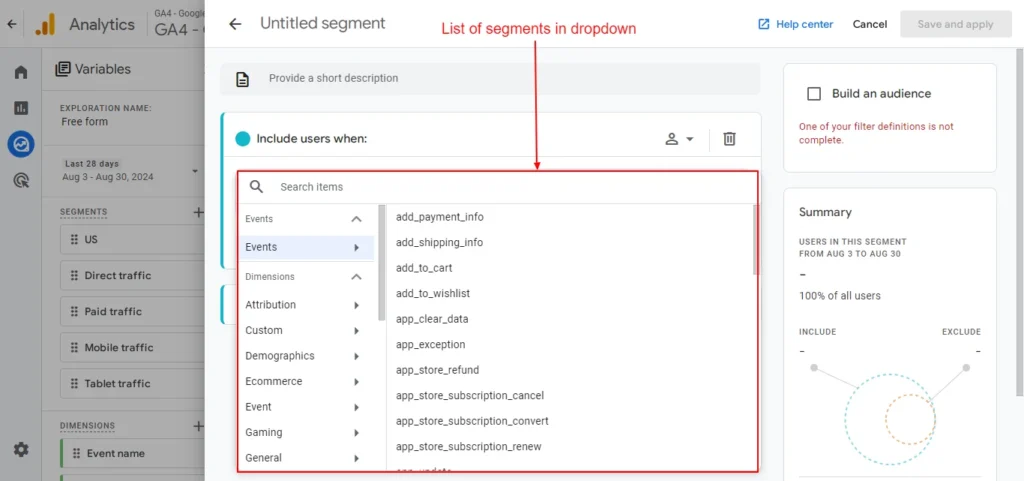
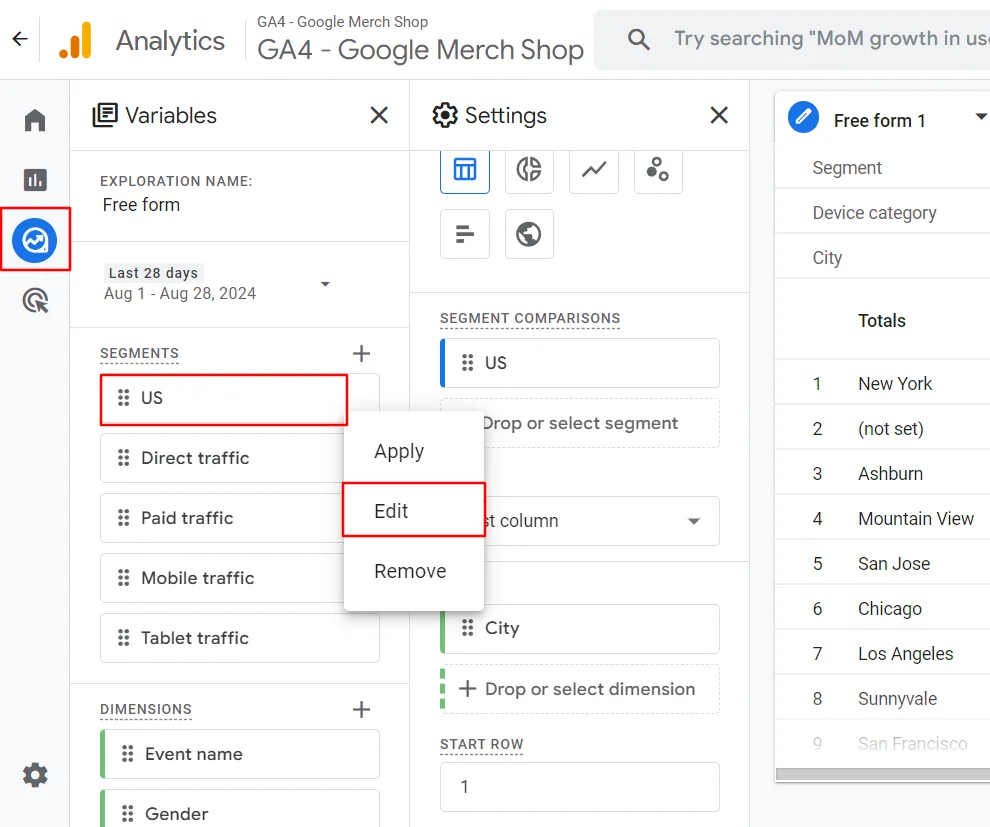
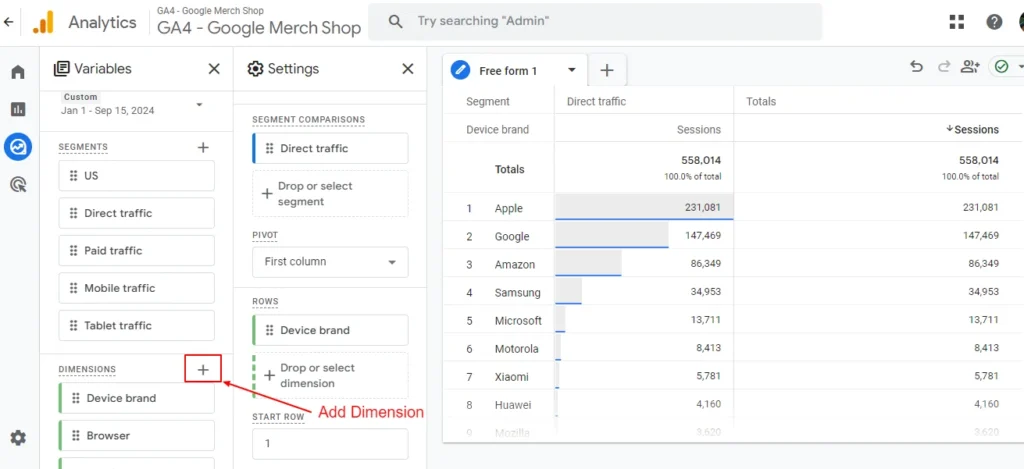

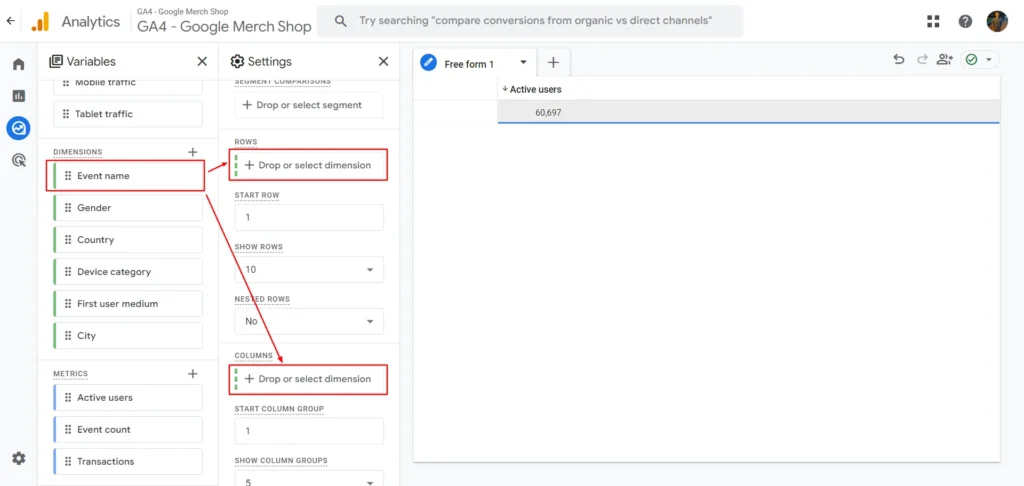

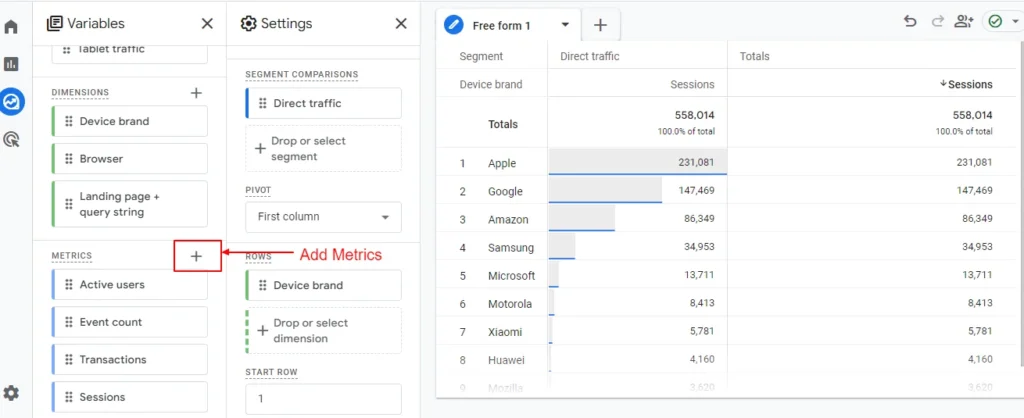

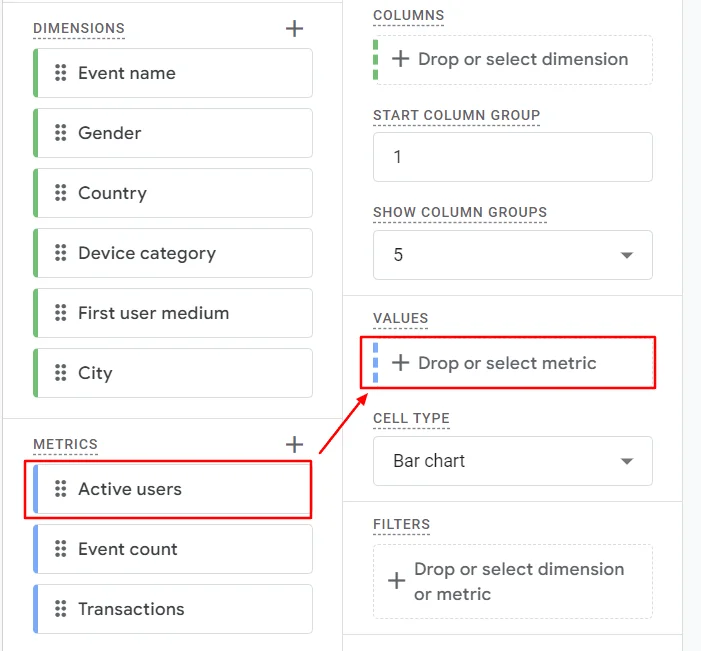
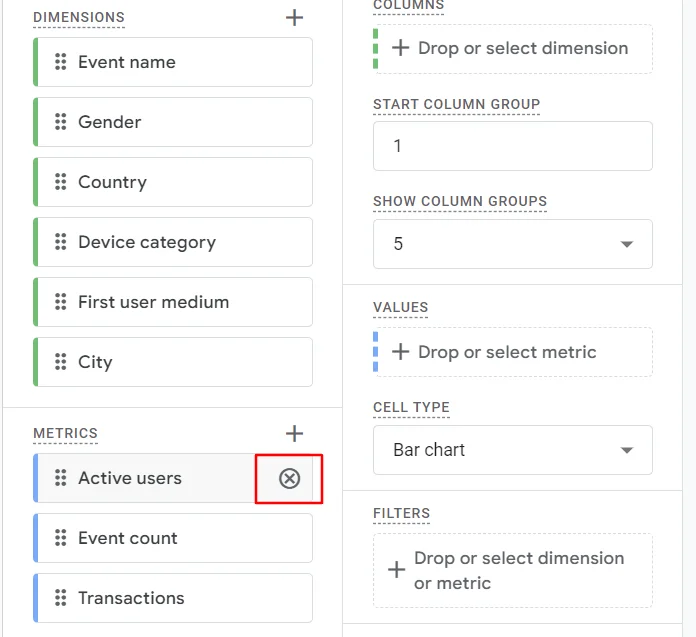
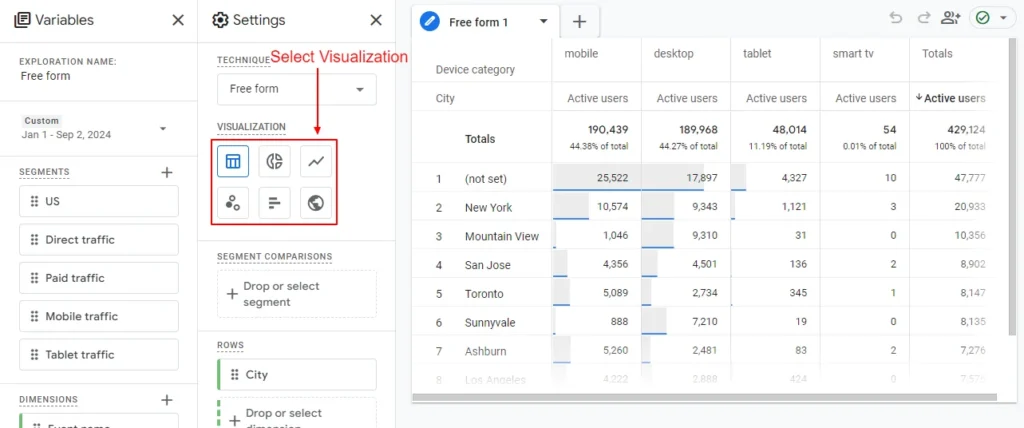
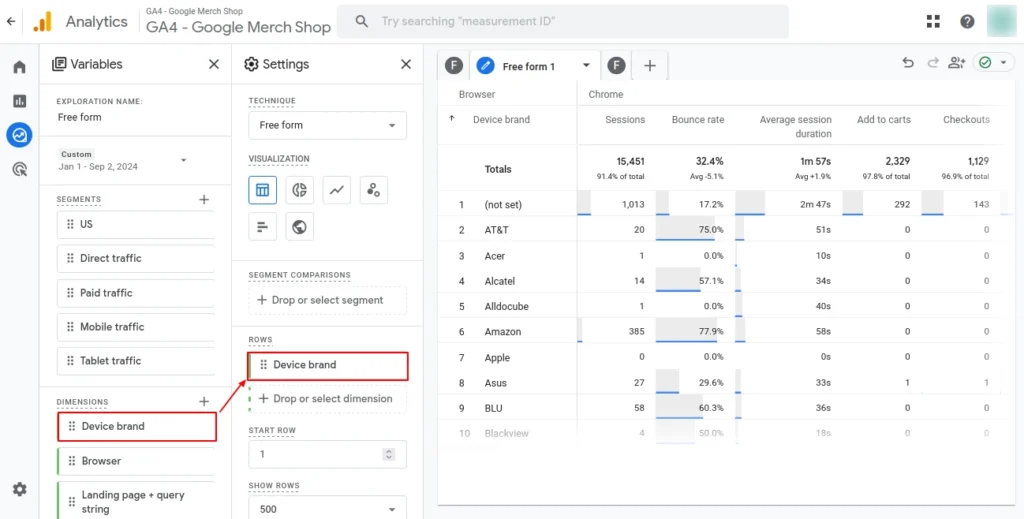
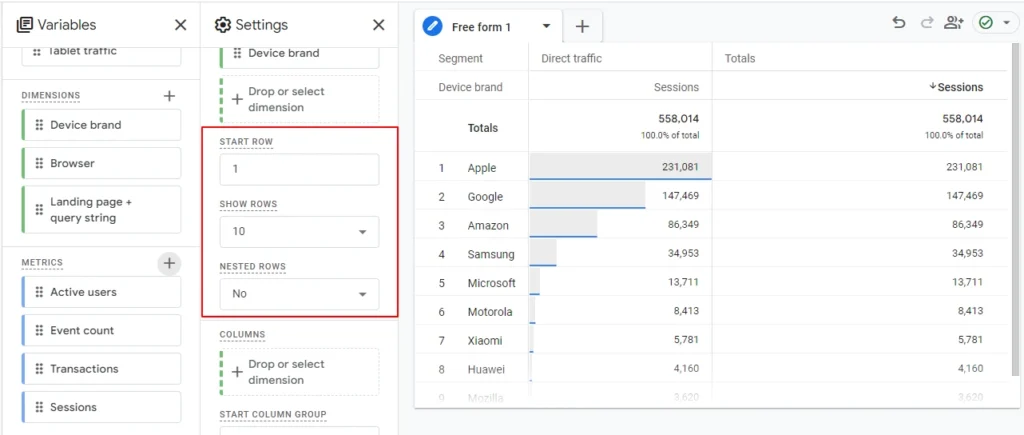
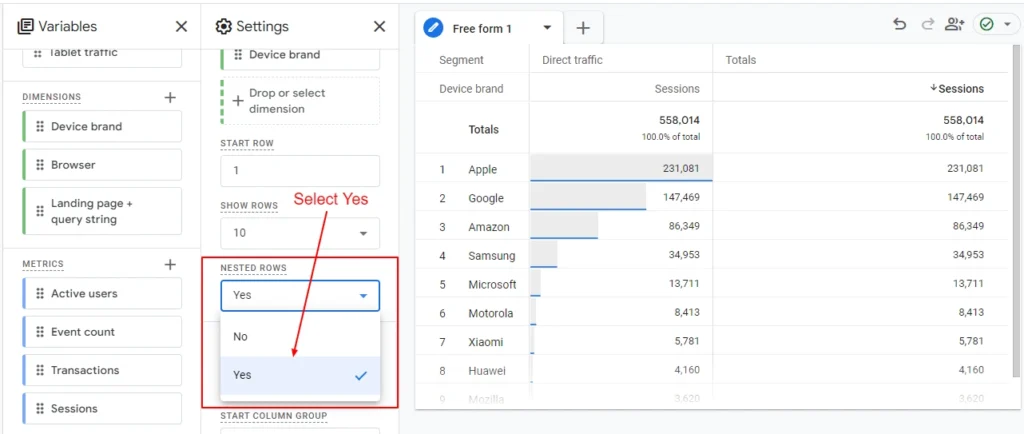
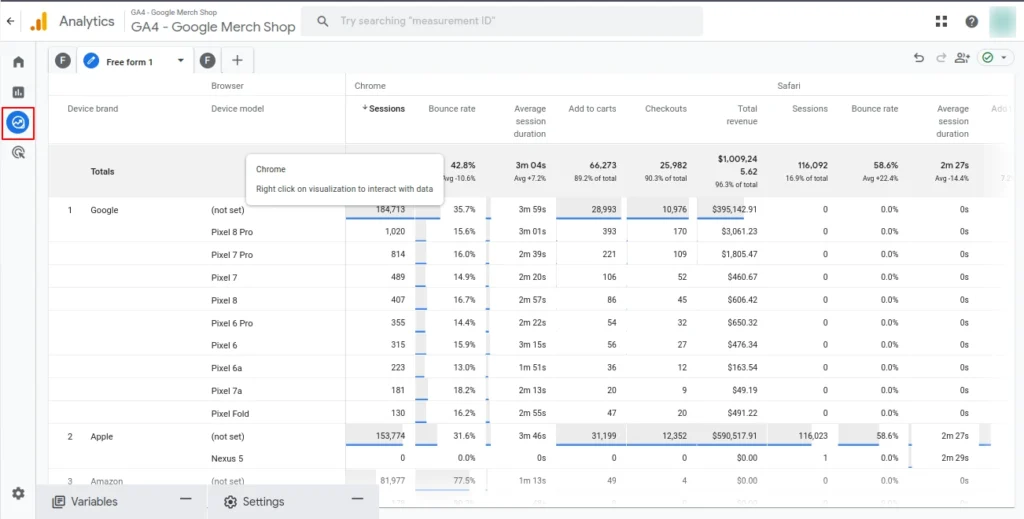
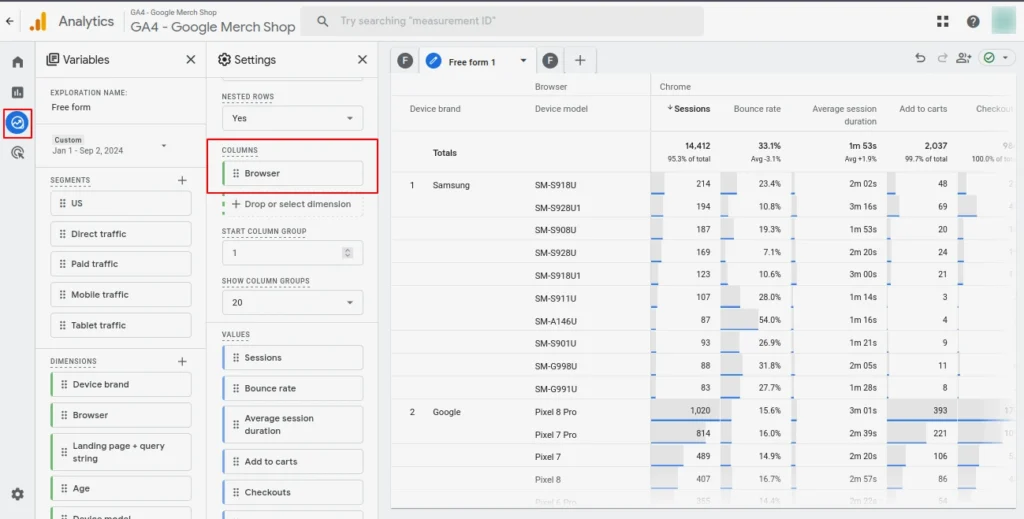
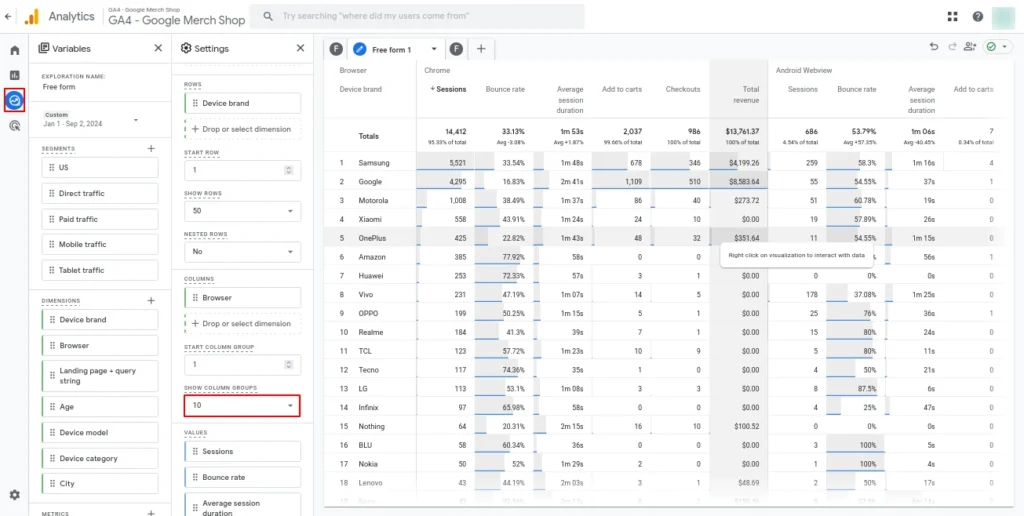
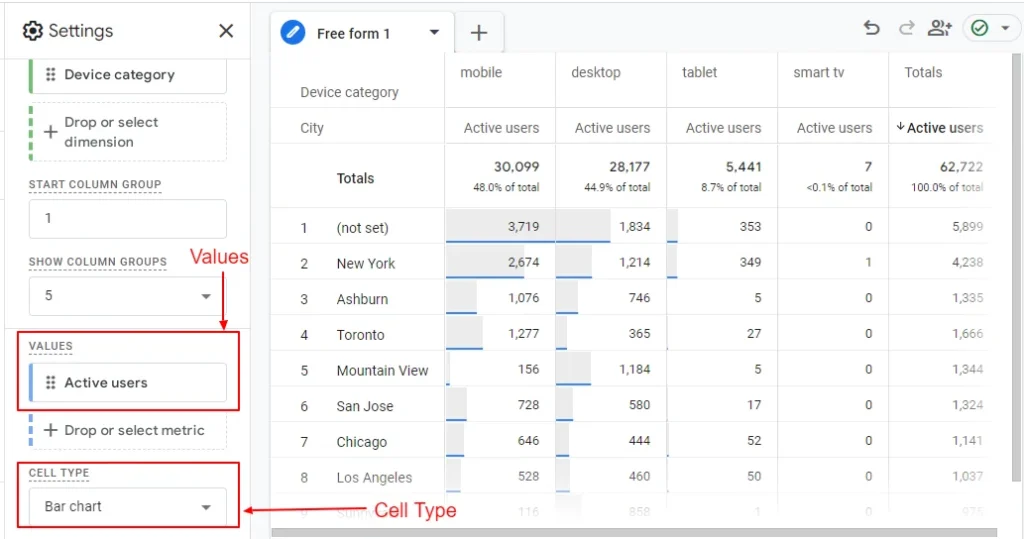
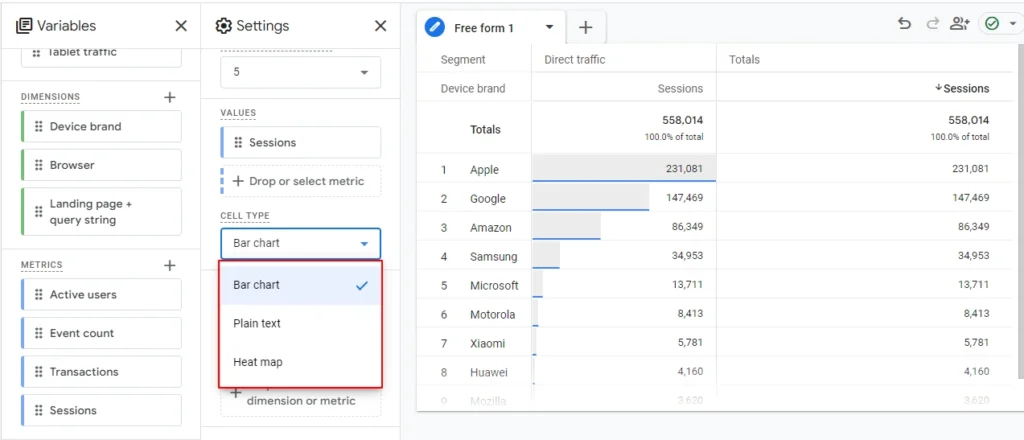
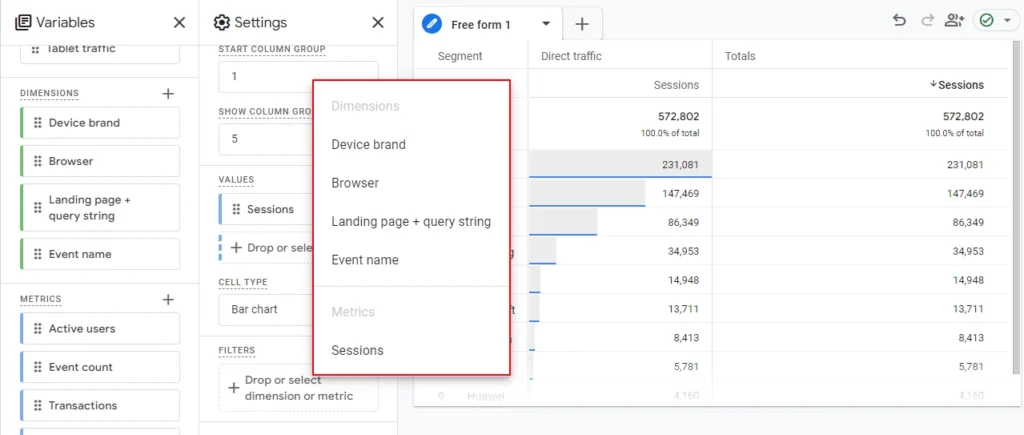
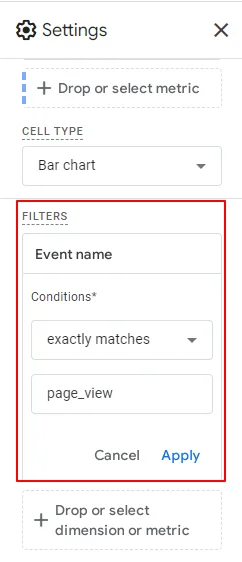
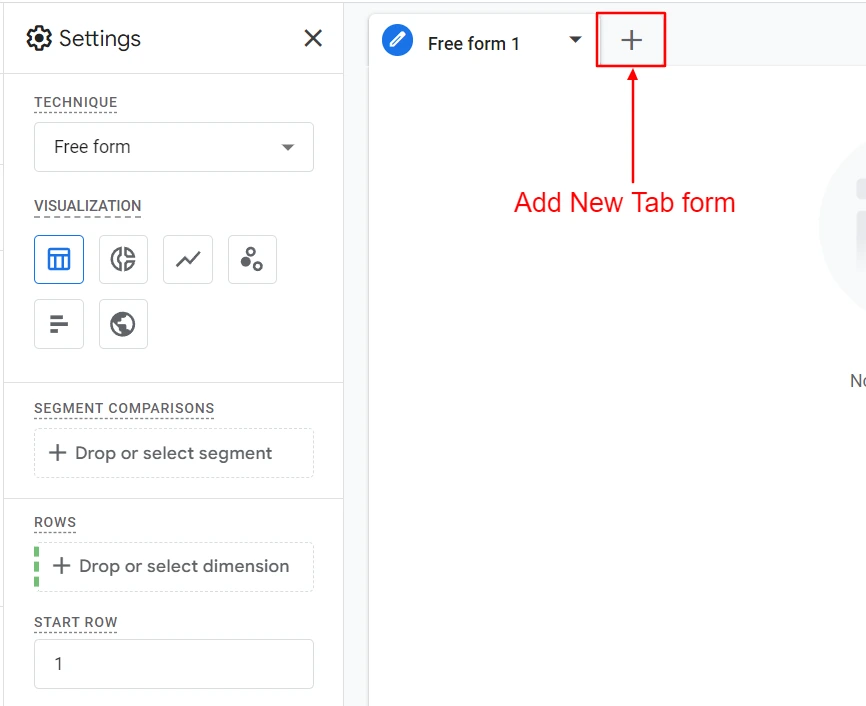
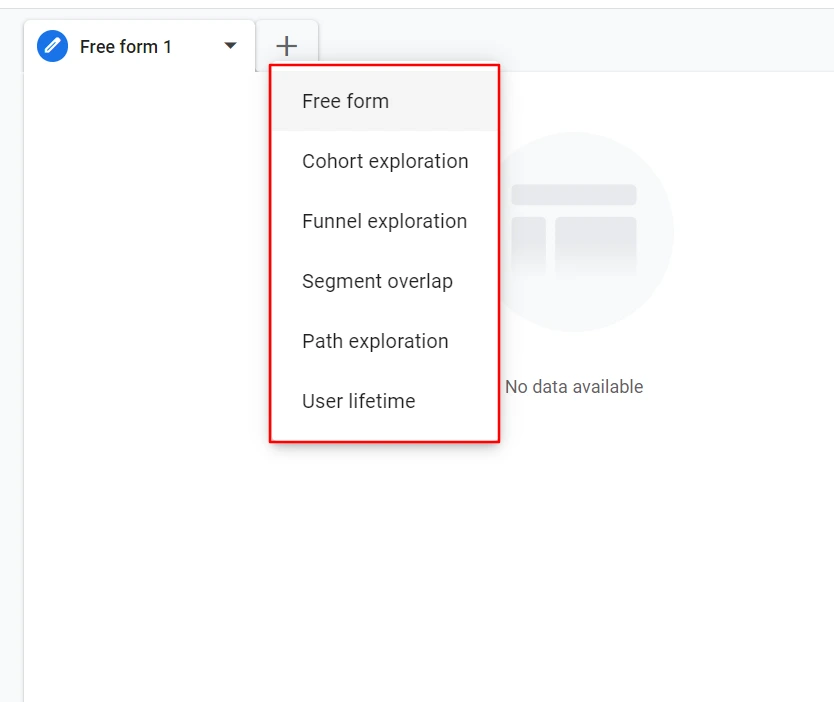
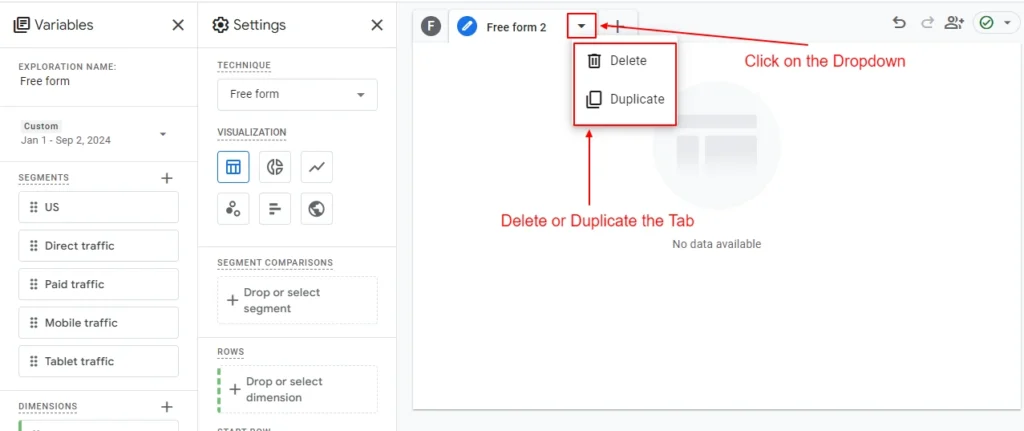
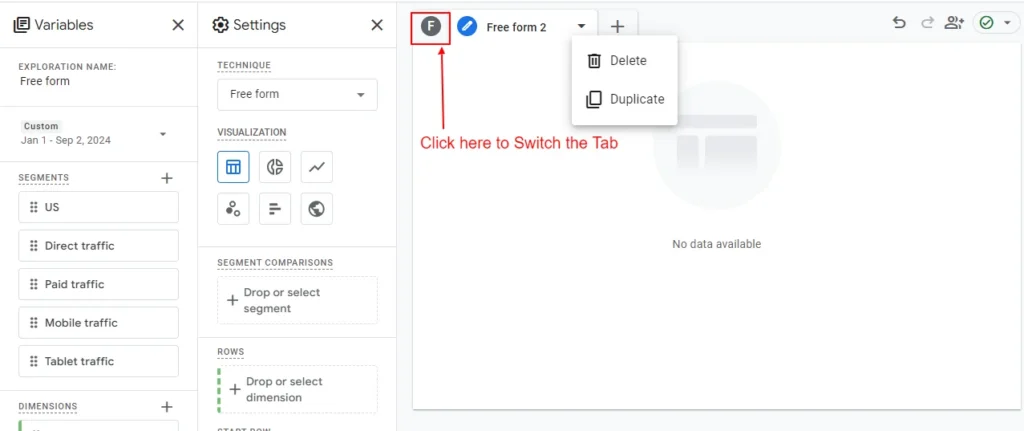
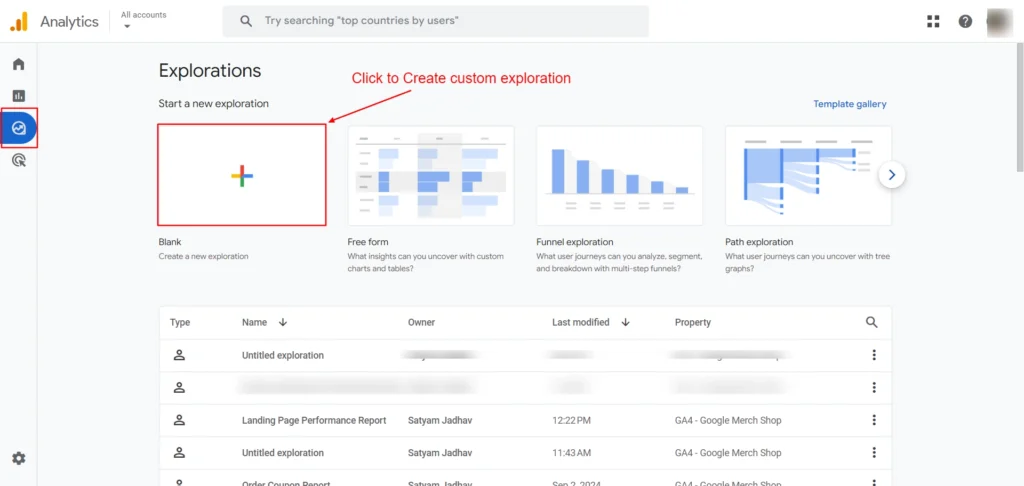
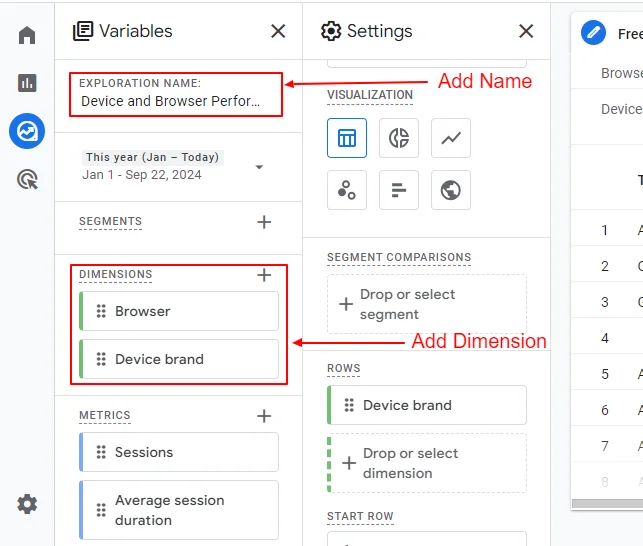
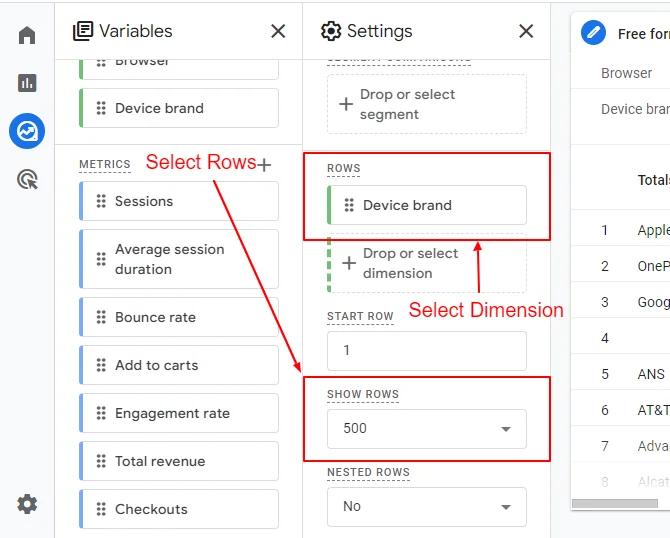
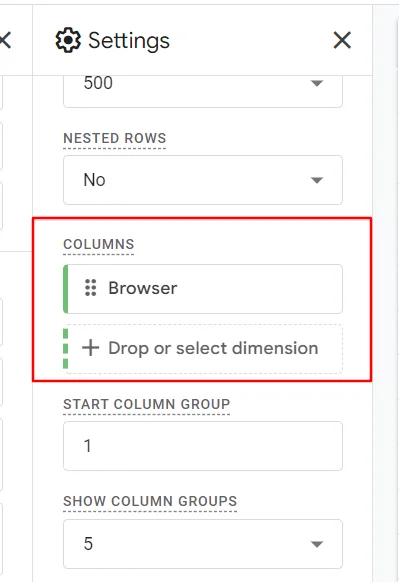
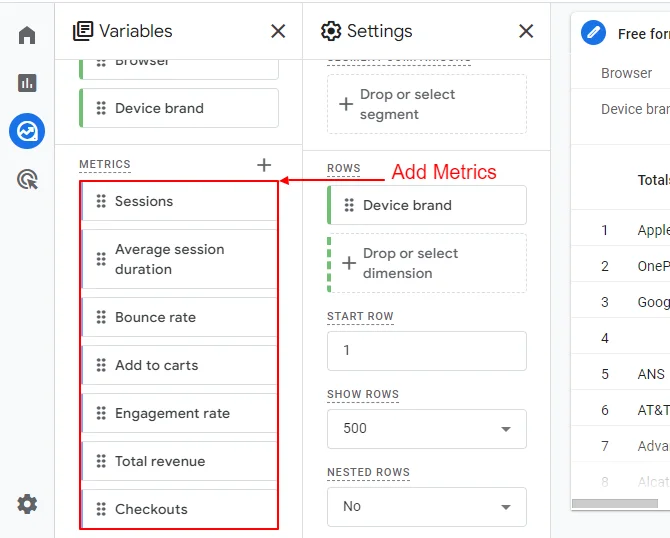
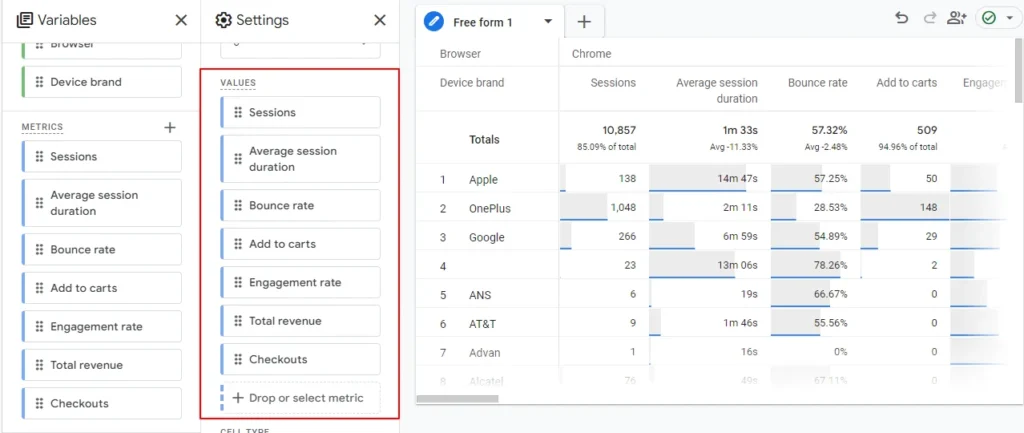
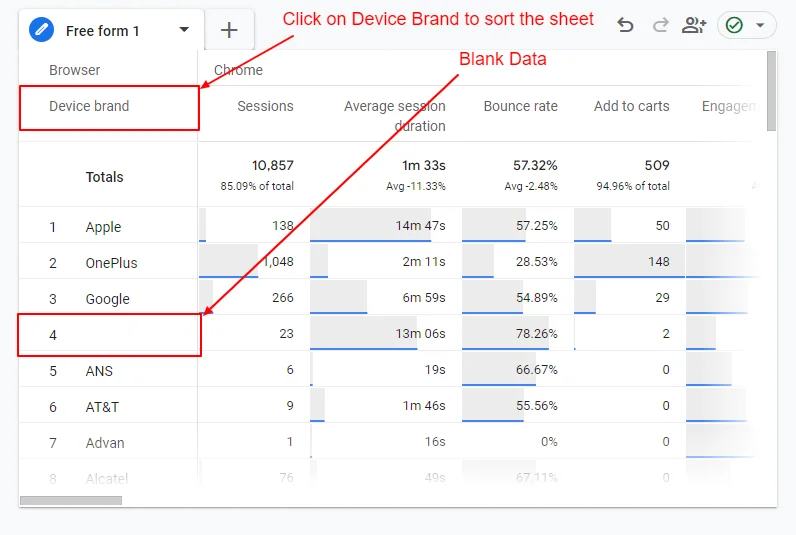
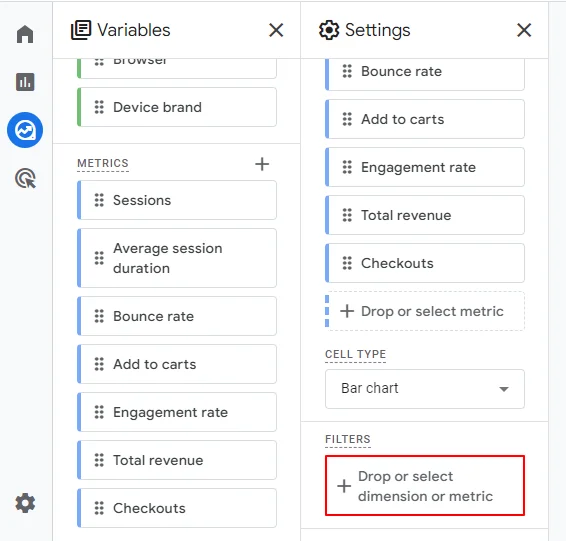
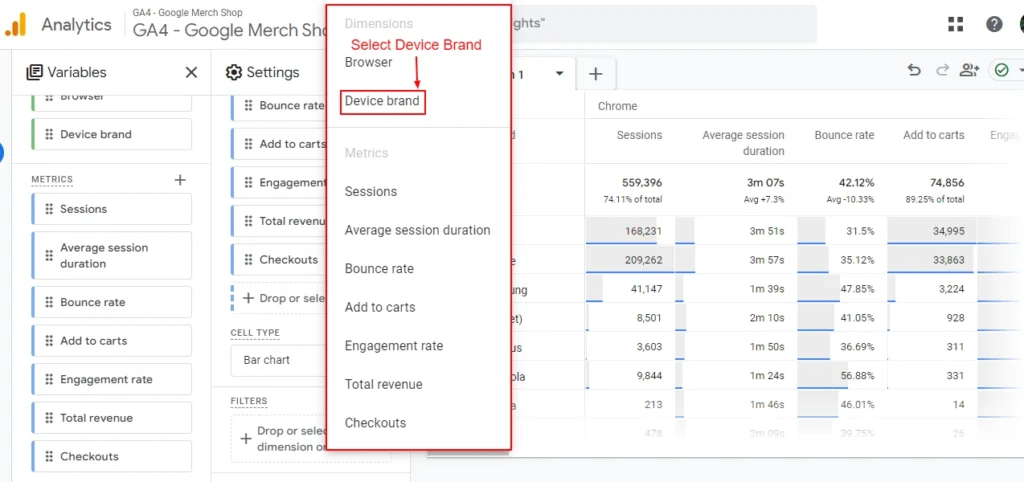
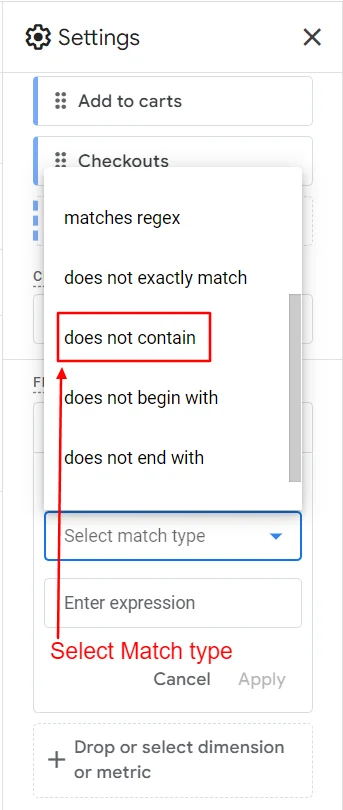
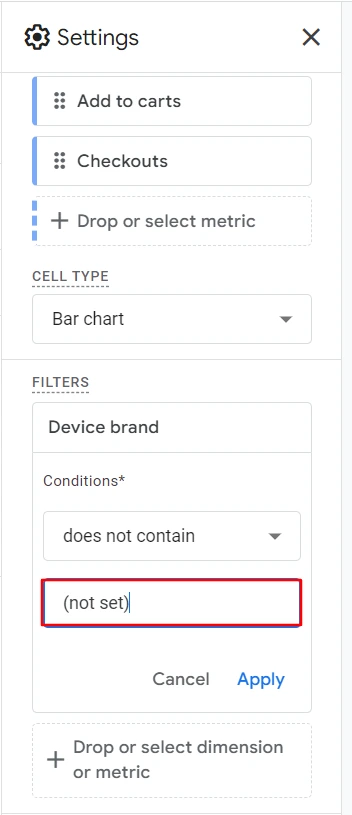
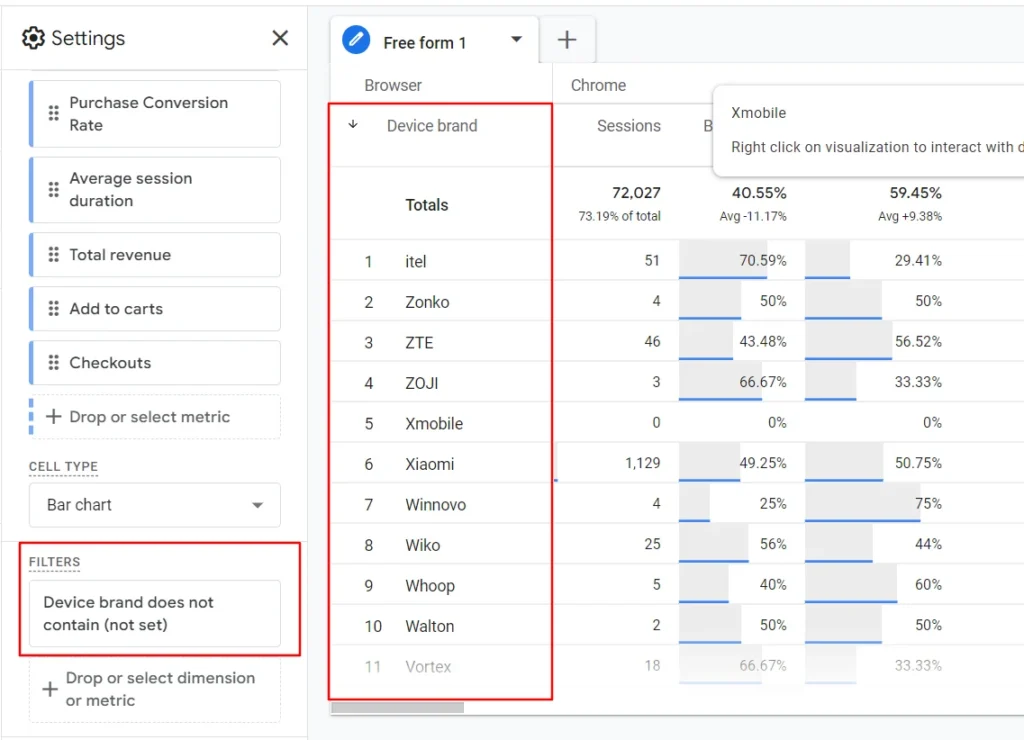
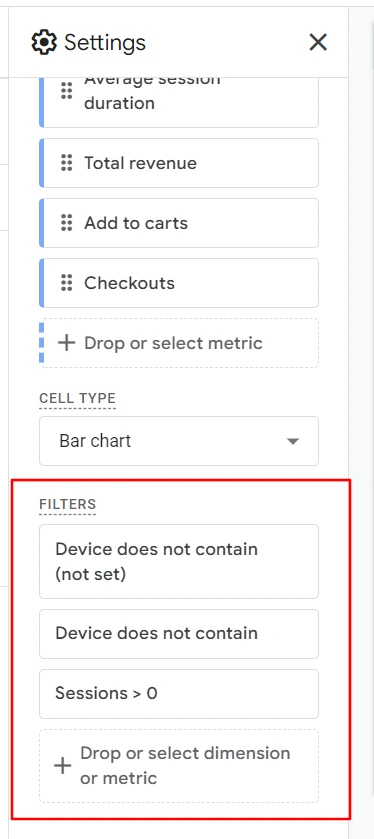
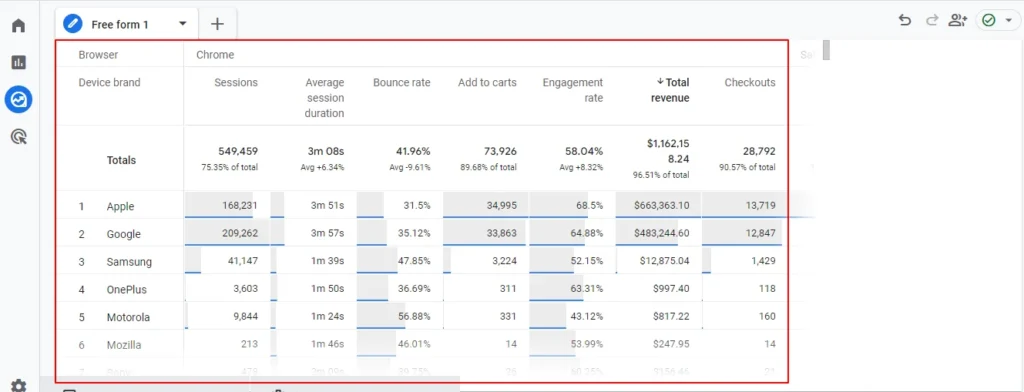

Tutorials
9 min read
How to integrate a Helpdesk and Customer Support Ticket System in WordPress using SupportCandy (Part 2)
Introduction
In Part 1 of this 3 part Blog series, we covered the basics of setting up the Support Candy plugin, focusing on the following sections of the plugin
- Installation and Setting up the Plugin
- Tickets
- Customers
- Support Agents
- Custom fields
Now, in Part 2 of this Blog, we will explore the following sections of the SupportCandy.
- Ticket List
- Agent Ticket List
- Customer Ticket List
- Email notification
Ticket List
- Ticket List section is used to define the columns that appear in the Admin and Agent dashboard under Tickets → Ticket List screen and Customer Tickets list on the front end.
- You can add new columns from the existing list of items or rearrange the columns order in which they are displayed.
Step 1: Agent Ticket List
List Items tab
- Go to the SupportCandy plugin menu.
- Click on the Ticket List → Agent ticket list → List items
- Customize the column order displayed in the ticket list.

Screenshot 1: Item Lists
Adding List Items (Coulmns) to Tickelt list table
- Click on Add new to Add new List items.
- Select fields from the available list (e.g. date created, email address, etc) as shown in the below screenshot.
- Hit Submit to save changes.
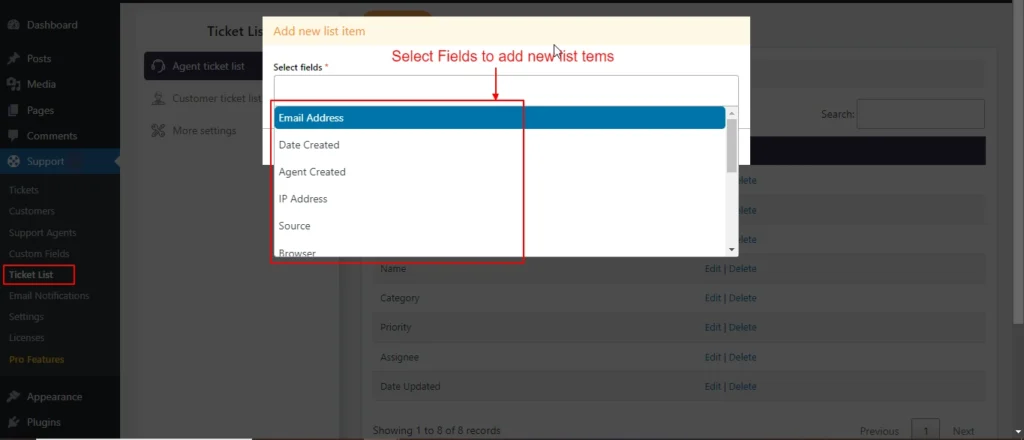
Screenshot 2: Adding New Column to Agent Ticket List table
Editing List Items
- In the Agent Ticket List section, edit the column that you want to reorder.
- Click Submit to apply your changes.
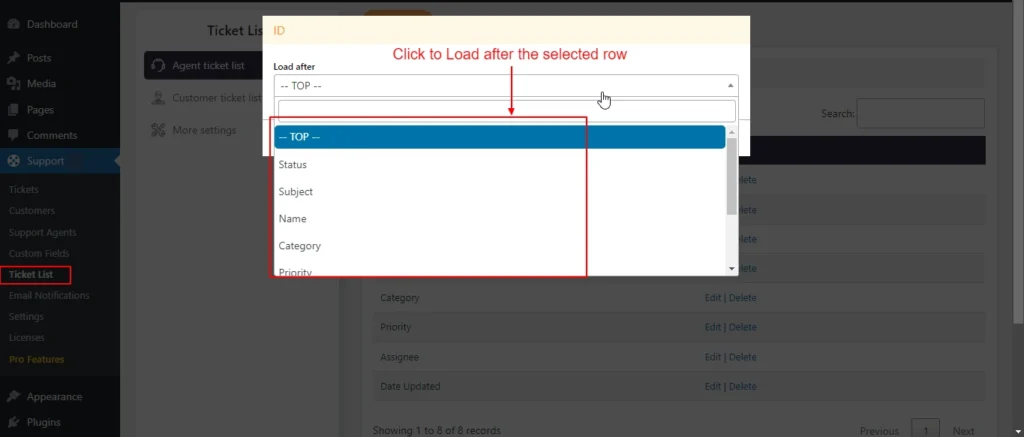
Screenshot 3: Edit List Items (reordering columns)
Filter Items
- This screen allows us to add filter options for filtering tickets on the Agent Tickets list screen. You filter tickets based on their status, customer, subject, category, priority, and so on.

Screenshot 4: List of available filters in the Agent Ticket List
Add New Agent Tickets Filter Items
- Go to the Ticket List → Agent ticket list → Filter items.
- Add the filter options you want to filter tickets by, as shown in the screenshot below.
- Click Submit to apply the filter settings.
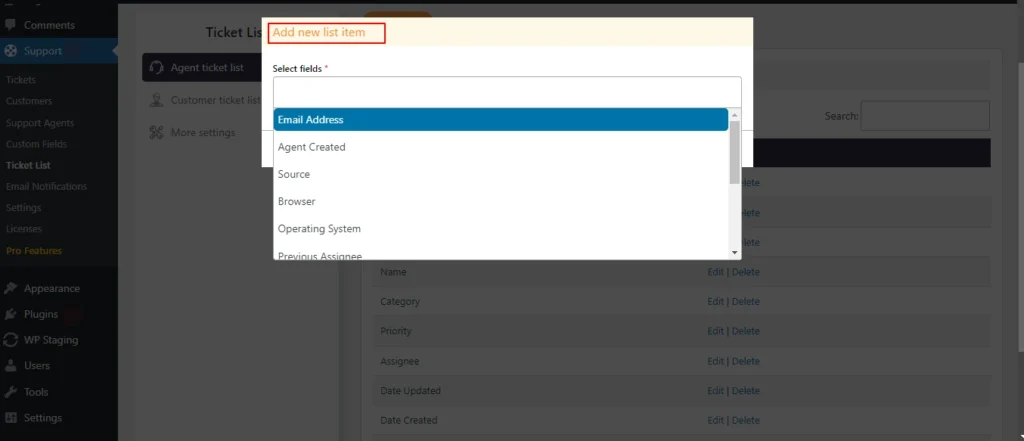
Screenshot 5: Add New filter options to Agents Tickets
Edit Agent tickets Filter Items
- Go to the Ticket List → Agent ticket list → Filter items. Click the Edit link beside the field.
- You can only change the Load after setting
- Click Submit to apply your changes.
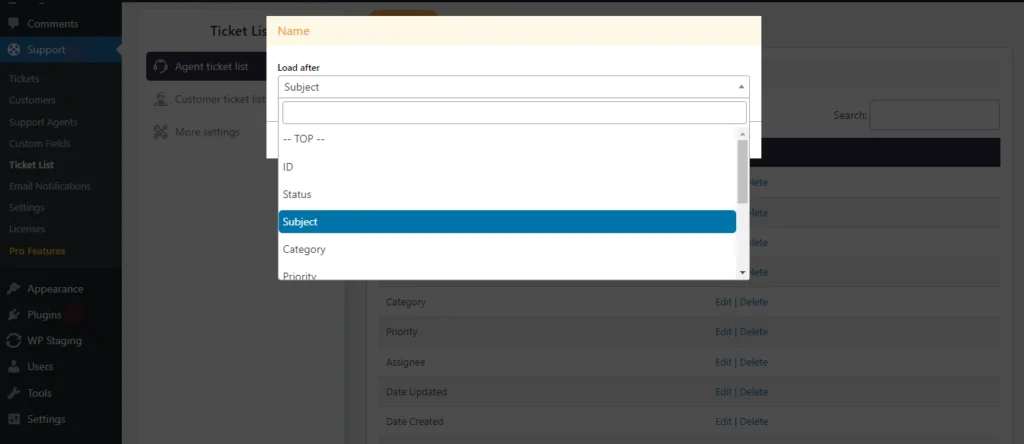
Screenshot 6: Edit filter item for Agents Tickets
Default Filters
- Default filters are filters on the ticket list. Here we choose the fields created in the above steps. These filters are available to agents.
- Select the items for default filters drop down on the Ticket List page (e.g., All, Unresolved, Unassigned, Mine, Closed, Deleted, show only open tickets).
- Drag and drop to reorder the fields as needed.
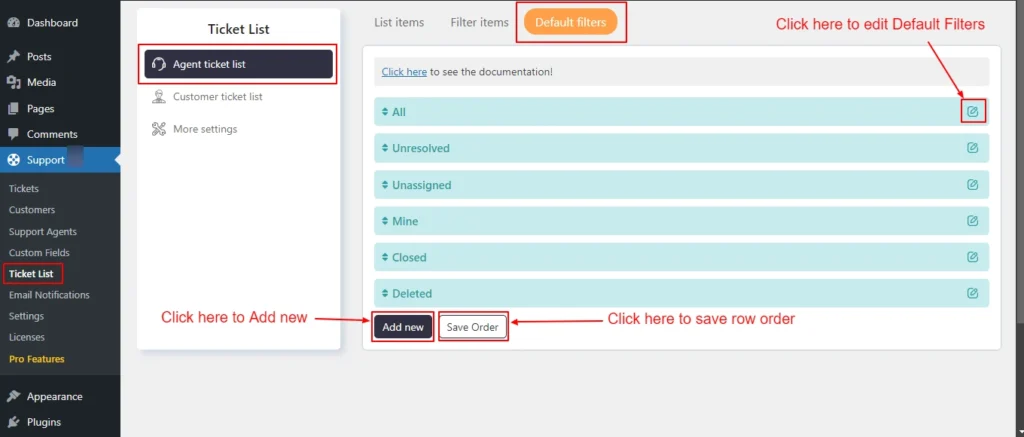
Screenshot 7: Agent Ticket List Default filters
Add new Agent ticket list Default Filters
- Go to Ticket List → Agent ticket list → Default filters
- Enter the Label, choose the Parent filter if needed
- If required apply conditional logic.
- Set the Enable drop-down to Yes
- Click Submit.

Screenshot 8: Add new Default filter
Edit Agent tickets Default Filter
- Go to Ticket List > Agent ticket list > Default filters
- Click on the edit icon beside the filter name
- You can only edit the Label and its Enable status.
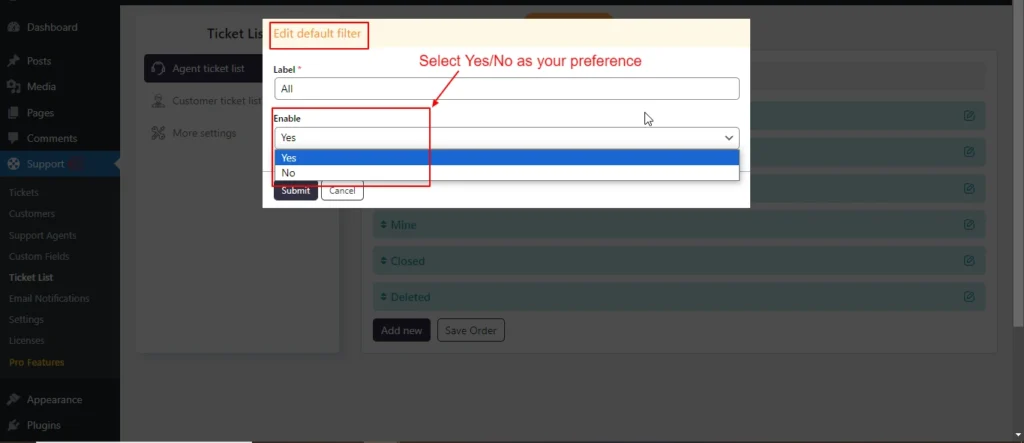
Screenshot 9: Edit Default filters
Step 2: Customer Ticket List
- Similar to Agent ticket list we can define columns for the Customer ticket list and add new filters to it.

Screenshot 10: Columns displayed in the Customer ticket list
List Items
- Go to the SupportCandy plugin menu.
- Click on the Ticket List → Customer ticket list → List items
- Customize the column order displayed in the ticket list.
Adding List Items (Coulmns to Tickelt List Table)
- Click on Add new
- Select fields from the available dropdown (eg. Name, email address, priority, etc.) as shown in the below screenshot.
- Hit Submit to save changes.
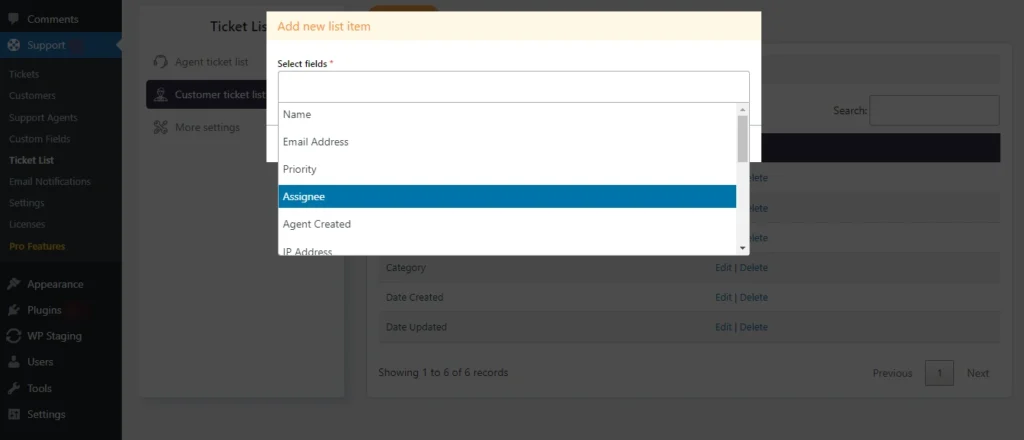
Screenshot 11: Custom ticket list → Add new list item
Editing List Items
- In the Customer Ticket List section, edit the column that you want to reorder.
- Click Submit to apply your changes.

Screenshot 12: Customer ticket list → Edit list item
Filter Items
- This screen allows us to add filter options for filtering tickets on the Agent Tickets list screen. You filter tickets based on it’s status, customer, subject, category, priority, and so on.
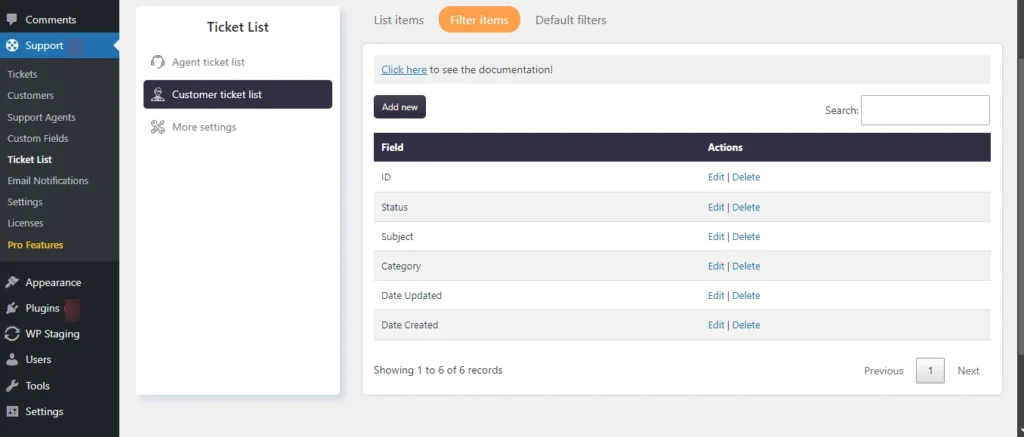
Screenshot 13: Filter fields for Customer tickets (frontend)
Add New Customer Tickets Filter Items
- Go to the Ticket List → Customer ticket list → Filter items.
- Add the filter options you want to filter tickets by, as shown in the screenshot below.
- Click Submit to apply the filter settings.
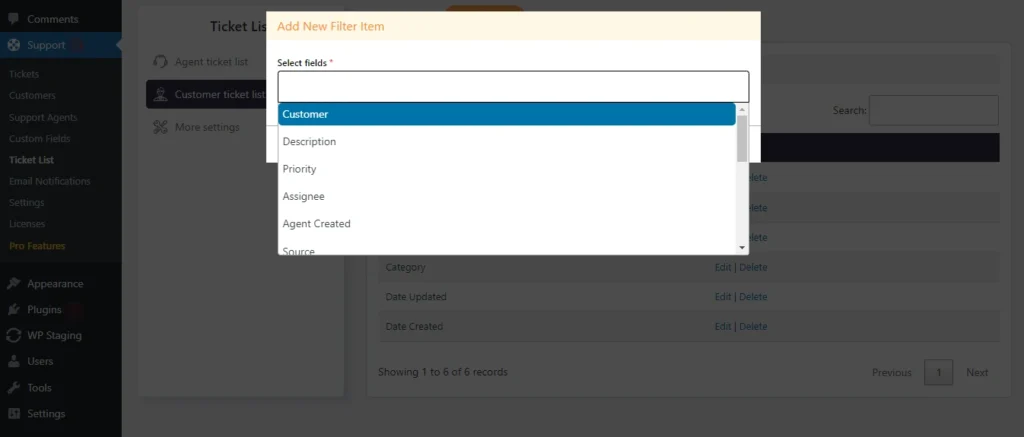
Screenshot 14: Add New filter options to Customer Tickets
Edit Agent tickets Filter Items
- Go to the Ticket List → Customer ticket list → Filter items. Click the Edit link beside the field.
- You can only change the Load after setting
- Click Submit to apply your changes.

Screenshot 15: Edit filter options to Customer Tickets
Default Filters
- Go to Support → Ticket List → Agent ticket list → Default filters
- You can set the default filters that appear in the customer tickets screen, similar to the Agent Agent tickets screen.

Screenshot 16: Default filters in the Customer Tickets list
Adding Default Filters to Customer Tickets
- Go to Support → Ticket List → Agent Customer list → Default filters
- Enter the label; choose the Parent filter if needed.
- If required, apply conditional logic.
- Set the Enable drop-down to Yes.
- Click Submit.
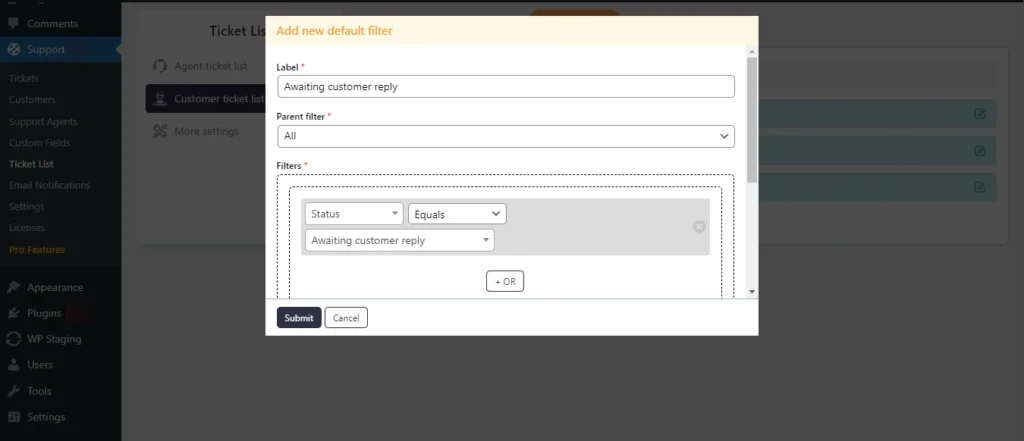
Screenshot 17: Adding Default Filters to Customer Tickets
Edit Customer tickets Default Filter
- Go to Ticket List → Customer ticket list → Default filters
- Click on the edit icon beside the filter name.
- You can only edit the Label and its Enable status.

Screenshot 18: Edit Customer tickets Default Filter
Step 3: More Settings
- Using the More settings tab, you can customize how the ticket list behaves for both agent and customer views.
- Here are the available settings for both:
- Default Sort By: Choose the default field by which tickets will be sorted.
- Default Sort Order: Set the default sort order (ascending or descending).
- Number of Tickets: Specify how many tickets will be displayed per page.
- Unresolved Statuses: Define the statuses that are considered unresolved.
- Default Filter: Set the default filter for the ticket list. Agents can adjust this further in their profile settings within the ticket portal.
- Ticket Reply Redirect: Choose what happens after a reply is added to a ticket. "No redirect" keeps the customer on the current ticket screen, while "Ticket list" redirects them back to the ticket list screen.
Agent view

Screenshot 19: More Settings Agent View
Customer view

Screenshot 20: More Settings Customer View
Advanced Tab
- You can define a closed ticket status group, where tickets with statuses in this group are treated as closed.
- Additionally, you can configure the default auto-refresh behavior for the ticket list. If enabled, the ticket list will automatically refresh every 10 seconds by default until you turn off this feature from the ticket list settings.

Screenshot 21: Advanced Tab
Email Notifications
- Using this menu, you can set up email notifications.
Step 4: General Settings
- Go to the Email Notifications section under the Support menu.

Screenshot 22: Email Notification → General settings
- Here, you can configure the following email settings:
- From name – Sender's name.
- From email – From which email address will the email be sent
- Reply To – When a user replies to a notification, emails will be sent to the specified email address. If no address is provided, the "From" email address will be used as the reply-to address.
- Number of emails per cron job – Set the maximum number of emails that should be sent in a batch.
- Blocked Emails – Specify email addresses that should not receive email notifications.
- Attachments in notifications – configure to send emails with attachments (links or actual files )
Step 5: Ticket Notifications
- In this section, you can edit or create email notification templates.
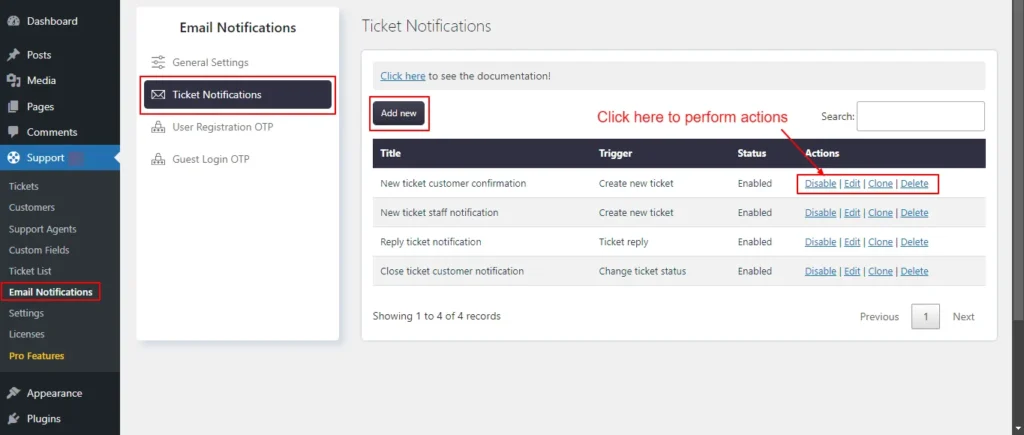
Screenshot 23: Ticket Notifications
Adding New Ticket Notification
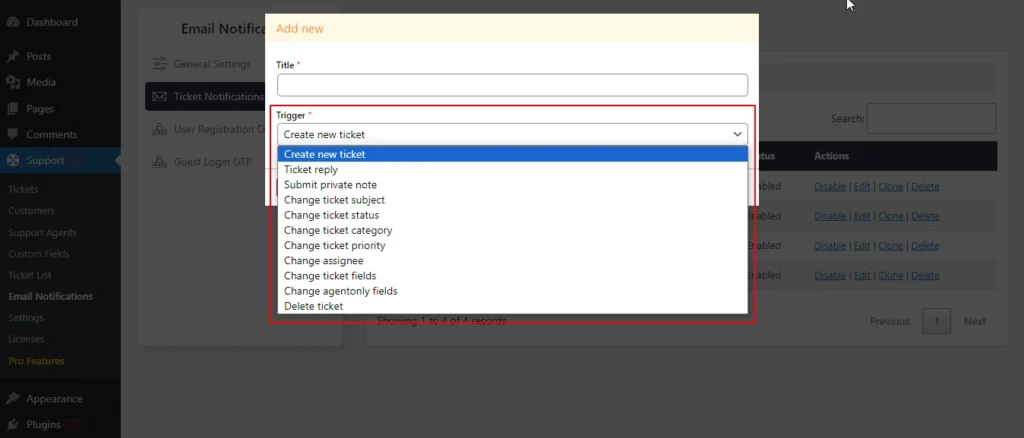
Screenshot 24: Add New Ticket Notification
- Click on Add New.
- Add Title and Select a Trigger
- Following are trigger events that can be used to send email notifications
- Cricket new ticket: When a new ticket is created
- Ticket reply: When a ticket receives a new reply, relevant parties are notified to the new response.
- Change ticket status: When the ticket status changes, for example, from Open to Awaiting customer reply, the activation occurs.
- Change ticket category: When the category of the ticket is modified
- Change ticket priority: When the priority of a ticket is changed
- Change assignee: When the assigned agent of the ticket is changed, it will trigger a notification to the new assignee.
- Delete ticket: When a ticket is deleted,
- Submit private note: When a private note is added to a ticket
- You must change the notification status to Enabled. Otherwise, this email notification won’t be sent.
- You can use macros or placeholders within the Subject and Body.
Editing Ticket Notifications
- Click on Edit button beside the template name for which you want to edit.
- You can manually add recipients in To address (required), CC, and BCC using the following settings
- General Recipients
- Agent Roles
- Custom Email Addresses (one per line)
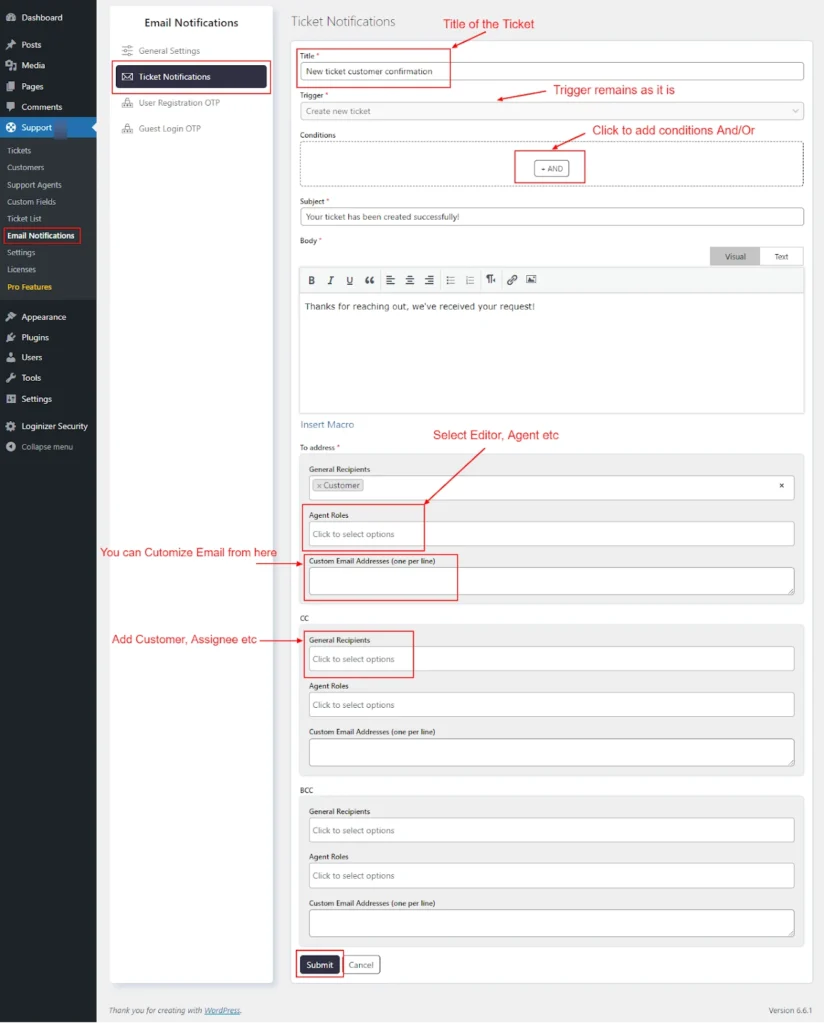
Screenshot 25: Editing Ticket Notifications
- You can Insert Macro in the email body
- Click on the Insert Macro button to view a list of available macros.
- The list will include placeholders for various types of data, such as customer name, status, date created, etc.
- Select the macro you wish to insert. For example, {{customer_name}} can be used to insert the customer's name dynamically.

Screenshot 26: Insert macro current user name
- After clicking on the Insert button, the user name macro has been added under the body, as shown in the below screenshot.

Screenshot 27: User name Macro
Conditions
- You can add And/Or conditions, and when they are met, then only an email notification is sent
- Let’s say that you want to send a notification for ticket change status to the Awating agent reply.
- Click on Add New under the Email Notifications → Ticket Notifications section. Set the trigger to Change Ticket status
- Under the Conditions section, set the Status equal Awaiting Agent reply.
- Add the subject, body, and email addresses to which this notification should be sent.
- Click Submit. Just now you configured that this notification should be sent when the status is Awating agent reply.
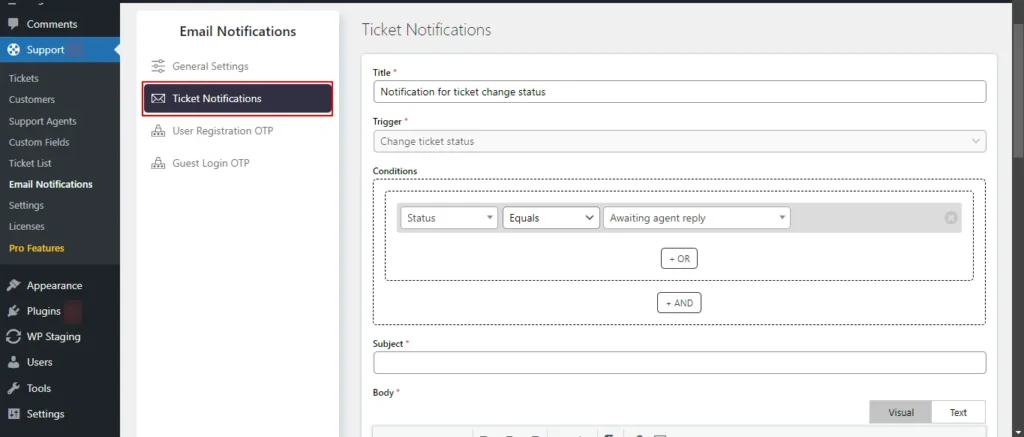
Sccreenshot 28: Setting Conditions in Ticket Notifications
Step 6: User Registration OTP
- This screen is to configure the email template for the Default registration of the supportcandy plugin. You can customize the email template that is used to send the OTP.
- The user registration OTP is a single-use password that is sent to verify the user's email address when using the “Default” registration form.
- Within the body section of the setting, you can utilize macros (placeholders) in the email subject and body as shown below.
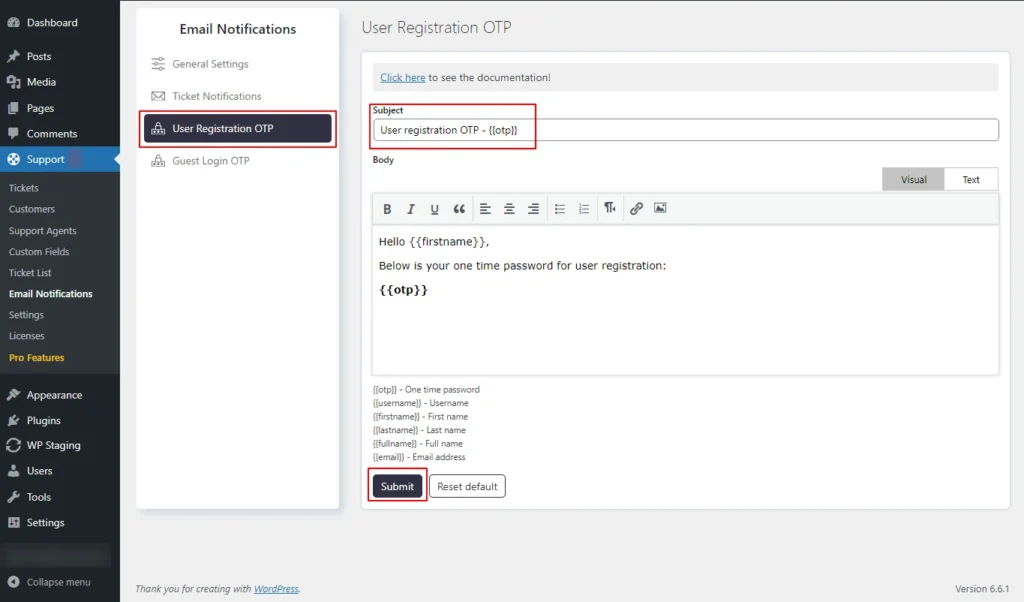
Screenshot 29: User Registration OTP
Step 7: Guest Login OTP
- To allow guest users to access their ticket list, you can activate an OTP (One Time Password) login.
- Keep in mind that OTP login is functional only when guest tickets are enabled. You can turn on this feature by navigating to Support → Settings → General Settings → Page Settings.
- Under the Guest Login OTP setting, you have the option to change the email template used for sending the OTP.
- On the same setting page, you can insert macros (placeholders) into the email subject and body.
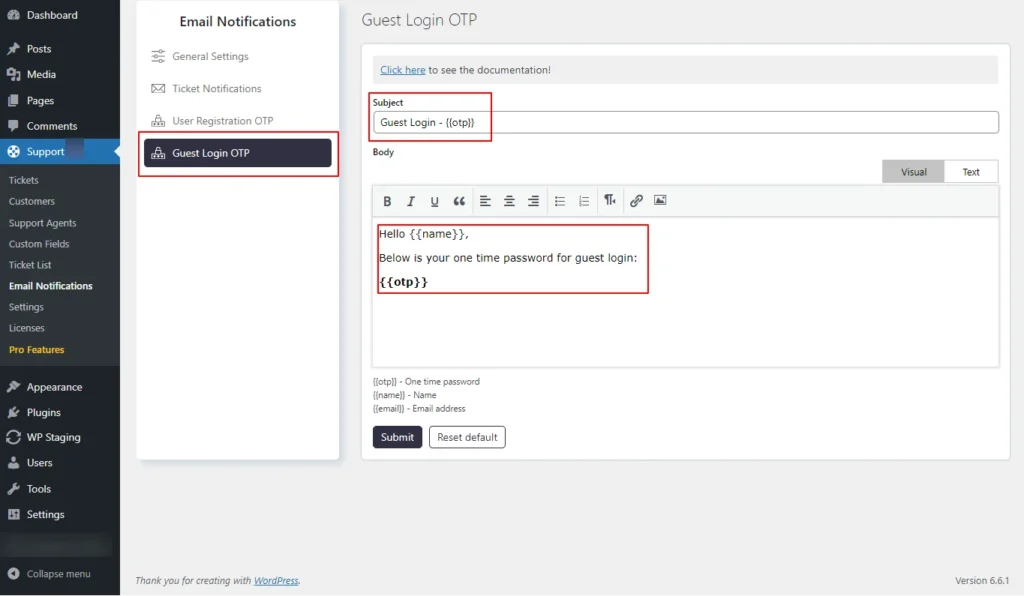
Screenshot 30: Guest Login email notification template for OTP
Conclusion
In this blog (Part 2 of the 3 Part Blog series), we walked you through the Ticket List, Customer Ticket List, Agent Ticket List and Email Notifications Sections.
That’s it for this article.
In the upcoming Part 3 of this series, we'll explore even more advanced features to take your customer support to the next level.
If you need any help related to WordPress, contact our WordPress experts.

Tutorials
12 min read
How to integrate a Helpdesk and Customer Support Ticket System in WordPress using SupportCandy (Part 1)
Introduction
In today's competitive landscape, providing exceptional customer support is a top priority for businesses to maintain a loyal client base. Whether you run an online eCommerce store, a membership site, a product, or a service-based business, having a robust customer support system is essential for maintaining a positive customer experience.
Integrating a helpdesk and customer support ticket system directly into your WordPress website can be a game-changer.
In this step-by-step guide, we'll delve into the process of integrating a robust customer support ticket system into your WordPress website using the SupportCandy plugin.
This is a three-part blog series. In this Part 1 article, we discuss the following sections of the SupportCandy.
- Installation and Setting up the Plugin
- Tickets
- Customers
- Support Agents
- Custom Fields
The step-by-step process of adding a customer support system to WordPress using the SupportCandy
Step 1: Installing the SupportCandy plugin
- In the beginning, go to your WordPress homepage.
- For the Plugins tab, click on it.
- Press the Add New button.
- Use the search bar to look for SupportCandy.

Screenshot 1: Click on Add New Plugin
- Click the Install Now button under the plugin SupportCandy—Helpdesk & Support Ticket System.
- Click the Activate button, and you are done!
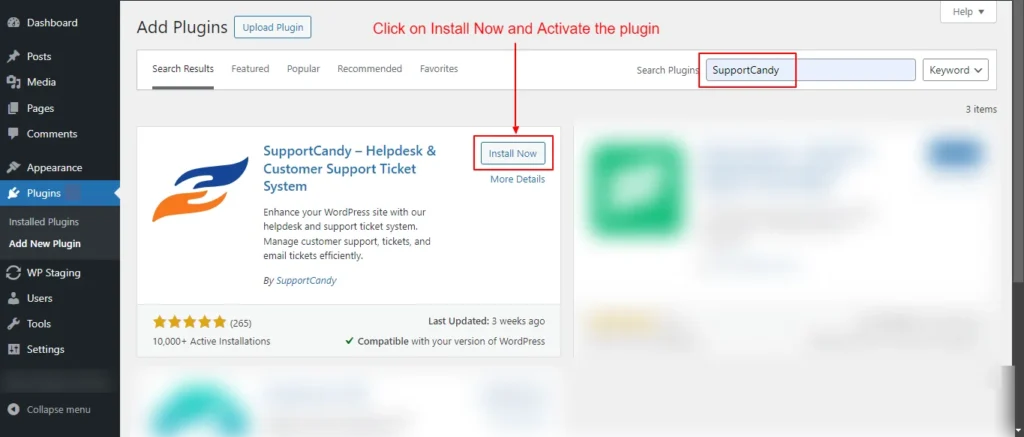
Screenshot 2: Install and Activate the Plugin
Step 2: Setting up Frontend Pages
Once the plugin is activated, we need to create web pages to embed SupportCandy shortcodes to display various support-related features and functionality.
Support requests Page
- Go to the WordPress Pages menu. Click on the Add New Page. Name the page Supports Requests.
- Add the shortcode ‘[supportcandy]’ to this page and save it.
- Go to the Support Candy menu Support → Settings → General Settings → Page Settings.
- Select the newly created page Support Requests under the Support page dropdown.
- Save the settings by clicking the Submit button.

Screenshot 3: Create a New WordPress Page Support Requests
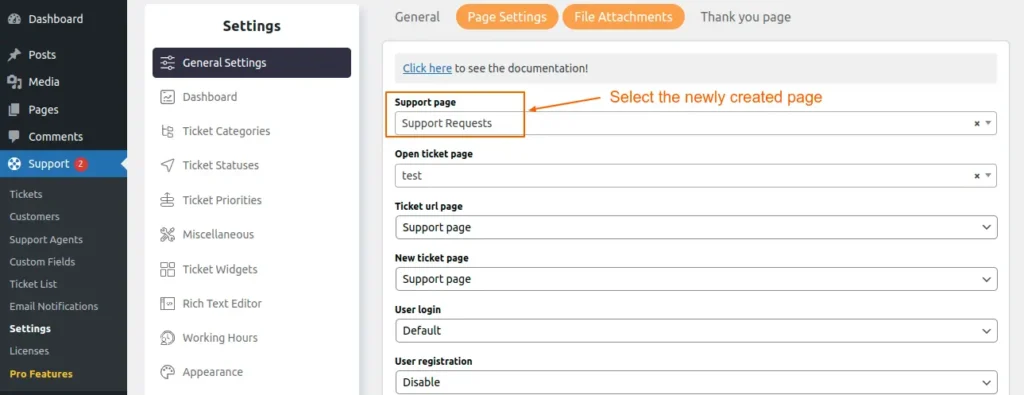
Screenshot 4: Add it to Support → Settings → General Settings → Page Settings
Tickets
Step 3: Ticket List (Viewing Tickets)
- Navigate to the Tickets section under the SupportCandy menu.
- Here you will see a list of all tickets.
- Use the filters and search bar to find specific tickets.
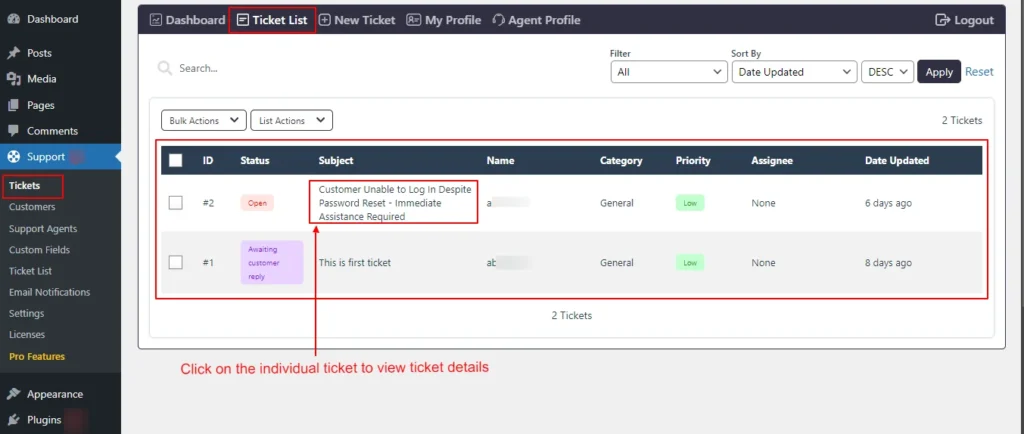
Screenshot 5: Ticket List
- Click on an individual ticket to view the ticket details, such as ticket status, ticket info, and comments, as shown in the below screenshot 6.

Screenshot 6: View single ticket details
Step 4: Viewing Dashboard

Screenshot 7: Dashboard
- At the top of the dashboard, we can see numbers of New, Unresolved, Unassigned, and Closed Tickets.
- Below that we can see various cards, such as
- Ticket Statistics
- Today's Trends
- Agent Workload
- Recent Activities
- Recent Tickets
- Unresolved tickets by Category, Priority, and Status (default: last 7 days data)
- Ticket statistics by day of the week
- You can choose which cards to display in this dashboard under the settings menu, which is discussed in the default tab under Agent Profile.
Step 5: Adding a New Ticket
Adding a New Ticket from Frontend
- Your customers can add a ticket from the front end.
- Go to the Support Requests page that we created in Step 2.
- Click on the hamburger menu on the right side of the ticket list.

Screenshot 8: Slideover
- Click on New ticket.
- Add a subject or short description of the ticket.
- Add a detailed description of the ticket.
- Select the category.
- Agree to all terms and conditions.
- Click on Submit.
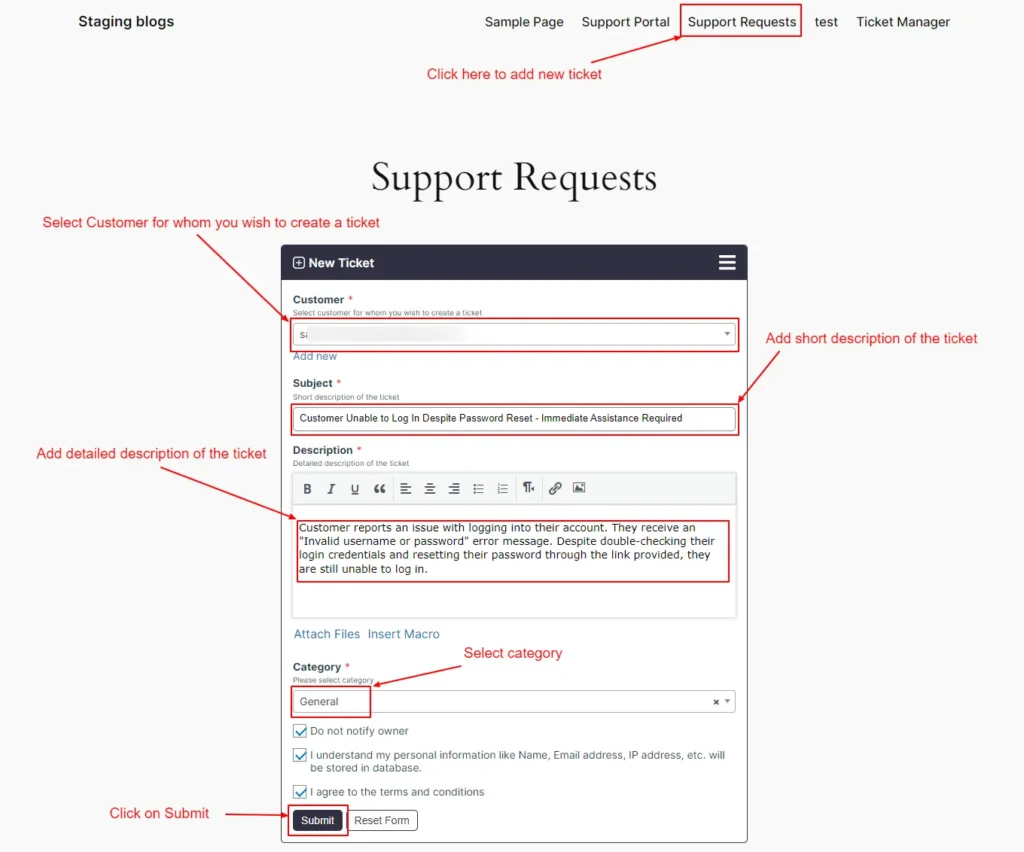
Screenshot 9: Adding a New Ticket from the Frontend
Adding a New Ticket from the backend
- In some situations, Support agents need to create tickets. Agents can add tickets from their accounts using this screen.
- Click on Support → Tickets.
- Click the New Ticket tab.
- In the Customer section, select the customer for whom you wish to create a ticket.
- Add a subject or short description of the ticket.
- Add a detailed description of the ticket.
- Select the category.
- Agree to the terms and conditions and click submit to save details.
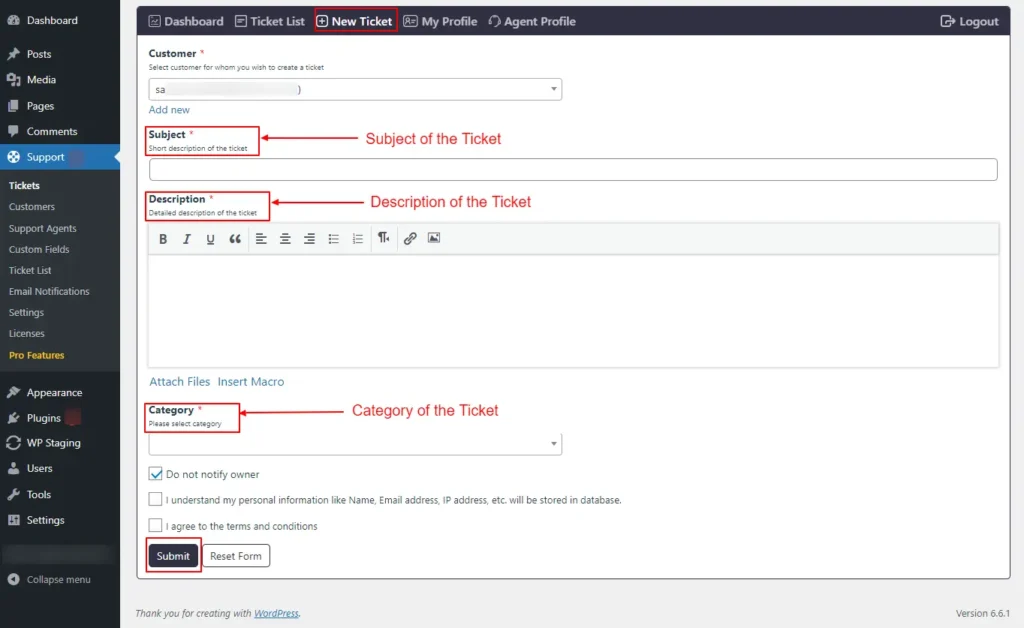
Screenshot 10: Adding a New Ticket from the Backend
Step 6: My Profile
- Since we have already logged in as administrators, we can view our profile.
- If you want to update your name, you can do it on the My Profile screen.
- Hit Save Changes to save your name.

Screenshot 11: My Profile
Step 7: Agent Profile
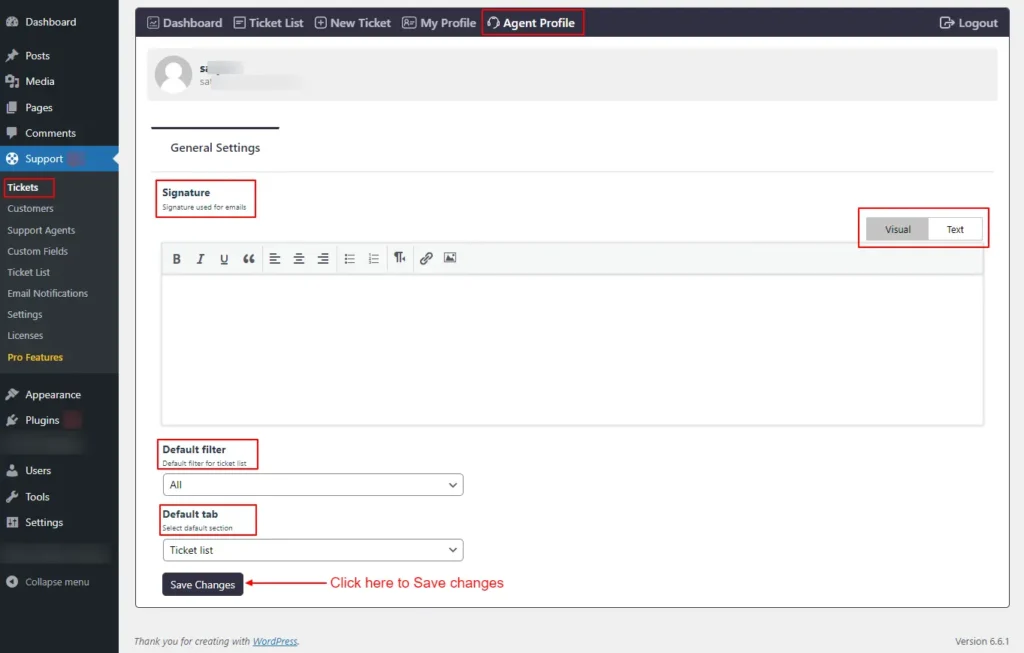
Screenshot 12: Agent Profile
- You can set the signature used for emails using the screen.
- Default filters on the Ticket List tab can be set from here. You can choose from Unresolved, Unassigned, Mine, Closed, and Deleted tickets.
- The default tab for the Support main menu can be set from here. You can choose from the available options Ticket List, Dashboard, and New Ticket.
Customers
Step 8: Managing Customers
- Go to the SupportCandy plugin menu.
- Click on the Customers, submenu.
- Here you will see a list of all registered customers.
- You can select between All Users or Users who have tickets to filter the customer list.
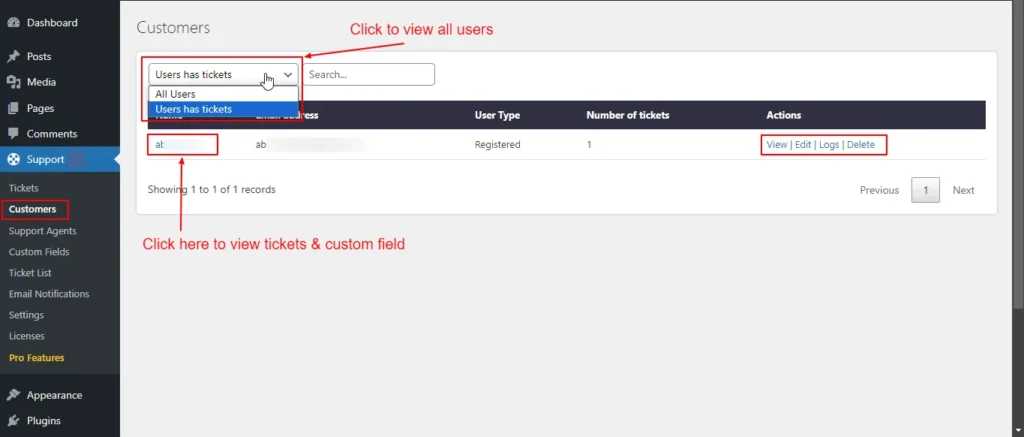
Screenshot 13: Filter Customers

Screenshot 14: Edit Customer Info
- You can edit the customer information by clicking the edit button or view it by clicking the view button.
- When you click on the customer name, it will take you to his ticket list, as shown in the screenshot 15. There are 3 subtabs. Tickets, Custom Fields, Other.

Screenshot 15: Customers → Tickets
- The Tickets tab shows all the tickets of a particular customer.
- Other tabs shows Recent Activities related to that customer.

Screenshot 16: Customers Recent Activities
Support Agents
Step 9: Managing Agents
Adding a New Agent
- First, there should be a WordPress user account for the person to whom you wish to add an agent.
- Go to the SupportCandy plugin menu.
- Click on Support Agents.
- You can see all the agent lists in the screenshot 17.
- Click on Add New Agent.
- Search for the name from the list of WordPress users, for which you want to add as an agent.
- Select Role (Administrator, Agent, Editor, etc.)
- Click Submit.
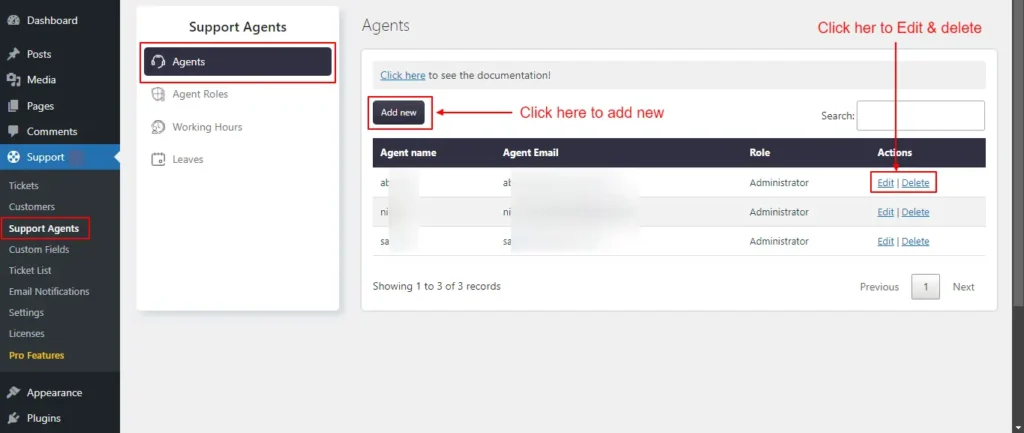
Screenshot 17: Agent List

Screenshot 18: Adding a new Agent
- You can also edit the agent role from the edit link or delete an agent using the delete link.
- The Edit link allows update roles (Administrator, Agent, Editor, or any custom role that you have added).
Step 10: Agent Roles
You can create an agent role and set its capabilities on this screen. By default, there are two roles, as follows:
- Administrator: Has all possible capabilities.
- Agent has limited capabilities.
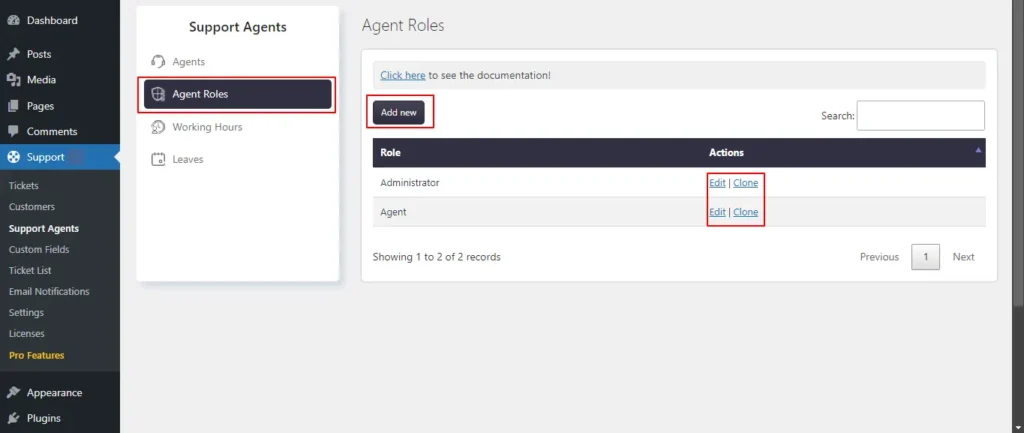
Screenshot 19: Agent Roles List
Adding a New Role
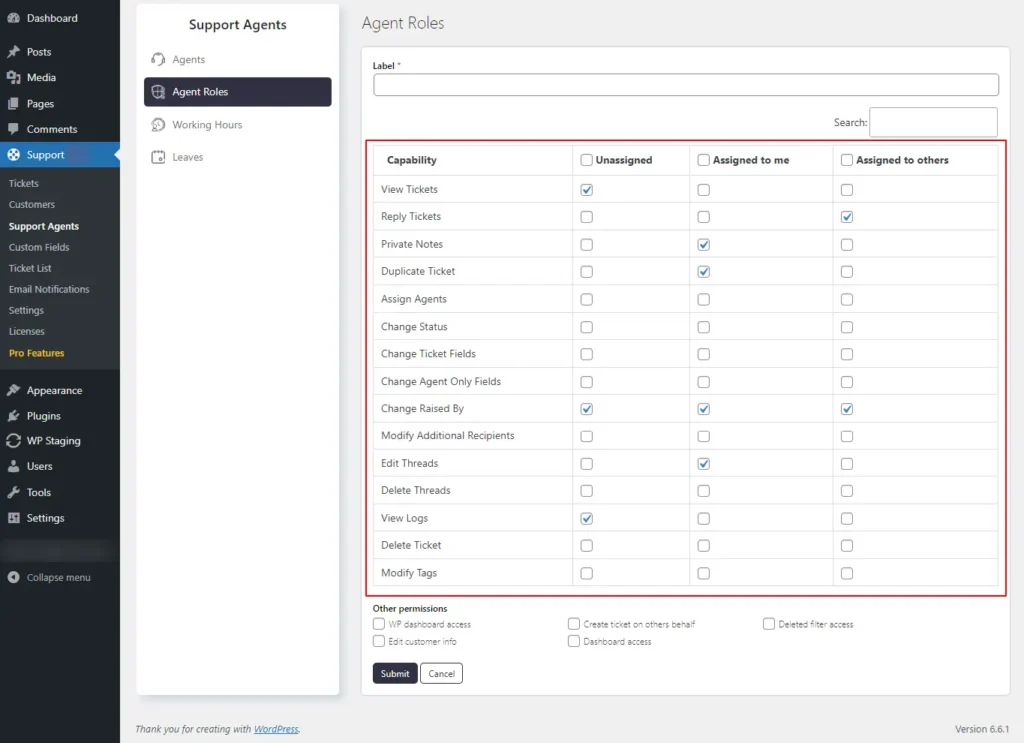
Screenshot 20: Assign agent capabilities
- Click on Add New Role.
- Specify the role name (label).
- You can grant permission for the following tickets:
- Unassigned: Tickets that have not been assigned to any agent or agent group.
- Assigned to me: Tickets that are specifically assigned to the current agent.
- Assigned to others: Tickets that are assigned to agents other than the current agent, but are not unassigned
- A few of the capabilities (actions that agents can perform)
- View Tickets: Controls read permission for applicable tickets. Agents who create tickets have read permission by default.
- Reply Tickets: Controls reply permission for applicable tickets. Agents who create tickets can reply by default.
- Private Notes: Controls permission to submit or read private notes on applicable tickets.
- Assign Agents: Controls permission to assign agents to applicable tickets.
- Change Status: Controls permission to change the status, category, and priority of applicable tickets.
- Change Ticket Fields: Controls permission to update ticket fields for applicable tickets.
- Change Agent-only Fields: Controls permission to update agent-only fields for applicable tickets.
- Change Raised By: Controls permission to update the ticket owner/creator for applicable tickets.
- Modify Additional Recipients: Controls permission to update additional recipients of applicable tickets. Ticket creators always have this capability.
- Edit Thread: Controls permission to edit/update threads of applicable tickets.
- Delete Thread: Controls permission to delete threads of applicable tickets.
- View Logs: Controls permission to view logs of applicable tickets.
- Delete Ticket: Controls permission to delete or restore applicable tickets.
- Here are additional permissions beyond ticket management:
- WP Dashboard Access: Grants an agent access to the WordPress dashboard. Without this, the agent can only view tickets from the front end, not the dashboard.
- Create Ticket on Others' Behalf: Allows an agent to create tickets on behalf of others.
- Deleted Filter Access: Allows agents to access the Deleted filter on the ticket list, enabling them to view deleted tickets. Without this, deleted tickets cannot be accessed.
- Edit Customer Info: Permits an agent to update customer information within individual tickets.
- Click Submit to save the new role.
Editing an Agent Role
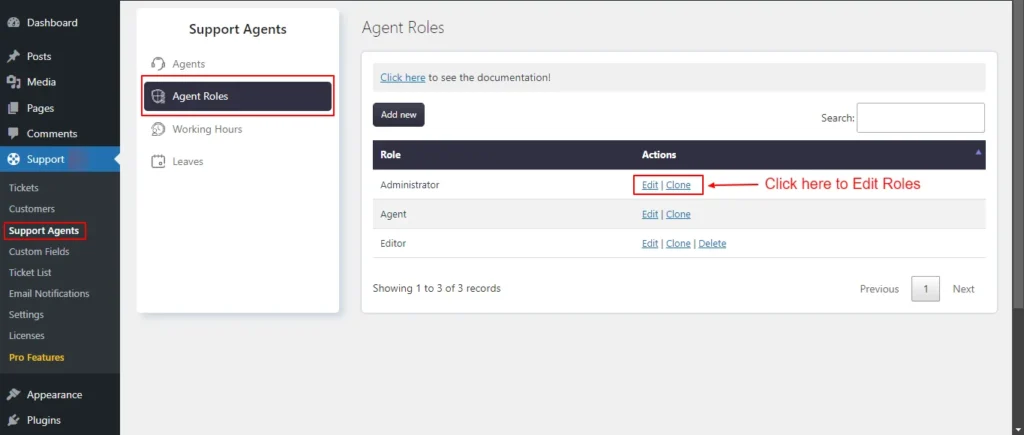
Screenshot 21: Edit Agent Roles
- Under the Support Agents tab, click on Agent Roles.
- Select a role and click Edit.
- Make the necessary changes.
- Click Save.
- You cannot delete Administrator and Agent roles as these are the default roles.

Screenshot 22: Edit roles and permissions
Step 11: Working Hours
Configuring Working Hours
- Go to the Support Agents → Working Hours tab.
- Select the agent from the dropdown and then set the working hours.
- Click Submit.

Screenshot 23: Working hours
Working Hours Exceptions
- Exceptions allow for adjustments to standard working hours on specific dates. For example, if your typical working hours on a Monday are from 9:00 a.m. to 6:00 p.m. but you need to work from 9:00 a.m. to 2:00 p.m. on a particular Monday, you can set an exception to reflect this change.
- The system will then prioritize these modified hours over the usual schedule.

Screenshot 24: Exceptions
- Click on Exceptions.
- Add Title, Date, and Schedule
- Click Submit.
Step 12: Leaves
- You can set leaves or day-offs for the agents.

Screenshot 25: Leaves Calendar
- Click on the date for which you want to add leaves. Search for the agent name for which you want to grant leave and click submit.

Screenshot 26: Add leaves
Custom Fields
Step 13: Ticket Form Fields
- The Ticket Form Fields are the fields that are displayed on ticket form. This section lets you add or remove fields from the submit ticket form.
- If you want to add new fields to this form, Go to Support → Custom Fields → Ticket Fields, which is discussed next.
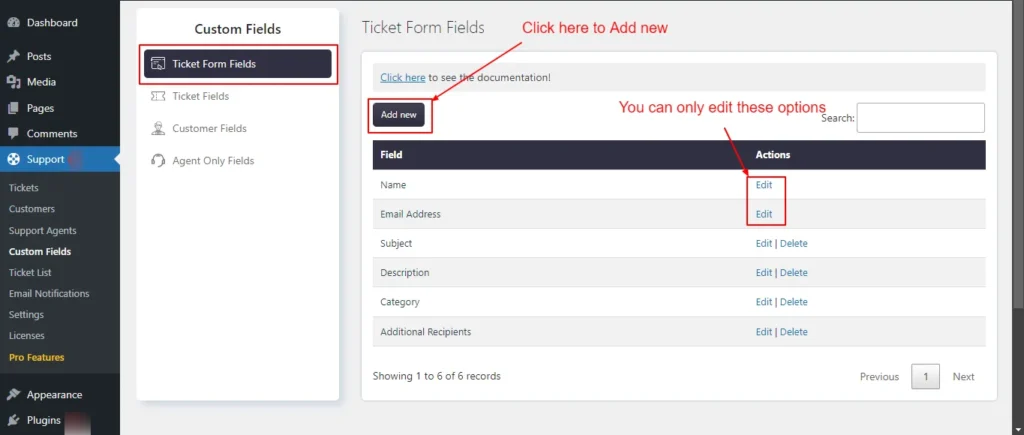
Screenshot 27: Ticket Form fields list
Add a field to the Ticket form fields
- Using Ticket Fields, Customer Fields, and Agent Only Fields you can add new fields to a ticket submission form.
- Ticket Fields: These are fields to collect more information from the customer (ticket subject, ticket description).
- Customer Fields: Fields to collect information about the customer. Name and email are default.
- Agent Only Fields: You can add fields specific to an agent.

Screenshot 28: Add a new field to the Ticket form
- The Add New Field screen has the following settings to be configured
- Select field: You can choose which fields from the ticket fields and user fields you want to add.
- Is required: Deciding whether the selected field is essential is up to you. If a field is marked as mandatory, it must be completed before submitting the report.
- Width: Within the form, it's possible to adjust the width of the area. There are three choices available: one-third of the row, half the width of the row, and the entire width of the row.
- Load after: This choice lets you change the order of the fields.
- Visibility conditions: The selected field can be displayed only when a specific situation is met. The fields will remain hidden as long as the conditions are not met. Conditions can be set using both AND logic (where all conditions must be met) and OR logic (where at least one condition must be met).
Editing Ticket Form Fields
- Go to the Support menu.
- Click Custom Fields → Ticket Form Fields.
- Click the Edit button next to a field you want to change to make changes.
- Click Submit.
- The name and email address fields are default; hence, you can only change the Width and Load after settings. Also, you can't delete them.
- For the rest of the fields, you can edit and delete them.
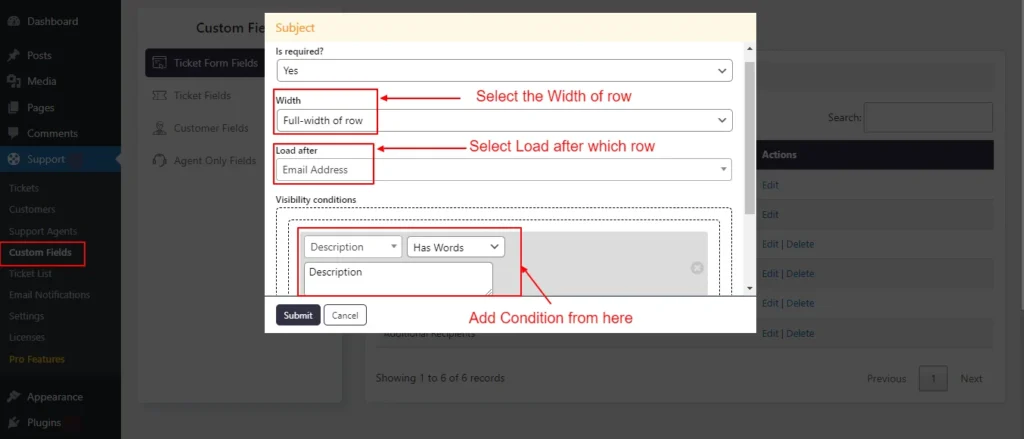
Screenshot 29: Editing the Subject Field
Step 14: Ticket Fields
- From the Ticket fields screen, you can create new fields to collect more information about tickets which can then be added to the New Ticket form.
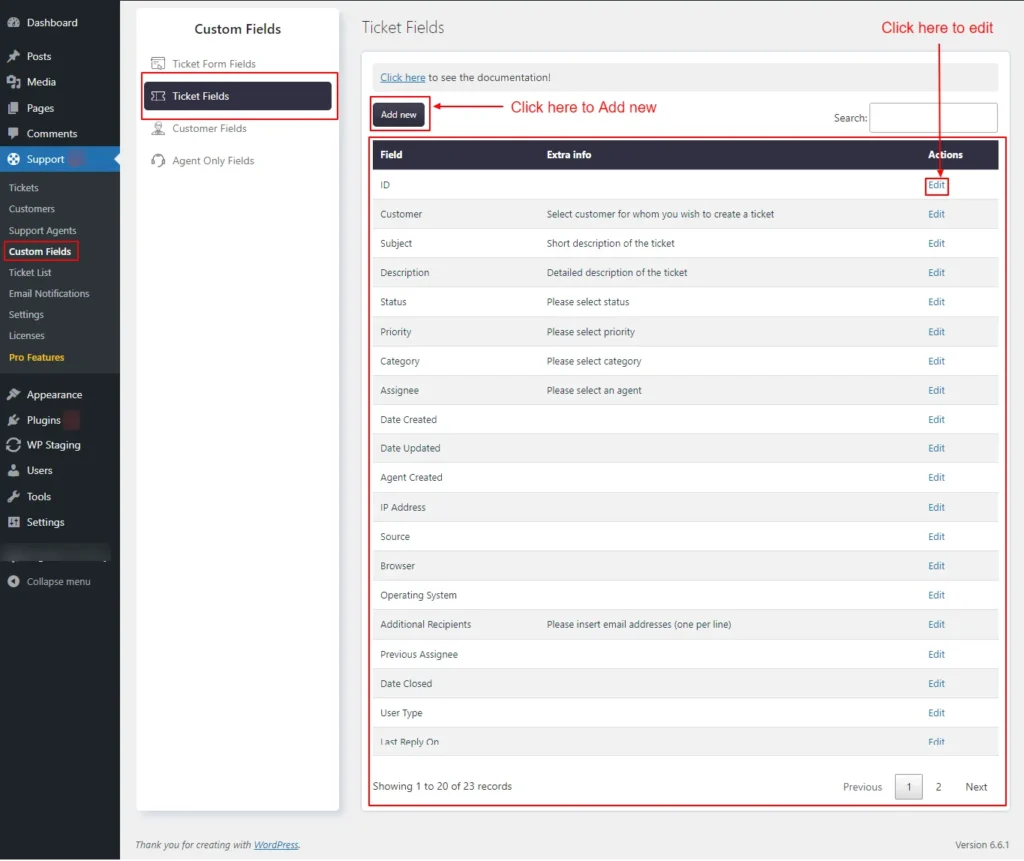
Screenshot 30: Ticket fields
Adding New Ticket Fields
- Click Add New to create a new ticket field.
- Enter the label.
- Choose where will be this field loaded after.
- Choose the field type (e.g., text, dropdown, checkbox). Based on the field type, it will show more configuration options, such as Extra Info, Default Value, Auto-fill in ticket form, Character limit, Placeholder, Has personal info etc.
- Click Submit.
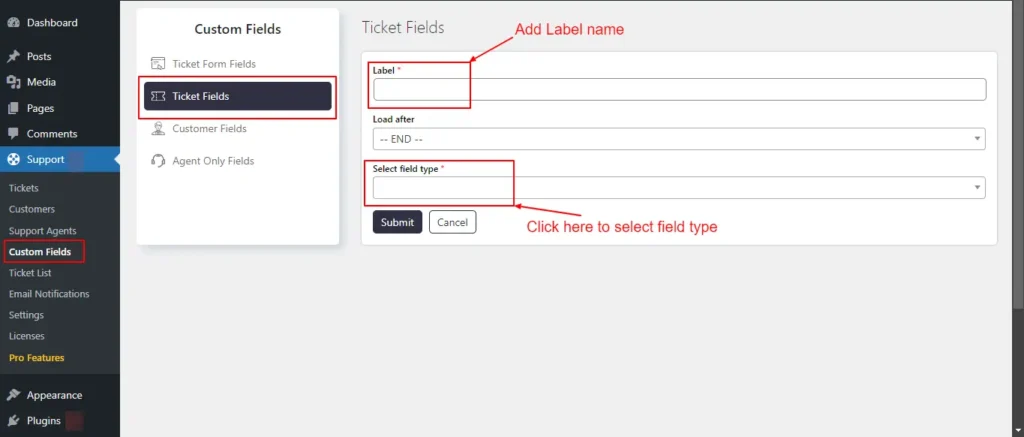
Screenshot 31: Adding New Ticket fields in the custom field
Editing Existing Ticket Fields
- Click Edit to edit a ticket field.
- Edit the field details such as Label, Subject, Load after, Extra info, Short description of the ticket, Default value, Not Applicable, Auto-fill in ticket form, Character limit, Placeholder, Ticket list width (pixels), etc.
- Once done Click Submit.

Screenshot 32: Editing Ticket fields in Custom fields
Step 15: Customer Fields
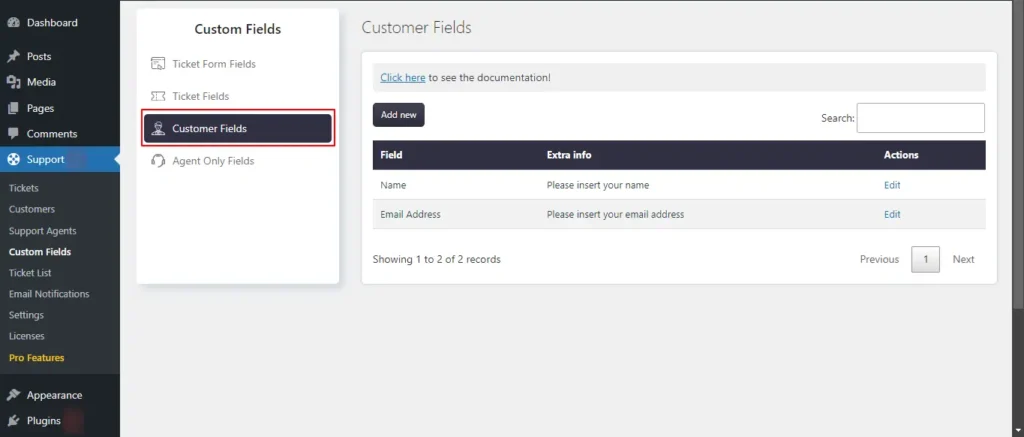
Screenshot 33: Customer Fields list
Adding New Customer Fields
- Click on the Add New button to create a new customer field.
- Choose the field type (e.g., text, dropdown, checkbox). Based on the field type, it will show more configuration options, such as Extra Info, Default Value, Auto-fill in ticket form, Character limit, Placeholder, Has personal info, Allow in my profile and Allow in ticket form, etc.
- Click Submit.

Screenshot 34: Adding New Customer Fields
Editing Customer Fields
- Click on Customer Fields.
- To edit an existing field, click on the Edit button next to the field.
- Make the necessary changes to the field settings.
- Click Submit.
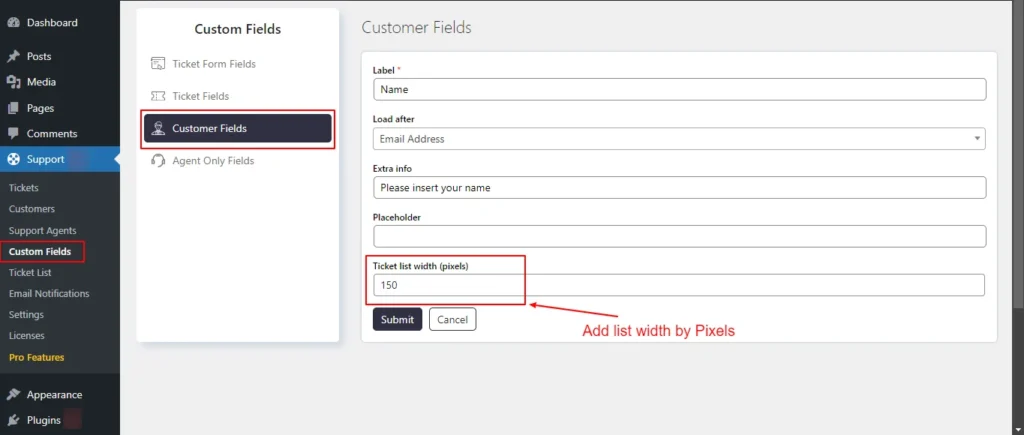
Screenshot 35: Editing Customer Fields
Step 16: Agent Only Fields
- Ticket fields and agent-only fields are essentially identical, with the sole distinction being that the latter is not viewable by customers.
- If agent-only fields are included in the customer ticket list items, customers have the ability to view them in the ticket list.
Adding New Agent-Only Fields
- Click Add New to create a new agent-only field.
- Choose the field type (e.g., text, dropdown, checkbox).
- Configure the field settings (Extra info, Default value, Character limit, Placeholder, Ticket list width, Has personal info etc.)
- Click Submit.
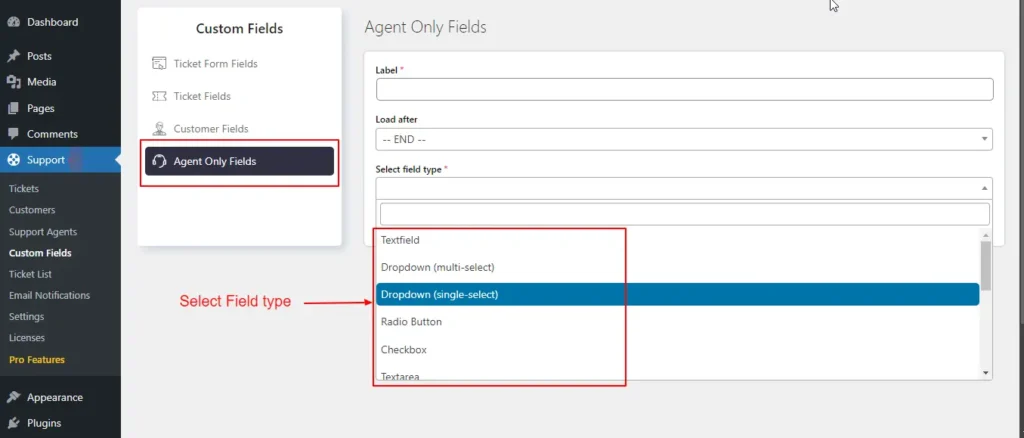
Screenshot 36: Adding New Agent Only Fields
Editing Agent Only Fields
- Go to the SupportCandy plugin menu.
- Click on Agent Only Fields.
- To edit an existing field, click on the Edit button next to the field.
- Make the necessary changes to the field settings.
- Click Submit.

Screenshot 37: Editing Agent Only Fields
Conclusion
In this blog (Part 1 of 3 of the series), we walked you through how to add a helpdesk and ticket system on WordPress using the SupportCandy plugin.
SupportCandy adds to your WordPress site the features of a complete help desk and customer support ticket system. It is one of WordPress's most popular helpdesk and customer support ticketing plugins.
That’s it for this article.
In Part 2 of this series, we will dive deeper into other sections of SupportCandy.
If you need any help related to WordPress, please contact our WordPress experts.


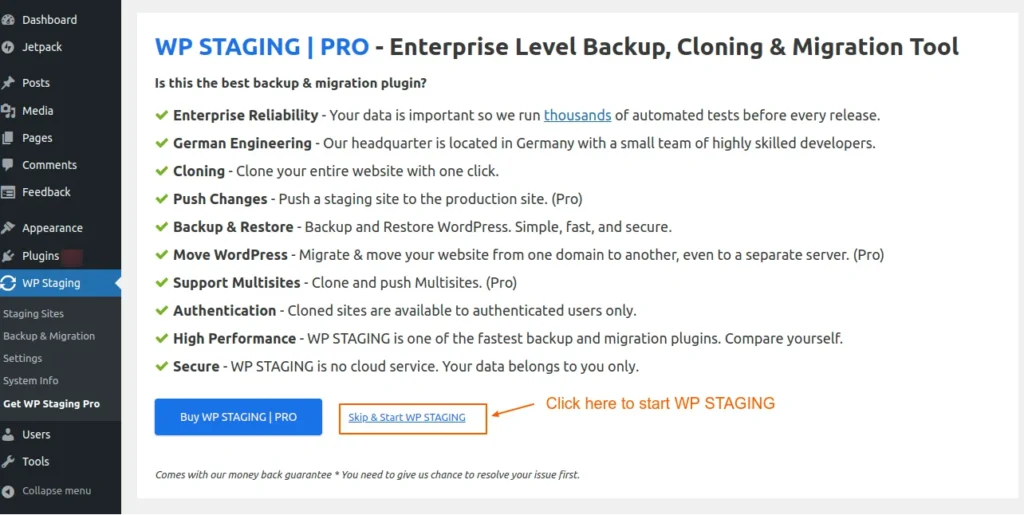


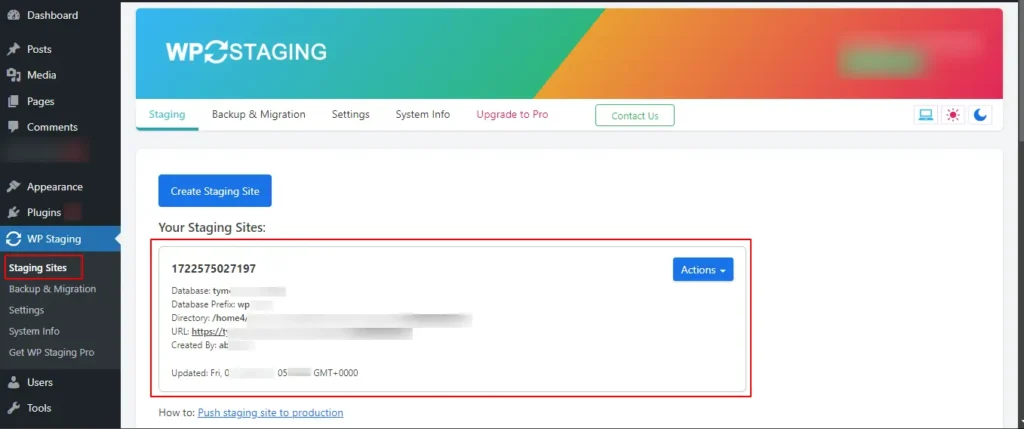


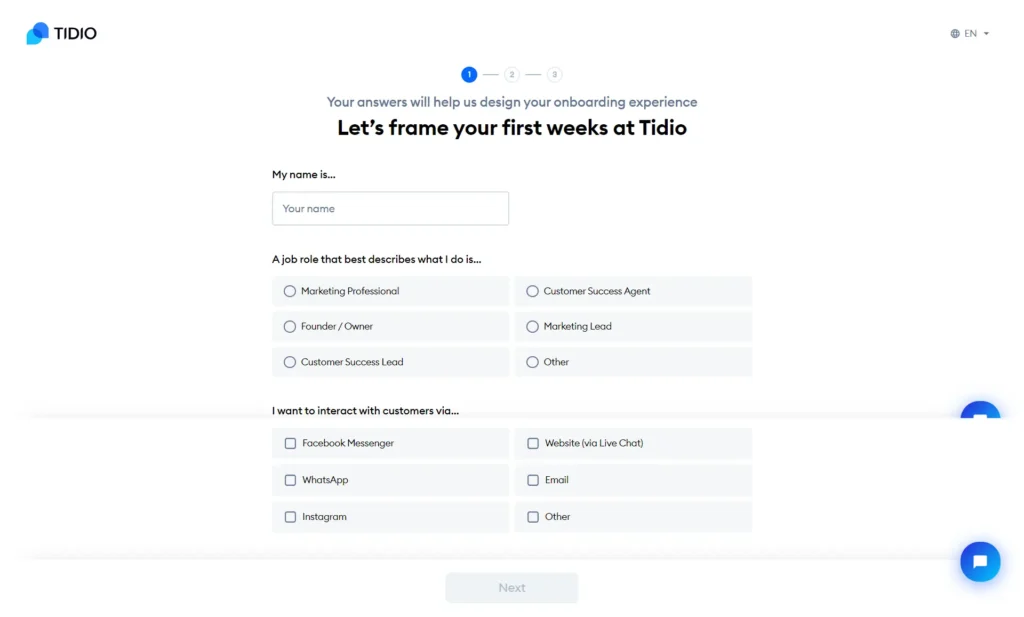
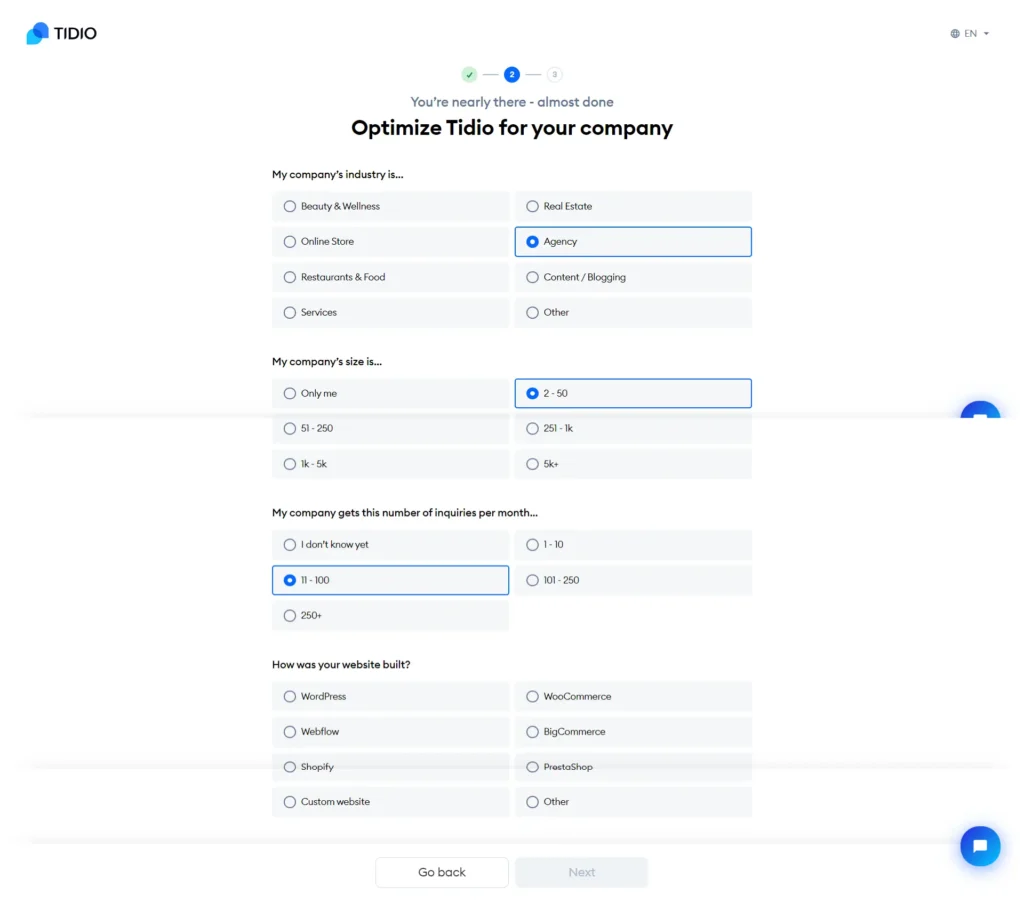
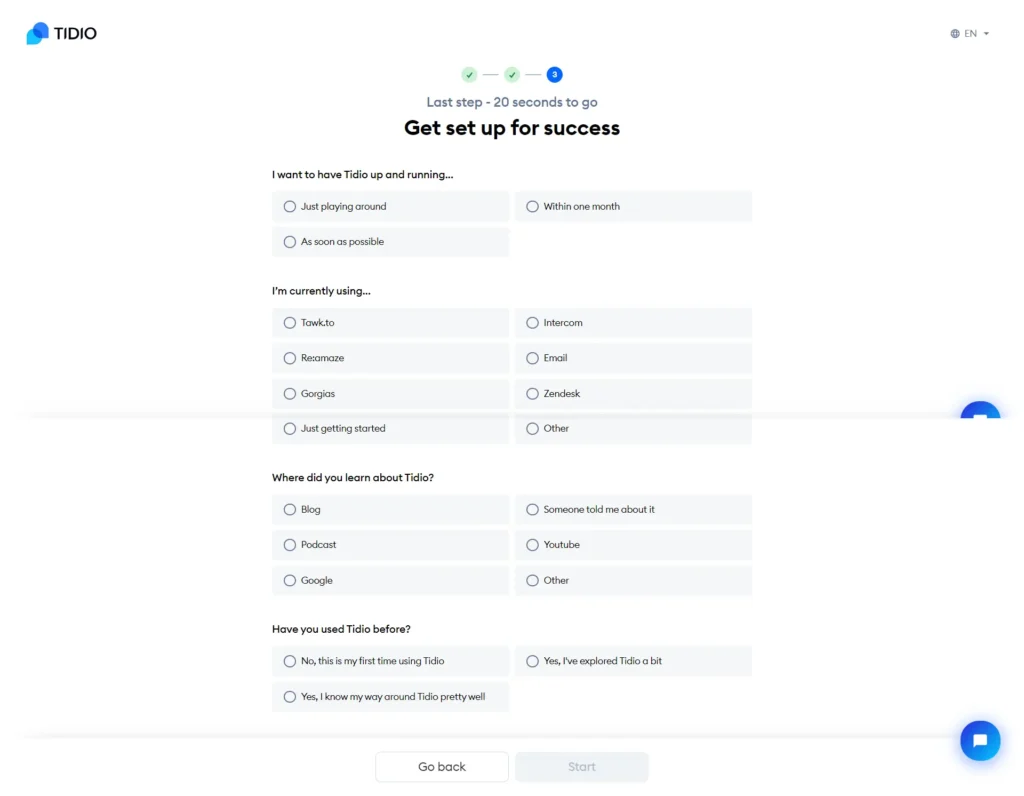
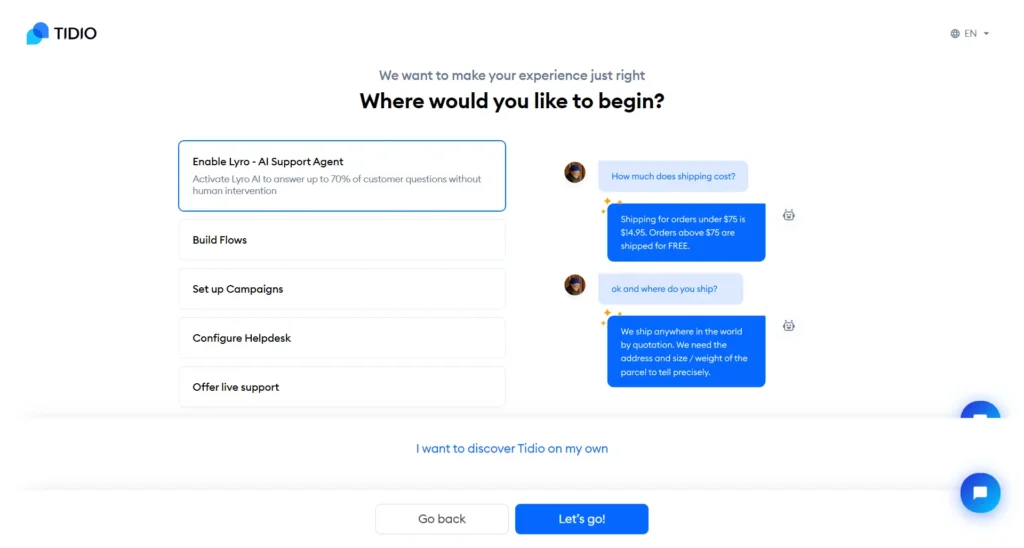
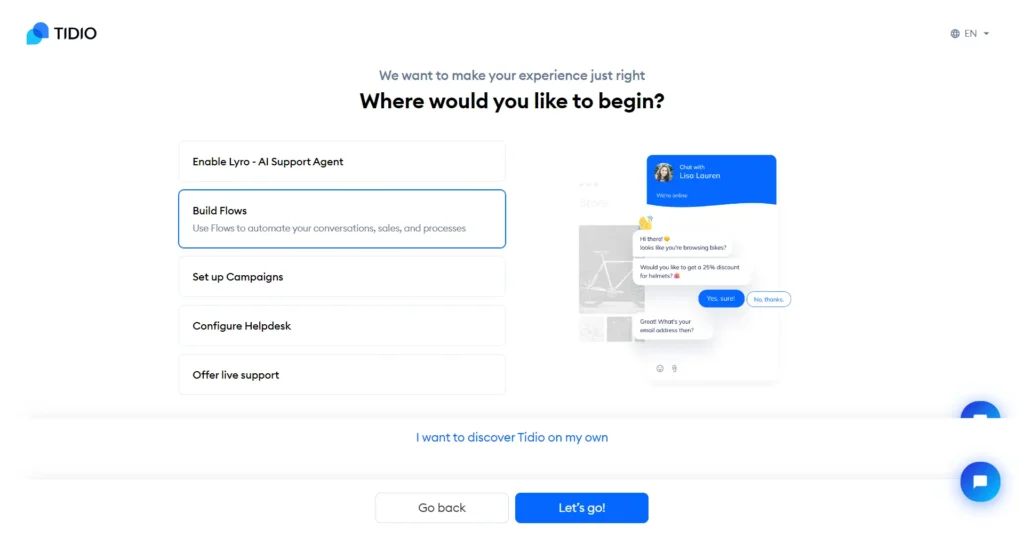
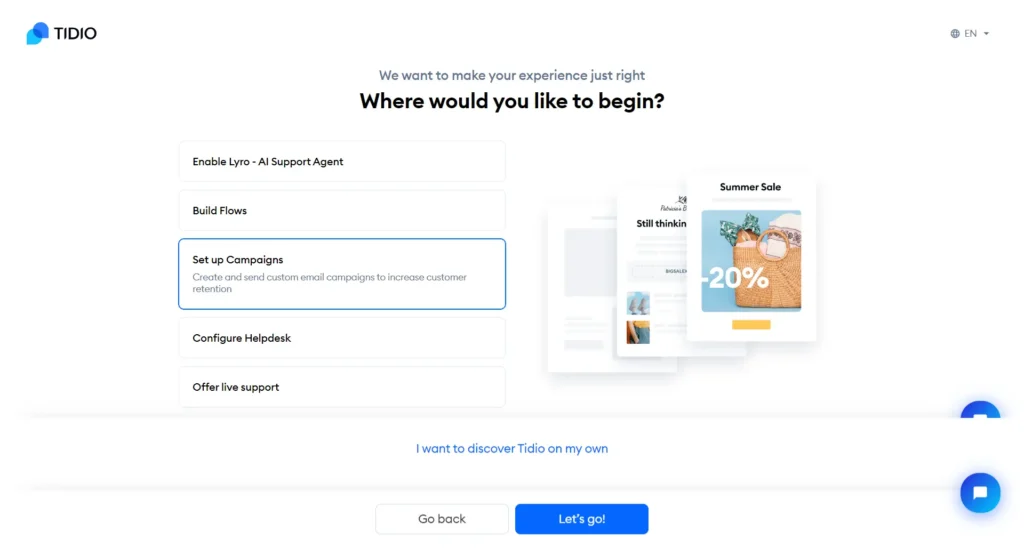

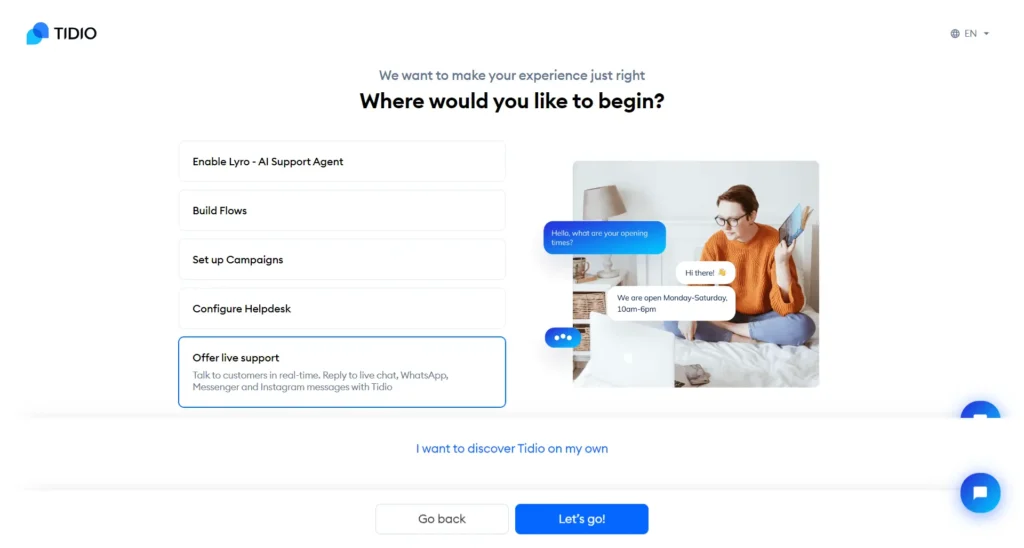

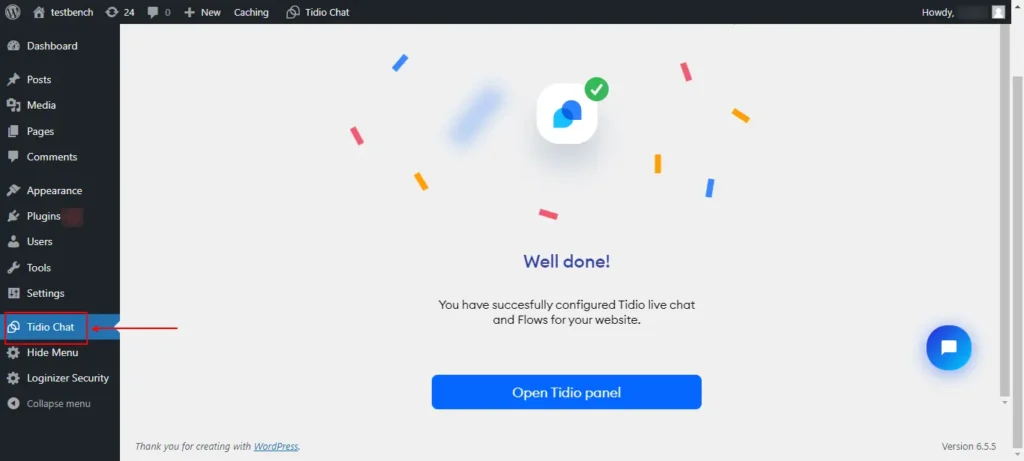
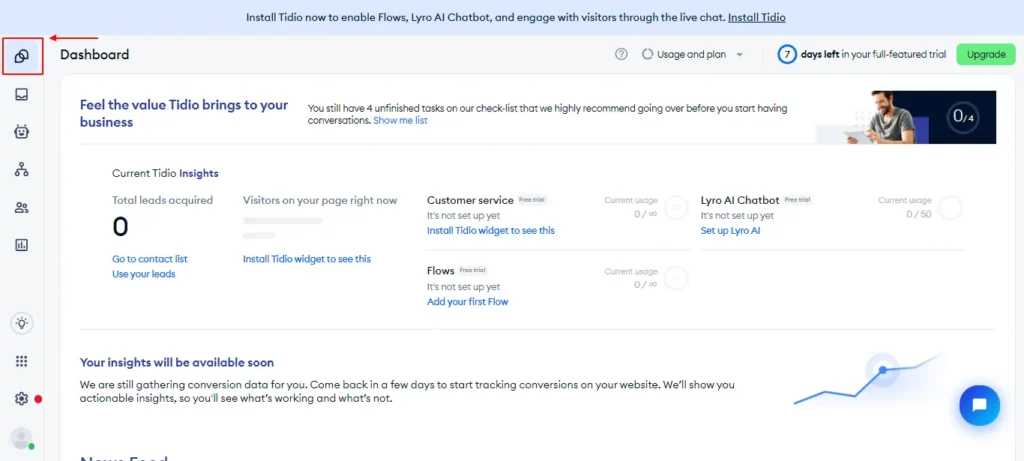
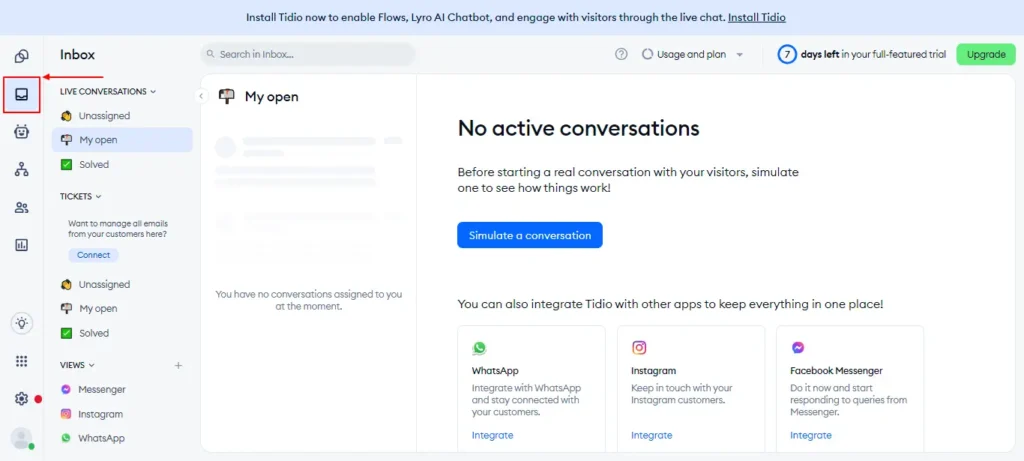
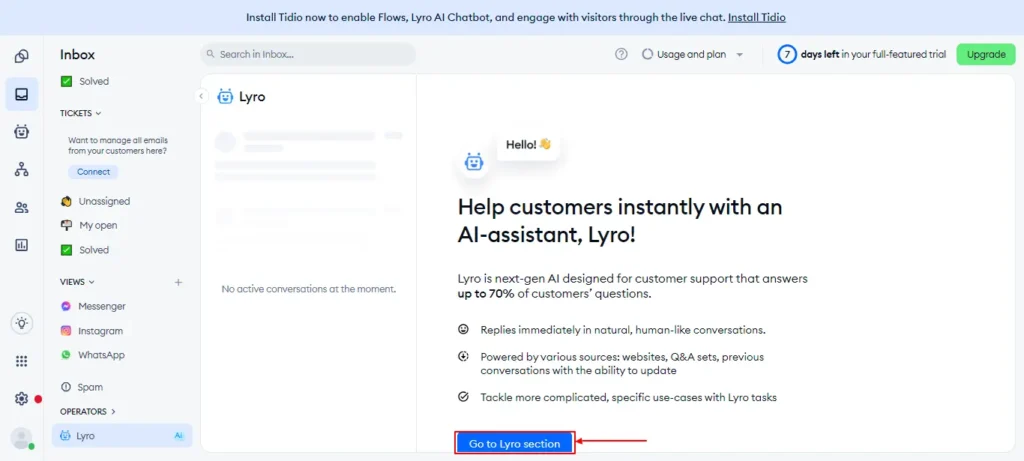
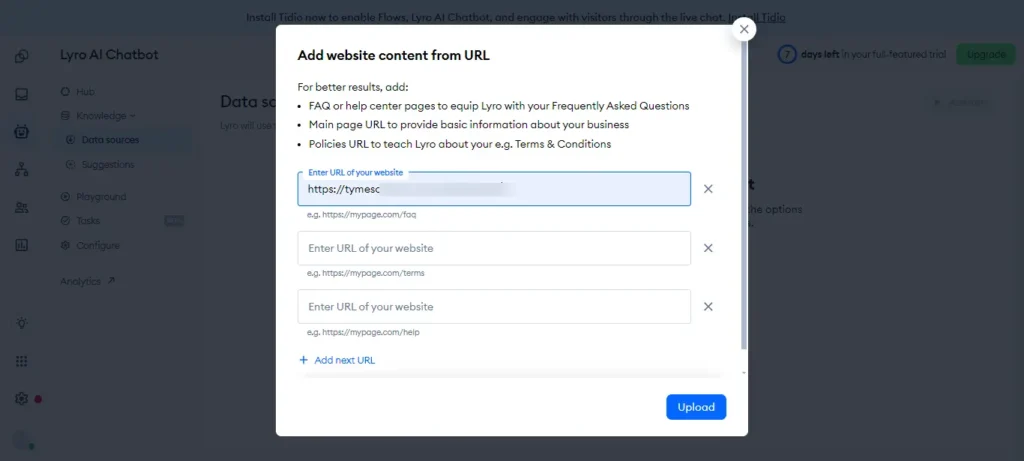

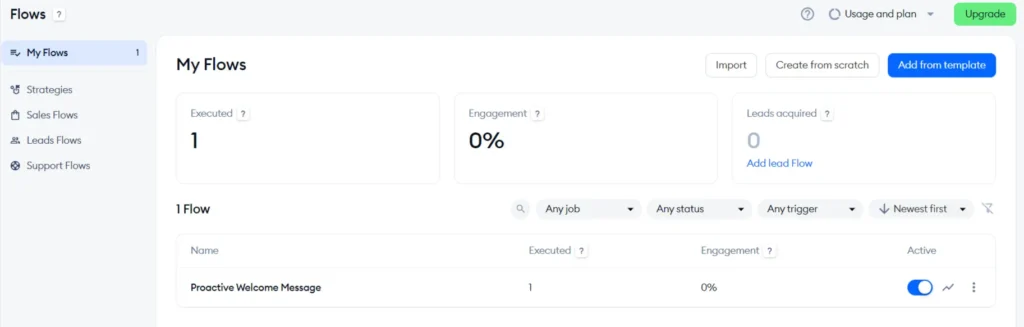
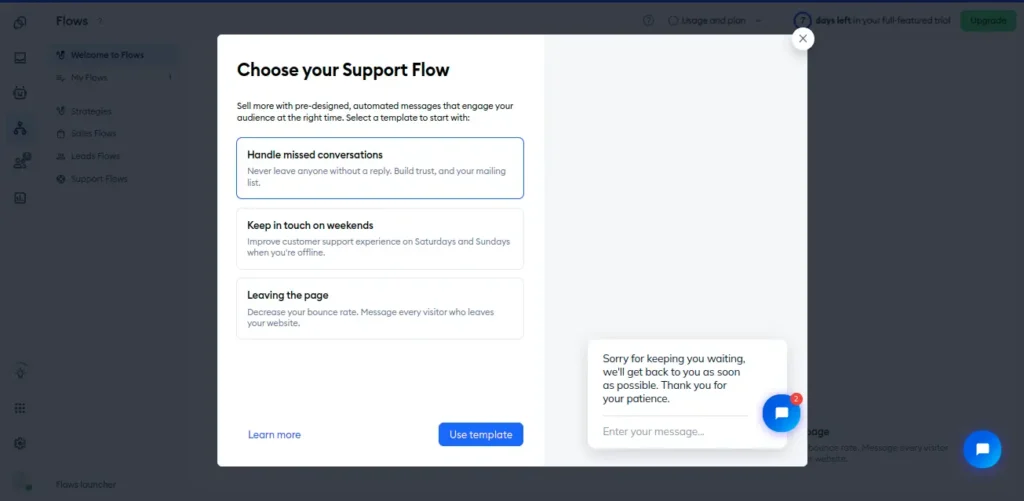
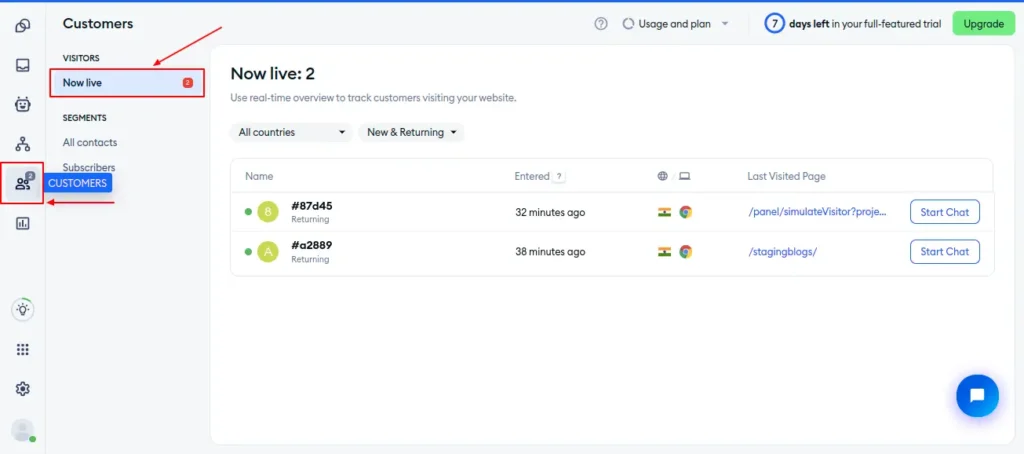
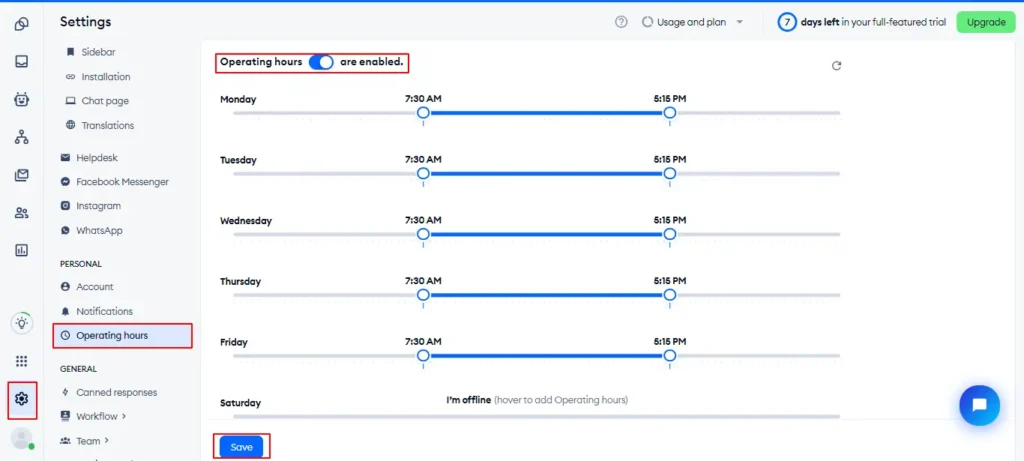
Consulting services in the UAE
3 min read
Dubai Islamic Bank Reviews Learn Customer Support Reviews Of Dib Ae
It offers a variety of present and savings accounts, including the FAB One Account. You can open it through mobile app, and it has everything you need for on a regular basis banking including a debit card and a few additional perks. Needed to ask if I open a salary account with DIB will I have to maintain 3k within the account in any respect times? By far the worst financial institution l have ever dealt with in my life. If you wish to free your cash and for it by no means to be discovered do financial institution with them.

It is significant to examine DIB’s promotion because it presents you the good factor about lowered charges and better profit charges. You can even get a Clever card for a one-time payment of simply £7 and use it to spend in Dubai and 160+ international locations worldwide. There are not any https://execdubai.com/ hidden charges, and you can even connect your Sensible card to Google Pay or Apple Pay.
An worker provided incorrect instructions, and I spent a number of days going to the office only to search out out she wasn’t even aware of the correct process. After I became annoyed, she made her colleague face me as a substitute to clarify the scenario.They approve loans simply but charge extremely excessive charges, so watch out. Do not use this financial institution if you don’t need unnecessary complications. Dubai Islamic Bank (DIB) is the largest supplier of Sharia-compliant banking providers within the UAE. The branches of Dubai Islamic Financial Institution ensure that you can take pleasure in Sharia-compliant banking experiences in numerous cities of the UAE.
Finest Dubai Financial Institution Accounts For Expats
After reading this, you need to have a better concept of tips on how to open a checking account in Dubai as a UK expat. Some banks could ask to see your Emirates ID card, though you possibly can provide this later when you don’t have it but. Your registration form for your ID card might suffice as an alternative.
What Is Dib Roshan Digital Account

We’ll also present you a unbelievable various to a bank for managing your money in Dubai. Open a Sensible multi-currency account and you’ll have the ability to hold and manage your money in 40+ currencies, together with GBP and United Arab Emirates dirham (AED). Learn on to find out every thing you should know, together with data on costs, expat-friendly banks in Dubai and the method of getting your new account arrange. Declare your profile to access Trustpilot’s free enterprise tools and connect with customers.
- Prioritize features like user-friendly digital banking platforms, multi-currency accounts, and widespread ATM and department networks.
- Emirates NBD fashioned in 2007 after a merger between Emirates Financial Institution International (EBI) and the National Bank of Dubai (NBD), turning into one of the largest banking teams within the UAE.
- Appears you're dealing with a difficulty accessing our web site.
- Individualswill be thoroughly checked for compliance checks like anti-money laundering procedures.
- This full information on the means to open a checking account in Dubai will assist you to understand thesteps, necessities, and the best practices.
Branches Of Dubai Islamic Financial Institution Within The Uae

It offers all of the necessities for everyday cash administration, including on-line and cellular banking. In Dubai, it was once the case that you simply had to go to a bank department in person to open an account. But issues have modified, and a lot of Dubai banks now allow you to apply on-line for accounts - and the process seems quite quick and easy.
Workers do not care about the prospects, particularly once they request documents.I submitted my paperwork 4 times in 6 months. Dubai Islamic Financial Institution Pakistan provides Roshan Digital Account (RDA) – A full solution for the comfort of Non-Resident Pakistanis residing anyplace throughout the globe. Dubai Islamic Bank Roshan Digital Account (RDA) permits abroad Pakistanis to open checking account digitally by way of the Cellular App or web site. At All Times prefer to use the Dubai Islamic Financial Institution Mobile app and online banking as it provides comfort and safety. Read our roundup of the best financial savings accounts for non-UK residents, including options from Barclays, HSBC Expat, NatWest and Skipton Worldwide.
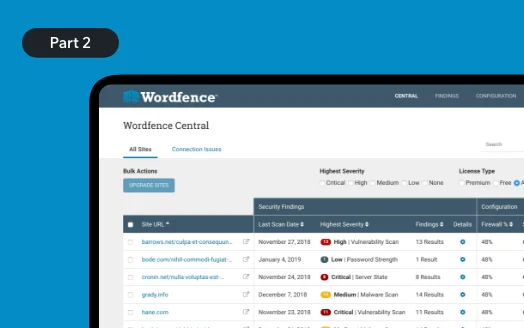
Tutorials
9 min read
How to Secure Your Enterprise WordPress Website Using Wordfence (Part 2)
Introduction
This blog is Part 2 of our series, exploring how the Wordfence plugin can help secure your enterprise website. In the previous post, Part 1, we installed and configured the plugin, understood the Wordfence Dashboard, and configured the Wordfence Firewall.
In Part 2, we discuss the following sections of the Wordfence plugin,
- Wordfence Scan
- Wordfence Tools
- Wordfence Login Security
Wordfence Scan
Step 1: Scan
Wordfence checks your WordPress site for hidden threats like malware, backdoors, and suspicious URLs, all in one scan.
- Once you have configured the firewall, go to Scan.
Screenshot 1: Scan
- The dashboard of Scan shows various aspects such as Scan Type, Malware signatures, Reputation checks, Scan options, and Scheduling.
- It also displays a detailed report of your scan.

Screenshot 2: Wordfence Scan Dashboard
Step 2: Manage Scan
- Click on Manage Scan on the Wordfence Scan dashboard.
Screenshot 3: Manage Scan
- Click on Scan Scheduling to Enable or Disable Wordfence Scheduled Scans. By default, it is enabled.
- You can choose either automatic scans scheduled by Wordfence or scan manually (premium feature).

Screenshot 4: Scan Scheduling
- After you have selected how to schedule your scans, you can choose the Basic Scan Type options.
- Depending on the type of your requirement, you can select the type of scan:
- Limited Scan: Designed for entry-level hosting, this plan provides a basic level of threat detection without using many server resources.
- Standard Scan: Selected by default, this option is recommended by Wordfence for all websites.
- High sensitivity: This is a more in-depth scan ideal for those who believe their site may have been breached, but be aware it might identify some safe actions as potential threats.
- Custom Scans: Automatically chosen after you adjust General Options for this site.
Screenshot 5: Basic scan Type Options
- After you have chosen the Basic Scan Type option, go to General Options.
- Here you can choose what to scan on your website.
- This includes Spamvertising Checks, Spam Checks, Blocklist Checks, Server State, File Changes, Malware Scans, Content Safety, Public Files, Password Strength, Vulnerability Scans, and User & Option audits.
- Some options are selected by default, but you can customize it further by choosing the options that best fit your requirements.

Screenshot 6: General Options
- After you have selected General Options, go to Performance Options.
- Here you can optimize the server performance by choosing to Use Low Resource Scanning, Limit the number of issues sent in the scan results email, Time limit that a scan can run in seconds (by default it is three hours), How much memory should Wordfence request when scanning (256 by default), and Maximum execution time for each scan stage.

Screenshot 7: Performance Options
- Go to Advanced Scan Options to:
- Exclude files from scan that match these wildcard patterns: If you have large, safe files like backups that Wordfence keeps getting hung up on, this feature lets Wordfence to ignore certain file extensions.
- Additional scan signatures: This section lets you define custom scan signatures that the scanner will use to identify malware during checks. However, this is an advanced option that only works well if you understand how malware signatures are built and how they function.
- Use only IPv4 to start scans: Check this if you want to avoid connecting your site to IPV6.
- Maximum number of attempts to resume each scan stage: Internal connection problems can make Wordfence scans fail. It retries 2 times by default (up to 5). You can disable retries by setting it to 0.

Screenshot 8: Advanced Scan Options
Step 3: Manage Options (Reputation Check)
- Wordfence's Reputation Check feature monitors your website's reputation on known databases of compromised and dangerous sites. It checks if your website is listed on three blacklists, and alerts you if your domain or IP is blacklisted. (Premium Option)
- Under the status circle of Reputation Check, you’ll see Manage Options.
- This will take you to the General Options covered above under Manage Scan Step 8.

Screenshot 9: Manage Options
Step 4: Scan Options and Scheduling
- Wordfence's Scan Options and Scheduling dashboard allows users to set up automatic or manual scans.
- Clicking on this link will take you to Scan Scheduling, Scan options and Scheduling already covered above in Manage Scan.

Screenshot 10: Scan Options and scheduling
Step 5: Start New Scan
- After you are done customizing, you can Start New Scan.
- By default, scans are enabled to run automatically. The free version of Wordfence runs a quick scan every day and a full scan every 72 hours, while the Premium version runs a quick scan daily and a full scan every 24 hours.
- However, if you wish to scan again, you can select this option.

Screenshot 11: Start New Scan
Step 6: Scan Stages
- Wordfence scans your site in stages, with icons showing progress and any problems found. A blue check means all is clear, while a yellow warning means something needs attention.
- The stages include Spamvertising Checks, Spam Checks, Blocklist Checks, Server State, File Changes, Malware Scans, Content Safety, Public Files, Password Strength, Vulnerability Scans, and User & Option audits.
- The settings for these can also be found in General Options under Manage Scan.

Screenshot 12: Scan Status
Step 7: Handling Scan Results
- The result of a Wordfence scan will vary depending on what it finds on your website.
- The report shows Results Found and Ignored Results (false positive results).
- It also shows the numbers for Posts, Comments, & Files, Themes & Plugins, Users Checked, and Results Found.
- You can take action by clicking on Delete all Deletable Files and Repair all Repairable Files.
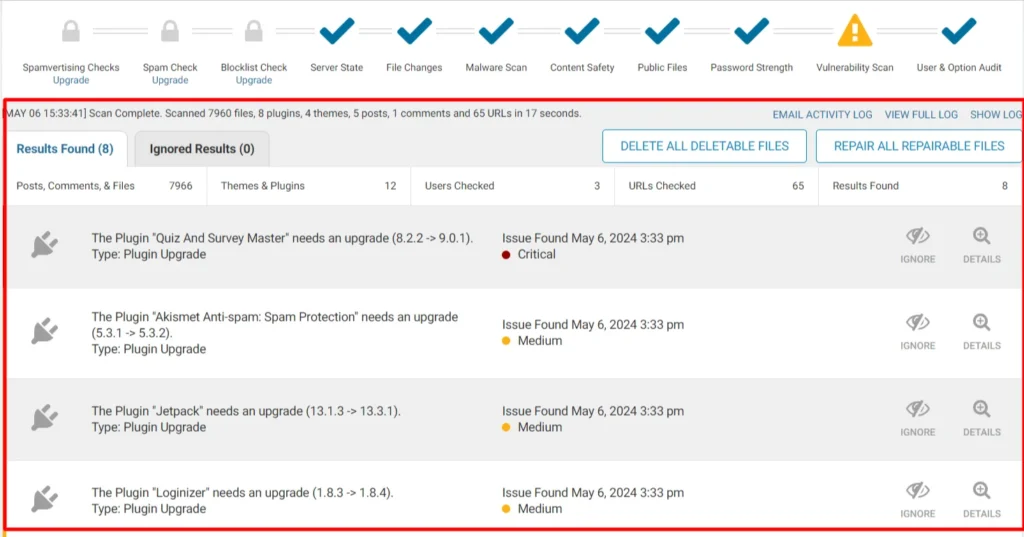
Screenshot 13: Scan Result
Wordfence Tools
Step 8: Tools > Live Traffic
- Go to Wordfence> Tools.
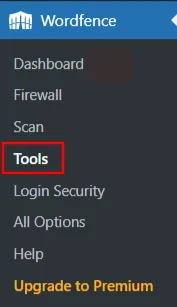
Screenshot 14: Tools
- The screen will display Live Traffic.
- Wordfence "Live Traffic" gives you a real-time view of your website activity, including things missed by analytics tools. It tracks everything happening at the server level, so you see visits from bots, crawlers, and even hack attempts, not just human visitors with Javascript enabled.
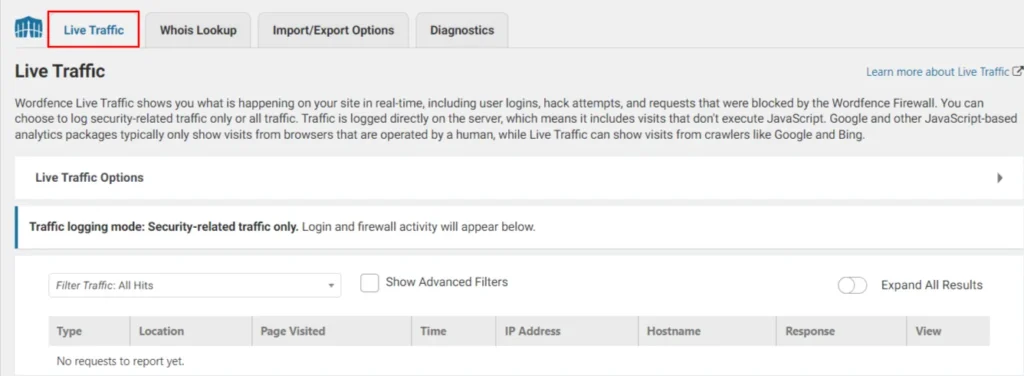
Screenshot 15: Live Traffic
- Select Live Traffic Options to choose which traffic to log or ignore some types of visitors, and other options.
- This functionality provides granular control over traffic logging. You can define which visitor interactions are recorded based on access level, user credentials, IP address, or browser type.
- You can choose options like Don't log signed-in users with publishing access, List of comma separated usernames to ignore, Browser user-agent to ignore, and others (refer to screenshot below).
- For high-traffic websites where real-time monitoring might not be practical, the Traffic logging mode can be adjusted to Security Only to prioritize security-related events.
- You can also check to Display Live Traffic menu option.
- Click on Save Changes at the end.
- Click on Restore Defaults to restore the default options.
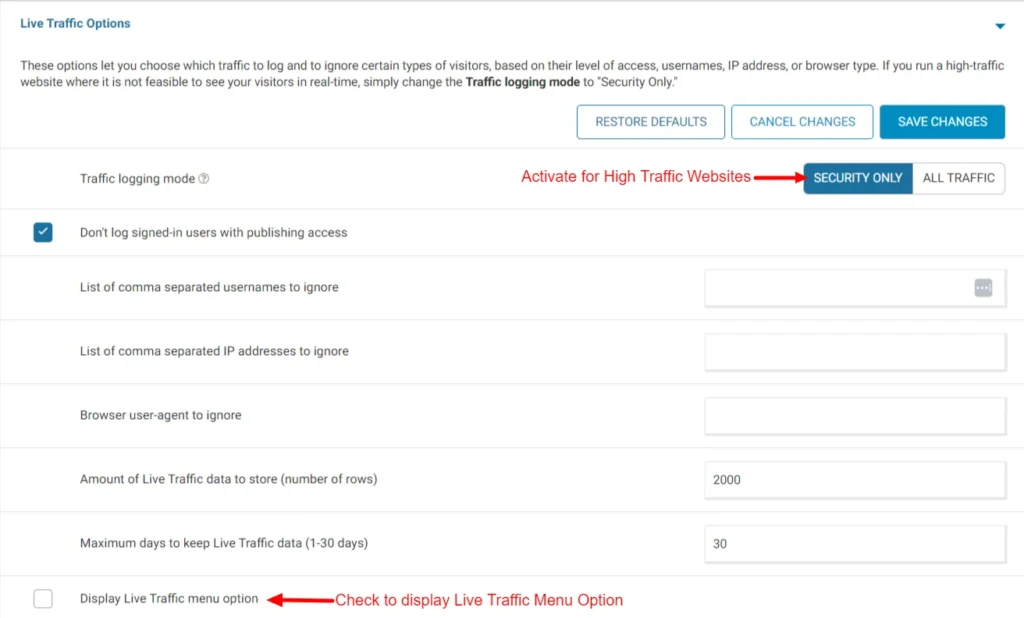
Screenshot 16: Live Traffic Options
- You can filter Live Traffic data based on various filters like All Hits, Humans, Crawlers, Registered Users, Page Not Found, Blocked by Firewall, and others.
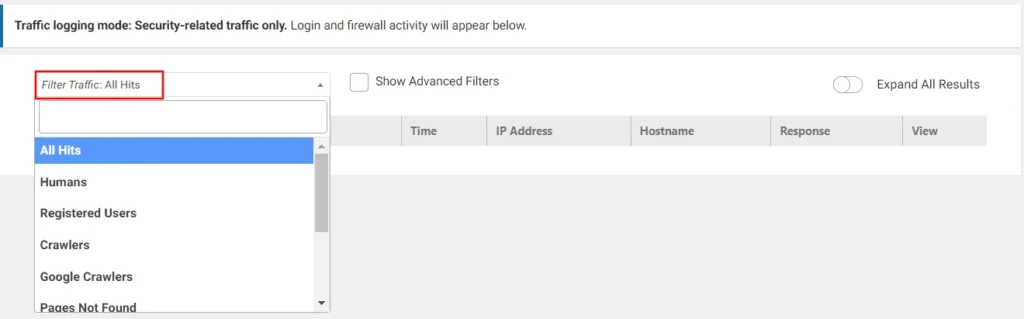
Screenshot 17: Filter Traffic
- Check Show Advanced Filters to customize your Live Traffic data.
- In this, you can have advanced filters like Username, Google Bot, IP, URL, and many others. You can also add your filter by clicking on Add Filter.
- You can set the time period for which you want to view the traffic.
- Select the Group By to view the traffic according to the option selected.
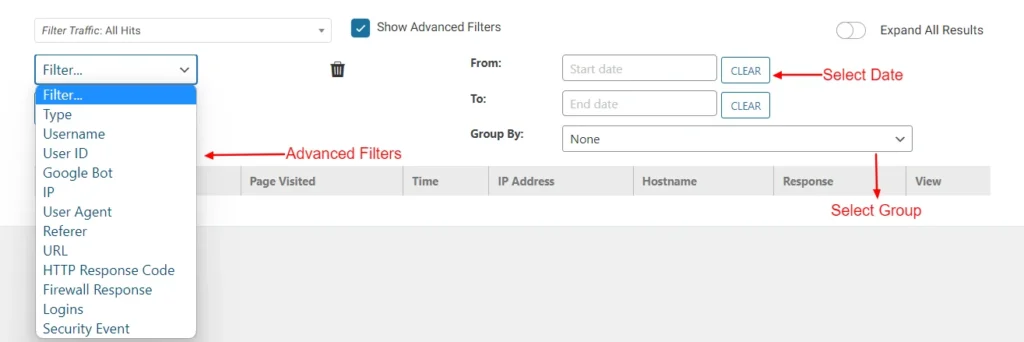
Screenshot 18: Advanced Filters, Select Date, and Select Group

Screenshot 19: Add Filter
Step 9: Tools > Whois Lookup
- Whois Lookup helps to identify the owner behind an IP address or domain name. This is particularly useful for investigating suspicious website visitors or malicious activity.
- To utilize this feature, simply enter the desired domain name and initiate the lookup process. This will provide details such as registration date, expiration date, registrant information, and potentially associated contact email addresses.

Screenshot 20: Whois Lookup Tool
Step 10: Tools> Import/ Export Options
- Go to Import/ Export Options to establish cloning across multiple sites.
- You can either Export this site's Wordfence options for import on another site or Import Wordfence options from another site using a token.
- The export and import process generates a token, a unique alphanumeric string. This token should be treated with the same level of confidentiality as your login credentials.
- Unlike other systems, Wordfence tokens are permanent, ensuring the continued availability of your exported settings.
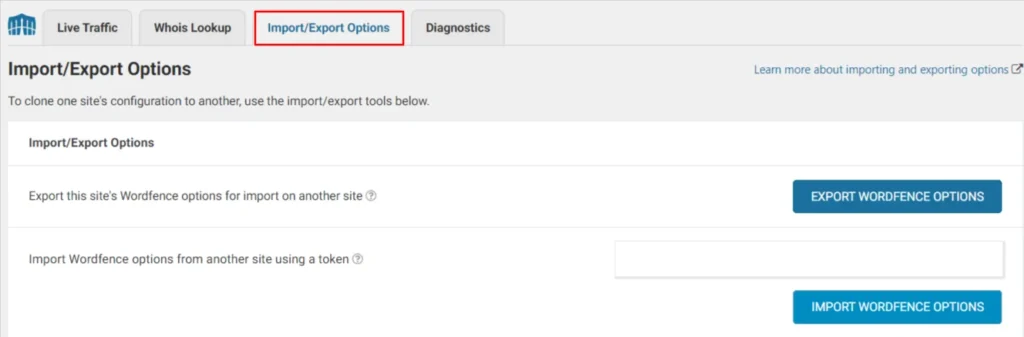
Screenshot 21: Import/ Export Tool
Step 11: Tools> Diagnostics
- Go to Tools> Diagnostics to access information when you are facing issues with Wordfence and need troubleshooting.
- This guide assists in troubleshooting conflicts, configuration issues, or compatibility problems with plugins, themes, or your hosting environment.
- You will have access to information about Wordfence installation, current WAF configuration, PHP version, Database version, status of installed themes, and many others.
- You can choose to Export or Send Report by Email.
- Click on Expand All Diagnostics to view all information at once.

Screenshot 22: Diagnostics Tool
Wordfence Login Security
Step 12: Login Security
- Go to Wordfence> Login Security for 2-factor Authentication.
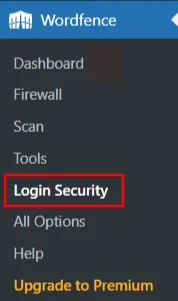
Screenshot 23: Wordfence> Login Security
- This option enables Two-Factor Authentication for your Wordfence.
- To add your account in the authenticator app, Scan the QR code displayed, or enter the code.
- The authenticator app will generate a code, which is to be entered to verify and activate Two-Factor Authentication.
- If you face any issues logging into your authenticator app, Wordfence provides you with 5 recovery codes. Each of these codes can be used only once.
- Click on Activate.
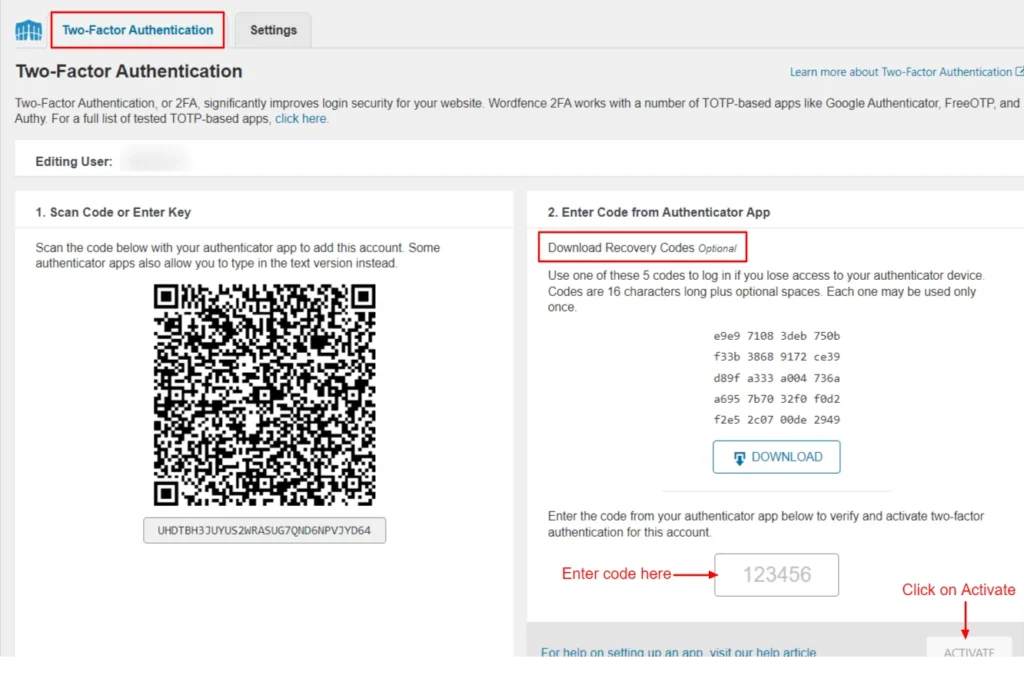
Screenshot 24: Two-Factor Authentication
- Go to Login Security> Settings.
- This Login Security page offers functionalities to enhance login security, including two-factor authentication (2FA) and reCAPTCHA.
- The report begins with a User Summary, providing a breakdown of users who have activated two-factor authentication (2FA) and those who haven't.
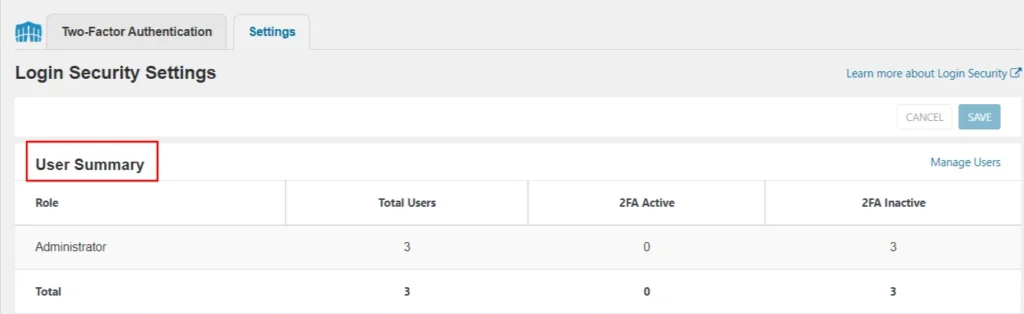
Screenshot 25: User Summary
- By default, only admins (or super-admins in multisite) can use 2FA. You can extend it to other roles:
- Required: Enforces 2FA for specific roles (with a grace period).
- Optional: Allows, but doesn't require, 2FA for certain roles.
- Disabled: Prevents 2FA usage for a role (except Admin).
- Users manage their own 2FA devices through a dedicated "Login Security" menu (visible when enabled for their role).
- 2FA enforcement includes a grace period for required roles, preventing immediate lockouts.

Screenshot 26: 2FA Settings
- Check WooCommerce Integrations if you have the WooCommerce plugin activated.

Screenshot 27: WooCommerce and Custom Integrations
- Check Enable reCAPTCHA on the login and user registration pages box for enhanced security and enabling reCAPTCHA.
- Activate by entering the site key.
- For optimal balance, fine-tune the captcha's threshold (default 0.5) based on your site's score history.

Screenshot 28: reCAPTCHA
- The General settings have the inclusion of Allowlisted IP addresses that bypass 2FA and reCAPTCHA, NTP Protocol (Network Time Protocol), last login timestamp, and deletion of security settings and of 2FA upon deactivation of the plugin.

Screenshot 29: General Settings
Wordfence All Options
The All Options section of Wordfence includes Wordfence Global Options, Firewall Options, Blocking Options, Scan Options, and Tool Options.
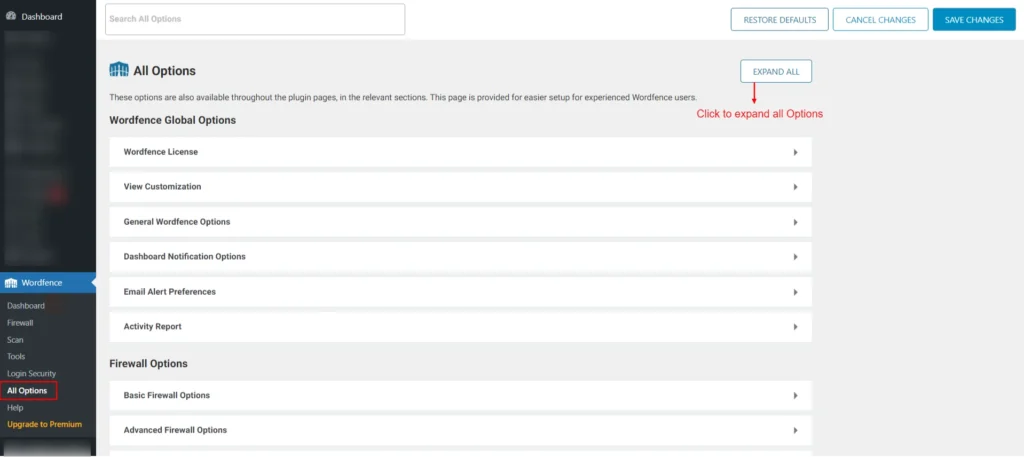
Screenshot 30: All Options
Conclusion
By now, you have gained insight on why security is important to your enterprise website, and how Wordfence is a good fit for it. With its comprehensive features and user-friendly interface, Wordfence empowers you to take control of your website security and keeps your enterprise website well-protected.
We hope this guide has equipped you with the knowledge and resources to secure your website. Remember, website security is an ongoing process. Stay vigilant, keep your software updated, and leverage tools like Wordfence to maintain a strong defense against ever-evolving threats.
Online Casino
7 min read
Pin-Up Aviator Casino Game: Play Online for Free & Real Money
It caters to enthusiasts who enjoy quick access to their favorite games, ensuring robust performance and user-friendly navigation. This option allows players to experience the game, test strategies, and familiarize themselves with the gameplay without spending any real money. Yes, Pin Up Casino offers a demo version of Aviator, allowing players to try out the game without using real money. Casino offers a variety of bonuses designed to enhance the gameplay for both new and existing players.
Welcome Bonus For Pin-Up Aviator Players
Consider having a couple of gaming sessions in the demo mode to get familiar with the game. Don’t rush to make massive bets, especially if you are new to the game. Even though you can try the game for free without registration, you must create an account to start gameplay for real money. The Pinup Aviator iOS app is currently unavailable; the app is under development and will be available for download soon. We’ve streamlined the steps to ensure a hassle-free setup so you can start enjoying the Aviator game and more without delay.
Pin-Up Aviator game strategy
From welcome bonuses to daily rewards, each offer is crafted to bring players closer to the action of the Aviator game Pin Up. In the Aviator Pin-Up APK, Indian gamers can look forward to an array of bonuses designed to enhance their gaming experience and increase their chances of winning. The app’s social features, high RTP, and cross-device adaptability make it a standout choice in the online gaming world.
The selection and reliability of the payment methods enable the Pin Up casino application users to play Aviator with quick money flow after the download. If you have an iOS gadget, the Pin Up Aviator app download and setup instructions are unusable for you to play the mobile version of the game. At the same time, the players have the opportunity to apply the features of the mobile operating systems to make the gameplay convenient.
Unfortunately, there are no existing methods now that allow you to crack the code and win the game. No one can possibly know what users will be the first to place a bet. However we can assure you and say that the game mechanism has been created specifically so that it can’t be messed with.
- The team prioritizes customer satisfaction, ensuring thorough and timely responses to ensure a seamless gaming experience.
- This approach bears more risk and calls for a significant bankroll.
- It is a great solution for those who spend a lot of time with their phone and appreciate the convenience and speed of the gameplay.
- The game features crisp graphics and smooth animations, creating an immersive environment.
- With multipliers reaching up to x300, the game’s unpredictable multiplayer format keeps things exciting.
- After being downloaded and set up, the Pin Up Aviator app is ready to use.
Pin Up Aviator App Download for Android (APK) and iOS
Pin Up Casino India offers a wide variety of convenient deposit methods for players. Ensure a stable Wi-Fi connection or switch to a reliable mobile data network for uninterrupted access to the Pin-Up Aviator download. Sometimes, users may encounter difficulties while trying to download or install the Pin Up Aviator app. Delve into the options and choose the best fit for your gaming preferences while enjoying the unmatched thrill of Pin Up Aviator apk and its vibrant community. This table compares trusted casinos pin up casino india providing the sought-after Pin Up casino Aviator app download. Explore the top destinations to enjoy the Aviator Pin Up app, where excitement meets gaming expertise.
How can I get my wins from the Pin Up Aviator app?
To play the casino game wherever you are, just download the Pin Up mobile app for Android or iOS. Knowing the advantages of the Pin Up mobile casino is a crucial prerequisite for the Aviator players who consider the app download. The Pin Up Casino App delivers a dynamic and immersive gaming experience tailored for mobile users, combining a vast selection of games with cutting-edge features. Whether playing slots or placing live sports bets, everything is available in the casino app for a seamless experience.
Before you start gambling or placing bets, it's crucial to make sure you’re following all age and legal regulations. We also provide different strategies to help you manage your gaming in a healthy way. If you still have questions about the Pin Up Aviator download, see the frequently asked questions below. The Pin Up Aviator app for Android and iOS allows you to deposit and withdraw money via a multitude of payment options. Clicking on the link in the email, you will immediately get into the application.
Pin Up Aviator: Play the Game and Multiply the Stake
Some players track multiplier trends and use auto-betting and auto-cashout options to reduce emotional decisions. To improve your chances of success in Aviator, it is important to understand the game mechanics and apply a smart approach. This is a great way to start playing Aviator online with an extra bankroll! Below are approximate probabilities of hitting various multipliers during the game. We have prepared exclusive bonus offers to make your Aviator experience even more exciting.
Play Aviator at Pin-Up Casino for Fun or Real Cash in 2025
By using the app, you can easily play on the go, register on the website, deposit and withdraw funds, claim all types of bonuses, etc. The application offers a user-friendly interface with a lot of useful features inside. The Pin Up Aviator app is designed especially for Android users. Now you have your account created, you can proceed with crediting your casino balance to play Pin Up Aviator for real cash.
- Please note that our company is not responsible for the actions of users on third-party platforms.
- Here’s a concise comparison of advantages and limitations to help players evaluate their experience with the Aviator Pin Up app.
- The Aviator game at Pin Up India is based on random multiplier generation.
- Similar to the Android version, the Pin Up iOS app is free and can be downloaded and installed in just a few minutes.
Don’t wait—Pin Up Aviator download today and see why it’s a favorite for so many of our players. Also, Pin Up India has a valid Curacao license, so they will never add fake games. It’s possible to play this game without any money in the demo version.
Best Sites for Pin Up Aviator Download
I usually play a couple of times a week and try to maintain discipline. In demo mode, you are given virtual credits to place bets without any risk. The Aviator game is based on random number generation (RNG), and there is no guaranteed way to predict the multiplier. In general, each game round lasts from just a few seconds to about one minute. The duration of an Aviator game round at Pin Up India varies depending on how long you wait before cashing out your multiplier.
Using the Pin up app for iOS, you can place bets on a variety of sports events, play Aviator, manage your account, watch video broadcasts, and take advantage of bonuses. It is a great solution for those who spend a lot of time with their phone and appreciate the convenience and speed of the gameplay. Pin Up Aviator app, according to our experts, is one of the best apps for playing Aviator for real money. With a large number of games, Pin Up is a well-known, reputable, and feature-rich online casino and sports betting platform. You can track your bets, the decisions of other players and the outcomes of previous rounds. Nonetheless, the payouts may take up to 2 days to approve the request for the players with new accounts to perform the verification.
The three players the seed of which is used in the formula are the ones who were first to bet in the round, so it changes every time. Sometimes the new users may be confused because of it and start thinking that it can’t be real, and there must be something tricky about the game. In order to take the Pin Up Aviator winnings with you, you have to play the full game version for real money. The bookmaker gives the users $3000 to make bets in Aviator. The option allows you to play the game without making a deposit.
Android Devices to Play in the Pin Up Aviator App
Yes, you can use the Aviator Pin Up app to play the game. Use this to your advantage to find the crash game that matches your playstyle and risk appetite. While they share a similar gameplay core, each offers unique features, visual styles, and winning potential.
How the UFC Partnership Benefits Players
Betting at a casino has never been easier with the modern services provided by Pin-Up Casino. Please note that our company is not responsible for the actions of users on third-party platforms. Cashout in the app is impossible after a plane falls.
However, since the game operates with a “Provably Fair” algorithm, guaranteeing future results is completely impossible. Aviator is a game that combines simplicity with high potential rewards. It’s important to note that the use of unauthorized or “hacked” software to manipulate the game is strictly prohibited and may result in penalties.

Tutorials
10 min read
How to Secure Your Enterprise WordPress Website Using Wordfence (Part 1)
Introduction
Website security is no longer a luxury for businesses; it's an essential foundation. Enterprises today rely heavily on their websites to conduct business, communicate with customers, and store valuable information. A secure website is critical for protecting this data and maintaining trust with your audience.
For enterprises, the consequences of a website breach can be severe. Hackers can steal sensitive customer data, like credit card numbers or personal information, leading to financial losses and legal repercussions.
The most damaging impact may be on your brand reputation. A security breach can erode customer trust and make it difficult to regain their confidence.
Taking website security seriously is key to safeguarding your enterprise. By implementing the right tools and strategies, you can prevent these risks and build a strong foundation for success.
This guide will explore how the Wordfence plugin can help you secure your enterprise website and ensure its ongoing protection.
This is a two-part blog series. In Part 1, we discuss the following sections of the Wordfence plugin
- Wordfence Dashboard
- Wordfence Firewall
Understanding the Security Threats Faced by Your WordPress Website
While WordPress offers a powerful platform for building websites, it's important to understand the potential security risks involved. Here's a breakdown of some common threats faced by WordPress sites:
- Hacking Attempts: Malicious actors may try to gain unauthorized access to your website through various methods. This could involve brute-force attacks where they guess your password repeatedly, or exploiting vulnerabilities in outdated plugins or themes.
- Malware Injections: Hackers might inject malicious code into your website. This code could steal sensitive data from your visitors, like credit card information or login credentials. It can also redirect users to fraudulent websites or disrupt your website's functionality.
- Security Vulnerabilities: Outdated WordPress core software, plugins, and themes can contain vulnerabilities that hackers can exploit. These vulnerabilities can act as backdoors for unauthorized access or allow malicious code execution.
Now, let's talk about the potential consequences of a security breach on your enterprise website:
- Data Breaches: A security breach can expose sensitive customer data like names, addresses, and credit card information. This can lead to financial losses for your company and legal trouble from regulatory bodies.
- Website Downtime: Malware or a denial-of-service attack can take down your website, preventing customers from accessing your products, services, or information. This can lead to lost revenue and damage your brand reputation.
- Loss of Trust: A security breach can erode customer trust in your brand. If customers believe their data is not secure on your website, they may be hesitant to do business with you. Regaining their trust can be a long and challenging process.
By understanding these security threats and their potential consequences, you can appreciate the importance of taking proactive measures to safeguard your enterprise website. The good news is that plugins like Wordfence can help!
Step-by-Step Process of Securing an Enterprise Website with Wordfence
Step 1: Install Wordfence
- Go to the dashboard and click on Plugins to add a new plugin.
- Search for the Wordfence plugin.
- Click on Install and Activate.

Screenshot 1: Install and Activate the Wordfence Plugin
Step 2: Getting the License
- On installing the plugin, you’ll be prompted to register and get the license to use the plugin. You’ll be redirected to the official website of Wordfence to register.
- Enter your email ID and you get your license. There’s no extra cost for that.

Screenshot 2: Get WordFence license
Step 3: Activating the Wordfence License
- Enter the email ID and the license that you got on your mail.
- Click on Install license.

Screenshot 3: Install Licence
Wordfence Dashboard
Step 4: Understanding Wordfence Dashboard
- The Wordfence dashboard indicates the status of your installation.
- The Firewall and Scan indicate how much your site is protected in percentage. The features and settings that you have activated determine the degree of protection.
- When you first install Wordfence, you’ll see below the Firewall status circle, “WAF Currently in Learning Mode”. This status will automatically change after 7 days. This allows the firewall to get adjusted to your website.
- In learning mode, the firewall is not fully active and does not block any attacks.
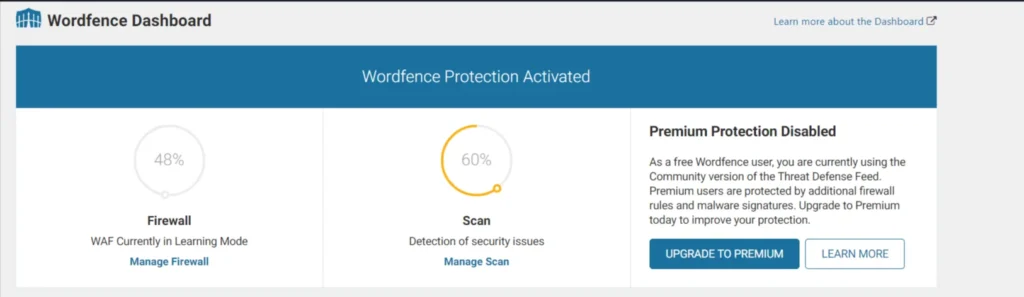
Screenshot 4: Wordfence Dashboard
- On a computer, move your mouse cursor over a status circle. On a mobile device, simply tap it. Either way, a tooltip will appear, explaining what steps you need to take for full protection.

Screenshot 5: Firewall Status Tooltip
- The Notification section indicates which actions are to be taken.
- You’ll get notified about required updates, security alerts, product updates, promotions, blog highlights, etc. Please note that some of these notifications are only available in the premium version.

Screenshot 6: Notifications
- The Wordfence Central Status section shows if your site connects to Wordfence Central. This tool lets you manage security for multiple WordPress sites in one place. A free account gets you started, while a Premium license unlocks additional features (login required).

Screenshot 7: Wordfence Central Status
- In addition to the main menu, you'll find sections for Tools, Help, and Global Settings. Global Settings lets you configure Wordfence overall, including how it sends alerts (email address), what triggers alerts, and what kind of notifications appear on the Dashboard.
- You can also find the Tools section in the menu bar of Wordfence, as indicated in the following screenshot.

Screenshot 8: Tools, Help, and Global Options of Wordfence Dashboard
- The Firewall Summary section details the recent attacks blocked by your website's security measures, categorized by the type of attack. This is not visible in Learning Mode.
- The Total Attacks Blocked graph visualizes the overall attack volume targeting your site, and compares it to attacks detected across the entire Wordfence security network.

Screenshot 9: Firewall Summary and Total Attacks Blocked.
Wordfence Firewall
Step 5: Firewall Configurations
Wordfence WAF shields your WordPress site from both general web attacks and those targeting WordPress itself. It acts as an early defense system, filtering threats before vulnerable code from plugins or themes can be exploited.
- Once you understand how to read the dashboard, click on “Firewall” to configure it.
Screenshot 10: Click on “Firewall”

Screenshot 11: Firewall Section of Wordfence
- When you go to the Firewall section, you’ll see the status of your protection.
- The colored circles show how well your firewall is protecting you right now. Gray circles mean the firewall is either in learning mode or turned off. If you click on a circle, a tooltip will pop up explaining what you need to do for the best possible protection (100% rating).

Screenshot 12: Firewall Status Circle and Tooltip
Step 6: Firewall Status Circle Check
- For all your firewall circles to be completely filled (at 100%), you need to make sure the following things are done:

Screenshot 13: Firewall Settings to get 100% Status Circle Check
- Rate Limiting: By default, this feature is turned on. It's located on the "Firewall Options" page under "Rate Limiting". The rate limiting settings include configurations about how we should treat Google's crawlers, if anyone's requests exceed or if a crawler's page views exceed, and so on.

Screenshot 14: Rate Limiting Settings
- Blocking: This helps to configure what you want to block including blocking according to geolocations (country) (premium), IP address, or Custom Pattern in which you can block by IP address range, hostname, user agent etc.

Screenshot 15: Blocking by IP Address

Screenshot 16: Blocking by Country
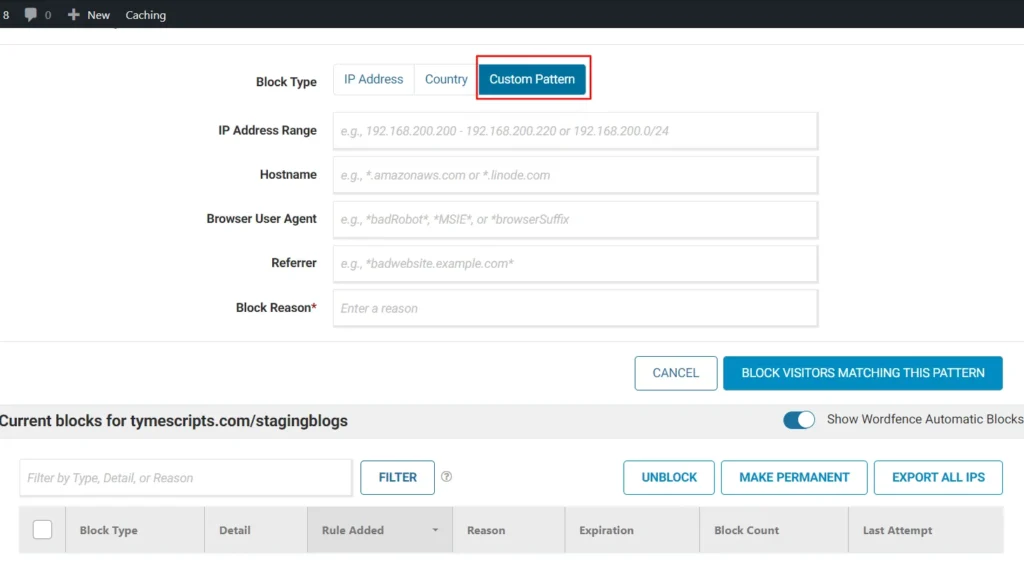
Screenshot 17: Blocking by Custom Pattern
- Help: You can get the documentation and help from here.

Screenshot 18: Firewall Help

Screenshot 19: Help Section
- All Firewall Options: Go to All Firewall Options and select Advanced Firewall Options.
- In this section, you can enable advanced firewall securities such as:
Allowlisted IP addresses that bypass all rules: This feature lets you create an exception for a specific IP address, allowing it full access to your website regardless of Wordfence security rules. This is useful if you have a constant internet connection (like in an office) with a static IP address.

Screenshot 20: All Firewall Options

Screenshot 21: Advanced Firewall Options
- Allowlisted Services: Wordfence prevents accidental blockage of certain external services, like Facebook. This can happen with strict Rate Limiting rules, where Facebook's crawler might get blocked if it requests pages too fast (like when someone shares multiple links from your site). By default, some services are pre-approved (allowlisted). You can manually remove any service from this list using the "Allowlisted Services" option. Once unchecked, a service will be treated like any other visitor.

Screenshot 22: Allowlisted Services
- Immediately block IPs that access these URLs: This feature lets you create a honeypot to catch malicious visitors. You can define a fake URL, like "/example-one". Anyone attempting to access this non-existent address will be automatically blocked. Remember to use relative URLs starting with a forward slash, and be mindful that these URLs are case-sensitive.

Screenshot 23: Block IPs that Access mentioned URLs
- Ignored IP addresses for Wordfence Web Application Firewall alerting: Do you run regular scans, uptime checks, or other automated services on your site? If so, and you don't want alerts for those activities triggering an "increased attack rate" notification, you can add their IP addresses here. But remember, only include services you completely trust, as you won't be notified if that IP actually attacks your site.

Screenshot 24: Ignored IP Addresses
- Rules: Wordfence's firewall packs a double punch. First, it has a set of specific rules that recognize common attacks hackers love to use. These rules are super efficient at spotting matches because they're so precise. Second, the firewall has another layer of defense with broader rules that use patterns to sniff out suspicious activity. This helps block even never-before-seen attacks (known as "0-days") that fall into familiar categories.
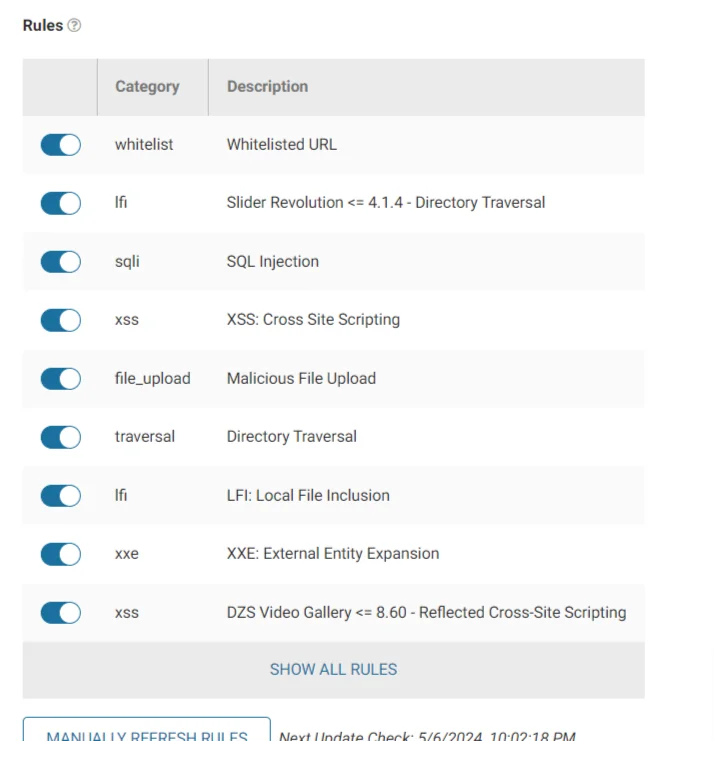
Screenshot 25: Rules
- Brute Force Protection: This acts as a master control for enabling or disabling all Brute Force Protection features.

Screenshot 26: Brute Force Protection
- Lock out after how many login failures: Blocks repeated login attempts (protects against brute force attacks). Set to 20 to allow for forgotten passwords, but lockout kicks in after 20 attempts.
- Lock out after how many forgot password attempts: Limits on the "Forgot password?" form stop spam and brute-force attacks. Set it to 5 for most sites.
- Count failures over what time period: This setting defines a window to track failed logins. It thwarts brute-force attacks by locking out users after too many failed attempts within that period. You can adjust this window for your needs.
- Amount of time a user is locked out: This sets the lockout duration for failed login attempts (to prevent brute force attacks). Strong passwords make it very difficult to crack them, even after many tries.
- Immediately lock out invalid usernames: Enabling immediate lockouts for invalid usernames can be inconvenient for small sites (1-2 admins/editors) due to potential typos. It's best for sites with few users. If a legitimate user gets locked out, unblock their IP via Wordfence "Firewall" > "Blocking".
- Immediately block the IP of users who try to sign in as these usernames: This setting blocks login attempts with usernames you specify (e.g., "admin" or your domain name). Avoid usernames similar to real accounts to prevent accidental blocks. Existing accounts with these usernames won't be blocked.
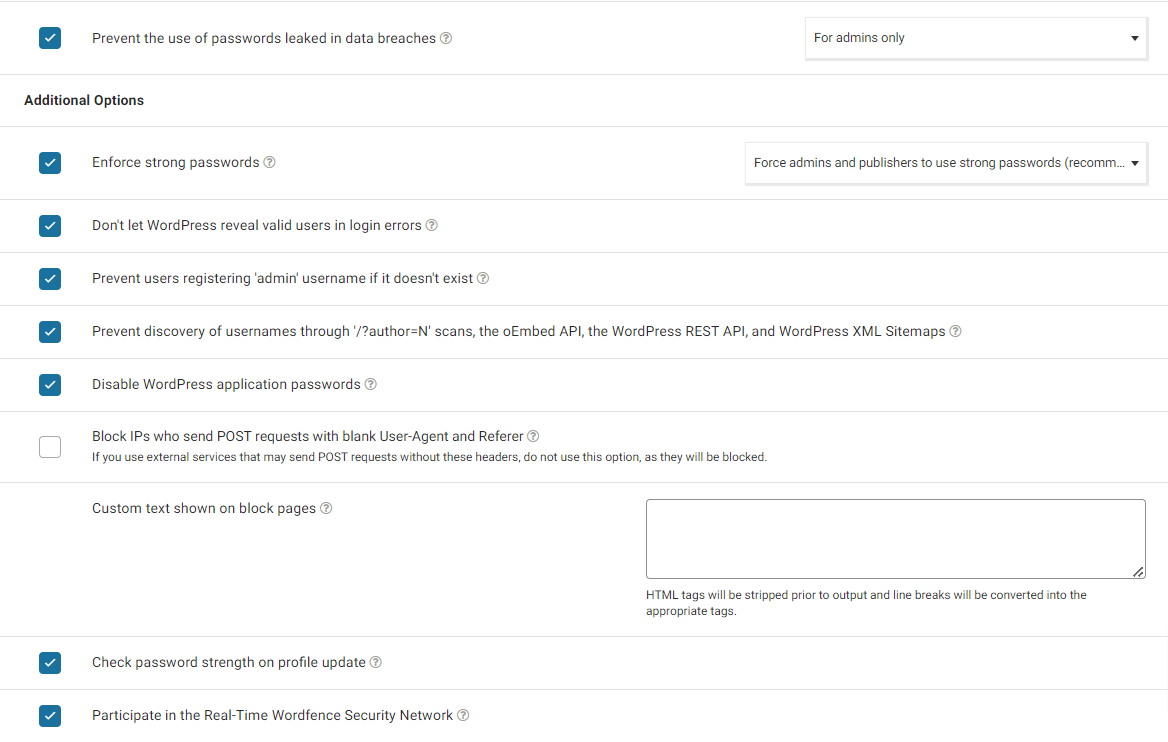
Screenshot 27: Brute Force Additional Options
- Prevent the use of passwords leaked in data breaches: Stops logins with leaked passwords (used in hacks) for admins by default. Optionally, apply it to all who can publish posts (including admins).

Screenshot 28: Check to Prevent Use of Passwords Leaked
- Additional Options:
- Enforce strong passwords
- Don't let WordPress reveal valid users in login errors
- Prevent users from registering 'admin' username if it doesn't exist
- Prevent discovery of usernames through '/?author=N' scans, the oEmbed API, the WordPress REST API, and WordPress XML Sitemaps
- Disable WordPress application passwords
- Block IPs who send POST requests with blank User-Agent and Referer
- Custom text shown on block pages: Wordfence lets you add a custom message for blocked users (e.g., how to contact the site owner). Keep it plain text, and line breaks work like the WordPress editor.
- Check password strength on profile update
- Participate in the Real-Time Wordfence Security Network
- The dashboard of Wordfence Firewall also displays IPs blocked, Top Countries by Number of Attacks, firewall summary, a graph about total blocked attacks, and login attempts (both failed and successful).

Screenshot 29: Firewall Dashboard
Conclusion
In this post (Part 1 of 2 of the series), we installed and configured the WordFence plugin. Then we understood the Wordfence dashboard, which shows the status of the installation, with Firewall and Scan indicating the site protection percentage.
Next, we configured the firewall WAF, which protects the WordPress site from web attacks. We also looked at the features of rate limiting, blocking, and advanced firewall options.
In the next part of this series, we will explore in more depth the various settings and features of WordFence.
Online Casino
7 min read
Play Demo for Free
At any moment, you can choose to cash out and secure your winnings, or push your luck for even bigger prizes. We are not responsible for any financial losses related to your gaming sessions at Chicken Road. It is crucial to play responsibly, betting only what you can afford to lose. Licenses issued by Curaçao eGaming enjoy global recognition, allowing operators to access diversified markets. Curaçao eGaming is a leading institution in the field of online gambling regulation, based in Curaçao, a Dutch Caribbean island.
Looking for more than just the free demo version? Just open the official website and start playing. They test new tactics or try out the adjustable speed modes.
Playing for Success
Every part of the user interface, from tile spacing to multiplier placement, was redesigned to balance clarity and tension on small screens. The sound cues are clear and functional – subtle tones for safe steps, sharp alerts for hidden traps. Animations flow at 60 FPS, and the chicken reacts dynamically to movement, danger, and defeat. The sequel abandons the roadside daylight of the first game and moves into a lava-lit dungeon. Flames burst under the tiles, and visual tension mirrors the volatility of each step.
Demo Version
Use a few short sessions to map how obstacles appear, set simple bankroll rules, and refine a routine for when to bank small payouts or press one more step. The game is built with HTML5 technology and works smoothly on iOS, Android, tablets, and desktop browsers with no downloads required. Jump in today and find out how far your chicken can make it across the road!
With each step, both your potential winnings and the risk increase. The RTP stands at a solid 97 percent, meaning fair chances of winning for you as a player. You have access to all game features that are also available in the real money version. Games are restricted to players aged 18 and over. As a seasoned player, he shares valuable insights to help readers understand game mechanics and strategies. With 15 years of experience in gambling and online mini-game writing, Matt Jackson is a passionate expert who combines in-depth knowledge with hands-on experience.
Experienced players also appreciate the demo. Both beginners and experienced players will enjoy what it has to offer. This online casino game centres around a brave chicken trying to cross the road. We recommend that players always check the terms and conditions directly on the casino site to verify the validity of bonuses and promotions. We are delighted to see players appreciating the evolution of the game and enjoying the thrilling, fair play we strive to deliver. For players seeking a middle ground between caution and risk, the Balanced Strategy offers a compelling option.
Payouts and Multiplier Progression
Each successful crossing boosts your multiplier, with increases ranging from 1.2x up to 2.5x based on the mode you choose. Whether you’re looking for quick sessions or aiming for that big payout, Chicken Road 2 brings a fresh twist to the online casino scene. Step into the action with Chicken Road 2 from InOut Gaming, where your goal is to help a determined chicken cross chaotic roads and win up to 10,000 times your bet. Since its launch in 2024, the studio has released over 30 games, including popular hits like Chicken Road and Hamster Run. InOut Games is a fast-growing game development studio specializing in engaging and innovative iGaming titles. As a regulator, Curaçao eGaming is committed to promoting a healthy and ethical online gaming industry.
Set your stake
It’s slow and steady, but with a high win rate. Some follow the philosophy of “slow is smooth, smooth is fast,” while others live by “fortune favors the bold.” The game supports both. As with any game of dynamic betting, your approach is everything. But if you bring a mindset, learn the rhythm, and take calculated risks, you’ll start to see patterns others miss. Mistakes are costly — but each successful step forward can multiply your bet in exciting ways.
Can I play Chicken Road 2 for free?
No chicken road app download needed—browser play is safer and always up-to-date. Neither you nor the casino can manipulate outcomes, ensuring transparent gaming at 1win. Every round uses cryptographic algorithms that players can verify independently.
- Every spin, every game, every moment holds the potential for your name to join our wall of champions.
- Players in India can start with modest bets as low as ₹1, offering a low-risk entry.
- Hard feels like a real test as every step could be your last.
About Innout Games
Understanding which chicken combinations pay what amounts is crucial. Take time to study the paytable before playing! 🔄 Regular updates keep the app fresh with new features, while our dedicated support team stands ready to assist with any questions about your Chicken Road 2 adventure!
Other games similar to Chicken Road 2
- You set your own bet amount—tailored to your budget and risk appetite.
- Chicken Road 2 features a dynamic multiplier system that rewards you for consecutive crossings without any collisions.
- The setting is fast-paced and dynamic, emphasizing excitement and tension as the player controls the chicken's movement.
- Great if you’re comfortable with swingy rounds.
- It’s a perfect practice space especially for understanding how each multiplier behaves across stages.
- Fortune favors the brave at our casino, especially in fan-favorite games like Chicken Road 2.
This enhanced visual fidelity helps immerse players in the whimsical world of Chicken Road 2. Players can enjoy free spins, win multipliers, and a gamble feature for even bigger rewards. 🎯 What sets Innout Games apart is their distinctive blend of cartoonish visuals with surprisingly deep gameplay systems. Yes, most online casinos offer a free demo version of Chicken Road 2 where you can practice with virtual credits. Consider cashing out at consistent multipliers rather than chasing huge wins. LuckyCharm7 walked away with $500 after just five minutes of gameplay, while VegasQueen claimed her royal fortune of $750 after a nail-biting bonus round.
It gives you the freedom to explore every feature, try out strategies, and practice your timing in a fun, risk-free environment. It’s a game that rewards both careful planning and bold moves, ensuring every round feels fresh, tense, and genuinely entertaining. For those who enjoy more control, Space Mode changes the way you play. With a strong 98% RTP, Chicken Road 2 offers some of the best odds in the crash-game category. This flexibility allows everyone to play the way they like best.
Get a feel for the pace, the multipliers, and when you like to cash out. Players gravitate to chicken road 2 because it feels both familiar and fresh. You’re always one tap away from locking in your current multiplier and payout in chickenroad2.
Instead, its bonus system is integrated into the core gameplay through escalating multipliers and risk-based decision-making. The game allows instant cash-out at any stage, letting players secure winnings before risking further progress. High volatility is aimed at players chasing intense excitement, with multipliers that can reach x500 or more, though at a higher risk. Opting for a higher risk delivers multipliers that rise more rapidly, but the gameplay also becomes more intense. This quirky casino game has captured players' hearts with its amusing theme and exciting gameplay!
Modern players expect to enjoy games wherever they are, and Chicken Road 2 has been optimized for mobile play. It is important for players to understand that every country and jurisdiction has its own laws regarding online gaming. It’s designed to give players more control, more strategy, and deeper gameplay — while keeping the fast-paced fun that made the original a hit. Yes, playing Chicken Road 2 is legal in most Indian states where online skill-based games with real-money elements are allowed.
Its unique gameplay mechanics and generous bonus features have created more winners this month than any other game. The balance between frequent small wins and the potential for massive payouts creates a satisfying experience for both casual players and high rollers. The "Chicken Run" feature randomly activates during base gameplay, sending wild chickens scattering across your reels and guaranteeing wins. While the game is largely based on luck and chicken road download can be highly volatile—especially at higher difficulty levels—it remains fair and legitimate when played at licensed online casinos. As the player progresses through lanes, their payout multipliers increase, allowing for potentially large wins.
After a few sessions I realized I was getting more small wins and cashouts compared to similar arcade gambling games. The game is already attracting the attention of players in India and beyond. Chicken road 2 is a crash-style casino game where you move a chicken across the road, step by step.
Online Casino
8 min read
Best Online Slots in 2026 Real Money Slot Games
Since then, New Jersey casino players have been presented with an unprecedented number of real money casino options, covering both real money slots and casino games. There are many casinos that advertise free slots and casino games, only for players to find that they don't have a no deposit bonus available. Vegas slots offer players the same titles they enjoyed in land-based casinos, but with improved graphics and in some cases extra bonuses and games. While free slots are great to play just for fun, many players prefer the thrill of playing real money games as it can lead to big wins. Players also have a chance to win real money on slots with no deposit if they choose to play these games.
Bonuses And Promotions For Slots Players
Our experts are always exploring the games available in the top online casinos around the world. Many of the casino games and slots you already know and love have been developed by a select group of the top game software developers, a group which is being added to all the time. Video Poker is similar to the online version of vegas casino app the game, but differs in that you play against the online casino and not other players.
Win money
With a $1000 deposit, that amounts to a maximum $2500 bonus, enough to keep players playing for hours of top rated casino excitement. Slots of Vegas online casino is the best place for limitless online slot game play. Our players love that they can enjoy their favorite slots and table games all in one place!
Download our software directly to your desktop, mobile, or tablet for instant access to the best casino games and gambling excitement. Experience the best in ceaseless online gambling and the ultimate destination for players seeking a Vegas-style gaming thrill. ⁃ Win a full-screen sun symbols in HOT CHILLI slots casino game. Feel the Vegas Casino slot machine experience right from your phone.Spin your favorite slot machines in this free casino slots game. Enjoy 60+ Vegas slots straight from the Las Vegas Strip’s slots casinos. Both bonuses require just a $30 minimum deposit and feature player-friendly 5x wagering requirements.
EXPERT TIPS & TRICKS FOR PLAYING CASINO GAMES ONLINE
Like most of the slots that are available today, Slots of Vegas allows you to play online casino games for free. There are offers and deposit bonuses available at these casinos to reward players for their loyalty, too. Online casinos offer special casino bonuses for newly signed-up players who wish to try their casino without the risk of making a deposit. If you're not in a location that provides real money slots, you can still get some great entertainment by playing free slots at a social casino! If you're in the UK/EU, the top place to play right now with no deposit is Paddy Power Games, where you'll find a huge range of slots, jackpot games, as well as table casino games. Read on below for more details on where you can play real money casino games in the US at the moment.
You can easily find your favorite internet casino games at Slots of Vegas, and you’re certain to find new favorites as well. After you’ve read up on your favorite casino games, you can try them for free. Also, there’s practical advice on every aspect of online gaming, including bonuses, cash-out procedures gambling online only, and more.
Your login grants you access to targeted promotions designed for specific games. For players who operate on another level, signing in opens the door to the VIP and High Roller sanctum. These aren't just numbers; they are the fuel for chasing life-altering payouts on record-breaking games. Forget standard offers; we’re talking about serious firepower from your very first deposit. Online casino gambling is also looking to reach brand new milestones this year through an ever-growing interest in VR and Augmented Reality.
These are slots connected across a network of sites with thousands of players feeding into a huge jackpot. We offer a vast selection of over 15,300 free slot games, all accessible without the need to sign up or download anything! You'll see the complete RTG flash slots portfolio ready and waiting, and each one plays so smoothly in your browser, providing a dizzying array of great features and ways to win. Regardless of interference by ultra-conservative governments trying to stop people from gambling, online casinos continue to prosper. The fledgling online casino empire saw no signs of slowing down, and its global popularity continued to increase. The final challenge for early online casinos involved the security of online financial transactions, a new concept in the early days of the internet.
Do they offer you any live dealer casino games?
The Siberian Storm does not disappoint its players in terms of the bonuses offered. Kitty Glitter is one of the best slots game you can ever play online. For the games that we recommend, we always check their popularity with players, the ratings from other sites, their design, UX and gameplay and, of course, their return to player %.
Play Jacks Pot Slot for Free with No Deposit
The pull of the progressive jackpot slot game is hard to deny. This is the category where the unusual and otherwise not categorized games get put, and they are wonderful diversions from the typical. Often overlooked by serious players, Specialty Games are among our favorites! We even drop No Deposit Bonuses directly to deserving players, like 65 Free Spins on Big Cat Links with code BIGCATVEGAS.
What would you like to play today?
Donald Trump then proposed building a 62-story hotel-casino on the site. The ship would have a casino and the cabins would function as a hotel. In 1986, two theatrical producers, who had recently bought Sardi's restaurant in New York, announced plans to develop a hotel-casino in the marina district called Sardi's Broadway Casino Hotel.
Play for free in a demo mode so you can understand how the game works before playing for money. Go to the slots section of the casino site and see what they have to offer. There are plenty of options out there, but we only recommend the best online casinos so pick the one that suits you.
- Slots of Vegas wants to make sure you’re always enjoying the best possible gaming experience, which is why it offers several support options.
- But you can also find demo versions of casino games, slot games in particular, on slot developer websites.
- These moves can make huge differences to the success of your gameplay!
- RealTime Gaming has made a name for itself in slots with its big, bold graphics and bonuses offering lucrative rewards.
In the previous section, we touched on the availability of free games at Slots of Vegas; in this one, we explicate the situation for all those who gravitate towards real money opportunities. In fact, the availability of so many variations means that you can play 5 reel video slots, Classic slots with 3 reels and 1 payline, and the usual variety of table games and specialty games without any financial obligation whatsoever. Inside the Slots of Vegas casino, you will find tons of video slots of every variety, as well as high RTP (Return to Player) table games and video poker. The ability to play for free is front-and-center to all online casinos of note; all it takes is a Chrome, Safari or Firefox browser (the browser needs to be able to support the Adobe Flash program). There are slots, table games, video pokers, and specialty games, with each game offering an unforgettable experience filled with fun, rewards, and sometimes even a new learning experience.
When RTG comes out with a new game, Slots of Vegas is among the first to get it, and their games are the best to be found! However, do look out for new no deposit bonus codes to land on the promotions page as well. Bonuses were mentioned on the home page when we visited, and we think any no deposit bonus that might be available would be mentioned there. You get far more than just some bonuses to look at, complete with the codes required to trigger them.
- ⁃ Special events to keep the game fresh and fun.
- All players need to do to play a basic game of roulette, is to place a chip or chips on the table to make a bet, choosing a number, color, or a combination of these.
- However, the developers below are at the top of the market and have numerous incredible games in their portfolios.
- It's the most played slot ever, because it follows the golden rule — Keep it simple.
Each time you sign in at Slots of Vegas Casino, you are accessing a personalized gaming command center, loaded with exclusive rewards and direct routes to jackpot glory. Your account is more than just a login; it’s your personal key to a vault of immense winning potential. By 2006, all forms of online sports betting had been banned under the US Supreme Court 2002 Federal Wire Act. Wishing you a year full of lucky spins, big wins, and nonstop fun! ⁃ Watch the endless wilds & big wins erupt in WILD LEPRECHAUNS. ⁃ MORE slot machines added with every update and hundreds of Jackpots await you!
Follow these steps to give yourself the best possible chance to win jackpots on slot machines online. Online slots are entirely reliant on chance, but that doesn’t mean there aren’t things you can do to put yourself in a better position to win. For example, if a slot game payout percentage is 98.20%, the casino will on average pay out $98.20 for every $100 wagered.
Cafe Casino supports both traditional methods and cryptocurrency options for deposits and withdrawals. For more big winner insights and news check out the monthly big winners blog. “Be patient, be positive, and you can be a winner too.”
Online Casino
6 min read
Chicken Road 2 India: Demo, Review, Rules & Safe Play
Chicken Road is an exciting crash game with engaging mechanics developed by InOut Games. The company's rich and diversified catalog has enabled it to strengthen its presence on the global gaming market. Official Google experience
Yes, the demo version allows you to play for free without spending real money. The demo version of Chicken Road 2 is one of its most appealing features. The graphics and animations remain crisp, and the gameplay adapts smoothly to smaller screens.
Place your bet, start the game, and decide when to cash out before the chicken gets hit! The road to riches is just a game away! Why not make today the day you join our winners' circle? Every spin, every game, every moment holds the potential for your name to join our wall of champions. 🍀 Remember – today's spectator is tomorrow's winner.
Where can players access the second version of Chicken Road?
This quirky casino game has captured players' hearts with its amusing theme and exciting gameplay! ⏱️ Don't waste another minute playing inferior casino games! 🌟 Special app-exclusive tournaments happen weekly, giving mobile players extra chances to win big while helping those brave chickens navigate treacherous roads! However, real money gameplay requires an active internet connection to connect to casino servers.
How to Start Playing Chicken Road 2 on iOS
Set win/loss limits and stick to them when playing Chicken Road 2 online. Always practice with Chicken Road 2 demo at 1win casino first. Neither you nor the casino can manipulate outcomes, ensuring transparent gaming at 1win. This player control creates intense, strategic gameplay in Chicken Road 2 online. Whether you're curious about crash games or searching for how to play Chicken Road 2 online, this guide has all the answers.
Pressing it locks in https://chickenroad2gameapp.com/ the current multiplier and transfers the winnings straight to your balance. Every lane you clear successfully boosts your multiplier, which is clearly displayed at the top of the screen. This mechanic lets you dodge the obstacles that continually appear in your path. Guide your character with the keyboard’s arrow keys or by tapping directly on the screen to switch lanes. Next to this, select your preferred risk level from the available Low, Medium and High options.
What Is Chicken Road Game Gambling App
The 98% RTP means for every ₹100 wagered, the game returns ₹98 on average over millions of rounds. 🚀 Experience Chicken Road 2 on 1win 🚀 What makes Chicken Road 2 online compelling is player control. Should these steps not resolve the issue, please contact our live chat, available 24 hours a day. If the game fails to load, we recommend refreshing your browser first.
Chicken Road Gaming App Functionality
- We strongly advise players in the UK to fulfill all necessary requirements before engaging in the Chicken Road 2 at their chosen casinos.
- With the APK installed, you can access all the features and functions of the app right from your phone or tablet.
- In the demo you place virtual bets and watch the chicken cross the lanes just like in live play.
Get ready for a buttery smooth, high-performance gaming action only on BlueStacks. Chicken Road 2 — Official app is a quick-hit mix of runner tension and slot-style thrills from InOut.TM. Each step forward brings you closer to a big reward, and it’s up to you to decide when to cash out. The answer to the famous question in this game is “to reach the Golden Egg and hit the jackpot! Immerse yourself in the thrilling adventure of Chicken Road—the crash game taking the online gambling world by storm. Start from the main hub at Chicken Road for smooth play on phone, tablet, or PC.
The combination of gameplay and storytelling creates a lighthearted yet rewarding experience. With its high RTP of 98% and adjustable difficulty levels, this game caters to both casual players and high-rollers alike. The gameplay experience adapts to different screen sizes and input types, including touch, mouse, and keyboard controls. Chicken Road 2 is built entirely on Provably Fair technology, giving players full transparency and the ability to verify every game result in real time.
- Players can also choose any stake between $0.10 and $200 per round, regardless of the difficulty level selected.
- 🔄 Regular updates keep the app fresh with new features, while our dedicated support team stands ready to assist with any questions about your Chicken Road 2 adventure!
- The interface is designed to be user-friendly, making it easy for both new players and experienced gamers to enjoy.
- The maximum prize is $20,000, with multipliers that can reach an incredible x3,203,384.8 in certain runs.
Yes, Chicken Road is available at PIN-UP casino! Yes, you can play Chicken Road at 1Win! All payment information is securely processed and never stored on your device.
Responsible Gaming
Not being restricted to a single transfer method increases the app’s worldwide accessibility and helps circumvent certain regional restrictions. Below is a table of the most popular deposit methods and their main features. The payment policy of Chicken Road application is focused on versatility, so the application supports several types of systems. In addition to formal licenses, the Chicken Road app development team pays great attention to technical security aspects. This provides an additional level of trust in the application from the audience.
Devices Compatible with Chicken Road 2
Visit the game’s page, where you can choose between demo mode or real play. Modern players expect to enjoy games wherever they are, and Chicken Road 2 has been optimized for mobile play. This app gives players full access to the high-stakes, arcade-style gameplay without needing a browser. Registered users can immediately start playing for real money or test the demo mode. Easy mode gives the lowest risk with fewer lanes to cross, making safe steps more likely but capping multipliers at lower values. Space Mode appeals to those who crave a more engaging and participatory gaming experience, blending elements of arcade action with casino excitement.
Plus, there's this awesome offline mode where you can practice your strategy without using any data. The chicken moves smoothly across your screen, the road animations are crystal clear, and those multipliers pop up beautifully. We've put a ton of work into making Chicken Road look stunning on mobile.
Game Info
You might win big in 30 minutes or lose your bankroll faster than a chicken crossing a highway. 🔄 It's not a promise for your individual gaming session. 🎭 Chicken Road 2 features medium-to-high volatility, which paints an interesting picture of your potential journey. Volatility, on the other hand, is the game's personality.
🔒 Innout Games maintains a strong commitment to fair play and player satisfaction. Their titles consistently receive high ratings on major gaming platforms. The game is regularly audited by independent testing agencies to ensure fair and random outcomes. Set a target multiplier, manage your bankroll wisely, and know when to cash out rather than pushing for higher multipliers. Your winnings depend on your bet amount multiplied by the multiplier achieved when cashing out.
The app requires a one-time download, while the browser needs no install but relies on a stable connection. The Chicken Road download process on iOS devices is almost identical to Android installation but is done through the App Store. Below is a table reflecting the basic system requirements for a comfortable gaming experience. These feed into a hash function to decide the exact step where the chicken fails – fully verifiable post-round via the game’s history tab. You cash out at the current level or risk it all on the next step.
This risk-free practice is highly recommended for learning game mechanics and testing strategies before real money play. The Chicken Road 2 demo mode is available at 1win casino with virtual credits. No chicken road app download needed—browser play is safer and always up-to-date.
The game performs flawlessly across iOS and Android platforms, with optimization for various screen sizes and device specifications. This continuity ensures you're always connected to your gaming experience. The RTP stands at a competitive rate, and the maximum win can reach impressive multipliers of your original stake! The world of Chicken Road 2 immerses players in a colorful countryside setting where our feathered friends are up to their usual mischief.

WordPress
7 min read
How to Create a Multilingual Enterprise WordPress Website Using Weglot
Introduction
It is now essential for enterprise-level organizations to have a multilingual web presence in today's interconnected business ecosystem. This step goes beyond just accommodating; it shows that we are actively trying to reach more diverse audiences and grow your market.
Think about this situation: A website run by a multinational firm only supports one language. Because their language preferences differ from the site's preferred language, many potential customers are unintentionally left out of this setup.
There are several important reasons why multilingual websites are important:
- Broadened Audience Reach: Embracing linguistic variety allows organizations to engage with a broader spectrum of global consumers, broadening their audience reach. Companies may promote inclusion and accessibility by making their platforms multilingual.
- Fostering Trust and Relatability: Users feel more comfortable and at ease when they can consume the content in their local language, which in turn increases trust and relatability. This language resonance greatly enhances credibility and long-term relationships with customers.
- Strategic Competitive Advantage: In today's highly competitive industry, having a website that is available in multiple languages gives you a clear advantage. It enhances a company's brand appeal and relevance by portraying it as culturally sensitive and aware of global market trends.
- Elevated SEO Performance: Websites that are available in more than one language improve SEO performance by increasing their visibility in more geographic areas. Search engine rankings, the amount of organic traffic, and overall online presence can all be improved with locally optimized content.
Choosing the Right Translation Plugin
Selecting the perfect multilingual plugin for your enterprise website is crucial. Imagine it as the bridge that connects your website content to a global audience, and you want a sturdy, reliable bridge! Here's a breakdown of key factors to consider when choosing a plugin that can handle your business needs:
1. Scalability: Can it Scale?
Enterprise websites tend to deal with a lot of content and traffic. The last thing you want is a plugin that buckles under pressure. Look for a plugin that boasts scalability, meaning it can handle your website's growth as you add more languages and content.
2. Feature Feast: Does it Have the Right Tools?
Multilingual plugins come with a variety of features, and for an enterprise website, you'll likely need a well-equipped toolbox. Here are some must-have features to consider:
- Number of Languages Supported: Does the plugin offer enough languages to reach your target audience? Enterprise needs might be broader, so a plugin supporting a vast array of languages is ideal.
- Translation Method: Choose a plugin that offers flexibility in translation methods. Automatic translation can be a good starting point, but there must be an option for self-editing for a more polished final product.
- Content Management: Managing translated content across multiple languages can get tricky. Look for a plugin with a user-friendly interface that allows you to easily edit, review, and approve translations.
3. SEO Savvy: Can it Help You Get Found?
Search Engine Optimization (SEO) is crucial for any website, and a multilingual website is no exception. Ensure the plugin you choose is SEO-compatible. This means it should allow you to optimize your translated content for search engines in each language. The goal is to make sure your website shows up in search results, no matter what language someone uses.
4. Multisite vs. Subfolder Structure URLs
This might seem like a technical detail, but it can impact your website's structure and SEO. Here's a simplified breakdown:
- Multisite: In essence, you create separate websites for each language version of your website. This offers more control and flexibility but can be more complex to manage.
- Subfolder Structure: Here, you add a language code to your existing website URL (e.g., [invalid URL removed] for French). This is a simpler setup but offers less flexibility in managing each language version as a separate entity.
Ultimately, the best choice depends on your specific needs and priorities. Keeping the above points in mind, we have selected the Weglot Plugin for translation for this blog.
Step-by-Step Guide on How to Create Multilingual Enterprise Website Using Weglot
Step 1: Getting the API Key.
- Head over to Weglot: https://weglot.com/ and sign up for a free trial.
Screenshot 1: Register to get the “API Key”
- Once you register for the site, create a project by entering its name and selecting a technology.

Screenshot 2: Create a Project and choose website technology as "WordPress.”
- Once that is done, copy the generated Weglot API key.

Screenshot 3: Copy the Weglot API key
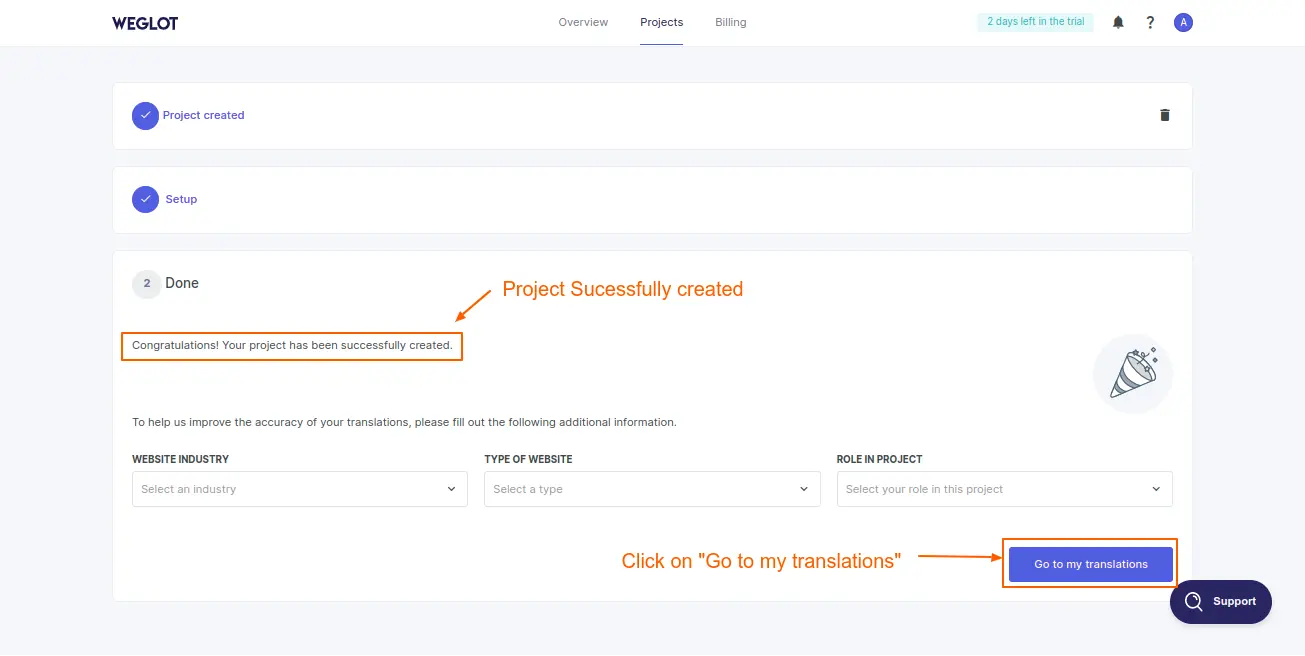
Screenshot 4: Project successfully created
Step 2: Install and Activate WeGlot Plugin
- Go to Plugins on your website’s dashboard.
- Go to Add New Plugin.
- Search for Weglot Plugin.
- Install and Activate the plugin.

Screenshot 5: Install and Activate the plugin
Step 3: Weglot Plugin Settings
- After you activate the plugin, go to the Weglot plugin from your dashboard.
- Enter the API key that you received when you registered at the WeGlot website in Step 1.
- Configure the required settings, like choosing the original language and choosing the destination language. For this blog, we have added Hindi as the destination language.
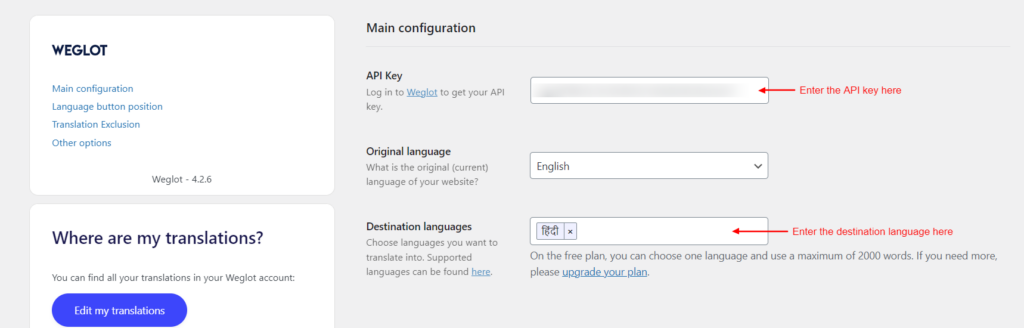
Screenshot 6: Main Configuration Settings
Step 4: Language button design
- The language button design settings allow you to customize how your language switch button will look on the website.
- The settings include whether to display the language button as a dropdown or side by side, whether to display a flag in the language button, how the flag would look (rectangle, circular, or square), or whether you want a full language name or only the language code.
- You can also customize the language button settings by overriding the CSS code.
Screenshot 7: Language Button Settings
Step 5: Language Button Position
- These settings define where the language button will be positioned, which would help the user locate it easily.
- Choose from various options to place the language button in the menu, as a widget, with a shortcode, in the source code, or even in a custom position.
- To select these positions, go to Appearance > Menus or Appearance > Widgets.
- To select a custom position, you can go to the Switch editor.
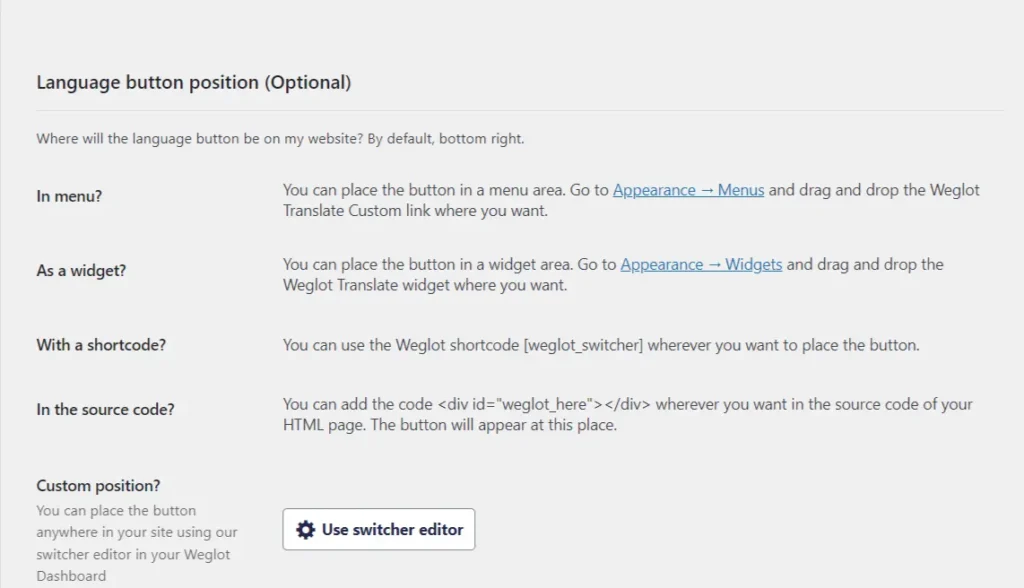
Screenshot 8: Language Button Position
Step 6: Translation Exclusion
- These settings allow you to specifically exclude any URL or blocks that you do not wish to translate on your website.
- Note that these settings are optional and not mandatory.
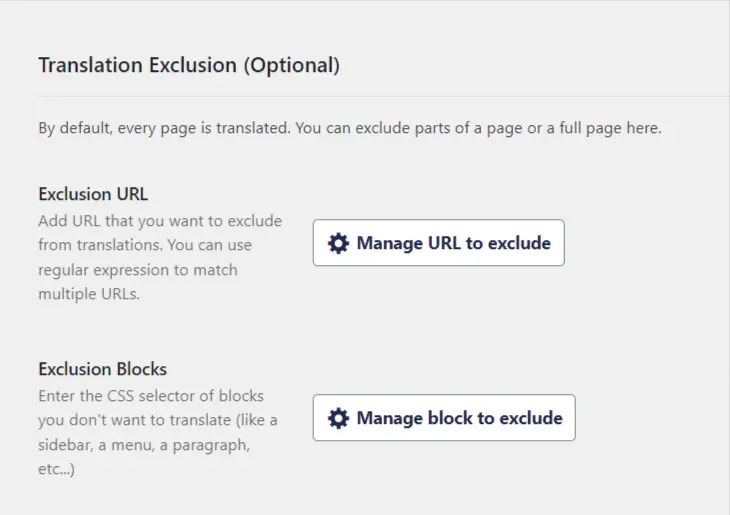
Screenshot 9: Translation Exclusion Settings
Step 7: Other Settings
- These settings include auto redirection for users, auto email translation, Translate AMP pages, and allowing users to search in their languages.
- Note that these settings are optional and not mandatory.
- Click on Save Changes.
- Your website is ready to be translated.
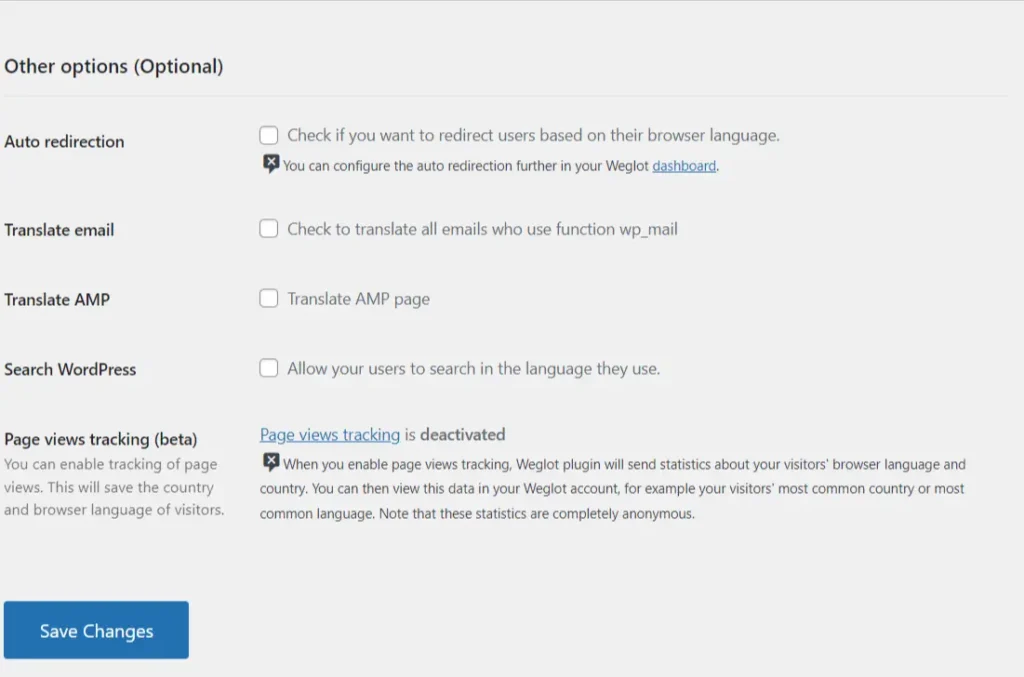
Screenshot 10: Other Options
- Once you have configured the settings, head over to the front end of the website to see the automated language translation in action.

Screenshot 11: Output of Language Selection

Screenshot 12: Output of Translated Website in Hindi
Step 8: Editing Translations
- Once the plugin is configured, click the language switcher on the front end of the website. The Weglot plugin then automatically translates all the text on the website into the destination language selected.
- Sometimes it's required to edit those translations manually. To do that, click on “Edit my translations” button, it will take you to the Weglot dashboard, as shown in the below screenshot (number).
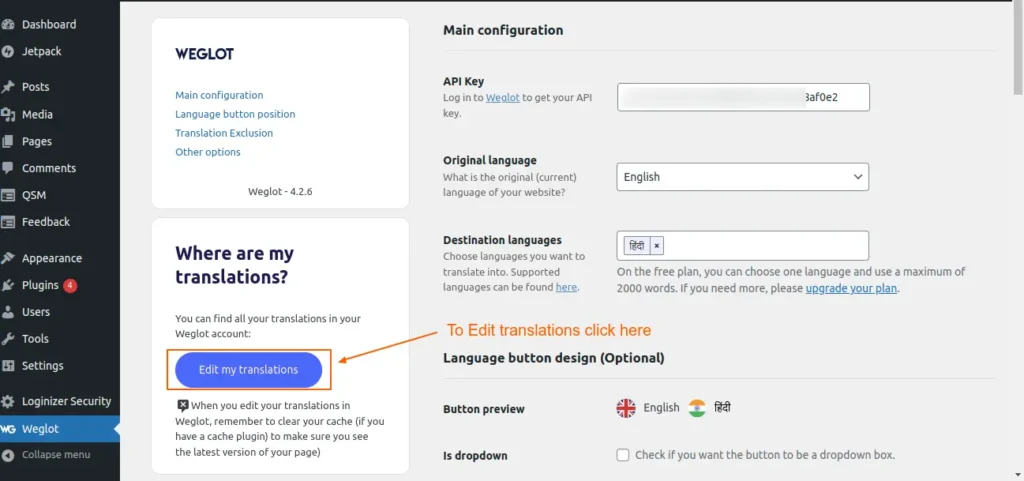
Screenshot 13: Edit translations
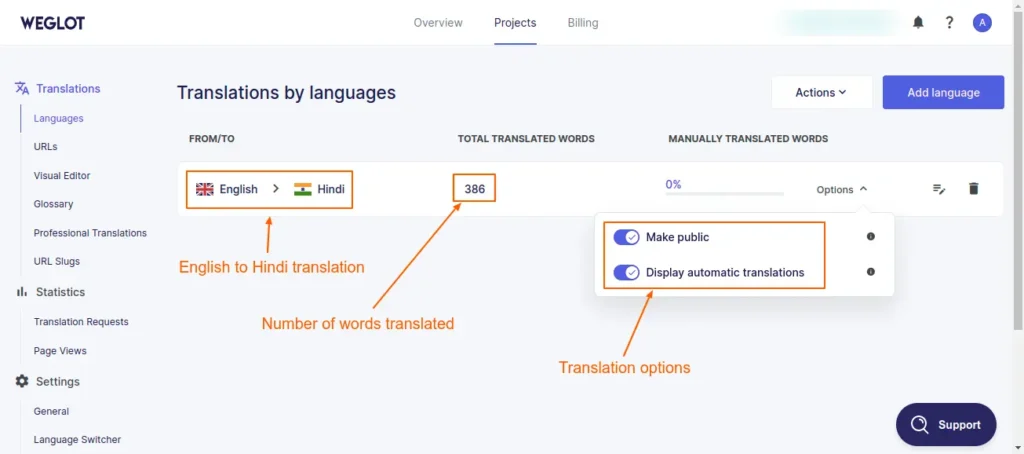
Screenshot 14: Translation by languages (English to Hindi)
- On the Weglot dashboard’s “Translations by languages” screen, we can see the “Total translated words” and “Manually translated words” columns.
- Also, there are two options available, as seen in the above screenshot number. First, we can make the translations public or private. This is helpful if you want the language translations to be private so that only you and your team can view them (by appending “?weglot-private=1” at the end of the URL). This means it won't be visible to search engines or visitors.
- The second option is “Display automatic translations.” If you prefer to show only manual translations on your website rather than automatic translations, switch on this option.
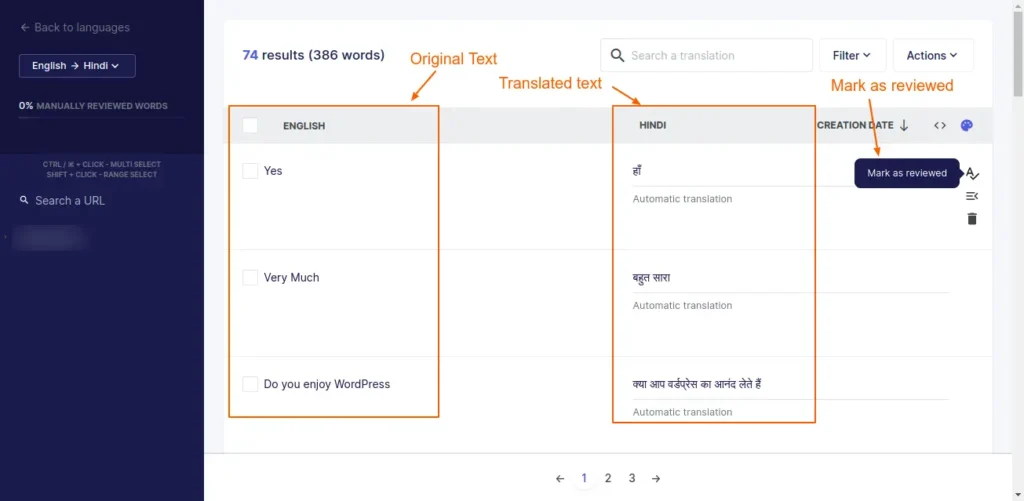
Screenshot 15: Manually edit the translation and mark it as reviewed
Note: All the translations (automated and manual) are stored on the Weglot platform. Only the Weglot plugin settings are stored in the WordPress database.
Conclusion
Making a website that supports multiple languages doesn't have to be complicated when you have Weglot by your side. With this intuitive plugin, you can expand your reach to new markets and engage with people all over the world—without ever having to touch a line of code.
If you want to build a multilingual enterprise WordPress website, connect with us.

WordPress
10 min read
How to choose the best Enterprise WordPress agency for your business
Choosing the best enterprise WordPress agency is crucial for companies looking to make a big online impact in the fast-paced digital world of today. Making decisions might be overwhelming because there are so many organizations fighting for your attention. On the other hand, making the time and effort to locate the ideal fit can pay off well in the end.
Finding a strategic partner who understands your business goals & brand identity and has the competence to execute your vision is key.
The decision to choose an enterprise WordPress firm is a strategic investment in your company's future. To boost your brand's online presence, start by digging deep into your requirements, communicating clearly and openly, and focusing on your research. This way, teaming up becomes a game-changer, making your digital stand out.
Understanding Enterprise WordPress Agency
So, you're diving into the world of enterprise WordPress agencies – it's like stepping into a whole new ball game, isn't it? Let's explore what defines these agencies, how they differ from standard WordPress agencies, and the critical factors to consider when embarking on enterprise-level projects.
What is an enterprise WordPress agency?
Enterprise WordPress agencies are specialized firms equipped to handle large-scale, complex projects for established businesses and organizations. They possess a deep understanding of enterprise-level requirements, including scalability, security, and customization, to accommodate the diverse needs of their clientele.
Characteristic features of enterprise WordPress agencies include:
- Expertise in WordPress development: These agencies boast seasoned developers proficient in leveraging WordPress's extensive capabilities to create highly customized solutions tailored to enterprise clients.
- Robust infrastructure: They employ advanced tools, frameworks, and methodologies to build scalable, high-performance websites capable of handling significant traffic loads without compromising on speed or reliability.
- Focus on security and compliance: Enterprise WordPress agencies prioritize security measures and adhere to industry best practices to safeguard sensitive data and ensure compliance with regulatory standards.
- Strategic consulting: Beyond technical execution, these agencies offer strategic guidance and consulting services to help enterprises maximize their online presence, enhance user engagement, and achieve their business objectives.
Distinction from Regular WordPress Agencies
While both regular and enterprise WordPress agencies share a foundation in WordPress development, they cater to distinct clientele and project scopes.
Regular WordPress agencies primarily serve small to medium-sized businesses and startups, focusing on building foundational websites, blogs, and e-commerce platforms. They may lack the resources, expertise, and infrastructure necessary to tackle enterprise-level projects effectively.
In contrast, enterprise WordPress agencies specialize in addressing the multifaceted requirements of larger organizations with diverse stakeholder needs, intricate workflows, and rigorous security protocols. They possess the scalability, technical prowess, and industry-specific insights required to execute projects of considerable scale and complexity.
Factors To Consider While Choosing An Enterprise WordPress Agency
1. Experience and Expertise
Proven Track Record
An enterprise WordPress agency's track record stands as a testament to its capability and reliability in delivering exceptional results. Businesses can gain valuable insights into an agency's capabilities by looking at past projects and client feedback. This helps them understand how well the agency can handle challenging tasks, meet deadlines, and go beyond what's expected.
A track record of successful implementations demonstrates the agency's proficiency in navigating challenges, adapting to evolving requirements, and delivering tangible value to clients. This history of accomplishment instills confidence and reassures enterprises that their projects are in capable hands.
Portfolio Assessment
A comprehensive portfolio serves as a window into the agency's capabilities, showcasing a diverse range of projects, industries served, and creative solutions implemented. When evaluating an Enterprise WordPress Agency, businesses should scrutinize its portfolio to assess compatibility with their objectives and vision.
A strong portfolio shows off what the enterprise WordPress development company can do – it's all about their range, their knack for coming up with fresh ideas, and how they customize their work to fit what every client needs.
It gives you a peek into their design style, how savvy they are with tech, and just how good they are at using WordPress to get the results they want.
Custom Development and Complex Functionalities
Enterprise-level projects often necessitate custom development and the integration of complex functionalities to address specific business requirements. An adept enterprise WordPress agency should possess the expertise and technical acumen to execute these tasks seamlessly.
Whether it involves integrating curated plugins, third-party systems, or implementing intricate workflows, the agency's proficiency in custom enterprise WordPress development is paramount. By leveraging WordPress's extensibility and flexibility, the agency can create tailored WordPress enterprise solutions that aligns precisely with the enterprise's objectives and operational workflows.
2. Technical Proficiency
Understanding of WordPress Core, Themes, and Plugins
A reputable enterprise WordPress agency must possess a comprehensive understanding of the WordPress ecosystem, including its core architecture, themes, and plugins. The agency excels at utilizing all the features that WordPress provides. They have the ability to develop personalized solutions that perfectly align with the requirements and preferences of enterprises.
From building themes to extending functionality through plugins, the agency's mastery of WordPress empowers them to create visually stunning, user-friendly websites that meet the highest standards of excellence. A thorough grasp of WordPress core ensures that the agency can navigate technical challenges adeptly, implement best practices, and optimize the platform to achieve desired outcomes.
Scalability and Performance Capabilities
Enterprises require websites that can scale seamlessly to accommodate growth, handle increasing traffic volumes, and deliver optimal performance under any circumstances. An enterprise WordPress agency must demonstrate the ability to architect scalable solutions that meet evolving business needs while maintaining exceptional performance standards.
This involves optimizing the codebase, leveraging caching mechanisms, and employing content delivery networks (CDNs) to minimize load times and enhance the user experience.
By keeping scalability and performance in mind from the initial stage, the agency can make sure the website is adapting to the new requirements and changes. This way, users always get a smooth, high-quality experience.
Security Best Practices
For anyone investing in WordPress development for enterprise, security's not just important—it's at the top of the list. Implementing security practices isn't optional, it's a must. An Enterprise WordPress Agency must employ robust security measures to safeguard against cyber threats, data breaches, unauthorized access, and much more.
This entails implementing industry-standard security protocols, regular software updates, encryption techniques, and proactive monitoring to mitigate risks effectively. Starting with security in mind right from the development process itself, the agency puts its clients at ease. It's all about safeguarding those precious assets and keeping enterprise clients’ online identities solid and secure.
3. Scalability
Ability to Handle Large Databases
Dealing with a large amount of data is a common challenge for enterprises. Therefore, they require robust systems and efficient information management solutions at scale. An Enterprise WordPress Agency must demonstrate proficiency in handling large databases efficiently, ensuring optimal performance, data integrity, and scalability.
The performance and speed optimization of the database is our primary concern in this context. To accomplish this, intelligent strategies need to be implemented, including database optimization, efficient query execution, and the utilization of caching mechanisms.
We maintain optimal database configuration and management practices, enabling us to process increasing volumes of data for our clients without impeding operations. Thus, everything operates efficiently and promptly.
Experience with High-Traffic Websites
Websites that get a ton of visitors have their own set of challenges. We're talking performance, reliability, and making sure they can grow without a hitch. An experienced Enterprise WordPress Agency should have a proven track record of managing websites that attract substantial traffic volumes without compromising speed, uptime, or user experience.
By using a mix of caching, CDN (content delivery network), and load balancing, the traffic on the website can be handled more efficiently. The enterprise agency should be an expert at creating systems that can handle loads of traffic without breaking a sweat. So, even when the site gets super busy, users can still navigate smoothly and enjoy their experience.
Handling Complex Integrations
Enterprises rely on various systems, applications, and third-party services to streamline their operations, enhance productivity, and deliver value to customers. An adept Enterprise WordPress Agency should possess the expertise to integrate WordPress seamlessly with these complex ecosystems, ensuring interoperability, data synchronization, and workflow automation.
When it comes to connecting different systems like CRM platforms, online stores, payment gateways, or tools for automated marketing, the agency must be good at handling these complex integrations.
By leveraging APIs, web services, and custom integration solutions, enterprises can facilitate seamless data exchange and streamline business processes for enhanced efficiency and productivity.
4. Support and Maintenance
Post Launch Support Services
After the grand unveiling of your enterprise website, the journey doesn't end there; it's just getting started. A top-notch agency understands this and extends a reassuring hand of post-launch enterprise support for WordPress services.
Whether it's minor tweaks to enhance performance or guidance on utilizing new features effectively, having an expert team ready to assist ensures your digital presence remains dynamic and robust.
Ongoing Updates and Security Patches
Technology evolves, and so do the tactics of those with malicious intent. This is why ongoing updates and the application of security patches are a must.
A reputable agency makes it a top priority to keep your website up-to-date and secure from potential risks. This proactive strategy not only strengthens your website's defenses but also guarantees that it takes advantage of the newest advancements and enhancements, helping you stay ahead in the competitive online landscape.
Prompt Issue Resolution
In today's world, things move quickly, and everyone's time is crucial. The perfect WordPress Enterprise agency understands this well—they don't just talk about it; they live it.
With a committed team ready to assist you, problems get spotted and fixed promptly. This helps keep your online activities running smoothly, with minimal interruptions. Such quick responses not only make your website more dependable but also reassure you that your online presence is being taken care of by WordPress experts.
5. Communication and Project Management
Transparent communication
Imagine working with a team that makes you feel like you're part of the process every step of the way. That's the hallmark of transparent communication. It's about open dialogues, where your ideas, concerns, and feedback are not just welcomed but are considered pivotal.
A standout Enterprise WordPress development agency practices clarity from the get-go, setting the tone for a collaborative partnership. Being transparent builds trust, thus ensuring that you're never left guessing about your project's status.
Regular Progress Updates
Staying informed is critical in the project development process. You must constantly monitor the status of your project. Regular updates provide a snapshot of your website's evolution, keeping you current on its state.
The right agency doesn't keep you waiting or wondering; instead, they proactively share updates, celebrate milestones, and discuss the next steps. These updates aren't just to keep you in the loop; they're also an invitation for your thoughts and feedback.
Agile Project Management Processes
When you're selecting a WordPress Enterprise Agency, make sure their team maintains effective communication and follows an agile project management process.
Here's a breakdown of the project management process,
- Initiation: This is where the project kicks off. You discuss your goals, requirements, and expectations with the agency. They gather information to fully understand the scope of the project.
- Adaptive Planning: Agile projects embrace change; hence, agile teams prioritize delivering the highest value features first and adjust their plans based on feedback and changing priorities. The project is broken down into small, manageable tasks organized into sprints or iterations, timelines are set, roles and responsibilities are defined and resources are allocated.
- Execution: This is the hands-on phase. The agency starts developing your WordPress site, implementing designs, writing code, and integrating functionalities. Regular communication is key here to ensure everything stays on track.
- Monitoring and Controlling: Throughout the project, the agency keeps a close eye on the progress made. They track milestones, conduct regular reviews, and address any issues that arise promptly. Agile methodologies emphasize continuous improvement and flexibility, allowing for adjustments as needed.
- Project Deployment: Once the WordPress site is developed and tested, it is ready to go live. The agency ensures all deliverables meet your requirements, conducts final testing, and prepares for deployment.
- Post-Project Review: After the site is launched, there's still work to be done. The agency gathers feedback, evaluates the project's success, and identifies areas for improvement, if any. This assists in shaping future projects and maintaining continuous client satisfaction.
Conclusion
As you embark on the pivotal decision of choosing the right WordPress EnterPrise Agency, remember that the best partnerships are built on transparency, collaboration, and a shared commitment to excellence.
Choosing an agency that resonates with your organization's values and goals is integral to not just meeting but exceeding the expectations of your digital initiatives. The right WordPress Enterprise agency becomes an extension of your team, a collaborator who is as invested in your success as you are.
If you are looking for enterprise WordPress development services then look no further Connect with our experts.

Tutorials
8 min read
How to Create a Survey in WordPress Using Quiz and Survey Master Plugin
Capturing the attention of your target demographic while simultaneously collecting useful data is a must in the modern digital era. Any content producer or business owner's toolbox should include surveys since they provide a direct route to understanding your audience's preferences, wants, and opinions.
You can engage your audience on a deeper level and empower them to make well-informed decisions by adding surveys to your WordPress site. Using the powerful capabilities of the Quiz and Survey Master plugin, this tutorial will show you how to implement surveys in WordPress.
Note: The Quiz and Survey Master plugin as the name suggests, can be configured for conducting quizzes and surveys. This article discusses the configuration of surveys only.
Step 1: Install and Activate the Plugin
- Log in to your WordPress dashboard.
- Navigate to Plugins > Add New.
- In the search bar, type “Quiz and Survey Master”.
- Once you find the plugin, click on Install Now.
- After installation, click Activate to enable the plugin on your WordPress site.

Screenshot 1: Install the Quiz and Survey Master Plugin
Step 2: Create a New Survey
- Go to QSM > Quizzes/Surveys in your WordPress dashboard.
- Click on the Create New Quiz/Survey button.
- Enter a name for your survey in the Quiz Name/Survey Name field.
- Optionally, you can add a description of your survey.
- Click Create Quiz/Survey to proceed.

Screenshot 2: Click on ‘Create New Quiz/ Survey’
- Select the theme for which you want to create your quiz/ survey. There are also paid themes available to choose from.
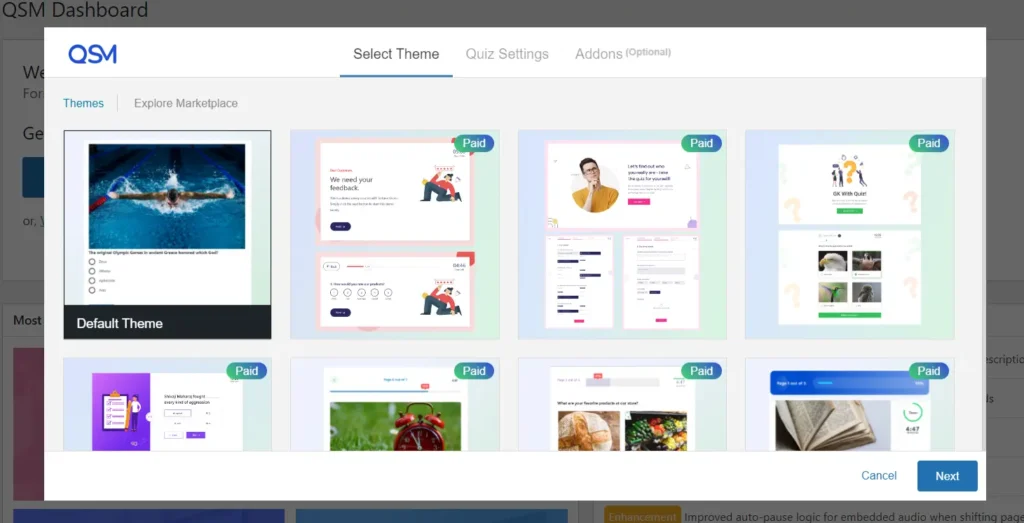
Screenshot 3: Select Theme
- After selecting your theme, you must enter Quiz Settings' details.
- Select the form type Survey to create a survey. This is an important step for creating and configuring surveys
- Further options, such as enabling a contact form, setting a Time Limit, requiring user login, enabling a comment box, and others, are set to “No” by default. You can choose “Yes” or options that fit your requirements.

Screenshot 4: Enter the Quiz Settings Details
- You can choose other add-ons such as Quiz Navigator, Quiz Protector, Advanced Question Types, and many more. These add-ons come with an additional price, which can be viewed by clicking on View Details.
- Click on Create Quiz to proceed further.
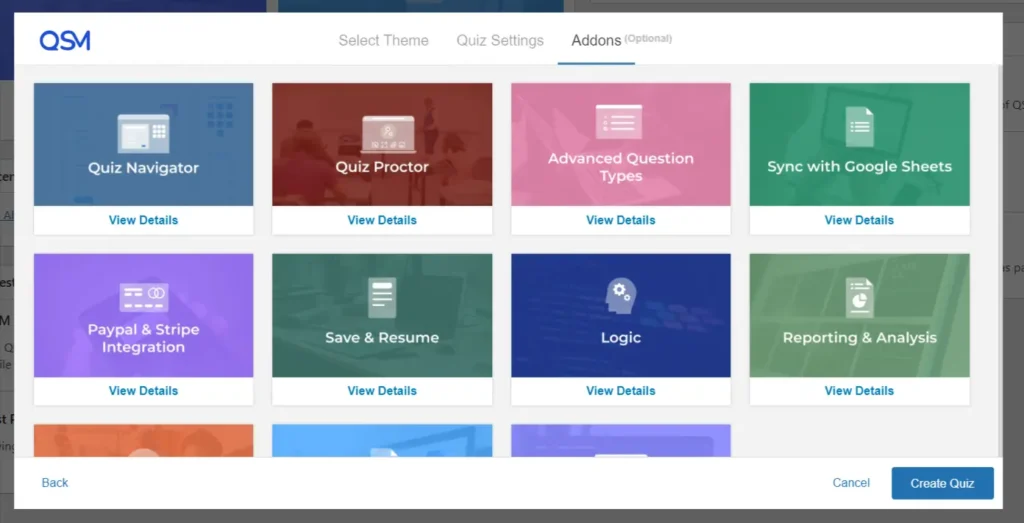
Screenshot 5: Choose add-ons (optional)
Step 3: Add Questions to Your Survey
- After creating your survey, you'll be redirected to the Questions tab.
- Click on ‘Type Your Question Here’.
- Code tags in question descriptions can display HTML, CSS, and JS code snippets. Using code snippets prevents the system from executing the code and interfering with the website's code.
- The WordPress Visual editor lets you add photos, audio, video, documents, spreadsheets, and more from your Media Library and customize the Question using formatting options. Click the Text tab on the editor to add your question in HTML.
- Choose the question type from the dropdown menu on the right side (e.g., Multiple Choice, True/False, Open Answer).
- Enter the question in the Question text area.
- Feed the answers to your questions. Answers depend entirely on the Question Type.
- Set additional parameters for the question, such as required answers or hints.

Screenshot 6: Questions Tab: Enter your Questions
- You can also feed information for correct answer info, the type of comment box you want, and add a Hint if you want. At the end of the quiz, the user can receive a thorough explanation of the correct answer through the correct answer info block. The results page shows the right answer.

Screenshot 7: Select various fields
- Set the featured image if you require it.
- You can Add a new category for your questions too.
- Click Save Question to add it to your survey.

Screenshot 8: Click on Add New Question
- Click on Add Questions and repeat these steps to add more questions to your survey.
- Clicking the “Create New Page” option at the bottom of the question tab generates a new page for questions and responses. A quiz/survey with numerous question pages will show Next & Previous buttons to switch between pages.
Step 4: Gathering User Information
- After setting up the questions and answers, create a contact form to collect user contact information or other details before or after taking the quiz/survey.
- Go to the Contact tab.
- Enable the field and enter the Label Name.
- Choose the Form Options according to when you want to display the form.
- Click on Save Form.

Screenshot 9: Gather User Information Through Contact Form
Step 5: Editing Text Sections
- Once we have some quiz questions, we can alter some of the text users will see and interact with.
- Go to Text tab.
- The text tab is divided into 3 subtabs:
- General: You can choose from several different messages in this drop-down menu.

Screenshot 10: Text > General Tab
- QSM Variables: This includes factors that have already been set for the Results Page and Email Pages.

Screenshot 11: Text > QSM Variables Tab
- Labels: Some Label options let you change things like the “Validation Messages” and the “Default Text” shown on the Quiz Navigation Buttons.
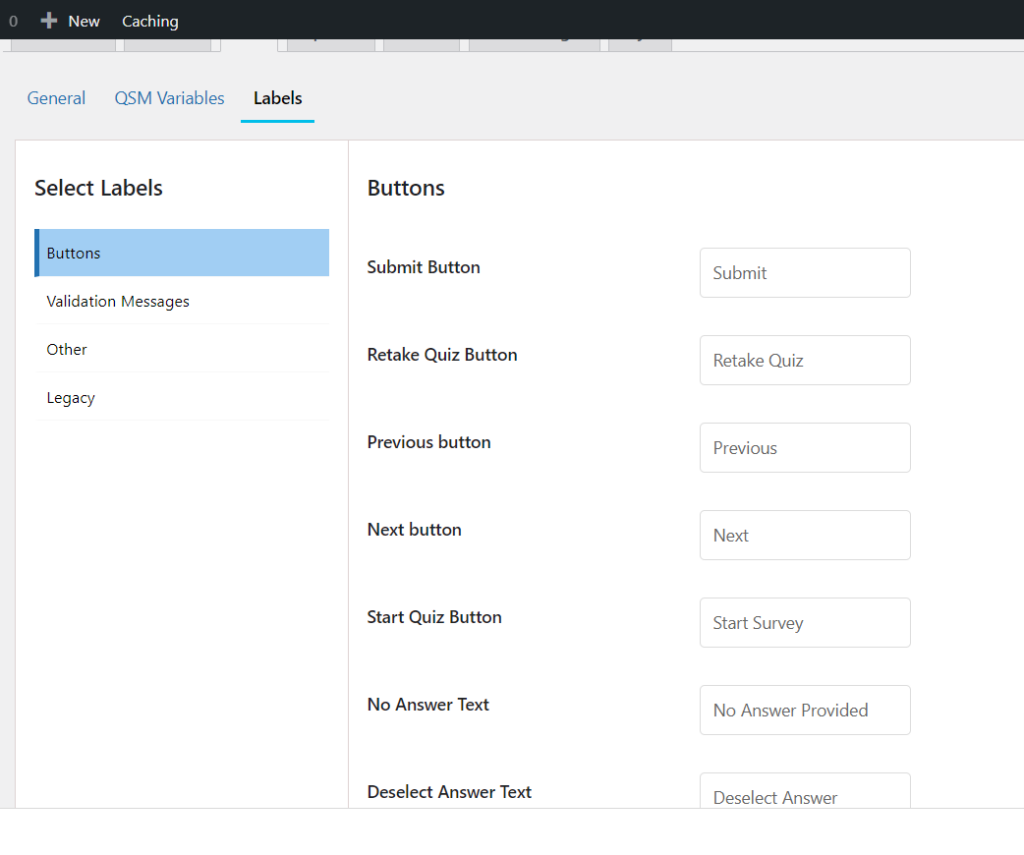
Screenshot 12: Text > Labels Tab

Screenshot 13: Text > Validation messages Tab

Screenshot 14: Text > Other Tab
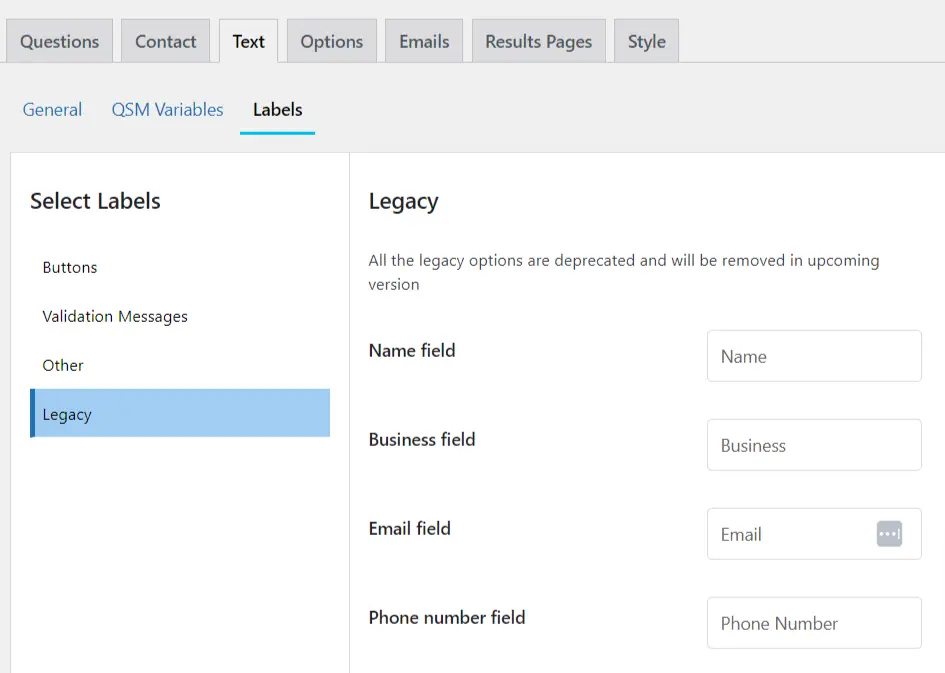
Screenshot 15: Text > Legacy Fields Tab
Step 6: Basic Settings in the Options Tab
- It's time to change the choices now that we've added our questions and written some text.
- Go to the Options Tab.

Screenshot 16: Options > General Settings Tab
- This tab involves various settings that fall under the categories as follows: General, Quiz Submission, Display, Contact Form, and Legacy.
- These are basic settings that allow you to select quiz type, set how to display results, set the position of the contact form, set what information to gather from users, etc.
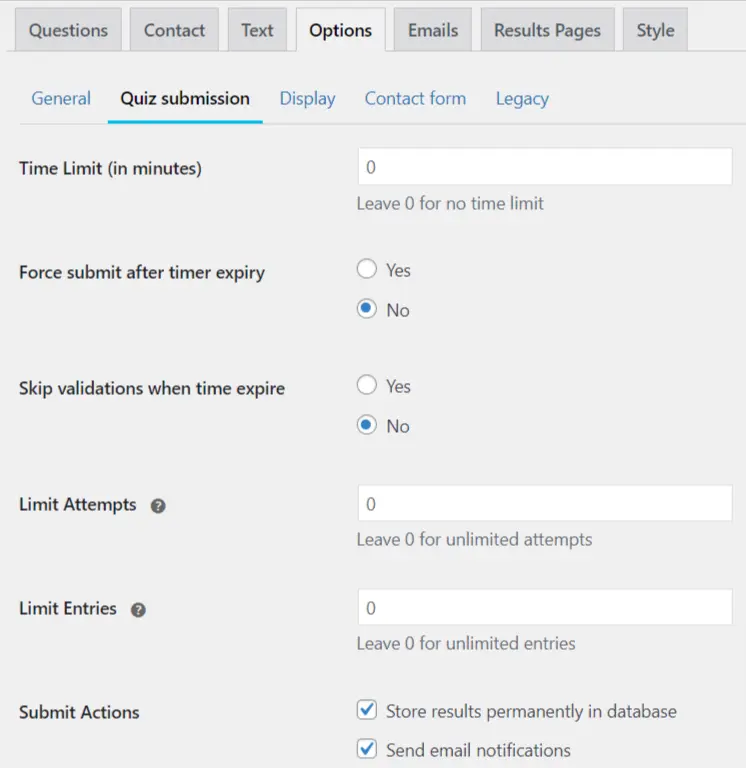
Screenshot 17: Options > Quiz Submission Settings

Screenshot 18: Options>Display Settings
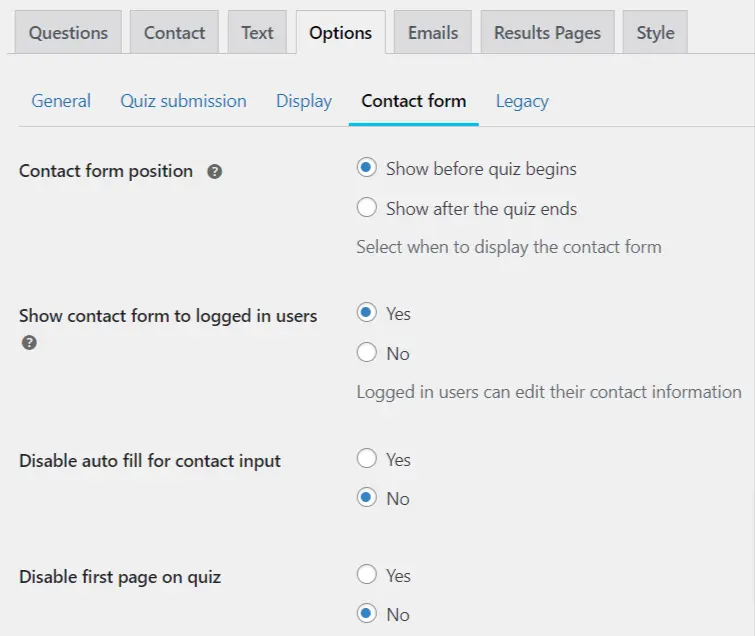
Screenshot 19: Options> Contact Form
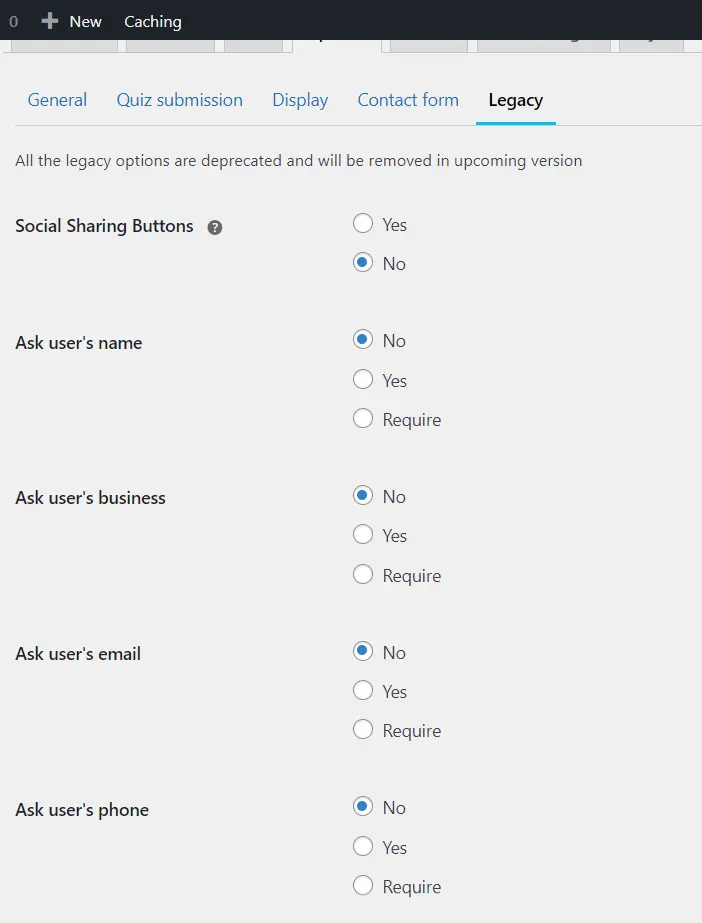
Screenshot 20: Options> Legacy Settings
Step 7: Setting up Emails
- After users submit the surveys, you may need to send them emails with their answers.
- Go to the Emails Tab.
- We can run a function with Template Variables.
- Click on Insert Template Variables at the bottom-right.
- Clicking the button opens a window with all the Template Variables you can use to send emails. These variables start a task when used.

Screenshot 21: Click on Insert Template Variables

Screenshot 22: Email Template Variables
- Click on the Variable you need. It gets copied automatically, and you can paste it into the email text section. Customise and add variables to improve the email experience. %QUESTIONS_ANSWERS_EMAIL% is set by default.
- To add extra content, use template variables in the Email Body to include Amount Correct, User Name, Points Scored, Average Category Points, Correct Score, Category Points, Category Average Points, Quiz Name, and more.
- Click on Add Additional Condition to add more conditions to your email.

Screenshot 23: Additional Condition for Email
Step 8: Result Page Settings
- This page is shown after the user submits the survey.
- This is quite similar to the Emails page we’ve seen earlier.
- Go to the Results tab.
- We can run a function with Template Variables.
- Opening the Results Tab, the Insert Template Variables button appears in the bottom-right corner.
- Once you click the button, a new window appears with all the Template Variables you may use to configure quiz results. These variables start a task when used.

Screenshot 24: Insert Template Variables for Results Page

Screenshot 25: Template Variables in Results Page
- Navigate to the Conditions section on the QSM Results Page.
- Click on the "Category Name" drop-down menu.
- Select the desired category from the options listed.
- Choose between "Total points earned" or "Correct score percentage" from the available options.
- Select a condition to apply to the output display.
- This allows you to showcase various outputs tailored to users whose results meet the specified category criteria.

Screenshot 26: Adding Additional Condition in the Results Page
Step 9: Styling Your Survey
- The Style tab is designed to help users customize the appearance of their quizzes and surveys.
- Select the Theme you want for your survey from the Themes section.
- You can add Custom CSS to customize your survey.
- The Legacy section will soon be removed from the plugin as specified in the screenshot below.

Screenshot 27: Styling Your Survey>Selecting Theme
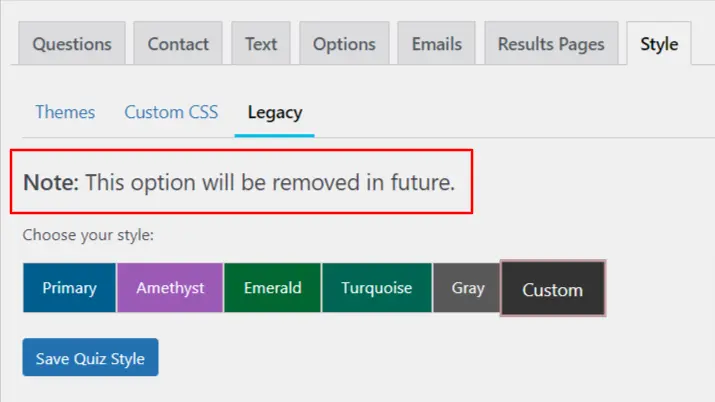
Screenshot 28: Legacy Section to be Removed
Step 10: Adding Survey to your Website
There are three ways to add a survey to your website:
- By Pasting Shortcode on Page/Post
- Copy the shortcode from QSM > Quizzes/Surveys > Shortcode. Paste it into your page or post. The shortcode displays the survey or provides a link to it.

Screenshot 29: Click to Add Shortcode

Screenshot 30: Embed the Shortcode
- By Using Gutenberg Block
- Insert the quiz or survey on a page or post with the Gutenberg editor by searching for the “QSM Block”. Select your Quiz/Survey ID from the dropdown in block settings and update.

Screenshot 31: Add Survey Through Gutenberg Block
- Now, you can select the survey to be added from block settings.
- Click on Update to add the survey to your website.

Screenshot 32: Selecting Survey from Block settings
- Click on View Post to view the survey embedded in your post.

Screenshot 33: Survey Embedded in Website
Conclusion
Crafting surveys in WordPress using the Quiz and Survey Master plugin is a streamlined process that empowers you to engage deeply with your audience and gather vital insights. This guide explored the steps necessary to design, customize, and deploy your surveys effectively. By leveraging this powerful tool, you can enhance your connection with your audience, make data-driven decisions, and ultimately drive your WordPress site's success forward.
Online Casino
8 min read
chickengamegambling chicken-road-2: https: chickenroad-2 app en
To hit it, you must place the maximum bet on one of the Hard or Hardcore game modes and achieve a minimum multiplier of x100. This results in losing your game and the entire bet you placed on Chicken Road. But of course, be careful not to be too greedy and take your winnings before becoming a roasted chicken.
That alone helps calm your play. If grass moves when there’s no wind, that might be a Chicken Road Easter egg. These are simple Chicken Road tricks that chicken road 2 app help every type of player. That’s one of the smartest Chicken Road tricks every player should learn.
Keep in mind that there are different approaches to the game. The other half is the proper strategy. Request self-exclusion/blocking from the casino if necessary. The game is published by InOut Games, holder of a Curaçao eGaming license n° 1668/JAZ and a Anjouan license No. The demo version is an excellent way to discover the four levels of difficulty and familiarize yourself with the 95.5 % RTP (Return to Player), while testing different bets. Some casinos may require a account verification before authorizing a withdrawal.
The high RTP provides better long-term value and encourages extended play sessions, appealing to both casual and experienced players. The absence of separate bonus rounds is balanced by the excitement of the main game, where each move presents a new opportunity for a higher payout or the risk of losing the bet. These elements combine to provide a dynamic experience that rewards both cautious and adventurous play styles, making Chicken Road 2 appealing to a wide audience of casino enthusiasts.
Now, with the MOD APK version, gamers can elevate their experience by unlocking unique features that make gameplay even more enjoyable. Unleash Your Gaming Experience with Chicken Road MOD APKIn the dynamic world of mobile gaming, Chicken Road stands out as a thrilling adventure that keeps players hooked with its simple yet addictive gameplay. Its simple controls and engaging mechanics make it easy for young players to enjoy, while the increasing difficulty and strategy involved keep seasoned gamers on their toes. While the original Chicken Road appealed mostly to casual slot players, Chicken Road 2 casino game expands its audience. This cross-platform functionality ensures that players can enjoy Chicken Road 2 anytime, anywhere.
As you can easily see, the margin applied by Inout Games hardly impacts our players' chances of winning. Before letting you play the Chicken Road gambling game, we would like to explain all of its features. By securing exclusive partnerships with some of the largest online casinos, we have been able to offer various alternatives to those who want to start playing on Chicken Road Casino. To allow our players to use the Chicken Road mini-game wherever they are, we asked our developers to build it using HTML5 technology.
Soundtrack and Animation
Seeing that many casino mini-games on the market offer capped and rather limited winnings, we quickly decided to apply a maximum win of €20,000 on Chicken Road. The satisfaction of progressing through these varied environments and unlocking achievements enhances the replay value of the game, encouraging players to keep returning for more adventures.A Unique Take on Classic GameplayChicken Road offers a unique twist on traditional gaming tropes. Together, players can explore strategies, discuss challenges, and celebrate accomplishments as they journey down the exciting Chicken Road.Customizable Gameplay ExperienceAnother advantage of the Chicken Road MOD APK is the customizable gameplay it offers. Engaging with fellow players through forums and social media can enhance your understanding of the game while providing insights on maximizing your experience with the MOD APK. MOD APK versions of games like Chicken Road often benefit from a dedicated community of players and developers who offer support, share tips, and provide updates.
Extraction Strategy: How to Survive Terminal’s Endgame PvP
To get these results, follow actionable tips that will enhance your gameplay in minutes. Spotting them makes the game feel fresh every time you play. Sometimes a sign will blink before playing a sound or showing a cartoon chicken. Some players miss the fun details in Chicken Road. This is a known Chicken Road shortcut that skilled players use all the time.
- Their sole purpose is to get you to sign up to an unscrupulous casino and earn a commission.
- We don't hide the fact that Chicken Road is a game of chance, entirely based on a Provably Fair random draw algorithm (blockchain-based).
- Every player makes small mistakes.
Smart Chicken Road Advice for Bigger Rewards
This modified version has successfully removed ads and has added speed-up functionality, allowing you to dive into the action without interruptions.Dive into the Fun with Speed-Up FeaturesOne of the standout features of the Chicken Road MOD APK is the speed-up option. With each victory, players gain a sense of accomplishment, motivating them to push their limits even further.Perfect for Any OccasionWhether you’re on a quick break or looking for a longer gaming session, Chicken Road fits perfectly into any routine. This easy-to-grasp control system allows players of all ages to jump right in and start having fun. Build your own real-money game with complete control and zero encryption barriers! A thrilling, step-by-step prediction game where players guide a chicken across a 25-step road. 🐔 Play with real money !
Simple Tricks to Escape Dangerous Situations Quickly
Many advertisements promote chicken road with deep fakes of celebrities like Ronaldo, Mr Beast, or even Elon Musk. Their sole purpose is to get you to sign up to an unscrupulous casino and earn a commission. Do not download any application to play Chicken Road 2. The reliability of Chicken Road 2 depends on the type of game you're referring to and the platform used. Even if some chicken road apps are available on the App Store or Play store, these are always eventually removed (being scams).
- Players must decide when to cash out to win!
- The demo version is an excellent way to discover the four levels of difficulty and familiarize yourself with the 95.5 % RTP (Return to Player), while testing different bets.
- This means that while wins may not occur as frequently, the payouts can be significantly larger when they do happen.
- The company focuses on delivering engaging player experiences, robust technical support, and seamless platform integration for operators.
With high volatility, crisp graphics, and engaging sound effects, Chicken Road 2 delivers a thrilling gaming experience for fans of farm-themed slots. Colorful symbols include chickens, eggs, tractors, and special Wild and Scatter icons that trigger exciting bonus features. The Chicken Road 2 slot features a classic 5-reel, 3-row layout with multiple paylines, offering numerous chances to win.
The thrill of collecting golden eggs, combined with the strategic elements of managing your chicken chain, ensures that each play session is filled with excitement. Families can gather around to enjoy the game together, sharing tips and competing for the best scores. You can easily pick up the game for a few minutes and get lost in the excitement of gathering golden eggs.
Specifically, we decided to apply a 98% RTP on Chicken Road, so that our users can receive frequent winnings. Each lane you cross allows you to cash out and exit the game on Chicken Road. But before you start playing, our teams would like to present it to you on our official Chicken Road Casino website.
Chicken Road: Opinions from the creators of the online casino game
Loading times are quick, and no performance is sacrificed regardless of device. Their appearance is more frequent in the bonus rounds, creating moments of high anticipation. Wilds in Chicken Road 2 are represented by a quirky rooster that substitutes for all symbols except the scatter and bonus icons. Chickens flap across the screen, eggs roll, and farm elements like haystacks and wooden fences contribute to the playful aesthetic.
🐔 Chicken Cross Road Game – Source Code
The game’s focus on player agency and real-time decision-making ensures that every round feels like a bonus opportunity in itself. Instead, its bonus system is integrated into the core gameplay through escalating multipliers and risk-based decision-making. The game allows instant cash-out at any stage, letting players secure winnings before risking further progress. Chicken Road 2 Features & Bonuses introduces a dynamic layer of excitement and strategy to the gameplay experience. You must be fully aware that it is possible to lose all the real money you have wagered on our Chicken Road casino game. With the speed-up functionality and ad-free experience, you can easily compete with friends or join online leaderboards to see how you stack up against players worldwide.
Stay Updated with Latest Features
With a 98% RTP, high volatility, and a top win of €20,000, Chicken Road 2 appeals to both casual and experienced gamblers. Instead of spinning reels, players guide a chicken across a dungeon, avoiding hazards and aiming to reach higher multipliers with each successful step. Launched in April 2024, Chicken Road 2 invites players to guide a daring chicken through a perilous dungeon, avoiding flames and other hazards along the way. As a regulator, Curaçao eGaming is committed to promoting a healthy and ethical online gaming industry. Operators must adhere to strict standards of security and transparency to obtain a license, thereby ensuring optimal protection for players against fraudulent practices. Founded in 1996, it stands out for its longevity and unmatched expertise in granting licenses to online gaming operators seeking to reach an international clientele.
Community
Players can expect a combination of adjustable difficulty levels, a high RTP, and interactive mechanics such as a real-time cash-out system. Players can enjoy the full range of features, including real-money and demo modes, without compromise on any device. Fast load times and responsive design guarantee a seamless experience, whether played on a smartphone or tablet.
What are the winning strategies in Chicken Road 2?
Instead, the game’s symbols are interactive elements that represent different stages and outcomes as the chicken progresses through the dungeon. This means that while wins may not occur as frequently, the payouts can be significantly larger when they do happen. Additional features include customizable avatars and intuitive controls, such as the option to use the spacebar for quick advancement. Their reputation for quality and innovation has earned industry recognition and partnerships with leading casino brands worldwide.
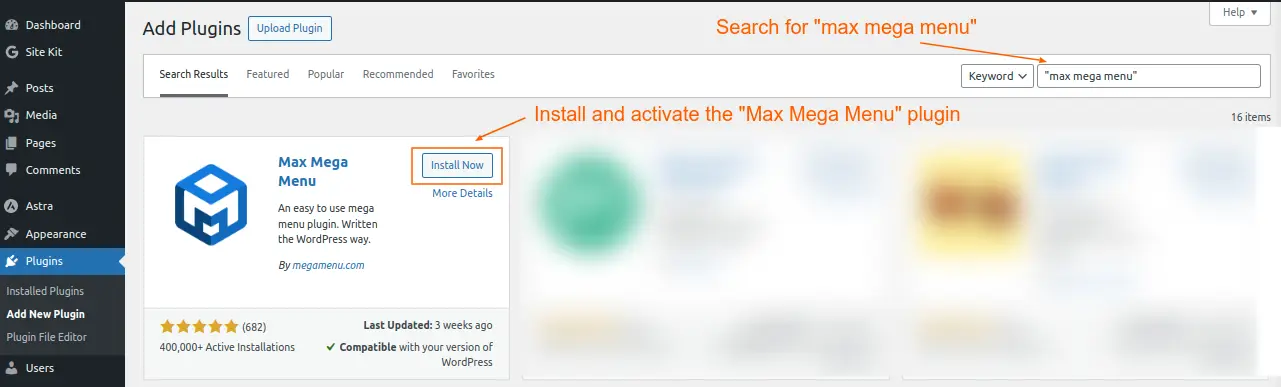


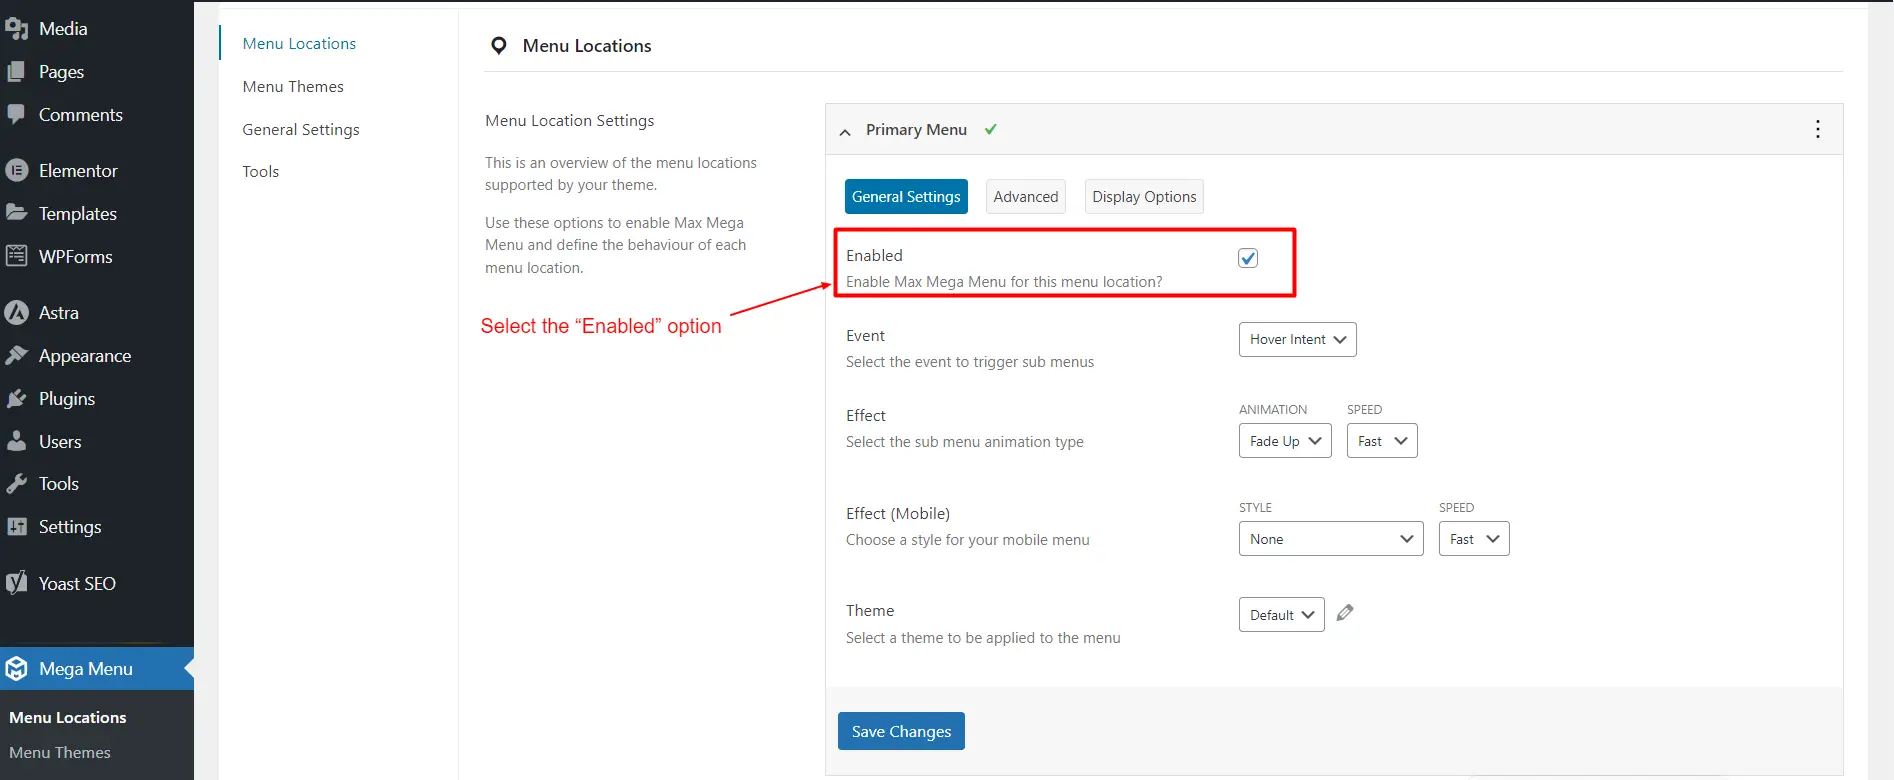
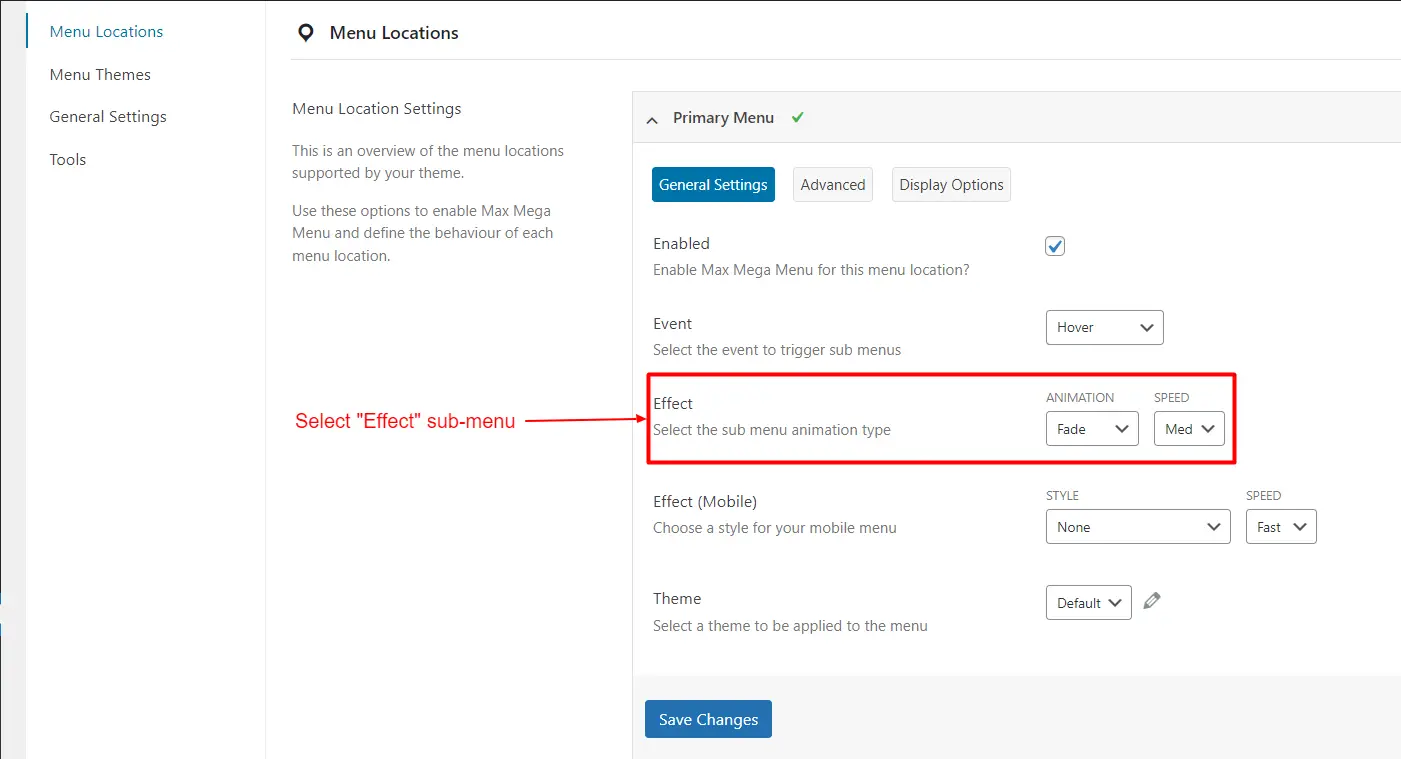
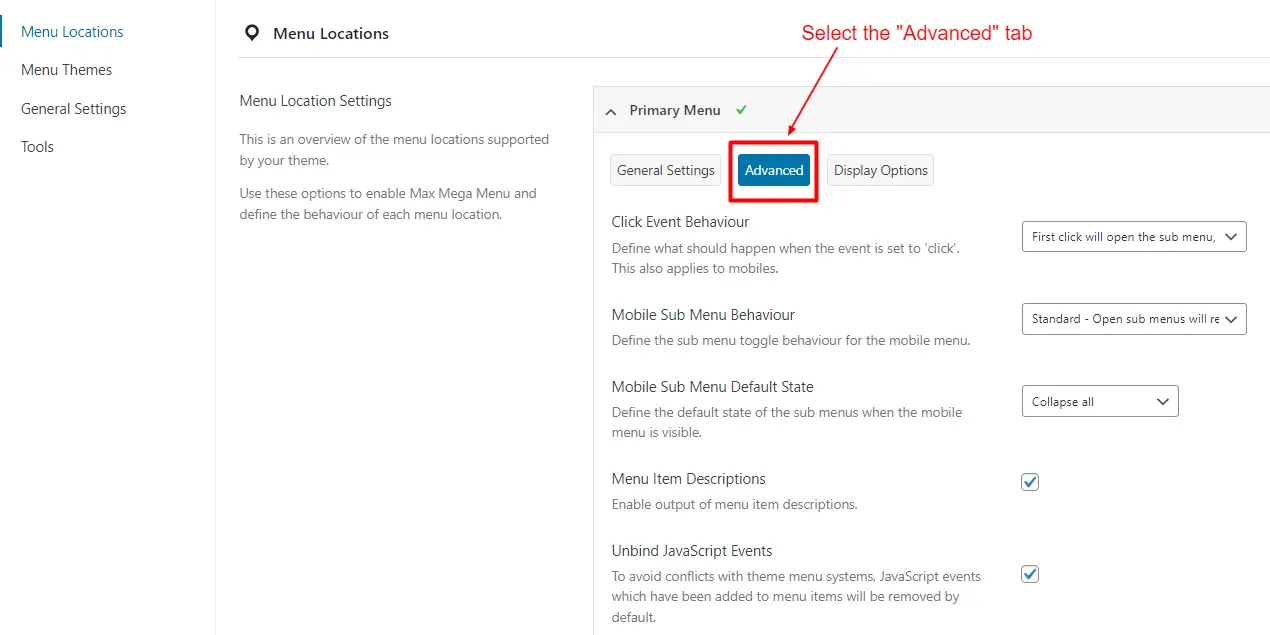

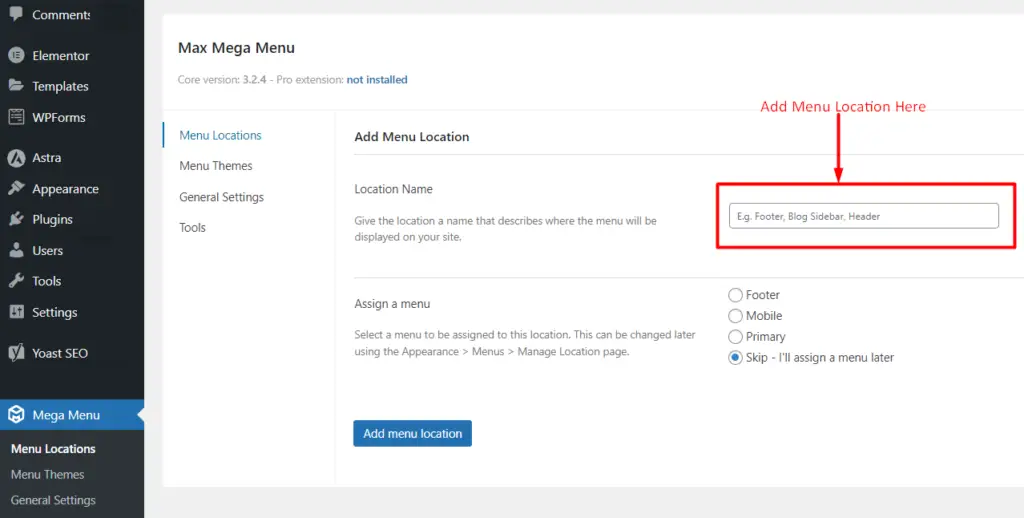

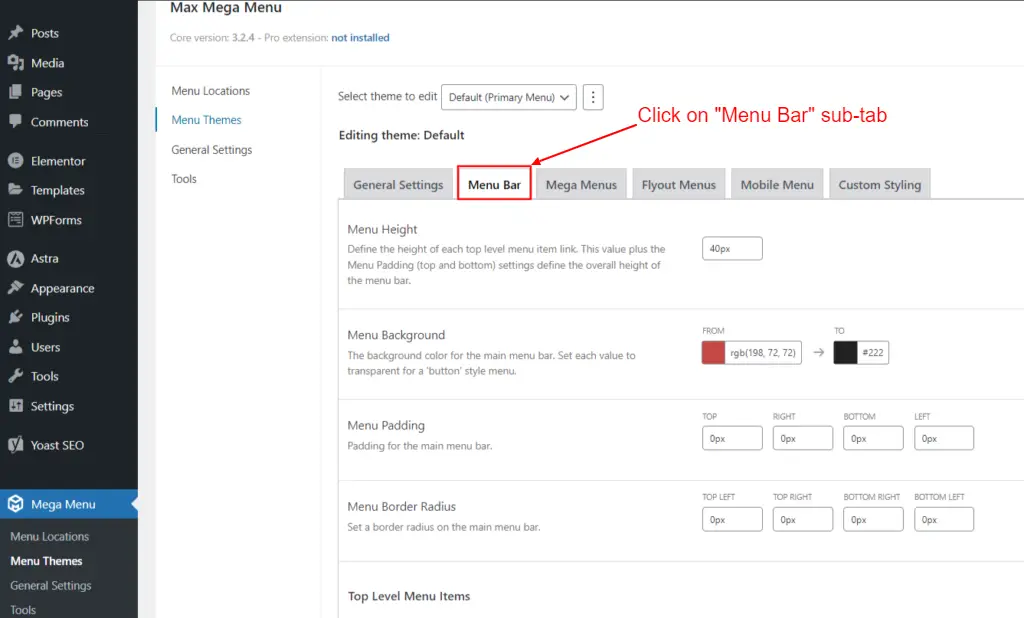

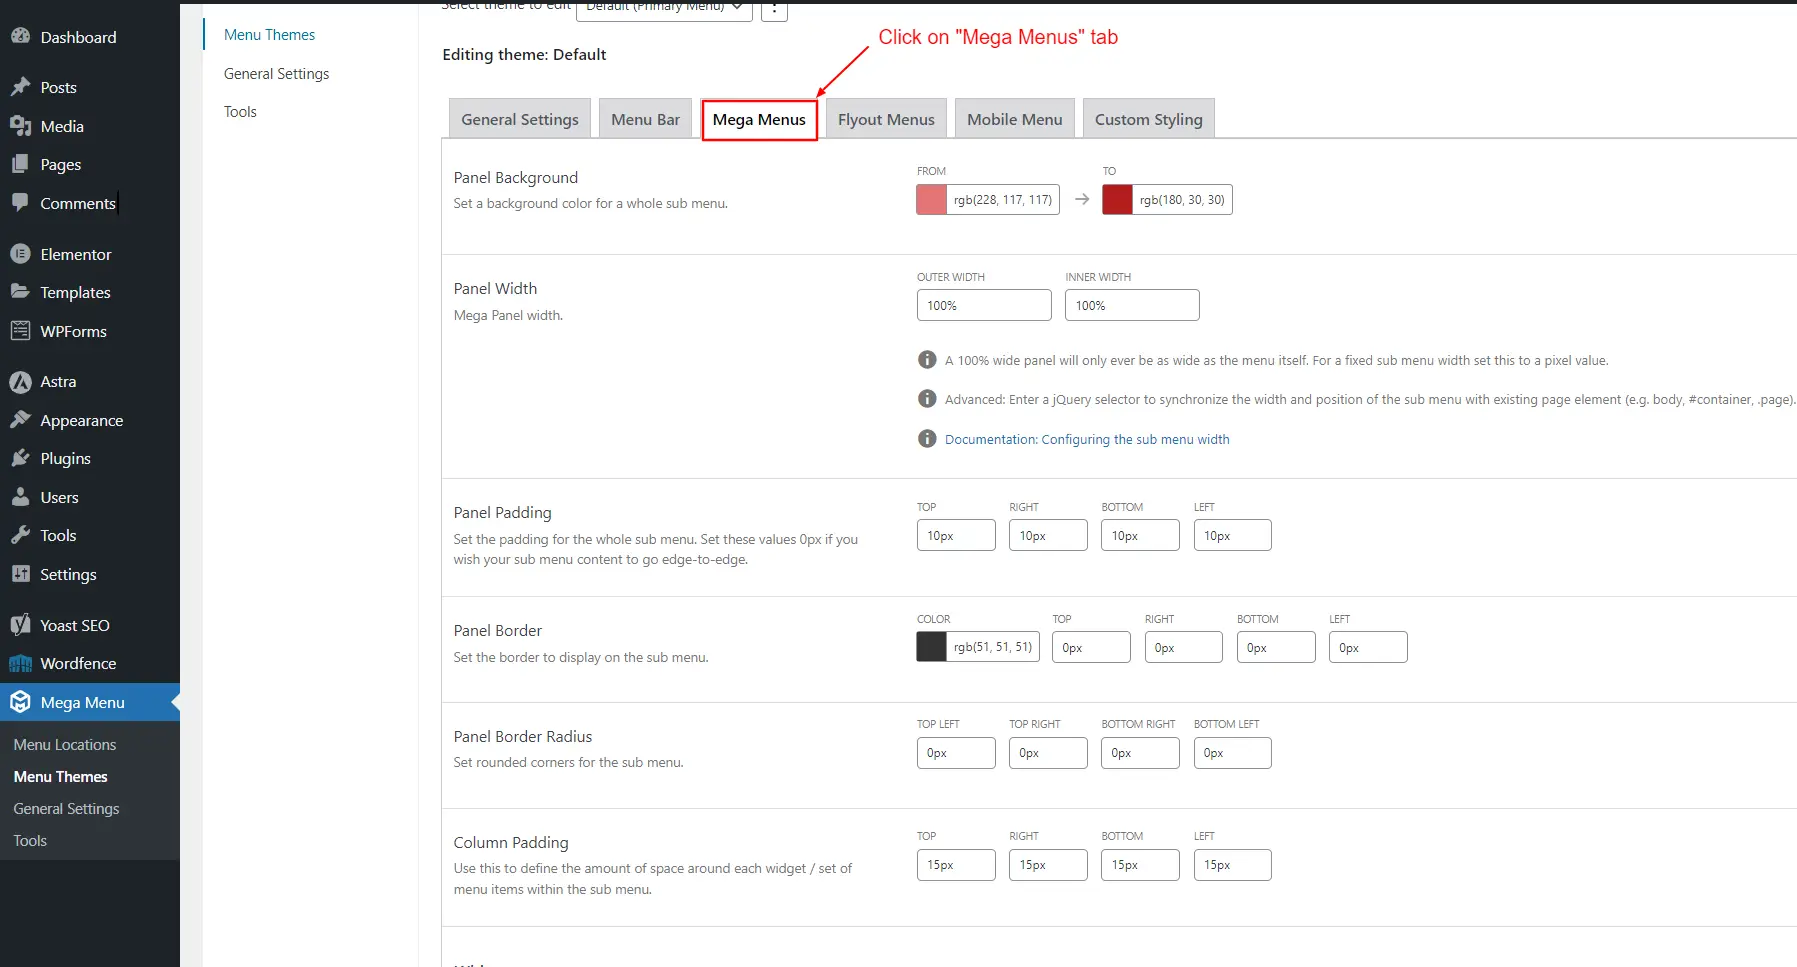

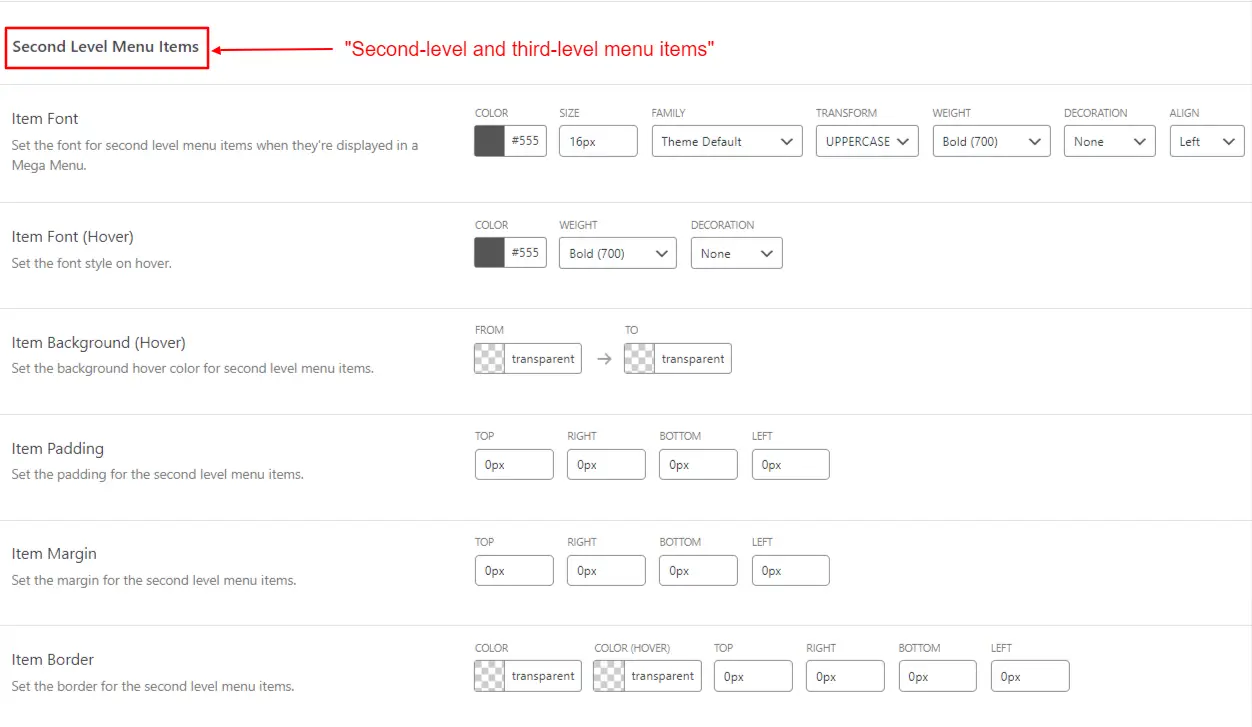
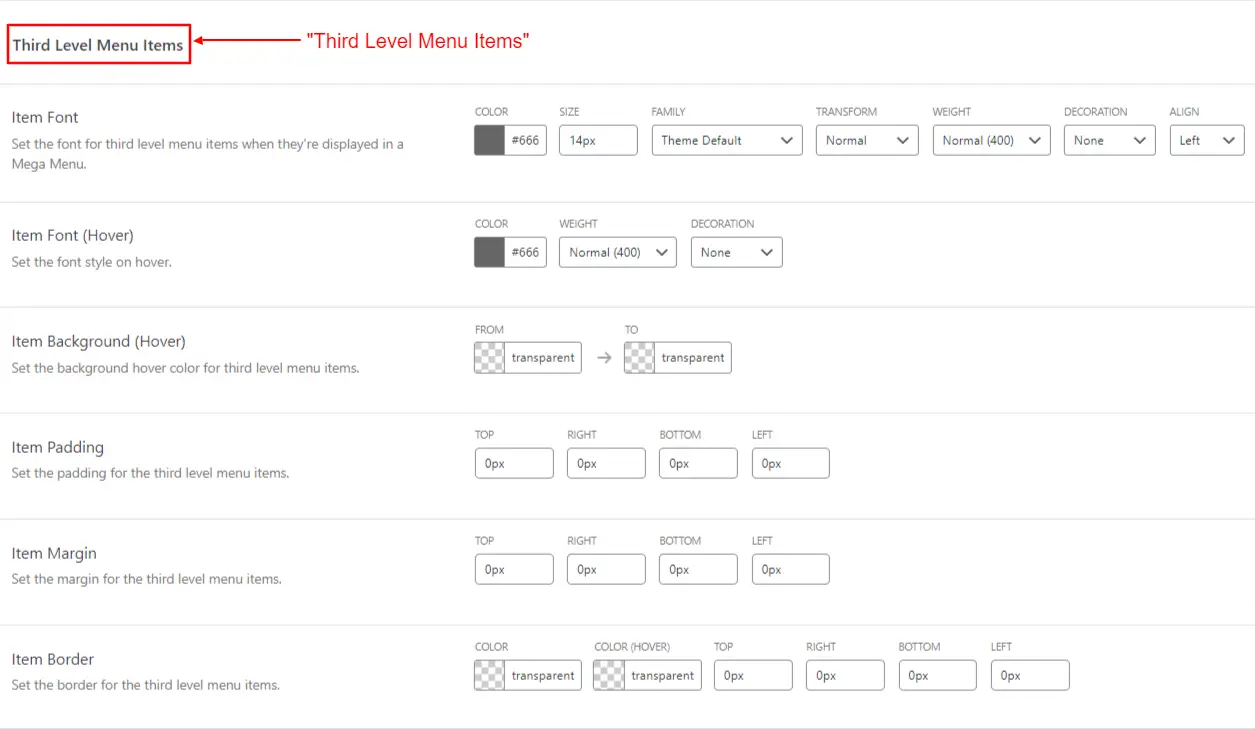
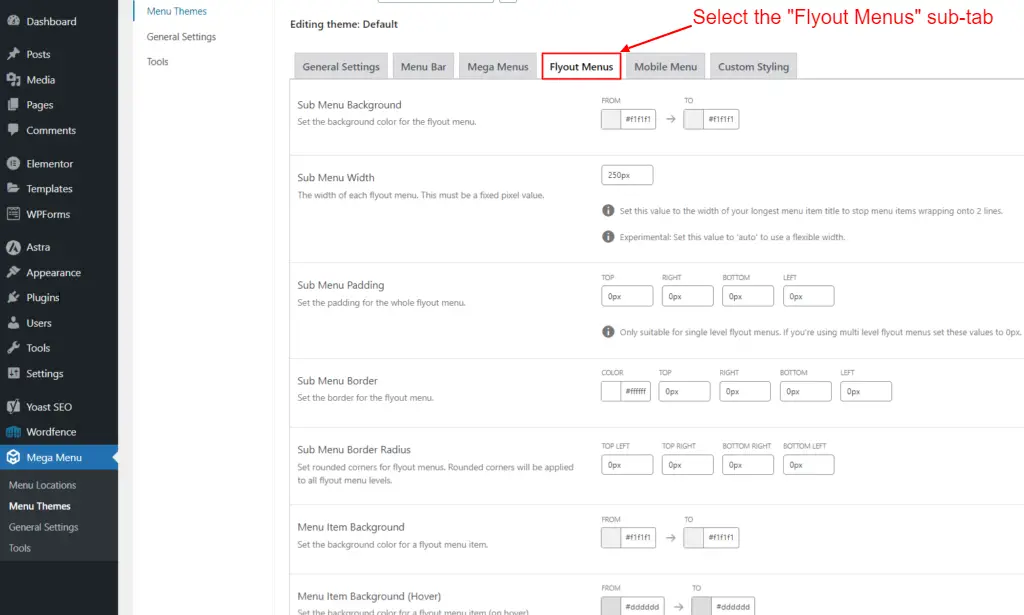


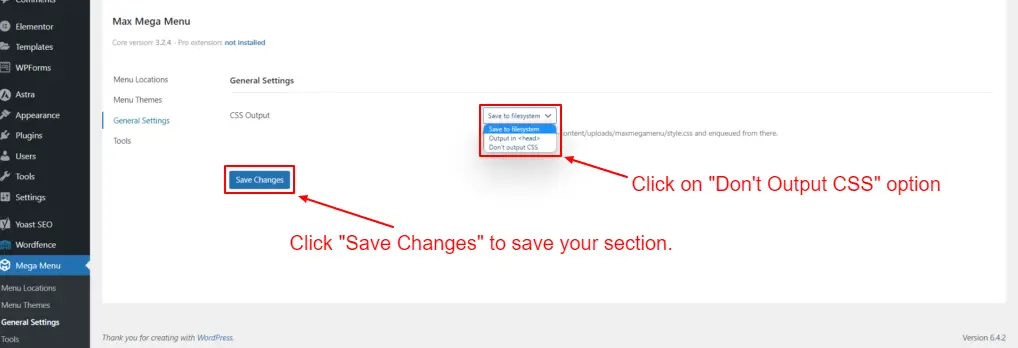
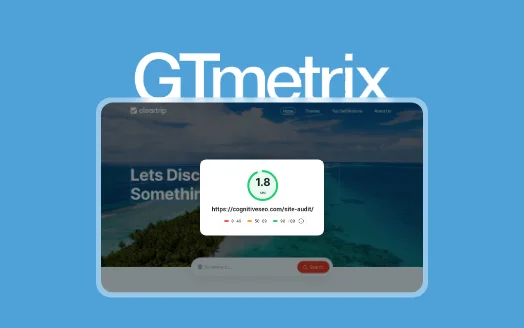
Tutorials
6 min read
How to Use GTmetrix WordPress plugin to Improve your Site Speed
Introduction
Is your WordPress website running slowly, thus affecting the user experience? Are you losing visitors and potential customers because of slow loading times?
It's time to take action and optimize your website's performance with the help of the GTmetrix tool. This tutorial will guide you through setting up and utilizing the GTmetrix WordPress plugin.
What Is GTmetrix Speed Test Tool?
GTmetrix is a tool to easily test the performance of webpages. Just enter the URL that you want to analyze performance, and within a few seconds, it will generate a detailed report providing recommendations for optimization.
One can easily identify performance bottlenecks and take appropriate actions to enhance your website's loading speed.
You can measure your website's loading times from different locations around the world. Currently, there are 7 free test locations and 15 premium test locations, for a total of 22 different global test locations. This allows you to understand how your web pages perform for users from different geographic locations around the world.
We can also test page loads on different mobile devices. As of this writing, GTmetrix supports testing on a real Android device or over 30 different simulated device options in its premium plan.
Installing and setting up the GTmetrix Plugin in WordPress
Step 1: Install and activate the “GTmetrix for WordPress” Plugin
The first step is to install and activate the “GTmetrix for WordPress” plugin on your WordPress website.
Begin by clicking on the “Plugins” menu and then clicking the “Add New Plugin” button, as shown in the screenshot below.
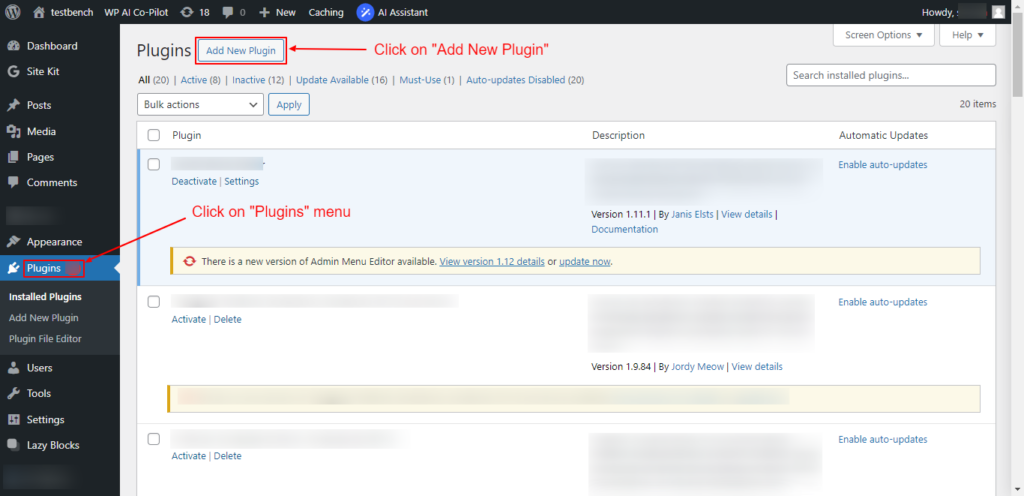
Screenshot 1: Click on the “Plugins” menu and select the “Add New Plugin” option.
Next, search for the “GTmetrix” plugin and install it, or download it from here, upload it, and install it on your website.
If you have already installed the plugin on your website, you can skip this step and go to step 2
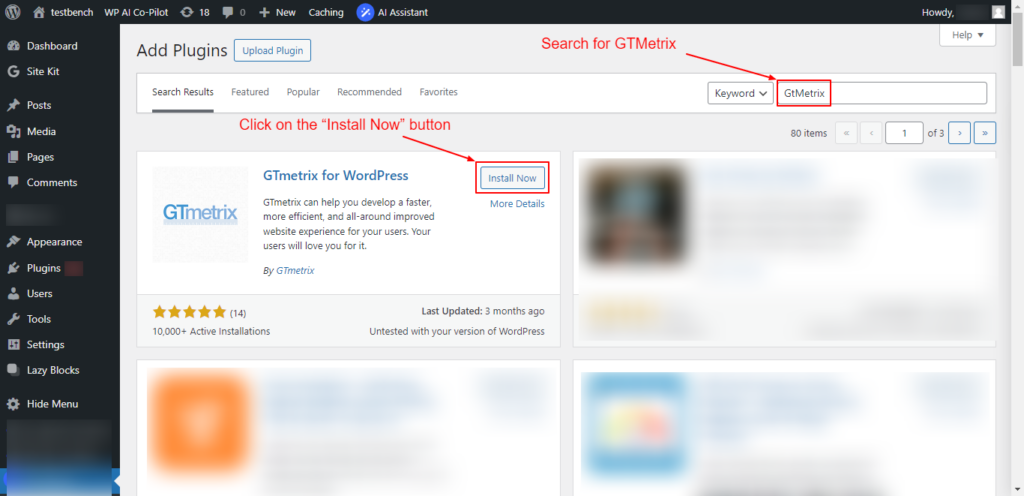
Screenshot 2: Search for “GTMetrix” in the available search box and click on the "Install Now” button.
Once activated, you will see the new menu option “GTmetrix” in your WordPress dashboard. Click on it, which will take you to the “GTmetrix for WordPress Settings” page.

Screenshot 3: Click on the “Register for a GTmetrix account now” link.
To use the GTMetrix plugin, you need to create a GTMetrix account and generate its API key.
For that, simply click the “Register for a GTmetrix account now” link to go to the GTmetrix website, where you can sign up for an account, as shown in the below screenshot 4.
Step 2: Create a GTmetrix Account and log in to it
Once you are on the GTmetrix website, click on the “Get Started for Free” button to create an account. Skip this step if you already have an account and go to step 3.

Screenshot 4: Click on the “Get Started for Free” button.
Fill in your information and agree to the terms, then just click on the “Create an Account” button as shown in below screenshot 5.

Screenshot 5: Fill in your information and click on the “Create an Account” button.
Next, you need to validate your email address to complete the account creation process. You will receive an email to verify your GTmetrix account.
Once you have created your account, Enter your email address and password, and click “Log in," as shown in the below screenshot 6.

Screenshot 6: Log in with your email ID and password and click on “Log in.”

Screenshot 7: Get the “GTmetrix Rest API Key”
Note: If you are directly logging in to Gtmetrix.com instead of clicking the link from its plugin settings, you have to scroll to the bottom of the homepage and then click on "GTmetrix Rest API,” as shown in screenshot 8.
This would take you to the https://gtmetrix.com/api/docs/2.0/ webpage. As shown in the above screenshot 7.

Screenshot 8: Click on “GTmetrix REST API” to get the API Key
Step 3: Generate a Gtmetrix API Key
Next, simply click on the ‘Generate API key’ button. Copy the API key, which is on the left-hand side of your screen.

Screenshot 9: Click on “Generate API Key” and then “Copy the API Key.”
Now, switch back to the ‘GTmetrix’ settings page in your WordPress dashboard. Go ahead and enter your GTmetrix account email address and the API key you copied earlier (as shown in screenshot no. 7).
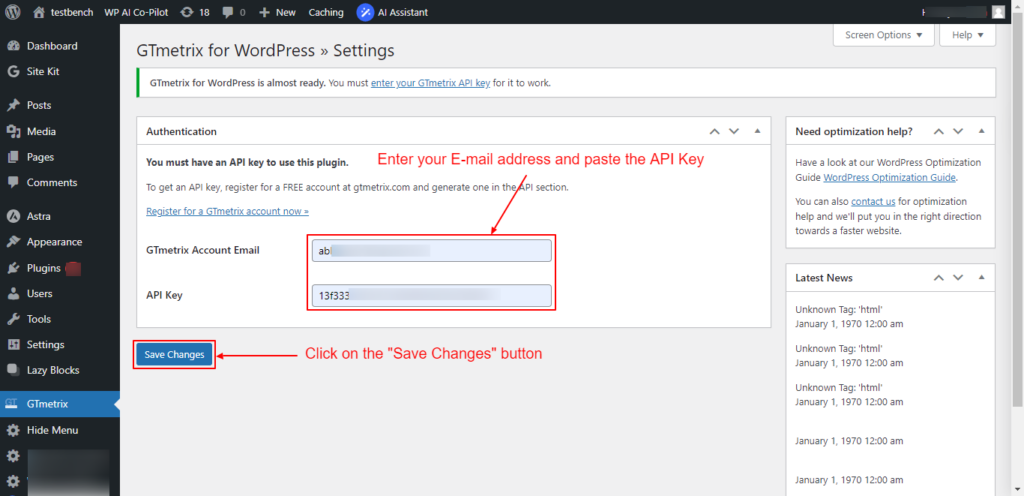
Screenshot 10: Enter your E-mail address and paste the GTmetrix API key
Don’t forget to click on the ‘Save Changes’ button to save your settings.
Step 5: Set Default options
Head over to the GTmetrix > Settings page, scroll down to the “Options” meta box, set the “Default location” drop-down to the Test Server location (region) that is closest to your hosting, and then again save the changes.
For this tutorial, we have selected Mumbai, India, as the default Test Server Region.
That’s it! You have successfully integrated GTmetrix with your WordPress site.
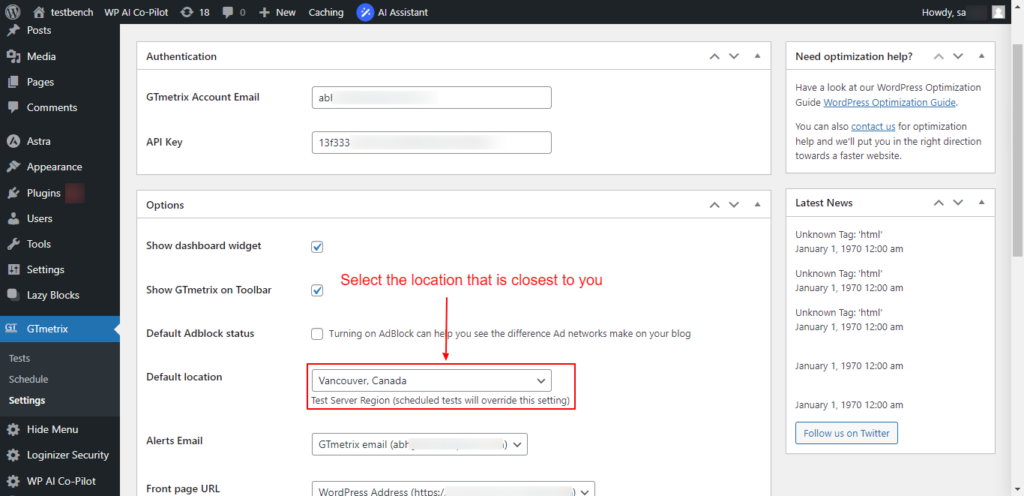
Screenshot 11: Select the Test Server location that is closest to your hosting
Step 6: Test the Web Pages
On the left-hand admin panel, click on the Tests sub-menu. Enter the page URL that you want to test the page load speed for.

Screenshot 12: Click on “Tests” to perform tests on any page of your website.
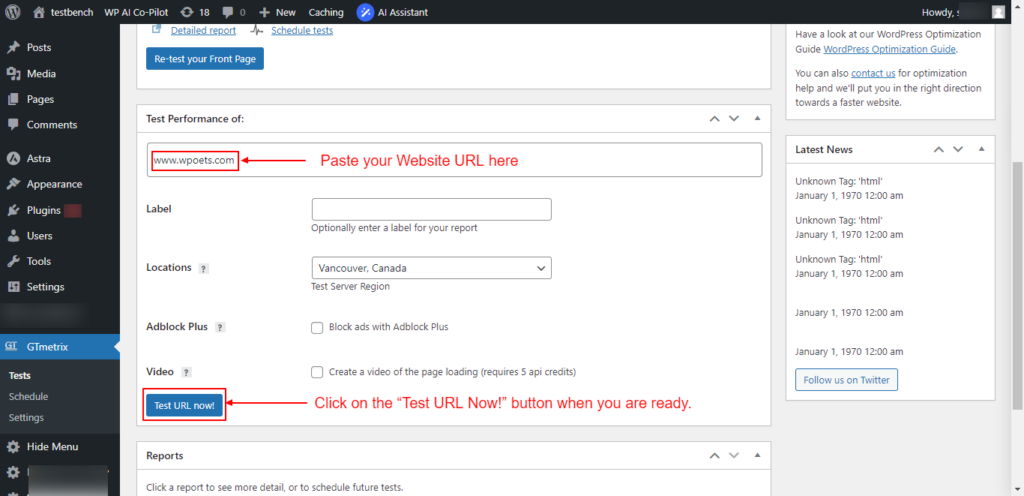
Screenshot 13: Paste your “Website” URL and Click on “Test URL Now!”
GTmetrix will take a few seconds to scan your whole page. Once the scan is finished, you will see your site's detailed reports, along with the top issues that you can fix to improve the user experience.
Screenshot 14: "GTmetrix" scan in progress.
This report generated gives you a detailed breakdown of your PageSpeed score, YSlow score, and a list of recommendations on what you can change to improve your page load time. Anything below a Performance score of “A” means there is room for improvement.
All the reports that have been completed are available under the “Reports” section (meta box) as shown in the below screenshot.
Screenshot 15: List of all reports. Click on Label/URL to expand/collapse
Individual reports can be expanded to view the summary of page speed scores, Yslow scores, load times, and other details, as shown in the above screenshot. Below the individual summary of the report, there are links to pages for scheduling future page load tests, viewing detailed reports, and even a link to download a PDF report.
For a detailed report, click on its link; it will take you to the GTmetrix web page, where you can view it in-depth. A sample report can be seen in below screenshot 15.
The detailed report is divided into different tabs. First, you will see your PageSpeed score, with different ranking items listed with their score.
Green items are good and don’t need your attention. Red items are slowing down your website and require further investigation.
Screenshot 16: PageSpeed score with different ranking items listed with their individual scores.
The best part is that when you click on the suggestions, it tells you exactly what needs to be fixed.
Step 7: Schedule Tests (Optional)
You can also schedule the page load tests to run hourly, daily, weekly, or monthly. By default, scheduled tests always use the Vancouver, Canada, test server region.
The test will automatically run at the frequency you choose. The admin will be notified when the test completes and one of the following conditions is met:
- Page Speed score is less than A, B, C, D, E, or F
- YSlow score is less than A, B, C, D, E, or F
- Page load time is greater than 1, 2, 3, 4, or 5 seconds
- Page size is greater than 100 KB, 200 KB, 300 KB, 400 KB, 500 KB, or 1MB
Screenshot 17: Choose a frequency to run the test automatically
Conclusion
In this tutorial, we saw how to install and use the GTmetrix plugin step by step. We also learned how to run and schedule page load tests to keep a check on your website's performance score.
The reports generated help you easily identify performance bottlenecks, such as large image sizes, excessive HTTP requests, slow server response times, and much more. With this crucial information, you can make the necessary changes to your website to optimize it, thus improving its loading speed.
That’s it for this tutorial. If you want your website to load blazing fast, connect with our Page Speed experts.
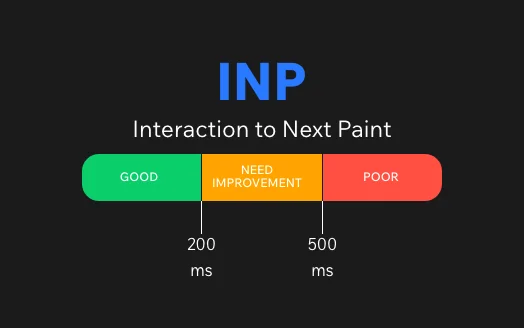
Tutorials
8 min read
How to optimize Interaction To Next Paint (INP) Core Web Vital in WordPress
Introduction
We all know how vital web performance is in today's digital world. Thanks to Google's Core Web Vitals, we know what to do to keep the performance of our website up! These metrics are designed to capture the most critical aspects of web performance that directly impact user satisfaction.
Google recently announced that Interaction to Next Paint (INP) will replace the First Input Delay (FID) as a core web vital starting in March 2024. Interaction to Next Paint is all about taking web experiences to the next level by optimizing user interaction and improving performance. In this blog post, we are going to cover everything about INP.
Importance of User Interaction
When we talk about websites, we're essentially discussing a digital space where users engage with content and perform actions. Simple activities include clicking a link, touching a mobile device button, or typing into a search field. User engagement makes a website live.
Imagine navigating the web without user interactions. It would be like reading a book where you can only view one page at a time, and you have to wait for someone to turn the page for you. The ability to interact with websites sets them apart from static documents. User interactions are the essence of the web, allowing us to explore, learn, shop, and communicate.
Whether you're booking a flight, scrolling through social media, or reading a news article, every action you take on a website is a form of interaction. These interactions drive the user experience and shape how we perceive a website's functionality.
Importance of Responsive Websites
Imagine clicking a "Buy Now" button on an e-commerce site and nothing happening for several seconds. Annoying, right? The latency between your activity and the website's response can make or break your experience.
However, responsive websites give instant feedback. After clicking that button, you expect the next page, the shopping basket, or confirmation of your activity. User happiness increases when websites respond quickly to user activities, creating a sense of seamlessness and control.
Slow-loading websites can make users confused, impatient, and even leave. Here comes Interaction to Next Paint (INP).
The Need for Interaction to Next Paint (INP)
As discussed earlier, as of March 2024, Google will switch from the FID to the INP metric as a Core Web Vital. INP will be used to measure the responsiveness of the webpage for the interactions by a user on a page. The lower the INP score, the higher the responsiveness of the webpage.
To put it in simple words, imagine you're eagerly waiting for a website to load, and you finally decide to click a button or link on the page. And guess what? Your action isn't instantly registered, leaving you hanging in the abyss of the digital universe.
Frustrating, right? That's where Interaction to Next Paint (INP) comes into play. INP measures the delay between your input and the page's response.
An example of poor versus good responsiveness (source: https://web.dev/inp/)
You must be wondering why Google is replacing FID with INP. While FID measures the delay between the user's first interaction with the page (such as clicking a button or a link) and the browser's response to that interaction, INP looks at the bigger picture and considers all the interactions from loading to exit.
This ensures a thorough evaluation of responsiveness throughout the entire lifecycle of a page. Google wants us to go beyond just measuring the first interaction and dive deeper into the complete user journey. With INP, you get a more comprehensive perspective on your page's responsiveness.
Factors that Affect INP Scores
INP measures how responsive a webpage is to user interactions, so it's critical to have a good score if you want to keep visitors on your site and boost your search engine ranking. Let’s take a look at factors that contribute to low INP scores.
1. Large and Complex JavaScript
If you have a lot of JavaScript on your site that takes a long time to load, it can cause significant delays when users try to interact with elements on the page. This can result in a poor user experience and decrease your score.
2. Heavy CSS Animations
Animations can make a website look more interesting, but they can also make pages take longer to load and lower the INP scores. To get better INP scores, you might want to make your animations simpler or get rid of some of them altogether.
3. Media Overload
If your site has a lot of images, videos, or other multimedia, it can bog down page speeds and cause delays. To combat this, try compressing images and using lazy loading to defer the loading of certain resources until they're needed.
4. Not Fixing Rendering Issues
If your site has trouble rendering and showing information, it could take longer for people to interact with the page. Make sure you test your pages carefully to find and fix any layout issues that might cause problems.
Effects of Low INP Scores on SEO
If your website's Interaction to Next Paint (INP) score is low, it can have negative effects on your SEO performance. Google considers page speed as one of the ranking factors, and a website's speed is directly correlated with its INP score. A low INP score can lead to decreased ranking, which ultimately results in decreased traffic.
Moreover, user experience is crucial for the success of any website. If your website is slow, visitors are likely to leave your site leading to a high bounce rate. This again negatively affects your website's ranking and traffic. In addition, a website with a poor user experience due to a low INP score is a sure way to drive away potential customers. Frustrated customers may never want to engage with your brand again, which can lead to a loss in revenue.
So, if you are serious about growing your business and improving your website's SEO performance, it is essential to pay attention to your page speed and INP score.
The importance of Monitoring INP Metrics continuously
It’s not enough to just improve INP scores; monitoring them is equally important. By regularly monitoring your INP scores, you can keep track of whether or not your improvements are working and continue to make necessary changes.
You can access Google’s official INP metrics to see how your website’s INP scores compare to others in your industry. With this information, you can set realistic goals and continuously work towards improving your website’s overall performance.
Advantages of INP
If you are still wondering why you should consider INP metric to measure your website’s performance score, take a look at its advantages:
Measures Complete User Interaction
Unlike FID, INP measures the input delay for all user interactions on a web page. This gives a more comprehensive picture of the website's responsiveness and performance.
Reliable Indicator of Page Responsiveness
INP not only measures the first input delay but also the delay in presenting subsequent frames and running event handlers. This makes it a more reliable indicator of page responsiveness than FID.
How to Measure INP
To understand how to measure INP, let us first understand what kind of user interactions INP focuses on.
- Mouse Clicks
- Touchscreen taps
- Key Presses
Every action taken by the user initiates a sequence of activities that result in a visual response on the page. This is known as ‘next paint’.
Knowing the definition and assessment procedure of INP is vital, but so is knowing what makes a good score and the consequences of a low result.
- Good: 200 ms or less is the optimum INP. This ensures that the visual reaction to user contact feels instantaneous, creating a seamless and gratifying user experience.
- Needs Improvement: An INP between 200 and 500 milliseconds suggests improvement. While not disastrous, these latencies may impair users' experiences.
- Poor: INP over 500 ms is poor. The latency between interaction and visual reaction may be visible and annoying for users.
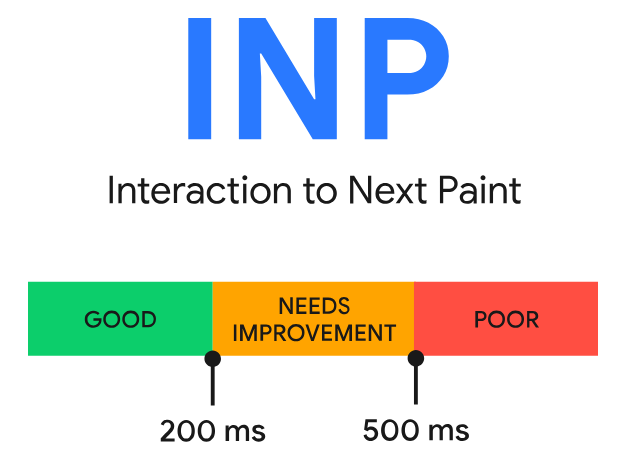
Thresholds for good and poor INP (source: web.dev/vitals)
Tools to Measure INP
You can use the following tools to measure the INP score as well as other Core Web Vitals:
PageSpeed Insights
You can measure the INP score on Google PageSpeed Insights. Just enter your site's URL and click on Analyze.
Under the Core Web Vitals Assessment section, you will see the newly added INP Core Web Vital (CWV).

Screenshot 1: Pagespeed Insights INP Core Web Vital
DebugBear
Enter the URL of your site on DebugBear and click on Start Test. Click on Web Vitals to view the details about core web vitals, including INP.
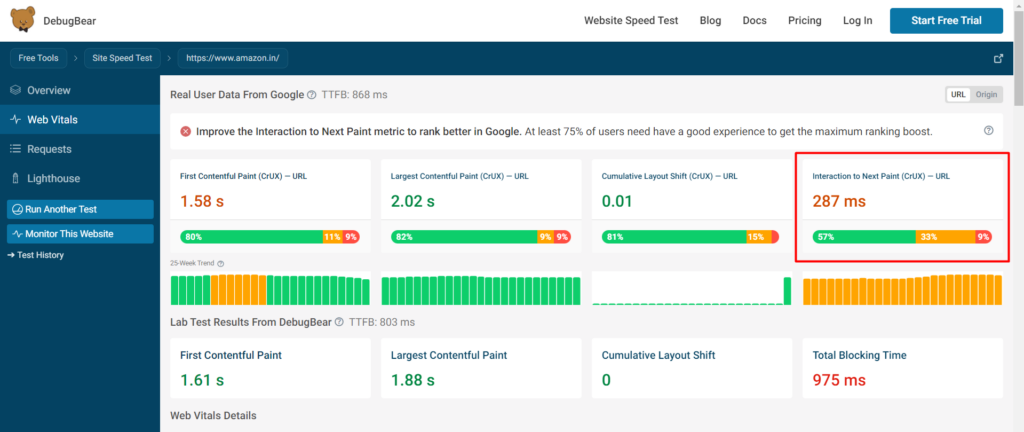
Screenshot 2: Debugbar INP Core Web Vital
How to Optimize INP
To improve your website’s INP scores, here are some ways to optimize it:
1. Minimize Input Delay
The first step to reducing input delay is to identify tasks that block the main thread. Optimize images and videos and defer non-critical JavaScript, which will speed up page loading time. Using a Content Delivery Network (CDN) to serve static assets can also help minimize input delay.
2. Reduce Process Time
Minimize the amount of time it takes for JavaScript to run. The main thread can be blocked by heavy JavaScript operations, delaying the response to user interaction.
3. Optimize Presentation Delay
Presentation delay can be optimized by reducing animations or queuing requests in the correct sequence. Compress photos, minimize CSS, and use contemporary image formats like WebP to reduce file size without compromising quality.
4. Breakup Long Task
Splitting Javascript tasks into several smaller tasks keeps the main thread free, thus reducing input delay.
5. Lightweight Event Handlers
If possible, keep the event handler code simple, as the computational load increases processing time and INP.
6. Web Workers
Using Web Workers, you can execute JavaScript on a different thread. Freeing up the main thread reduces processing time.
Conclusion
In conclusion, optimizing Interaction to Next Paint (INP) means making your website respond fast to user activities. Fast site speed makes users happy, and happy people are more likely to return.
Check your website's INP, implement techniques to improve its score, and monitor its performance. By doing that, you'll create a better experience for your visitors and set your website up for success in the online world.

WordPress
10 min read
Best Drag-and-Drop WordPress Page Builders in 2023
Introduction
Drag-and-drop page builders are becoming more and more important in the world of web design, which is always changing. With its easy-to-use interface, both experienced developers and complete newbies can make websites that look professional without having to write code by hand. In an era where online presence is paramount for businesses, personal brands, and virtually anyone looking to reach an audience, the ability to create an effective website is crucial. This blog explores the best drag-and-drop page builders for your WordPress website.Best Drag and Drop Page Builders of 2023
1. Elementor
 With its robust capabilities. flexible design options, and an easy-to-use interface, Elementor comes as a boon for both experienced and newbie web developers. Let's get to know more about Elementor.
Key Features
- Live Editing Interface: Elementor’s real-time design capabilities mean you can see changes as you make them, streamlining the design process and enhancing accuracy.
- Wide Range of Widgets and Templates: Elementor offers an extensive library of pre-made design elements and templates, allowing for quick yet customized builds.
- Responsive Design Controls: Create mobile-friendly designs effortlessly with specific controls for different devices.
- Integration with Popular Tools: Elementor integrates seamlessly with popular marketing and social media tools, enhancing its usability.
- Multilingual and RTL Support: Design websites in various languages with right-to-left text support, making it globally appealing.
Pricing
Check out the pricing plans for DiviBuilder here.Security and Reliability
When it comes to security, Elementor understands how important the safety and integrity of a website are to users. Using strict coding standards and best practices for web security, Elementor ensures that the user's website is safe and secure. And if you're the type who likes to add a little extra protection, Elementor plays nicely with a lot of the security plugins out there. So you can build up your site's defenses just how you like. Got a question or hit a snag? Elementor's support team has got your back. They've got loads of guides online, and there's a community of users who are always ready to lend a hand.Customization
Customization is where Elementor really feels like a playground for anyone wanting to create a unique website. Starting with the interface, it is a drag and drop thus allowing you to play with layouts, select colors, adjust fonts, and more. For those with more technical skills, Elementor opens up the possibility to explore custom CSS and JavaScript.In addition to these hands-on design features, Elementor also offers a rich library of pre-made templates. You can choose a template that closely matches your vision, and then tweak it to perfection.Flexibility
Imagine you're building a blog today, an online store tomorrow, and maybe even a portfolio site the week after that. This could mean learning three different methods with some tools, but not with Elementor. Elementor can be used for many different kinds of projects, irrespective of the requirements. Elementor's built-in features act like tools in a toolkit, and the third-party extensions act as specialty tools that can be added. There exists a vast ecosystem of modules and add-ons ready to extend Elementor's capabilities.SEO Impact
You don't just put together a website with Elementor; you craft it in a way that search engines can understand. This is essential because if search engines can readily read your website, they will be able to show it to more people. Elementor helps you build a search engine-friendly site.2. Divi Builder
 Divi Builder developed by Elegant Themes, is quickly becoming a favorite among WordPress users. Divi Builder has gained popularity due to its ease of use, vast customization, and varied design features it has. Let's dig in more:
Key Features
- Visual Builder Technology: Divi Builder offers a real-time design interface, allowing designers to see changes instantly without page refreshing.
- Modules and Layouts Library: A vast collection of customizable modules and layouts, catering to all design needs.
- Global Elements & Styles: Create global elements that can be used across the site, saving time and ensuring consistency.
- Split Testing: Test different design options to see what works best with built-in split testing tools.
Pricing
Check out the pricing plans for DiviBuilder here.Performance
Divi Builder is fast, which means you're not sitting around waiting for things to load. You can move things around, tweak them to your liking, and see the changes right away. Divi Builder's performance can vary depending on factors such as hosting, the complexity of your design, and the number of plugins you use.Security and Reliability
With frequent updates, Divi Builder maintains a secure platform. Moreover, Elegant Themes offers round-the-clock support, ensuring assistance when needed. Divi Builder provides an extensive library of tutorials and documents to help users navigate any challenges.Customization
Instead of abstract menus and settings, designers can click on any part of their website and modify it directly. Whether it's adjusting the typography of a headline, changing the color palette of a section, or adding interactive elements, Divi Builder lets users tinker and refine to their heart's content. While Divi Builder does come packed with a myriad of beautiful templates, each of them can be dissected, modified, and reassembled to create something entirely new.Flexibility
The digital world thrives on collaboration and interconnected tools, and Divi Builder embraces this wholeheartedly. By allowing and often facilitating integrations with a plethora of external tools, Divi Builder ensures that its users always have the right tool for the job, even if it's not native to the platform.SEO Impact
The very foundation of Divi Builder is built upon SEO-friendly principles. The generated markup is clean and streamlined, adhering to modern web standards. This clean code ensures that search engine bots can easily crawl and index the content. When these bots can efficiently understand the structure and content of a site, it naturally leads to better rankings on search engine results pages.3. Beaver Builder
 Beaver Builder has made a name for itself in the WordPress community as one of the best drag-and-drop page makers. It makes it easy for both new and experienced developers to create sites that look like professionals made them. Here's a more detailed look:
Key Features
- Live Front-End Editing: See changes as you make them with the real-time design interface.
- Module Variety: Various content modules like photos, text, and even maps can be dragged and dropped with ease.
- Page Templates: Access to pre-made layouts that help to quickly start the design process.
- White Labeling: Ideal for agencies, it allows you to replace the Beaver Builder name with your branding.
Performance
Professionals who value efficiency above all else will find Beaver Builder to be an excellent option because of its fast loading times, excellent responsiveness, and user-friendly interface for designing websites.Security and Reliability
Beaver Builder prioritizes data and browsing session security. Regular security audits find and resolve issues quickly. Open communication with the WordPress community has enhanced Beaver Builder's security posture. Feedback is quickly integrated, and concerns are addressed promptly. It is also known for its responsive support team that’s there to help with any issues. Beaver Builder's commitment to regular updates ensures compatibility with evolving web technologies and changing WordPress frameworks.Customization
From typography to column configurations, precise adjustments are feasible, ensuring a customized design outcome. Those who desire further customization and functionality modifications can use their own custom CSS and JavaScript in Beaver Builder. It enables the saving and reusing of design elements across multiple pages or websites, thereby promoting consistency and efficiency.Flexibility
Beaver Builder is always compatible with the latest WordPress releases and integrates well with various plugins. This ensures that users can blend multiple tools without compatibility concerns. The drag-and-drop mechanics appeal to beginners, while experienced coders are able to embed custom code. Global settings provide design uniformity and help users create site-wide design rules. SEO Impact Beaver Builder effortlessly collaborates with top-tier SEO plugins like Yoast SEO, enabling users to finely tune their SEO efforts without hitches. A crucial yet sometimes overlooked SEO factor is site speed. Beaver Builder's lightweight design ensures faster loading times, crucial for both user satisfaction and SEO optimization. A very important feature is that it offers clean code—essential for making sure search engines can efficiently crawl and index content, which, in turn, boosts website rankings.4. Visual Composer
 Visual Composer is a website builder with backend and front-end editing capabilities. Of course, like other page builders, this one also helps non-technical people to easily build websites.
While there are many excellent page builders out there, Visual Composer stands out due to its comprehensive features, dual editing modes, and extensibility. It's both beginner-friendly and robust enough for seasoned developers, making it a versatile choice for a wide range of WordPress users.
Visual Composer is a website builder with backend and front-end editing capabilities. Of course, like other page builders, this one also helps non-technical people to easily build websites.
While there are many excellent page builders out there, Visual Composer stands out due to its comprehensive features, dual editing modes, and extensibility. It's both beginner-friendly and robust enough for seasoned developers, making it a versatile choice for a wide range of WordPress users.
Key Features
- Dual Editing Modes: Offers frontend and backend editing capabilities.
- Wide Range of Elements: Basic to advanced elements, including post grids, slideshows, and interactive features.
- Templates: Comes with a variety of pre-designed templates to fast-track the design process.
- Extension Ecosystem: Supports a range of third-party extensions to extend its functionality.
- Integration Capabilities: Seamlessly integrates with many other WordPress plugins.
- Cloud Marketplace: This is a premium feature by Visual Composer which is an in-app marketplace for you to buy elements, extensions, and templates. This feature lets you build your website from the cloud.
- Unsplash Stock Images: Adding images to your website is made easy by this premium feature. From the Visual Composer Hub, you can get high-quality stock photos from Unsplash and add them to your site.
Pricing
You can check out the pricing plans for Visual Composer here.Performance
Websites created with Visual Composer generally maintain good loading times, but this also depends on other factors like hosting, image optimization, and overall website content. Visual Composer has clean code and is as optimized as possible. Still, like any tool, its performance can be impacted by how it's used. Overstuffing a page with too many elements or animations can naturally slow it down. Additionally, the plugin works with popular caching and optimization plugins. This collaboration allows for better loading times and performance with the appropriate setup.Security and Reliability
The Visual Composer is updated regularly to add new features, fix bugs if any, and also to add security patches. Thus, the tool wants to stay one step ahead of any possible threats. Visual Composer is known for its stability and reliability, even with WordPress updates. The Visual Composer staff provides excellent service. An active support system fixes difficulties and functions as a feedback loop to improve the tool based on user demands.Customization
A large library of elements and widgets of Visual Composer allows you to choose from simple text blocks to advanced sliders and social media feeds. This wide range lets you add functionality to your requirements without third-party plugins. When it comes to brand consistency or saving time, the templating features of Visual Composer are incredible. Design a layout, save it as a template, and use it on other pages or websites. This streamlines workflow and guarantees consistency without duplication.Flexibility
Visual Composer is flexible enough to accommodate a variety of project types ranging from blogs, e-commerce websites, or even portfolio websites. This page builder not only offers a service, but a solution to your requirements. It easily integrates with the third-party plugins you require for your website without any hassle. You can customize designs with custom CSS, HTML, or JavaScript. Developers who are willing to push the tool's limits in designing can benefit greatly from this freedom.SEO Impact
Visual Composer uses SEO-friendly HTML markup, which is the basis for any search-optimized site. A good HTML structure helps search engines read your content, and this tool does that. Headings, meta descriptions, and picture alt texts are integrated characteristics that promote rankings. Since Visual Composer is flexible enough, it is easy to integrate SEO plugins, thus further helping in boosting your site’s visibility. The builder doesn’t add unnecessary bulk to your web pages, making sure they load quickly, thereby bettering your SEO score.Conclusion
We examined 2023's most powerful and versatile drag-and-drop page builders for WordPress: Elementor, Divi Builder, Beaver Builder, and Visual Composer. Each has unique strengths and features that make it suited for various projects. The right page builder depends on performance, customization, adaptability, security, and SEO. A bad page builder can slow down your website, complicate design, and cause security problems. However, a good one may make your website quick, safe, and easy to use, improving user experience and SEO ranking. We hope our blog post will help you choose the right page builder according to your needs. If you are looking to build your website, look no further and connect with our WordPress experts.
Plugins
8 min read
Best WordPress Migration Plugins of 2023
Introduction
Website migration is essential for anyone who owns a website. It's like moving your entire digital identity from one place to another. Website migration is the bridge that lets you switch hosting providers, migrate from a development or staging environment to a live server, or revamp your site with a new name. Databases, themes, plugins, hundreds of files, and content elements are interconnected; therefore, one must migrate them without losing data or functionality. Manually doing this is time-consuming and risky. With the right WordPress plugins, migrating the website becomes easy. But how do you choose the right plugin? Worry not; read on to learn about the best plugins for migrating your website.Criteria for Choosing the Best Migration Plugin
Reliability and Accuracy of Data Transfer
When migrating your WordPress website, data integrity is critical. Choose a migration plugin with a track record of reliable and accurate data transfer. This implies that it must move all of your content without errors or omissions, including posts, pages, photos, databases, and configurations. A good plugin will ensure that the structure and content of your website remain intact during and after migration, preventing data loss or corruption.Ease of Use
Not everyone is a tech specialist, and an overly difficult migration can prove to be a nightmare. Choose a migration plugin with an easy-to-use interface and clear, step-by-step instructions. It should be simple enough for beginners to use while still providing extensive options for advanced users. A plugin with an easy-to-use interface can save you time and lessen the likelihood of costly mistakes during migration.Support for Different Migration Scenarios
Websites come in all forms and sizes, and your migration requirements may differ from those of others. Ensure that the plugin you select supports various migration scenarios. This covers both the standard single-site to single-site migration as well as more complex migrations, including going from a multisite network to a single site. The ability to handle a variety of scenarios provides you with flexibility and ensures that the plugin can adapt to your individual needs.Speed and Efficiency of the Migration Process
When it comes to website migration, time is of the importance. The migration plugin should be effective and quick in its process. Slow migrations might cause downtime and provide your visitors with a poor user experience. Look for a plugin that optimizes the migration process, reducing the amount of time required to accomplish the move.Compatibility with Different Hosting Environments
WordPress websites use many hosting providers and environments. Your migration plugin should work with shared, VPS, and dedicated servers. It should connect easily with your hosting environment, regardless of technical specifications, permitting a smooth migration regardless of hosting provider.Additional Features and Customization Options
While a migration plugin's main function is to migrate your website, extra features can be helpful. You can move or omit specific items with plugins that allow customization. Some plugins offer URL redirection, backups, and testing staging environments. These added features can improve migration and your WordPress management toolkit.Best Migration Plugins of 2023
Let’s take a look at the best migration plugins of 2023.1. WP Migrate DB
 WP Migrate DB is primarily focused on database migration. It plays a crucial role in ensuring that your site's data is transferred accurately and efficiently during a migration.
Features:
WP Migrate DB is primarily focused on database migration. It plays a crucial role in ensuring that your site's data is transferred accurately and efficiently during a migration.
Features:
- WP Migrate DB focuses on WordPress database migration, including posts, pages, comments, custom post types, settings, etc.
- WP Migrate DB's "Find and Replace" feature is unique. This functionality searches your database for particular strings or URLs and replaces them. This helps with migrating domain names, directory structures, and other site-specific information.
- WP Migrate DB intelligently handles serialized data, ensuring that it remains consistent and functional after migration.
- You can use WP Migrate DB to export your database as an SQL file, which can then be quickly imported into the database of the new site. This strategy ensures data consistency and minimal data loss during migration.
- WP Migrate DB integrates with WP-CLI for advanced users and developers who prefer command-line interfaces. More automatic and scriptable migrations make it a flexible tool for varied use cases.
2. All-in-One WP Migration
 All-in-One WP Migration is famous among WordPress users for its simplicity and reliability. Its simplicity makes it a favorite among beginners and experts. The plugin's simple UI lets you migrate a website in a few clicks. Despite your lack of website development experience, the simple layout makes transfer easy.
Features:
All-in-One WP Migration is famous among WordPress users for its simplicity and reliability. Its simplicity makes it a favorite among beginners and experts. The plugin's simple UI lets you migrate a website in a few clicks. Despite your lack of website development experience, the simple layout makes transfer easy.
Features:
- The plugin, as the name suggests, offers a single-click migration.
- All-in-One WP migrations can handle PHP memory constraints better than other migrating plugins.
- The plugin handles large websites well, making it suited for content-heavy platforms.
- It works with many hosting providers and environments, making it a versatile WordPress plugin.
3. UpDraftPlus
 You can duplicate or clone your current website using UpdraftPlus. When switching to a new host or domain, this feature is really helpful. You can make an exact duplicate of your website using the clone tool without having any impact on the live site. This guarantees that there won't be any downtime or disruptions for your visitors while the migration is taking place.
It's essential to have a reliable way to recover your website during migration in case something goes wrong. UpdraftPlus is excellent at this. With only a few clicks, you can quickly restore your website from a backup. This implies that you can quickly return to a prior state during migration if anything doesn't go as planned without losing data or jeopardizing the integrity of your site.
Features:
You can duplicate or clone your current website using UpdraftPlus. When switching to a new host or domain, this feature is really helpful. You can make an exact duplicate of your website using the clone tool without having any impact on the live site. This guarantees that there won't be any downtime or disruptions for your visitors while the migration is taking place.
It's essential to have a reliable way to recover your website during migration in case something goes wrong. UpdraftPlus is excellent at this. With only a few clicks, you can quickly restore your website from a backup. This implies that you can quickly return to a prior state during migration if anything doesn't go as planned without losing data or jeopardizing the integrity of your site.
Features:
- Easy cloning and restoration of the website
- Compatibility with various hosting environments
- The plugin offers remote storage options such as Google Drive, Dropbox, Amazon S3, and many more
4. Migrate Guru
 Migrate Guru stands out for its amazing speed and efficiency, especially when it comes to large-scale migrations. Migrate Guru has been designed to easily manage a multisite network with several sub-sites, an e-commerce site with thousands of products, or a blog with a lot of content.
Migrate Guru does not export your site to a file and import it on the new server. It uses a real-time transfer method to transport website data from your old server to the new one without making backup files. This direct transfer approach cuts migration time dramatically.
Features:
Migrate Guru stands out for its amazing speed and efficiency, especially when it comes to large-scale migrations. Migrate Guru has been designed to easily manage a multisite network with several sub-sites, an e-commerce site with thousands of products, or a blog with a lot of content.
Migrate Guru does not export your site to a file and import it on the new server. It uses a real-time transfer method to transport website data from your old server to the new one without making backup files. This direct transfer approach cuts migration time dramatically.
Features:
- This plugin is 80% faster, meaning you can clone 1GB of site in less than 30 minutes.
- The migration process takes place on Migrate Guru’s server, so there is no overload on the website
- Since the cloned copy of your site is on Migrate Guru’s server, no storage space is required. After the migration is completed, the copy is erased.
- Moving multiple sites or sites with serialized data doesn't require add-ons.
5. BlogVault
 Though it is known for its backup abilities, BlogVault is also renowned for migrating websites easily and efficiently. BlogVault makes migrating your WordPress website to a new host, domain, or server easy in a few minutes.
Features:
Though it is known for its backup abilities, BlogVault is also renowned for migrating websites easily and efficiently. BlogVault makes migrating your WordPress website to a new host, domain, or server easy in a few minutes.
Features:
- BlogVault has zero migration downtime, meaning your website is accessible and functional to users during migration.
- Migration is streamlined by automating file transfers and database exports. It handles everything from backing up to restoring your site on the new server or host.
- BlogVault uses incremental backups for migration efficiency. After the first backup, only website modifications are stored. This decreases the backup size and speeds migration, making it suitable for large websites with heavy content.
- BlogVault offers staging environments for testing migrated websites before going live.
- It provides real-time monitoring and notifications during migration.
6. Duplicator
 Duplicator's ability to efficiently clone and migrate WordPress websites makes it a top contender among migration plugins. Let’s see why Duplicator remains among the best migration plugins.
Features:
Duplicator's ability to efficiently clone and migrate WordPress websites makes it a top contender among migration plugins. Let’s see why Duplicator remains among the best migration plugins.
Features:
- Migration using Duplicator is reliable as it creates small packages of files, databases, themes, plugins, and settings during migration. This not only simplifies the migration process but also ensures that nothing is left behind.
- Its interface walks you through the migration process step by step, thus making it suitable for everyone.
- Duplicator automates database configuration during deployment, ensuring that your website functions correctly on the new server.
7. WPVivid
 WPVivid offers a comprehensive set of features designed to simplify website migration while maintaining data integrity. It offers an easy user interface, making it usable for people with non-tech experience.
Features:
WPVivid offers a comprehensive set of features designed to simplify website migration while maintaining data integrity. It offers an easy user interface, making it usable for people with non-tech experience.
Features:
- It comes with a simple migration procedure that saves developers time when building WP sites and migrating them from dev whether local or remote, to live or new web hosting.
- The snapshot feature is built into the plugin, so even if the restoration fails for some reason, your current site won't be affected.
- It is important for WordPress transfers to replace site URLs in a safe way. The plugin has been tested a lot and works with most of the best page builders and themes out there.
- WordPress migration is easier with separate export and import operations. Websites can be exported to a web server, external storage, or target site (auto migration). Restore the site by importing from places.
Conclusion
We discussed the top WordPress migration plugins. Each plugin has its own benefits, including user-friendly interfaces, rapid cloning, extensive capabilities, versatility, and simplicity. Your plugin choice depends on your website's complexity and migration experience. We hope that this blog has helped you choose the right migration plugin for your needs.Uncategorized
0 min read
Vavada Casino
Как отыграть вейджер вавада
Сосредоточьтесь на слотах: Играйте в автоматы с высоким процентом возврата. Это увеличит шансы на выполнение условий. Ищите игры с RTP выше 95%.
Установите лимиты: Решите, сколько готовы потратить. Тщательно контролируйте банкролл, чтобы не выйти за пределы выделенного бюджета.
Промоакции: Используйте бонусы и акции. Они предоставляют дополнительные средства и увеличивают шансы на успех. Не забывайте проверять раздел с предложениями.
Чтение правил: Ознакомьтесь с условиями бонусов. Это поможет избежать недоразумений и неудач при попытке выполнить требования.
Отслеживание прогресса: Записывайте результаты и наблюдайте за достижениями. Понимание своего прогресса позволяет корректировать стратегию.
Играйте на небольших ставках: Начните с минимальных ставок, увеличивая их по мере уверенности. Это позволяет дольше оставаться в игре и повышает шансы на удачу.
Остановитесь вовремя: Если удача на вашей стороне, не злоупотребляйте. Если же не везет, сделайте перерыв. Это поможет избежать эмоциональных решений.
Выбор игровых автоматов с наилучшими условиями для отыгрыша
Сосредоточьтесь на слотах с высоким процентом возврата игроку (RTP). Ищите аппараты с RTP в диапазоне 95% и выше. Это значит, что они потенциально вернут больше средств в долгосрочной перспективе.
Обратите внимание на дисперсию. Низкие и средние дисперсионные слоты обеспечивают частые, но небольшие выигрыши, которые могут помочь поддерживать баланс, тогда как высокодисперсионные аппараты могут приносить редкие, но крупные призы. Выберите вариант, который соответствует вашим стратегиям.
Не забывайте изучать бонусные функции. Слоты с фриспинами, умножителями или дополнительными уровнями дают возможность увеличить прибыль без дополнительных затрат. Это может значительно упростить выполнение требований по ставкам.
Проверяйте акции и бонусы. Некоторые автоматы могут быть включены в специальные предложения, которые увеличивают шанс на выигрыш. Ищите бонусные коды или программы лояльности, чтобы извлечь максимум из игры.
Стратегии управления банкроллом во время выполнения условий вейджера
Используй систему ставок, основанную на заранее установленном лимите, чтобы избежать потерь. Определись с максимальной суммой, которую можешь позволить себе затрат в игре. Это позволит контролировать свои траты и уменьшить риск внезапных убытков.
Обрати внимание на соотношение между ставками и размером банкрола. Ставь не более 1-2% от общего капитала на каждую игру. Маленькие ставки снизят вероятность быстрого истощения средств и дадут время на выполнение условий.
Устанавливай временные рамки. Определи, сколько времени ты собираешься тратить на игру каждый день. Четкое ограничение во времени также помогает избежать импульсивных решений и дает возможность более внимательно следить за ставками.
Регулярно анализируй свои выигрыши и потери. Веди записи, чтобы понимать, какие стратегии сработали, а какие нет. Это поможет адаптировать свои действия и улучшить результаты в будущем.
Если столкнулся с чередой неудач, пересмотри свою стратегию. Не стоит пытаться отыграться с помощью крупных ставок; это только увеличит риски. Уменьши сумму ставок или сделай паузу. Правильный подход к управлению капиталом снижает давление и способствует лучшим решениям.
Частые ошибки игроков при отыгрыше вейджера и как их избежать
Не уделяйте внимание только высоким ставкам. Часто игроки считают, что чем больше ставка, тем быстрее они достигнут результата. На деле лучше ставить разумные суммы, которые позволят дольше оставаться в игре и увеличить шансы на успех.
Пренебрежение правилами игры – ещё одна распространенная ошибка. Каждая азартная игра имеет свои особенности, которые могут значительно повлиять на выигрыш. Изучите правила, механизмы и возможные стратегии, а не полагайтесь на удачу с первых минут.
Не забывайте о времени. Установка лимитов по времени поможет избежать затягивания в игру. Если вы понимаете, что время пролетело незаметно, сделайте паузу и отдохните. Это поможет сохранить концентрацию и трезвый ум.
Игнорирование бонусов и акций – это ошибка, которая может стоить вам значительных выигрышей. Информация о вавада бездепозитные бонусы может быть весьма полезной, поэтому не упускайте возможность воспользоваться выгодными предложениями.
Не стоит подъём тоже в эмоциональном состоянии. Если игра не идет или начались проигрыши, стоит остановиться. Играйте только тогда, когда чувствуете себя уверенно и у вас хорошее настроение.
Отказ от контроля на счёте – это риск. Следите за своими финансами и ставками, устанавливайте лимиты и придерживайтесь их. Это поможет избежать ненужных трат и сохранить баланс.

WordPress
9 min read
WordPress 6.3: Exploring the Exciting Features and Enhancements
Introduction
WordPress 6.3 “Lionel” roared its way into the WordPress ecosystem on August 8, 2023. This major release includes many new upgrades that make creating and managing content all the more exciting. Among the features that come with WordPress 6.3, the Site Editor is perhaps the most notable addition, allowing users to handle everything from content to templates in one place. Block themes also enable users to preview new designs and customize them with greater ease. With the Command Palette, users can access expanded functionality with just a few keyboard strokes. At the same time, improved style revisions and annotations, as well as faster performance and improved accessibility, all make it even easier to manage and create content online.
Exploring WordPress 6.3
Here is a quick video exploring the new features of WordPress 6.3.1. Block Pattern System Changes

Screenshot 1: Pattern Tab
The Block Pattern System update in WordPress 6.3 has unlocked a new level of customization for pro-level editing. With new improvements and additions, it's now easier to create custom block patterns and apply them instantly to your content.
Screenshot 2: Comparison of Block Editor in WordPress 6.3 and 6.2
- Synced patterns, previously known as Reusable Blocks, are groups of blocks that can be saved and applied instantly without having to add the blocks repeatedly. Moreover, changes made to a synced pattern will apply globally on the website. Synced patterns can be used for elements like headers, footers, or sidebars that appear across the website.
- Non-Synced Patterns, previously known as Regular Block Patterns, allow you to customize. Any changes made to a non-synced pattern will only affect that particular pattern and not other places where it's used. Non-Synced Patterns can be used for page or post-specific content.
- The wp_block custom post type has been extended to support custom fields.
- The wp_block_sync_status field has been added to store the sync status of a pattern. This field indicates whether a synced pattern has been updated or not and whether those changes are reflected throughout your website.
- The block pattern design now has a source property to tell the difference between core patterns and user patterns.
- The REST API has been extended with a new endpoint for global styles revisions and it can be accessed at /wp/v2/global-styles/revisions.
2. New Gutenberg Blocks
WordPress 6.3 has added two new blocks, Detail and Footnotes.
Detail Block
The addition of the Detail Block allows you to hide content until the reader is ready to see it. You can now add extra information without cluttering your main text. With just a click, readers can reveal hidden information like event details, fine print notices, or even spoilers. It's like a secret hideout for your content!
Screenshot 3: Add the Details block while creating the post

Screenshot 4: Details block hiding the content

Screenshot 5: Details Block showing the content when expanded
With the addition of this feature, you now have two separate elements: a summary and hidden content. By default, the content is hidden, but readers can easily expand it by clicking on the drop-down arrow.Footnotes Block
Managing long texts is now easy with the Footnotes Block. With this new block, it's as easy as a couple of clicks. Just place your cursor where you want to add the link, click on the Footnote button, and done! A footnote appears at the bottom of the page. The Footnotes Block automatically adds, removes, and reorders footnotes as you edit your text. With this addition, you can effortlessly add context, source your work, or provide references right within your content.
Screenshot 6: Addition of Footnotes Block

Screenshot 7: Display of Footnotes Block
3. Block Improvements
WordPress 6.3 has made some improvements to the existing Gutenberg blocks. Let's take a look at them. With the Cover Block enhancements, you can have more control over the layout of your cover. Various layout options, design options (text colour), and border options have made this block more useful and handy. The Duotone filter has surprised WordPress users with its improved functionality. You can set a global duotone filter from the Style panel of the Site Editor. It is no longer required to navigate theme.json for the Duotone filter application. And don't even think about using colour values for duotone. WordPress 6.3 raises the bar by employing colour prefixes instead.
Screenshot 8: Duotone Filter
There are many other additional block improvements, a few of which are listed below:- The Button block now supports border color, style, and width.
- The Post Excerpt block now allows you to control the length of the excerpt
- For the Post Featured Image block, you can now adjust the aspect ratio.
- The Global Styles interface now includes controls for color and typography for the Caption element.
- A new variation has been added to the Post Date block - the Post Modified Date variation. This is particularly useful if you frequently update your posts and want to showcase when they were last modified.
4. Addition of the Command Palette
WordPress 6.3 introduces a new feature called the Command Palette, which has everyone buzzing with excitement.
Screenshot 9: Command Palette
The Command Palette streamlines several tasks for developers and site managers. With this feature, you can quickly access tasks like resetting or deleting a template or a template part. You can also register your custom commands and even view design options for specific posts or pages. The Command Palette can also be used for core commands such as navigating the site editor, toggling UI elements, and creating new pages and posts. Using the Command Palette is easy, too. All you have to do is press the keyboard shortcut Command+Shift+P on macOS or Ctrl+Shift+P on Windows to open it. You can then start typing in the command you need, and the Command Palette will automatically suggest possible commands. Different commands are available depending on your needs. The command list includes dynamic results based on the user's query in the command palette input field, and a few commands are only available under certain conditions. When changing a template, contextual commands take precedence and show automatically. Developers can register custom static commands using wp.data.dispatch(wp.commands.store).registerCommand or wp.data.useCommand React hook. It also offers an API. Here is an introductory article about the command pallet API. In short, the Command Palette has undoubtedly eased the work of developers and site managers. Its easy design and ease of usage will make it a staple feature in future versions.5. Enhancements in Site Editor
The Site Editor now has a more intuitive interface, making it easier to navigate. A few other changes include:Enhanced Navigation
A fresh, clean interface that organizes everything improves navigation. Navigation, Styles, Pages, Templates, and Patterns are all in one place, making them easy to find. It's ideal for finding a page or template part and making quick modifications. You may now reach any WordPress page in the navigation menu with a few clicks without reading through interminable lists. The Command Palette holds all your favorite WordPress tools, ready to use! You can find the item you want instantly using the new search button. The search button includes Template Parts, providing you with additional content and design versatility.Improved Pattern Management
The Site Editor navigation has now been updated to include patterns as one of the main navigation items. You can see all your reusable blocks in the “My Patterns tab” by clicking on the Patterns icon.
Screenshot 10: Pattern Management
Creating a new pattern or template part is just as easy as selecting the add (+) button. At the bottom of the navigation column, you will find links to manage all your patterns and template parts. With this feature, you can easily locate, edit, and create new patterns or templates to enhance your website navigation and overall design.Style Revisions
The Site Editor now provides revision history so you can browse and restore changes. This panel lists timeline revisions. It additionally tooltips each revision's author, date, and time. You may preview, restore, and navigate revisions in Global Styles at any time.Additional Improvements and Features
A new theme_preview parameter in WordPress 6.3 lets the Site Editor preview every block theme before activation. This update also improves the editor's loading state to prevent user interaction before loading. The WordPress 6.3 site editor has a distraction-free mode. This functionality has been in the post editor since WordPress 6.2. Distraction-free mode removes sidebars and toolbars, allowing you to focus only on editing.6. Changes and Performance Enhancements for Developers
WordPress 6.3 brings a wave of performance boosts and developer updates that will leave you in awe. The client-side performance has seen a remarkable 40% improvement for block themes and 31% for classic themes. On the server side, optimizations have made server response times 19% faster for block themes. And let's not forget the database performance improvements. Lazy-loading metadata and caching query results have made WordPress 6.3 more efficient than ever. But that's not all; there are exciting developer updates too! Script-loading strategies, lazy-loading images, low-level logic optimizations, and much more Among the numerous additions, we enlisted the following:- Image performance enhancements to improve page load speeds
- Improved emoji loader to reduce the time spent loading the emoji script. (#58472)
- Defer and async support added to the WP Scripts API. (#12009)
- Fetch priority support was added for images. (#58235)
- Skipping lazy loading for images outside the loop in classic themes. (#58211)
- Attempt rollback for failed plugin and theme updates. (#51857)
- Merge get_posts() and get_pages(). (#12821)
- Dropping Support for PHP 5
- Command Palette API
- Caching Improvements
7. External Library Updates
External library updates are an important feature of WordPress that take care of certain of your website's functionalities. These updates ensure that your site utilizes the most recent software available, with models regularly updated, and these upgrades may include new features, patches, or bug fixes. The WordPress 6.3 update includes modifications to various external libraries, which ensure that your website runs more efficiently and securely. Some of the updates are mentioned below:- PHPMailer is being updated to v6.8.0 (#57873)
- Requests library is being updated to v2.0.6 (#58079)
- jQuery is being updated to v3.7.0 (#58083)
- Sodium Compat is being updated v1.20.0 (#58224)
- jQuery Migrate is being updated to v3.4.1 (#58451)
- npm packages are being updated to the latest version (#58623)
8. Improvements in Accessibility
Accessibility Enhancements in WordPress 6.3 make it easier for users with assistive technologies to navigate, thanks to features like tab and arrow-key navigation and revised heading hierarchy. The new controls in the admin image editor ensure a better experience for users with disabilities. Here are a few major improvements in accessibility:- Improve accessibility of custom field UI
- Improved labeling, description, and focus style of block transform to pattern previews
- Fixed constrained tabbing failures with Safari and Firefox
- Fixed URL Input combobox to use the ARIA 1.0 pattern
- Fixed accessibility of the classic block modal dialog
- Improved Navigable Toolbar
- Multiple Tooltips from Focus Toolbar Shortcut on Widget Editor
- Support for aria content attributes in formatting
- Snackbar now has improved color contrast on hover for better readability
- Keyboard navigation has been enhanced for specific input types in the Writing Flow
- More details about the Accessibility Improvements in WordPress 6.3 can be found here.

WordPress
12 min read
The Ultimate Guide for WordPress Website Maintenance
Introduction
Developing a WordPress website is not the end of the task. Maintaining the developed site is crucial as it enhances the website's performance, ensures website security, maintains SEO rankings, and much more. A maintained website is a healthy website! In this blog post, you will get to know how to maintain your website and, at the same time, why you should do it.Crucial WordPress maintenance tasks to perform regularly
The following points describe each task in detail that is to be performed to maintain a website:1. Regular Backups
Whether your WordPress website is a small blog or a large eCommerce site, having a backup is essential. A backup is a saved copy of your website's data, including all the files and database. With regular backups, you can restore your site quickly if anything goes wrong.Importance of backing up your website
Backups are like insurance for your website. Here's why they are crucial:- Protection Against Data Loss: From server crashes to hacking attempts to simple human errors, various events can lead to data loss. Regular backups ensure that you can restore all your data, minimizing the impact of these events.
- Ease of Recovery: Backups allow you to recover quickly from any problem, whether it's a simple issue like a deleted post or a major one like a site crash. With a recent backup, you can get your website back to normal in no time.
- Protection Against Updates: Sometimes, updates to WordPress, themes, or plugins can lead to conflicts or errors. Having a backup means you can revert your website to its previous state if needed.
Tools and Plugins for Backups
There are several tools and plugins available that make backing up your WordPress website straightforward and convenient. Refer to our article about the best backup and restore plugins to know which backup plugin to choose for your website.Recommended Backup Frequency
The frequency of backups should align with how often you update your website. If you post daily, you should backup daily. If you update weekly, a weekly backup should suffice. However, for critical websites like eCommerce sites, where transactions occur continuously, real-time backups are recommended. Moreover, it's crucial to store your backups in multiple locations. For example, you could keep one copy on your local system and another in cloud storage. This redundancy adds an extra layer of protection.2. WordPress Updates
Developers frequently issue updates to the WordPress core, themes, and plugins. Updates like this are essential to keeping your website running smoothly and securely since they solve bugs, boost performance, and address security concerns. The importance of keeping your WordPress ecosystem updated cannot be overstated:- Security: Each new update patches vulnerabilities that could potentially be exploited by hackers. With roughly 90% of WordPress vulnerabilities attributed to plugins and themes, keeping them updated is crucial.
- Bug Fixes: Updates often fix bugs or glitches in previous versions, improving your site's performance and stability.
- New Features: Updates usually come with new features or enhancements that can boost your site's functionality and user experience.
- Compatibility: Updates ensure that the WordPress core, your themes, and plugins all work harmoniously together. This compatibility is key to preventing errors and site crashes.
Safely Updating WordPress, Themes and Plugins
While updates are essential, they should be performed correctly to avoid potential conflicts or issues:- Backup Your Website: Before updating anything, ensure you have a recent backup of your site. This gives you a safety net to revert to if something goes wrong.
- Update in Stages: Begin with updating your plugins, followed by your themes, and finally the WordPress core. This order helps avoid compatibility issues.
- Read the Changelog: Before updating, check the changelog for any significant changes that might affect your site.
Importance of Staging Environment while Updating
A staging environment is a clone of your live website where you can test updates without affecting your live site. This can be crucial for preventing update-induced issues on your website:- Test Compatibility: You can test updates in the staging environment to ensure they don't conflict with other elements of your site.
- Debugging: If there are issues post-update, you can identify and resolve them in the staging environment without affecting your live site.
- Experiment Without Fear: In a staging environment, you can freely explore and understand updates without the fear of breaking your site.
Frequency of Updates
The frequency of WordPress updates largely depends on when the updates are released by the WordPress team or the creators of the plugins and themes. WordPress Core Updates: Major WordPress core updates are typically released every few months. It's recommended to apply these updates soon after they are released, as they often include important features, enhancements, and security patches. Theme and Plugin Updates: These can happen more frequently, depending on the developers. It's also recommended to apply these updates soon after their release, as they can include security fixes and new features.3. Security Checks
A security check is like a health check-up for your website. It helps identify potential vulnerabilities, malware, and signs of unauthorized access or tampering. By regularly performing security checks, you can take prompt action to mitigate threats and protect your website. Regular security scans offer several advantages:- Identifying Vulnerabilities: Regular scans can detect security vulnerabilities before they are exploited, allowing you to fix them proactively.
- Detecting Malware: Scans can identify hidden malware that could be siphoning off your data or disrupting your site.
- Maintaining User Trust: By ensuring your site is secure, you can maintain the trust of your users and protect their data.
Plugins for Security Check
Security checks can be easily done by certain plugins. Yes, it is that easy! Refer to our article on the best WordPress Security Plugins to understand how to choose the best security plugins for your website.Understanding and Managing Security Reports
The results of security scans are often documented in reports generated by security software. Data on vulnerabilities, viruses, and suspicious activity may be included in these reports. Understanding these reports is crucial for taking appropriate action. It's advisable to familiarize yourself with the terminology and formats used in these reports and consult an expert if needed.What to do when a security issue is Detected
If your security scans detect an issue, take the following steps:- Verify the Issue: False positives can occur. Verify the issue independently or consult an expert.
- Isolate the Affected Component: If possible, isolate the affected part of your site to prevent the issue from spreading.
- Resolve the Issue: Use the security tool’s remediation suggestions, or work with a security expert to resolve the issue.
- Update and Strengthen Security: Update your WordPress core, themes, and plugins, and strengthen your security measures to prevent future issues.
Frequency of Security Checks
The frequency of security checks can depend on various factors, such as the nature of your website, the volume of traffic, and the sensitivity of the data you handle. However, a good rule of thumb is to conduct a security check at least once a week. For high-risk environments, real-time monitoring may be more appropriate.4. Database Optimization
A WordPress database stores everything that makes up your website. This includes posts, pages, comments, settings, and plugin data. Over time, this data becomes bloated with unnecessary information, slowing down your site.Optimizing Database
Optimizing your database involves removing unnecessary data, and here are the key steps to achieve this:- Deleting Revisions: WordPress saves every draft and revision of your posts. While this feature is useful, it can generate a lot of data that bloats your database. Regularly deleting old revisions can keep your database lean.
- Cleaning Transient Data: Transient data is temporary data stored by WordPress to speed up your website. However, not all transient data gets deleted when it's no longer needed, leading to unnecessary data in your database. Regularly cleaning up this data can help optimize your database.
Plugins for Database Optimization
There are numerous plugins that can assist you in database optimization. Some of them include: WP-DBManager, WPOptimize, Advanced Database Cleaner, and much more. These plugins automate database cleaning tasks, saving time while ensuring regular optimization. Additionally, they manage storage space effectively, contribute to site stability, and simplify site migration. Always remember to back up your database before running an optimization to avoid irreversible changes.Frequency of Database Optimization
The frequency of database optimization can depend on how often you update your site. If you frequently add or update content, you may want to optimize your database once a month. If your site is not updated regularly, a quarterly optimization might suffice. However, these are general guidelines, and the optimal frequency can vary based on your specific website's needs.5. Broken Link Check
Broken links are links that, when clicked, lead nowhere or display a 404 error page. This could be due to the linked page being moved, deleted, or the URL being updated.Identifying and Fixing Broken Links
Identifying broken links can be a manual or automated process. Manually, you would click on each link on your site to see if it led to a valid page. To fix a broken link, you either need to update the URL if it's incorrect, replace it with a new, relevant link, or remove it entirely. However, manually checking every link can be time-consuming for larger websites. That's where automated tools come in.Plugins and Tools for Checking Broken Links
Broken Link checking can be simplified by the use of various available plugins, such as Broken Link Checker and Screaming Frog (tool). These tools not only save you time, but they can also detect broken links that might not be immediately visible or accessible.Frequency of Checking Broken Link
The frequency of checking for broken links largely depends on how often you update your site and the size of your website. If you regularly add new content or modify existing content, bi-weekly checks may be advisable. For smaller, more static sites, monthly checks might be sufficient.6. Performance Monitoring
The performance of a website is measured by how quickly pages load, how quickly the site navigates, and whether or not all of the site's elements work as they should. Problems including poor load times, page problems, and unresponsive functionality can be identified with regular monitoring.Tools & Plugins For Performance Monitoring
There are several tools and plugins that can help you monitor the performance of your website. These include GTMetrix, Google PageSpeed Insights, and others. These tools provide comprehensive reports on various aspects of your site's performance, allowing you to target areas for improvement.Analyzing Performance Reports and Taking Action
At first, performance reviews can seem hard to understand, but with experience, they become easier to understand. They generally give a performance score and explain what is affecting that number. For instance, if your server takes a long time to respond, it could mean that you need better hosting. Large pictures might slow down page loads, so you might want to compress the images on your site. Once you know what problems are slowing down your site, you can take steps to fix them or ask for help if you need to.Frequency of Performance Monitoring
The frequency of performance monitoring depends on the nature of your website. High-traffic websites or websites that are frequently updated with new content should ideally monitor performance monthly. Smaller or more static websites can get by with monthly checks. However, any significant change or update to your site should be followed by a performance check to ensure everything is running smoothly.7. SEO Audit
An SEO audit is a thorough examination of your website from an SEO perspective. It identifies strengths, weaknesses, and potential enhancements to improve search engine rankings. An SEO audit is crucial because it:- Point out technical glitches affecting your visibility on search engines.
- Help you understand if your site isn’t getting the attention it deserves and why.
- Offer you insights to tweak your SEO game, helping your website rank better and attract more visitors.
Key Components of SEO Audit
An SEO audit has a few key parts:- Site Structure: This looks at whether search engines can easily understand and navigate your site.
- On-page SEO: Here you check things like title tags, meta descriptions, keyword use, the quality of your content, and how you're linking between pages on your site.
- Backlinks: You’ll also want to see who’s linking back to your site and ensure these links are of high quality.
Plugins for SEO Audit
There are various plugins that will help you perform an SEO Audit. Refer to our article on the Best SEO Plugins to understand and choose the plugins that suit your needs.Frequency of SEO Audit
How often should you do an audit of your SEO? That depends. If your website is always growing and changing, you should do an audit once every three months. If you don't post much content on your website, or don’t have a stable SEO strategy in place, you might only need a check-up once a year. And if you've made big changes to your site, you should do an SEO check right away to make sure everything is still in order.8. Regular Content Review and Update
Keeping your website's content up to date is a continuous job. It's a process that you do over and over again. It means making sure that what you have to offer is still useful to your audience and is up to date. Keeping your website's content fresh and relevant is essential because:- It improves SEO: Search engines love fresh content. Regularly updating your website can help improve your rankings.
- It increases user engagement: Users are more likely to return to your website if they find new and interesting content.
- It strengthens your brand’s credibility: Keeping your content current and relevant showcases your brand as a trusted and authoritative source of information in your field.
How to Keep your Content Fresh?
Here are some ways you can keep your content fresh:- Regularly review your content: Set aside time each month to review and refresh your content.
- Update statistics and data: Make sure that all your facts and figures are current.
- Refresh your images and multimedia: Visual content can become dated too. Regularly update your images, videos, and graphics.
Tracking Content Performance
To make informed decisions about updating content, you need to track its performance. Tools like Google Analytics can provide insights into which pages are performing well and which ones need improvement. Look for pages with high bounce rates or low time-on-page metrics; these are likely candidates for an update.Frequency of Content Update
The frequency of content updates depends on your industry, the nature of your content, and how often you publish new material. As a rule of thumb, you should review your content at least once a quarter, but high-traffic pages may need monthly reviews.Conclusion
We hope you have understood the importance of maintaining your website. Consider it a to do list for the success of your website. Each of these tasks mentioned in the blog are contributing factors for a safe, secure, and successfully running website.
WordPress
9 min read
Your WordPress website needs a retainer. Here is why!
Introduction
Starting and running a small or medium-sized business can be quite challenging. In today's digital age, having a WordPress website is essential for showcasing your products and services to your target audience. However, once the website is up and running, what's next? This is where WordPress retainers come in. WPoets WordPress retainers are an effective solution that provides SMEs with ongoing WordPress website support. With customized website solutions and regular security updates, it ensures the long-term success of your website. In this blog, we'll talk about how important WordPress Retainers are and how they can help you be successful in the long run.What are WordPress Retainers?
With WordPress retainers, you will have access to an expert WordPress team, ensuring continuous assistance ranging from regular updates to immediate troubleshooting during emergencies. WordPress is a powerful CMS, but it can be open to security breaches, downtime, and other problems if it isn't taken care of properly. The services offered typically range from maintenance (such as regular backups, updates, and security scans) to technical support (which involves troubleshooting and fixing any problems that may arise) to custom functionality development. The following are the key components that are typically included in a WordPress retainer:1. Development hours
 A key part of retainers is the number of hours spent on custom development. These hours are dedicated to adding custom features to the website that go above and beyond what WordPress already offers. It means building features on top of the website as per the business's needs.
The Wordpress Retainers offered by us include custom development hours that can be used for the following activities:
A key part of retainers is the number of hours spent on custom development. These hours are dedicated to adding custom features to the website that go above and beyond what WordPress already offers. It means building features on top of the website as per the business's needs.
The Wordpress Retainers offered by us include custom development hours that can be used for the following activities:
For custom functionality on the website
Custom functionality means features and functions that are made just for a website and aren't offered in standard WordPress themes or plugins. These unique features can differ based on what the website needs and what the business wants to achieve. The customization may include developing a custom CRM or RFQ system, a job portal, or maybe a portal to streamline your business processes.Third-party integrations
Third-party integrations of payment gateways, social media platforms, marketing automation tools, CRM systems, and other external services can be integrated with the WordPress website. The custom development hours will be used to integrate these services into your website.Creation of landing pages
The expert team here will design and develop landing pages that match your brand guidelines, which improves the user experience and thus boosts conversions. These landing pages could be for your social media campaigns on Facebook, Twitter, LinkedIn, and Instagram, or for your email marketing campaigns, or for your next tradeshow, conference, product launch, workshop, or seminar.Internal Web Page Development
Internal web pages for products, services, awards, and achievements, or any custom webpage for that matter, can be developed and optimized using development hours.Newsletters Development
Development hours can be used to create email templates that match the website's branding and are responsive across devices and email clients.2. UI/UX design
 UI/UX design is an important part of WordPress retainers. It involves creating interfaces that are both visually appealing and easy to use in order to improve the total user experience. It's the first phase before developing the website, where we create low-fidelity wireframes and then high-fidelity web page concepts using tools like Figma, Adobe XD, and many others.
Homepage Design
The homepage sets the tone for the entire website. An effective homepage design has a clear navigation menu, compelling imagery, concise content, and critical call-to-action features. It attracts visitors, makes relevant information easy to find, and guides them through the website. Based on the feedback from users, website analytics tools, user journey tools, and heatmap tools, the homepage should be continuously improved so that it is best optimized for conversions.Internal Landing Page Designs
Landing pages' main purpose is lead generation. A focused, campaign-aligned landing page maximizes conversions. The design engages visitors, communicates the value proposition, and motivates action. A Retainer plan takes care of everything on your website’s landing page.Any Web Page Design Concept
Website design involves coordinating text, color, graphics, and layout. A consistent design approach keeps the website professional, boosts brand recognition, and improves the user experience. This includes creating attractive, easy-to-use headers, banners, footers, navigation menus, sidebars, and content layouts for a web page.3. Graphics Design
 While WordPress Retainers do most of your job, graphic design is often left out. Don’t fret! We got you covered! Most WordPress retainer offerings don’t include graphics design, but we do.
The following graphic design activities can be done as per your needs,
While WordPress Retainers do most of your job, graphic design is often left out. Don’t fret! We got you covered! Most WordPress retainer offerings don’t include graphics design, but we do.
The following graphic design activities can be done as per your needs,
Images for Social Media Ads
Visually attractive creatives for advertising campaigns are vital for attracting and engaging the target audience. Images for social media platforms such as Facebook, Instagram, LinkedIn, and Twitter can be created to effectively communicate the intended message and encourage user interaction.Images for Social Media
SMEs often need images created to share them on social media. Images required for festivals, events, company updates, or any image for the social media calendar are included in the WordPress retainers. These images should be carefully crafted to fit the requirements.Icons for website
A well-designed set of icons may do wonders for the usability of a website or app. Custom icons can match the website's branding, aid navigation, or emphasize crucial features. These design icons should be visually uniform, instantly recognizable, and aesthetically pleasing.Images for website
Images play an important role in web design because of their ability to convey information, inspire emotion, and improve a website's aesthetics. We will create or find high-quality images that fit the site's design, content, and audience. Images will be carefully selected and edited for optimized web performance, reduced load times, and consistent appearances. These images could be featured images for blog posts, post content images, images for the homepage, landing pages, internal web pages, images for banners and sliders, or any images that are required for the website.Landing Page Graphics
Landing pages need eye-catching images to increase conversions. These graphics should match the content and goals. All the images required for the landing pages—banners, CTAs, infographics, or any other images—are covered. These images will convey the value offered and boost conversions.Email Newsletter Templates
Email marketing is a powerful tool for engaging with subscribers and driving conversions. Retainers include the design of brand-appropriate email newsletter templates. The newsletters will be designed as per your requirements. It could be for sending out weekly, or monthly newsletters, sending company updates to your team, or running any marketing campaigns for your products and services. These templates are optimized for email clients and devices, ensuring consistent branding and a visually appealing experience for subscribers.4. Technical Support and Maintenance
 Technical support and monthly maintenance are included in a WordPress retainer. This includes troubleshooting, bug fixes, software upgrades, security patches, plugin, and theme updates (to keep the website secure, reliable, and compliant with the newest WordPress version), and much more.
Plugin Management
WordPress plugins enhance website functionality and design. Updates can conflict and make managing these components difficult. Our WordPress experts will update or upgrade plugins regularly for performance and security.Security and Backup Solutions
It is a priority for any business to secure their website. Ongoing security measures protect the website from various possible threats. Implementing security plugins, monitoring for vulnerabilities, and fixing any issues quickly are all provided by our WordPress experts. Regular website data backups provide a recovery point in case of data loss or unexpected events.Performance Optimization
A website's speed and performance are crucial factors that define the user experience, and they also have an impact on search engine rankings. Specialists will analyze the website's performance, suggest areas for improvement, and apply ways to improve speed and performance. Optimizing code, implementing caching, image optimization, minimizing server response speed, and various other techniques are implemented for performance optimizations.Content Updates and Publishing
Websites need regular content updates to be fresh and engaging. The team will publish blogs or articles, case studies, success stories, or whitepapers and will update them as needed. Also, any content changes to the website pages such as the homepage, about us, products, and services, or any pages including landing pages are covered. Managing all the content on the website will be done by our team. The SMEs can focus on developing valuable content while experts handle content management.The Need for WordPress Retainers for

Continual Improvement of your Website
Any business website has a scope of work that is always changing and expanding. Your site will be updated and upgraded as per your needs on a regular basis, keeping it current and in step with your business's development. Your website's success and user satisfaction will both increase thanks to its continuous enhancements.Regular Maintenance of the Website
Regular maintenance checks, security scans, and updates protect the health and safety of your website. This proactive method can prevent problems, giving your company’s digital presence a strong line of defense.Eases your Financial Planning
Uncertainty about finances can be a big problem for any business. Unexpected costs can be a problem, especially if they are for important tasks like managing a website. A WordPress retainer gives you a set monthly cost for website services. Our pricing is transparent. This makes it easier for SMEs to budget, eliminates unexpected costs, and makes your finances more stable.Priority of Service
Most of the time, SME clients that opt for a WordPress Retainer will get priority service. This means that your requests are dealt with quickly, which cuts down on downtime and possible losses. In a business world where competition is high, the speed and ease of priority service can be a big advantage.Enhanced Security Services
Regular security updates are crucial for businesses, as they are more susceptible to cyber threats. It helps strengthen the website's security by providing regular patches and timely updates. It includes malware scanning and removal, SSL certificate installation, and backup and restore services. You can prioritize security without worrying about the technical aspects.Helps Focus on the core business
With a reliable partner taking care of your WordPress site, your team can focus on what it does best: brainstorming new ideas, building new strategies, and growing the business. For businesses, outsourcing website management can be a game-changer in terms of operational efficiency.Expert Support
One of the best things about WordPress retainers is that they give you access to a team of experts. These experts offer advice, help with problems, and solutions that are made to fit the needs of your SME. Their knowledge helps you improve the speed, functionality, and user experience of your website.Conclusion
WordPress retainers are a key part of making sure that SME websites keep getting better and doing well. SMEs can now focus on their core business activities while getting expert help and reliable website management. WPoets WordPress retainers give you the peace of mind you need to thrive in the digital world, from regular updates and maintenance to better protection and priority support. To discuss more about our retainer plans, please connect with our WordPress expert team.
WordPress
8 min read
Happy Birthday, WordPress! Celebrating the 20th anniversary and WPoets Town Hall 2.0
Pre-planning
Almost one month before the date, HR announced to the entire WPoets team in the weekly meeting that we are celebrating big this year. She asked the team members to volunteer for the event preparations. The organizing team was decided, and HR, along with a few senior team members, started to plan the flow for the event.Hashtag competition
With the trending era of hashtags on social media, we decided to craft a hashtag for our event too. We circulated among the team that there would be a hashtag competition. Whoever comes up with the best hashtag will be used for the event. The team started to contemplate various combinations of hashtags and gradually started submitting their word fusions to HR. The organizing team decided to announce the winner a couple of weeks before the event. So that everyone would start trending the hashtag on social media.WordPress milestones gallery

Team brainstorming ideas for the event
As it was going to be the 20th anniversary of WordPress, we decided to showcase the evolution of WordPress over these 20 years in the form of a gallery. We have also been using WordPress since the inception of WPoets, so we also planned to show how WPoets has evolved over that period of time. What energizing brainstorming days we spent sharing ideas with each other! As you can see in the picture above, the time and dedication spent on preparing the event to make it successful were quite distinguished. After a lot of discussions and meetings, images and storylines for the journey of WordPress and WPoets were finalized.
All set to celebrate the 20th anniversary of WordPress
Awards design
After the milestones gallery was finalized, the event management team moved on to the next step, which was to plan an award ceremony. We decided to give four awards, namely;- Instant Helping hand: The one who is always ready to help— The Madadkaari Award
- Most social in the team: The one who is an extrovert and ready to interact with everyone — The Ghulmil Award
- A good communicator: The one who can communicate and leaves you with no doubts — The Clear-Head Award
- Always ready to teach something: The one who is curious and ready to share knowledge at all times— The Gyaanvardhi Award

The final design of the awards

Awesome trophies
WPoets journey documentary
Just like the milestones gallery and awards section were funneled, the team moved forward with yet another captivating addition to the event; The Documentary. It was decided to create a documentary that would highlight the most important events and cover the journey of WPoets so far. Our journey was one big adventure, which was showcased in the documentary in a way that struck a chord with everyone. HR, along with some senior members of the team, sat down to collect all the photographs from the archives to create the documentary. The photos depicted all the events that took place and that WPoets was a part of and had organized. Be it a formal event or an informal team gathering, we had it all. The idiosyncrasy of capturing photos left us with so many memories, which shall continue ahead as well and compel us more to do so. After a lot of going back and forth in time through the photos, Aashish had finally planned the flow of the documentary.Awesome WP20 cake
Since it was WordPress’s 20th anniversary, how can one forget to celebrate without a cake? The team brainstormed a few ideas and designs of the cake before ordering the yummy cake, which you see in the picture below.
Delicious WP20 cake
WP20 Birthday celebrations & WPoets Townhall 2.0
Now you all know the setup that we went through before our event. In the fullness of time, the most anticipated day for the WPoets team was at the door. So let us take you all on a trip to our big day, which was the WP20 celebrations and Townhall 2.0. Everyone arrived at the venue with a lot of enthusiasm and excitement. Looking at each other's vibrant faces and energies, the atmosphere was completely kindled.
Welcoming the team
WordPress 20-Year Milestones and WPoets Journey gallery on display
The first thing that the team members noticed while entering the venue was the WordPress milestones and WPoets journey gallery. They were surprised and keen to have a look at both galleries. We wrote a detailed blog on WordPress 20-year milestones; you can read it here. Our design team put a lot of effort into creating the galleries. You can see in the pictures below their creativity, which did not miss to apprise everyone who took a glance at the gallery.
Gallery showing 20 years of WordPress journey through milestones
WPoets Journey Gallery
Screening the documentary
Once everyone was gathered and settled, our hosts began the event. They set the environment with a warm welcome and by starting off “The Documentary.”
Team members enjoy the WPoets documentary
All the eyes were completely hooked to the screen, and they could not stop praising the brief journey that they had just experienced. How could we not thank the director of this documentary, Mr. Aashish Ladhwe, for giving us such an unforgettable memory. The efforts made by him to illustrate all the milestones were truly admirable.Speech by the CEO
After the screening of the documentary, the team was addressed by our CEO, Mr Amit Singh. He shared his vision and the forthcoming plans that he has set for the organization.
Mr. Amit Singh shares his ambitious plans for WPoets
Quizmania
After the CEO’s speech was completed, everyone thought we would be moving for the cake-cutting. Who knew what surprises the organizing team had planned for everyone? Our hosts announced the quiz competition “Quizmania”, spontaneously to engage everyone and make the event more entertaining. To the team’s surprise, everyone became excited. We asked our project managers to pick up the chits one by one to build their teams to play in the competition. Four teams were created. The quiz revolved around questions about WordPress and the shortcode-based low-code framework, Awesome Enterprise.
Quiz competition in progress
The quiz session continued for about an hour. The team was relishing the time, along with some munchies and cocktails. While one of the hosts was keeping a record of the score for all four teams. You can see in the above gallery what a pleasant atmosphere it had become. Though it was a tough competition, everyone in the team enjoyed it.Prize distribution
After the quiz was over, we asked the team to wait for the results. Then the hosts announced the winning team of the quiz competition. You can see the happy faces of the winning team in the picture below.
Quiz competition winners
After that, the hosts announced the winner of the hashtag competition.
Hashtag competition winner
Awards Ceremony
Next up in the event was the awards ceremony. With no more delay, the host finally started announcing the four awards, The Madakari Award, The Clear Head Award, The Gyanvardhi Award, and The Ghulmil Award. There was a tie for The Madakari Award, so we decided to give both contenders the award.
Awards ceremony
The winners stood as an example for the rest of the team members. They encouraged others to compete in the next award ceremony by improving themselves and ingraining the qualities that helped them win the awards.Cake Cutting
The long-awaited moment that had everyone on the edge of their seats was finally pounding their hearts. Now that we had conducted all the segments of the event successfully as per plan, it was time to celebrate the 20th anniversary of WordPress. The mouth-watering cake was cut by Abhijeet and Sandip.
WP20 birthday celebrations
Vote of Thanks
With so many efforts and plans made by the organizing team to carry out the whole event as it was supposed to be executed without any deviations, it couldn’t stop our business head, Mrs. Savita Soni, from showing gratitude to all of them.
Vote of thanks by Mrs. Savita Soni
Last but not least, to motivate the WPoets team, she recited the following poem,
“Koshish Kar Hal Niklega” - written by Anand Param
Dance and Lunch
Last but not least, everyone moved to the buffet to savor the lunch and show a good time to their tummies and taste buds. Some of them could not stop their feet from rushing towards the dance floor to groove to the music of the DJ.
Dance and lunch
 It’s lunchtime
Wrapping it up
That’s how it was at the WP20 celebrations and WPoets Townhall 2.0. It was a fun-filled day with a variety of events. A special thanks to everyone who participated in making this event a hit. Hope you all enjoyed reading this blog. We promise to bring you more such events and their blogs. So stay tuned, and don’t forget to follow our LinkedIn company page, WPoets - WordPress Website Experts. Happy Birthday, WordPress, once again.
General
9 min read
Website Audit: Key Elements to Consider When Creating It
What should the website audit cover?
A website audit should examine all aspects of your website's performance and potential. It should assess your site's search, user experience, conversion optimization, on and off-page SEO, and many other factors. The following are the key areas that the website audit should address:1. Design Audit:
A design audit is an in-depth analysis of a company's visual identity, including but not limited to its website, logo, typography, and color scheme. The purpose of the audit is to make sure that all of a company's design elements are consistent with the brand's goals. It primarily focuses on:- User Interface (UI): Make sure that elements like buttons, icons, forms, and design aspects like colors, fonts, spaces, etc. are all the same. Consistency makes things more comfortable and easy to use.
- User Experience (UX): Check to see if the website's navigation, information hierarchy, and usability make sense to the user. You could try usability testing tools or surveys to learn more.
- Responsive Design: You should check your website on various screen sizes and devices to ensure the design is responsive and provides a consistent experience across all platforms.
- Branding Consistency: Ensure that the look and feel of your website are consistent with your brand's guidelines and successfully convey the brand's message.
Design audit frequency
Design audits should be performed every 6-12 months, however, this number can vary widely depending on the specifics of your company. Based on the findings, you should continuously improve your website.2. SEO Audit:
Evaluating how well your site is optimized for search engines is part of the SEO audit. The purpose of the audit is to identify strengths, weaknesses, and opportunities in order to increase search engine rankings and, hence, traffic. Here are the things to be considered in an SEO audit:Technical SEO
Technical SEO refers to server and website optimizations that affect how well search engines can crawl and index your content. Among these things are:- Crawlability: You can use tools like Google Search Console to find out if search engines can crawl your site correctly.
- XML Sitemap: Keep an accurate and up-to-date XML sitemap that search engines can use to learn about your site's structure.
- Robots.txt file: This file tells search engines not to visit certain pages. Make sure everything is set up right in the file.
- Site Speed: How long it takes for a page to load affects user experience and how search engines rank it. Use tools like Google's PageSpeed Insights to evaluate your site's speed.
- Mobile Optimization: Google uses mobile-first search, so your site should be easy to use on mobile phones.
On-Page SEO
This refers to a page's text and HTML source code:- Meta Tags: Make sure every page has unique and informative meta titles and descriptions.
- Header Tags: Look at how your H1, H2, etc. are used and where your keywords are placed.
- Keyword Optimization: Verify to see if your pages are optimized for important keywords, but avoid overusing keywords.
- URL Structure: URLs should be short, detailed, and include keywords. They should also be search engine friendly.
Off-Page SEO
This refers to ranking factors outside of your site, such as:- Backlinks: Use tools to assess your backlink profile. Check the quantity and quality of backlinks and look for links that could be damaging or of low quality.
Content Analysis
- Duplicate content: Having the same content on your site can hurt your SEO. Use tools to find and eliminate duplicate content.
- Quality of content: The content should be of good quality, relevant, and useful to the user.
- Internal Linking: Check to see if you have the right internal links, which help search engines understand how different pages on your site relate to each other.
Local SEO
If your business has a local presence, make sure your NAP (Name, Address, and Phone number) information is the same everywhere on the web. Also, make sure that your Google My Business page is optimized.Security
Check your site's security (HTTPS) to make sure it's safe. Google gives secure sites a higher score.SEO audit frequency
It is recommended to conduct an SEO audit quarterly. Additionally, you should also consider doing an audit if you notice a sudden drop in rankings or traffic, or after making major changes to your site. If you're interested in learning more about SEO tips, check out this article.3. Content audit
Reviewing the content you’re creating periodically will help you visualize gaps for which new content can be created and also highlight what old content pieces can be repurposed.- Performance Metrics: Analyse the performance of every bit of content. You can look at things like page views, bounce rate, time spent on the page, conversions, and social shares.
- Relevance and accuracy: Check to see if the information on your website is still relevant and accurate. Many times, content in blogs, case studies, and whitepapers, among others, needs to be updated. It's important to make sure the information is regularly updated.
- Consistency: Check to see if the tone, style, and voice of all your content are the same. Consistency helps build a strong brand identity.
- SEO Review: Analyze your content from an SEO point of view. Examine the use of keywords in your content. Meta descriptions and alt tags should be in place and working well. Organize your content properly with the appropriate use of headers.
- User Engagement: Identify if the content is intriguing to your target audience. You can determine this from how many comments, shares, and likes your post gets.
- Content Duplication: Make sure your site doesn't have any duplicate content, which can hurt your SEO. Use tools to look for content that has been copied.
Content audit frequency
It is recommended to perform a content audit every 3-4 months if you post content on your site frequently. If you do not post content regularly on your website, you can perform the audit every six months or once a year.4. Speed/Performance Audit
A website audit includes a look into the page speed and core web vitals that show how well or poorly the page is loading. Addressing website speed issues leads to better UX and a positive impact on SEO. It should cover the following aspects:Page Load Speed
The time needed to download and view the website content is a crucial factor.- Server Response Time: How quickly your site loads depends on how fast your server is. This can be measured with tools like Google's PageSpeed Insights.
- Large Images or Files: If your site has too many large images or other media files, it will move much more slowly. Images need to be optimized for the web.
- Render-blocking JavaScript and CSS: JS scripts and CSS files can slow down the speed at which a page loads. These can be found with the help of tools like PageSpeed Insights.
Website Functionality
- Broken links: These lead to 404 errors, which can be a nuisance for users and bad for SEO.
- Redirects: If your site has too many redirects, it can slow down and affect the user experience. Aim to reduce them as much as possible.
Compatibility with browsers
Your site should load quickly and work well in all of the major browsers. Make sure of this by testing your site on more than one device.Mobile Performance
Since more than half of all internet traffic now comes from mobile devices, it's important that your site works well on them. This means both speed and usefulness.Website Hosting
How fast your site loads depends a lot on how well your web hosting server works and how it is set up. Make sure you have a good host that fits the needs of your website.Plugins and themes
If you use a content management system like WordPress, keep in mind that some plugins or themes can drastically slow down your site. Check your plugins and themes often and update them to make sure they don't negatively impact your site's speed.Website speed audit frequency
Ideally, a thorough performance audit of the entire website should be carried out somewhere between six months and a year. However, using tools like Google Analytics and PageSpeed Insights to track your site's speed and performance monthly could prove beneficial. You should also do a performance audit after making any major changes to your site, including adding new features, media, or plugins, to make sure they haven't slowed it down.5. Security audit
A part of the technical audit of the website involves scanning the website for malware and checking against security best practices. An advanced security audit also includes steps like penetration testing. Consider the following aspects when performing the security audit:- Vulnerability Assessment: Look through your website for vulnerabilities that hackers could use. This includes things like security holes, bugs, and misconfigurations.
- Penetration testing: Simulate an attack on your website online to see how safe it is.
- Access Controls: Evaluate who has access to which website information and functions. Ensure there are appropriate restrictions in place.
- Data Encryption: Check to see if private information like customer information, credit card numbers, etc., is encrypted both in transit (using SSL/TLS) and when it is stored.
- Security Policies: Look over your security policies to make sure they are up-to-date and cover everything you need them to. This could include password policies, data retention policies, incident response plans, etc.
- Software Updates: Make sure that all of your software used to build and manage your website is up-to-date, including your CMS, plugins, third-party apps, and themes. Older versions may have known vulnerabilities that can be used against them.
- Backup and Disaster Recovery: Confirm that your website is being backed up regularly and that a disaster recovery plan is in place.
- Firewalls and Intrusion Detection Systems (IDS): Ensure that there is a good firewall and that intrusion detection systems are active. They should be set up properly to find threats and respond to them.
- Log Analysis: System and security logs should be looked at regularly to find any suspicious behavior.
Security audit frequency
A security audit should be performed three times a year to avoid vulnerabilities and attacks. Depending on your website's size, business, and data sensitivity, vulnerability assessments, software updates, and log analysis should be done more often.Conclusion
A website audit for your B2B establishment is less of an extravagance and more of an imperative. It equips you to discern website shortcomings, refine the user experience, improve traffic and conversion rates, fortify website security, and stay a step ahead of the competition. Optimizing your website's performance can substantially impact client acquisition and loyalty. Do not delay until your website begins to falter. Anticipate the trajectory and seize the advantages brought forth by a website audit. Want to audit your website? Talk to our WordPress experts.Online Casino
7 min read
Crash Game by InOut RTP 95,5%
In the early stages of a round, the multiplier may not be very high, but the chances of hitting a trap are lower. This strategy allows you to get familiar with the mechanics and test different strategies without risking too much of your bankroll upfront. Make sure the casino supports Chicken Road 2 and offers secure and easy withdrawals. Opt for a casino with a strong reputation, a smooth user interface, and fair terms. As you become more comfortable, you can move to harder levels for potentially greater rewards, but always ensure the difficulty aligns with your comfort and strategy.
What's the maximum win in 2.0 version?
At its heart, this is a video slot game with five reels and multiple paylines, but what makes it stand out is the story it tells. Just like its predecessor, it captures the fun and energy of a countryside adventure, but with upgraded visuals, smoother mechanics, and even more rewarding features. Gambling involves risk and may lead to addiction. Yes, ₹3,620,000 is the current maximum win available in Chicken Road 2.
Main features
Players can expect a combination of adjustable difficulty levels, a high RTP, and interactive mechanics such as a real-time cash-out system. The company focuses on delivering engaging player experiences, robust technical support, and seamless platform integration for operators. Chicken Road 2 is developed by InOut Games, a licensed B2B provider known for innovative online casino content. Fast load times and responsive design guarantee a seamless experience, whether played on a smartphone or tablet. The game runs smoothly in mobile browsers and is also available as a lightweight app through partner casinos. Sound effects and rhythmic background music complement the visual experience, intensifying as the multiplier climbs and the stakes rise.
High RTP Rate
Join them, and take the risk wherever you are.(Updated, Secured Verified) No reskins – just the pure Chicken Road 2 experience, fully mobile. Until then, enjoy our newest mini-game, Chicken Road 2 Money, possibly the hottest mini-game of the moment. The game just launched and fans are loving it. Low capital risk, but patience is key. But you got your winnings, and probably avoided getting run over.
- Some games have lower volatility, while others offer higher winning potential.
- A large app will consume MBs, whereas loading the Chicken Road 2.0 online requires very minimal data load, which is ideal in cases where a user has a limited data plan.
- Both iOS and Android users get identical, exceptional experiences.
- Chicken Road 2.0 uses a provably fair algorithm, which means every game outcome can be independently verified for randomness and fairness.
Manage Your Bankroll
You play with virtual credits and can try out all the features. But be careful—a car can hit the chicken at any time and you could lose your bet. You only need a modern browser to play Chicken Road 2. Demo versions are available for free, so you can test which game is https://chicken-road-game-money.com/ the most fun for you without any risk. These games follow the same basic principle. Outside of InOut Gaming, there are other developers offering similar crash games.
Casey Phillips is a dedicated gaming enthusiast from the UK with over a decade of experience exploring online slots. Its blend of humor, colorful design, and enticing win potential make Chicken Road 2 a top choice for players seeking entertaining and trustworthy slot action. The slot is optimized flawlessly for mobile and desktop, delivering smooth, fast-paced gameplay across devices. Chicken Road 2 comes from InOut, a respected name in the online gaming industry known for secure platforms and fair play.
Managing risk
Let the chicken cross just one or two roads. You can greatly improve your chances of winning by following a few proven approaches. The game combines quick reflexes with thoughtful planning. Watch the game closely and don’t let greed take over. Develop a clear exit strategy before you start playing. That means wins don’t happen often, but they can be significant.
Classic Mario A Timeless Classic Now On Your Desktop
Trying out different games keeps your casino experience exciting. Start with low risk levels and multipliers between 1.5x and 2x. You have access to all game features that are also available in the real money version. This online casino game centres around a brave chicken trying to cross the road. The game generates cryptographic hashes before each round, ensuring that neither the casino nor players can manipulate the results. Once you're comfortable, you can switch to real money play at any of our partner casinos.
While we at Inout Games are confident in the exciting experience Chicken Road 2 offers, We believe the most valuable insights often come directly from our community. It strikes a balance, aiming for noteworthy wins without excessive exposure. This method aims to achieve a more significant return than the Conservative approach while still managing the risk of encountering a hazard. This approach prioritizes capital preservation and extended playtime. With us and our partners, you can play with confidence.
If you ever feel that gameplay is becoming more stressful than enjoyable, step back. Many Chicken Road 2 online players use this across all levels to test the game’s randomness. This mode is made for players who want a real thrill while still keeping one foot on solid ground. The game features responsive gameplay and runs smoothly across all devices, including iOS, Android, and desktop. At Chicken Road 2 India, we offer a fast-paced, dynamic game with features designed for players of all levels.
- You can also try the demo mode first to get a feel for the game.
- The demo version of Chicken Road 2 is one of its most appealing features.
- Low capital risk, but patience is key.
- It is on this front that Chicken Road 2.0 is the ideal choice, being light-weight, fun, and playable anywhere.
- At Inout Games, We champion transparency for our players.
Difficulty Levels
Many fans had asked us for the next adventure of the chicken, and here it is! Released on April 15, 2025, Chicken Road 2 is the highly anticipated sequel to our hit mini-game released a year ago, Chicken Road. Chicken Road 2 is the 2.0 version of our Chicken Road game at Inout Games, which went viral on social media. Your feedback helps us enhance your experience.
When you arrive at Chicken Road 2 casino, your first step is to prepare to cross a chaotic highway. With these 3 phases, you’ll know everything about the game and give yourself the best chance to win. That’s why we developed the game using HTML5, so you can play on your iOS or Android smartphone, or even on a tablet! To do this, you must accumulate multipliers each time you cross a new lane of the highway. We are very proud to officially present this mini-game to you, through our 100% official site for Chicken Road 2 money.
Pick your risk
Chicken Road is a game where you bet on a chicken trying to cross a street with ovens. Each safe step increases your multiplier, pushing you to cash out or take a bigger risk. This is the one and only completely free online games site that has no ads. Our free games are playable anywhere, at any time. There's not much else to it, just really amazing games for free, no big deal or anything. Well we simply license every game we can find basically, then upload it to Games4.com so you can play the games at no cost.
The game stands out with its high return-to-player (RTP) rate of 98%, offering players frequent chances to win. To withdraw your winnings from Chicken Road 2The standard procedure is to go to the online casino where you play and follow their withdrawal procedure. The clear dashboard displays current bet, multiplier and game history. 👉 Play chicken road 2 (with real money) Play only at licensed online casinos, where the game is operated under regulation and fairness controls, so the experience stays legitimate and consistent.
Additional features include customizable avatars and intuitive controls, such as the option to use the spacebar for quick advancement. The core mechanic revolves around guiding a chicken through a series of obstacles, with each successful move increasing the potential payout. Their reputation for quality and innovation has earned industry recognition and partnerships with leading casino brands worldwide. Its interface features large buttons and clear layouts, ensuring easy navigation and control on smaller screens. Its 2D graphics evoke a nostalgic, retro video game feel, with vibrant colors and fluid animations that enhance the sense of action and adventure. Chicken Road 2 is the latest release from InOut Games, building on the popularity of the original Chicken Road mini-game.
In Canada, there are several reputable online casinos offering Chicken Road 2 by InOut Gaming. You’ll get a good feel for the game’s pace and learn how to properly assess the risks. You can instantly see which multipliers were achieved in the last rounds. Here you can experience the full game from InOut Gaming without wagering a single cent. Want to try out Chicken Road 2 without risking your own money?
Hardcore offers the highest multipliers but with significantly higher crash risk. What’s the difference between difficulty modes? Demo mode gives you full access to all game features without requiring any deposit or registration. The ability to choose difficulty modes means I can play conservative when I need to and go wild when I’m feeling lucky. The game is waiting—and so are those multipliers. They accumulate many small-to-medium wins rather than constantly chasing massive multipliers.

Plugins
6 min read
Best Security Plugins for WordPress to Safeguard Your Site in 2025
Best WordPress Security Plugins in 2023 to Protect Your Site
1. Sucuri Plugin
 When talking about the best free WordPress security plugins, Sucuri surely tops the list. Sucuri Security is a well-known WordPress security plugin that offers website monitoring, malware detection, and blacklist monitoring.
It provides a firewall that blocks harmful traffic from reaching your website.
Sucuri also offers an incident response service, which ensures that any security issues are handled quickly and effectively.
Though most of the features are available in the free version, features like the website firewall, SSL support, and more are provided in the pro version.
Key Features:
When talking about the best free WordPress security plugins, Sucuri surely tops the list. Sucuri Security is a well-known WordPress security plugin that offers website monitoring, malware detection, and blacklist monitoring.
It provides a firewall that blocks harmful traffic from reaching your website.
Sucuri also offers an incident response service, which ensures that any security issues are handled quickly and effectively.
Though most of the features are available in the free version, features like the website firewall, SSL support, and more are provided in the pro version.
Key Features:
- Protection from Brute Force Attacks with Web Application Firewall (WAF)
- The plugin identifies and prevents DDoS attacks
- Monitors blocklist authorities’ security warnings
- e-Commerce malware scanning
- Keeps track of all site activity, including file changes, most recent logins, and unsuccessful login attempts.
- Protection from SQL injection, XSS, and other similar attacks.
2. iThemes Security Plugin
 iThemes Security Plugin focuses on enhancing your site’s security. It provides numerous options in the free version, such as protection against brute force, tracking of file integrity, backups of database files, and two-factor authentication.
The pro version of the plugin offers user activity logging, a WordPress User Security Check, Real-time WordPress Security Dashboard, and many more features.
Key Features:
iThemes Security Plugin focuses on enhancing your site’s security. It provides numerous options in the free version, such as protection against brute force, tracking of file integrity, backups of database files, and two-factor authentication.
The pro version of the plugin offers user activity logging, a WordPress User Security Check, Real-time WordPress Security Dashboard, and many more features.
Key Features:
- Blocks any malicious IP address that attempts to scan your website for vulnerabilities.
- Notifies you through email if any potentially dangerous files have been updated on your site.
- Protection by blocking specific IP addresses and user agents from accessing the site.
- Strong password enforcement
3. All-in-one Security and Firewall
 The All-in-one Security and Firewall plugin offers extensive security features in the free version itself. The features in the free version include hiding the login page from bots by configuring a custom URL for the ‘Admin’ page, user account monitoring, IP filtering, brute force attack prevention by implementing a ‘Login Lockdown’ feature, two-factor authentication, and many more.
The plugin supports best practices, meaning that it prompts users to change their usernames if they have the default "admin" or identical login and display names.
You can add Google reCAPTCHA or simple math CAPTCHA using this plugin.
The pro version of the plugin offers automatic malware scanning, alerts you for the site’s status of blacklisting, reports blocks traffic from specific countries, blocks traffic to specific pages, and many more features.
Key features:
The All-in-one Security and Firewall plugin offers extensive security features in the free version itself. The features in the free version include hiding the login page from bots by configuring a custom URL for the ‘Admin’ page, user account monitoring, IP filtering, brute force attack prevention by implementing a ‘Login Lockdown’ feature, two-factor authentication, and many more.
The plugin supports best practices, meaning that it prompts users to change their usernames if they have the default "admin" or identical login and display names.
You can add Google reCAPTCHA or simple math CAPTCHA using this plugin.
The pro version of the plugin offers automatic malware scanning, alerts you for the site’s status of blacklisting, reports blocks traffic from specific countries, blocks traffic to specific pages, and many more features.
Key features:
- Firewall protection
- Sending an alert if file change is detected
- Password strength tool to force the user to create stronger passwords for their sites.
- Manually blacklist suspicious IP addresses
- Comment spam prevention by automatically blocking the spammer’s IP address.
4. Wordfence
 Wordfence Security is an all-inclusive plugin for website protection that includes many useful features. WordPress users widely use it due to its user-friendly interface and consistent upgrades.
A robust firewall, malware detection, and real-time threat intelligence are all part of its extensive security features.
The free version includes two-factor authentication, brute force attack protection, basic firewall protection, a malware scanner, and others.
While the free version of Wordfence covers most of the security issues, the premium version enables the user to get real-time updates on malware scanning and firewall, blocking traffic from specific countries (geoblocking), and support.
Key features:
Wordfence Security is an all-inclusive plugin for website protection that includes many useful features. WordPress users widely use it due to its user-friendly interface and consistent upgrades.
A robust firewall, malware detection, and real-time threat intelligence are all part of its extensive security features.
The free version includes two-factor authentication, brute force attack protection, basic firewall protection, a malware scanner, and others.
While the free version of Wordfence covers most of the security issues, the premium version enables the user to get real-time updates on malware scanning and firewall, blocking traffic from specific countries (geoblocking), and support.
Key features:
- The free version allows users to secure unlimited sites.
- Monitors and notifies you of any security breaches in your password, allowing you to quickly generate a new and secure password.
- The free and premium versions include ‘Wordfence Central’ allowing users to administrate various sites' security from a single dashboard.
5. WPScan
 WPScan is a WordPress security plugin that utilizes the WPScan vulnerability database, which is a continually updated list of WordPress core, plugin, and theme vulnerabilities.
WPScan, the company, is renowned for its open-source WordPress security scanner, and the WPScan plugin brings that same level of scanning to your WordPress site's dashboard.
The plugin is able to scan around 21,000 vulnerabilities in your site, including plugins, themes, and the core software.
The plugin not only identifies vulnerabilities but also provides suggestions and guidelines on how to fix them and improve your site's overall security.
Key features:
WPScan is a WordPress security plugin that utilizes the WPScan vulnerability database, which is a continually updated list of WordPress core, plugin, and theme vulnerabilities.
WPScan, the company, is renowned for its open-source WordPress security scanner, and the WPScan plugin brings that same level of scanning to your WordPress site's dashboard.
The plugin is able to scan around 21,000 vulnerabilities in your site, including plugins, themes, and the core software.
The plugin not only identifies vulnerabilities but also provides suggestions and guidelines on how to fix them and improve your site's overall security.
Key features:
- Scheduled scanning and get the reports of scanning by email.
- Get risk scores to see how vulnerable your site really is.
- See how hackers attack your site with the security scanner.
6. Bulletproof Security
 If you need a more robust, hands-on security plugin, BulletProof Security is a good option. Along with database security and login security, the plugin also offers firewall protection, but in a pro version.
This plugin comes with anti-spam, auto-restore, monitoring, the Mscan malware scanner, automatic and manual lockout options, and many more.
While the free features cover most of the security parameters, upgrading to the pro version will enhance the security of your site.
It offers advanced features such as quarantine, monitoring of the database and sending an alert if there is any change, an IP firewall that protects the WordPress Plugins folder, allowing only valid image file extensions through Upload Anti-Exploit Guard (UAEG) mode, and much more.
Key features:
If you need a more robust, hands-on security plugin, BulletProof Security is a good option. Along with database security and login security, the plugin also offers firewall protection, but in a pro version.
This plugin comes with anti-spam, auto-restore, monitoring, the Mscan malware scanner, automatic and manual lockout options, and many more.
While the free features cover most of the security parameters, upgrading to the pro version will enhance the security of your site.
It offers advanced features such as quarantine, monitoring of the database and sending an alert if there is any change, an IP firewall that protects the WordPress Plugins folder, allowing only valid image file extensions through Upload Anti-Exploit Guard (UAEG) mode, and much more.
Key features:
- Automatic logout idle sessions
- Provides BPS Pro ARQ Intrusion Detection and Prevention System
- Security logging of hackers, spammers, or any kind of attackers
- The pro version comes with 16 mini plugins that provide advanced security
7. Malcare Security
 Developed by BlogVault, Malcare Security comes with a cloud-based malware scanner that scans your entire website for thefts and fixes them. The plugin helps you to clean your website with the help of a one-click removal tool, even before the search engine detects any problems with your site.
When you install MalCare's firewall, you'll notice a speed boost right away. The reason is that MalCare keeps attacks from getting to your site, which makes it less busy. Failed attacks can drain the site once they reach it.
Based on WordPress hardening measures, MalCare provides various levels of protection, including disabling file editing, blocking PHP execution in untrusted folders, and changing security keys.
Key Features:
Developed by BlogVault, Malcare Security comes with a cloud-based malware scanner that scans your entire website for thefts and fixes them. The plugin helps you to clean your website with the help of a one-click removal tool, even before the search engine detects any problems with your site.
When you install MalCare's firewall, you'll notice a speed boost right away. The reason is that MalCare keeps attacks from getting to your site, which makes it less busy. Failed attacks can drain the site once they reach it.
Based on WordPress hardening measures, MalCare provides various levels of protection, including disabling file editing, blocking PHP execution in untrusted folders, and changing security keys.
Key Features:
- Identifies and blocks bots
- An intelligent tracking system for plugins and a firewall to keep intruders out.
- CAPTCHA for login page
- Activity log for all changes happening on your website
Conclusion
While all the above-mentioned plugins are best in their own way, the use of these plugins depends on the needs of your website. From the robust features of Wordfence Security and Sucuri Security to the user-friendly interface of iThemes Security and All In One WP Security & Firewall, each of these WordPress security plugins offers unique functionalities that can drastically enhance the security profile of your website. These plugins can improve site security, but no technology is perfect. Maintaining a secure WordPress site requires updating the WordPress core, themes, and plugins, using strong passwords, and taking other web security precautions.
WordPress
8 min read
Schemas that Digital Marketers Must Use on their Website in 2023
Role of Schema in SEO
Here’s how schemas help in SEO: 1. Enhanced Visibility in Search Results: Schema markup allows websites to give search engines detailed content information. This data is displayed in search results as rich snippets, knowledge panels, and other enhanced SERP features. To get more attention and clicks, websites can utilize these visually beautiful and informative snippets to differentiate themselves from the competition. 2. Improved Click Through Rates (CTR): Schema markup's rich snippets commonly include ratings, reviews, pricing, event details, and many more in search results. These characteristics make the search listing more appealing and relevant, increasing the likelihood of a click. A higher CTR indicates to search engines that the website is offering valuable and relevant content, which can positively impact its ranking. 3. Voice Search Optimization: Schema markup optimizes material for voice searches as voice assistants and voice searches grow. Schema tags like FAQ and Q&A enable search engines to extract and offer direct responses to voice search queries, boosting their likelihood of showing up in voice search results. 4. Structured Data Understanding: Algorithms interpret online material for search engines. Schema markup helps search engines understand your content better. It also helps search engines categorize and display your material, improving your ranking for relevant search queries. 5. Competitive Advantage: Implementing schema markup sets you apart from competitors who may not be utilizing it effectively. Rich snippets and better search results make your website more appealing and trustworthy than your competitors. Visibility and credibility can boost rankings, organic traffic, and conversions.Schemas That Digital Marketers Should Use
The following are the schemas that digital marketers must use:1. Organization Schema:
Organization Schema markup helps brands show that they are credible and authoritative. It tells about the organization, such as its name, logo, contact information, and social media accounts. By using Organization Schema, digital marketers can increase the exposure of their brand, get it into knowledge graphs, and make users trust the brand more. Best practices for implementing Organization Schema include using verified profiles and providing comprehensive and consistent information across various online platforms. Below is a screenshot of the organization schema in action for the search term WPoets. It shows
Screenshot 1: Organization Schema in action
Organization Schema should be added to the following web pages- Homepage
- About Us
- Our Work or a similar page,
- What We Do or a similar page,
- And other pages.
2. BreadCrumb Schema
The BreadcrumbList Schema allows you to specify the hierarchical structure of your website's pages using a list of breadcrumbs. Each item represents a step in the navigation path and typically includes the page title and URL. The order of the items in the list reflects the hierarchy of the pages. By implementing the BreadcrumbList Schema on your website, you provide search engines with structured data that can be used to enhance search results. When search engines recognize the schema markup, they may display the breadcrumb navigation in the search results, making it easier for users to understand the website's structure and navigate directly to specific pages. Below is a sample of breadcrumbs displayed in SERPs.
Screenshot 2: BreadcrumbList Schema in action
BreadcrumbList Schema should be implemented on all the website pages.3. Article Schema
Article schema markup is important for websites that are based on their content. It helps search engines figure out how articles are put together and what they're about, including the article body, author, date of publication, word count, keywords, and many more. By using the Article Schema, digital marketers can make their content more visible in search results and increase the chance that it will show up in Google's Top Stories or other rich results. Correctly structuring an Article Schema means using the right headline tags, giving information about the author, and following schema rules. The Article Schema should be used on web pages that give detailed information or content in the form of articles:- Blog Posts
- News Articles
- Documentation Pages
- Editorial Pages
- Magazine or Journal Articles
4. FAQ Schema
FAQ Schema markup makes it easy for websites to answer frequently asked questions directly in search results. It makes your site more visible and makes it more likely that it will show up in featured snippets, especially in voice search results. Digital marketers should use FAQ Schema by finding important questions and answers, organizing the content with the right HTML tags, and making sure it works well with voice search queries.
Screenshot 3: FAQ Schema in action
In fact, we have written a comprehensive article on adding FAQ Schema to WordPress with and without plugins. The FAQ schema should be used on websites that list Frequently Asked Questions (FAQs) and the answers to those questions. A few examples could be,- FAQ Pages
- Product Pages
- Service Pages
- Support or Help Pages
5. Local Business Schema
Local Business Schema markup is very important for companies that want to reach people in their area locally. It tells you where the business is, when it's open, how to contact them, their address, and what other customers have said about them (basically, Google reviews). Digital marketers can improve their visibility in local search results, improve their Google My Business listing, and attract possible customers in their area by using the Local Business Schema. Name, address, and phone number (NAP) consistency, getting real customer reviews, and optimizing for mobile devices are all important parts of the Local Business Schema. Below is a screenshot of the Local Business schema in action showing Opening Hours. Screenshot 4: Local Business Schema in action
- About Us page
- Contact Us page
- Home page
- Any location or place-specific page
6. Web Page Schema
Web Page Schema is a type of schema markup that provides structured data about a specific web page on your website. It allows search engines to understand the content and context of your web pages more effectively. By implementing the Web Page Schema markup, you can enhance the visibility, accuracy, and presentation of your web page in search engine results pages (SERPs). The Web Page Schema should be implemented on all the individual web pages of your website:- Content Pages
- Landing Pages
- Product and Service Pages
- Category Pages
- Home page
7. Video Schema
Video schema markup is a type of schema that provides structured data about a video on your website. It allows search engines to understand the video content, its metadata, and other relevant details. By implementing Video Schema markup, you can enhance the visibility and appearance of your video in search engine results pages (SERPs) and potentially increase the chances of it being featured in video-specific search results. The Video Schema should be implemented on web pages that contain videos or provide information about specific videos:- Gallery Pages (if the gallery contains videos)
- Article Pages with embedded videos
- Landing Pages with videos
8. Event Schema
Event schema markup is helpful for businesses that host events or promotions. It has a lot of information about the event, like the date, time, location, organizer, and people who will be performing, among others. Digital marketers can make events more visible in search results and thus get more people to attend by using Event Schema. To optimize the Event Schema, it's important to include correct and up-to-date information and use structured data testing tools to make sure everything is correct. The Event Schema should be implemented on web pages that provide information about specific events:- Event Listing Pages
- Individual Event Pages
- Calendar Pages (if your website has one)
- Landing Pages (created for promoting specific events)
9. Review Schema
Every business, no matter what they do, should implement the Review Schema on their website. This is because reviews are such a big part of how most people decide what to buy. Before buying something, almost 90% of people read reviews. So there's no reason not to show good reviews if you have them. Review snippets will show the number of reviews your product, local business, or software product has gotten, along with the yellow stars. Following is a screenshot of a product search query. Notice that the yellow stars are below the SERPs.
Screenshot 5: Review Schema in action
Web pages with user-generated reviews or testimonials should use the Review Schema:- Product Pages
- Business Listings
- Testimonial Pages
10. Product Schema
Product schema markup tells search engines about a product's name, price, availability, and reviews, among other things. By using Product Schema, digital marketers can make their goods more visible in search results and attract people who might buy them. It can also be used for adding schema for services.
Screenshot 6: Product Schema in action
The Product Schema should be implemented on web pages that provide information about specific products:- Product Details Page
- e-Commerce Category Page
- Featured Product Section
- Review Pages
- Comparison pages
Conclusion
In conclusion, leveraging schema markup on your website is a powerful strategy for digital marketers in 2023. Schemas provide a structured way to communicate essential information about your web pages, videos, and other content to search engines, helping them understand and present your content more effectively to users. By incorporating schema markup, you can potentially enhance your SEO efforts and improve your website's visibility and ranking in search engine results. If you want to know more about how to add these schemas to your WordPress website, get in touch with our web experts.
Plugins
6 min read
Best Backup and Restore WordPress Plugins for 2025
Things to look for before choosing the backup plugin
When choosing a backup and restore plugin, it's essential to consider the following key features to ensure it meets your specific needs: 1. Automatic Scheduling Automatic scheduling allows you to set up regular backups without manual intervention. Instead of remembering to initiate backups manually, the plugin will handle the process for you based on your preferred schedule. With this feature, your time and effort are saved without having to initiate the backups manually. It also facilitates a consistent data backup routine and reduces human error. 2. Incremental Backups Incremental backups are a method of storing only the changes made since the last backup, rather than creating a full backup every time. This improves site performance and eliminates dozens of backup files on your server. Thus, your backup plugin should analyze the latest file and avoid the next backup if no changes have been made. This leads to a faster backup process, reduced storage space, and efficient storage utilization. 3. Real-time backup for high-traffic sites Real-time backups refer to the ability of a backup plugin to capture and save changes to your website's files and database as they occur, ensuring that your backup is always up to date. High-traffic sites such as e-commerce and membership sites often experience frequent content updates, user interactions, and database modifications. In the event of a disaster or site failure, relying solely on scheduled backups could result in data loss since the most recent changes may not be captured. Real-time backups help minimize data loss by continuously saving updates as they happen, ensuring that even the latest changes are backed up. Real-time backups let you quickly restore your site after a hacking attempt, data corruption, or critical error. In the event of a failed transaction or interaction, you may easily revert back to the state before the interruption with the help of real-time backups. This is a must-have for e-commerce and membership sites so that users can connect with them easily.Best Backup and Restore Plugins
1. BlogVault
 BlogVault is a comprehensive backup and restores solution designed specifically for WordPress websites. It provides users with a reliable and user-friendly platform to safeguard their valuable website data and easily recover from any potential disasters or issues.
In addition to backups, BlogVault offers a range of website management features that enhance its value. These include one-click staging environments for testing site changes, malware scanning and removal, and a site management dashboard to oversee multiple websites from a single location.
This comprehensive set of features makes BlogVault a versatile tool for managing and protecting your WordPress sites.
Key Features:
BlogVault is a comprehensive backup and restores solution designed specifically for WordPress websites. It provides users with a reliable and user-friendly platform to safeguard their valuable website data and easily recover from any potential disasters or issues.
In addition to backups, BlogVault offers a range of website management features that enhance its value. These include one-click staging environments for testing site changes, malware scanning and removal, and a site management dashboard to oversee multiple websites from a single location.
This comprehensive set of features makes BlogVault a versatile tool for managing and protecting your WordPress sites.
Key Features:
- Real-Time Backup: BlogVault offers real-time backups, guaranteeing that every update made to your website is quickly captured and safely preserved.
- Incremental Backup: BlogVault comes with an incremental backup which reduces unnecessary multiple backups thus reducing storage space.
- Restores fully crashed sites: With BlogVault’s Emergency Connector, you can completely restore your crashed sites.
2. Jetpack
 Automattic has released a premium feature for their Jetpack plugin called VaultPress Backups. With this helpful WordPress plugin, restoring to a prior backup of your site is quick and painless.
Jetpack offers a suite of powerful features to enhance the functionality, security, and performance of WordPress websites. The beauty of Jetpack is that it doesn't require you to download and install a bunch of extra plugins.
Thus, you'll only need to use a single plugin, reducing the overall number of plugins that slow down your website.
While it comes with various tools for website management, we'll focus specifically on its backup-related features.
Key Features:
Automattic has released a premium feature for their Jetpack plugin called VaultPress Backups. With this helpful WordPress plugin, restoring to a prior backup of your site is quick and painless.
Jetpack offers a suite of powerful features to enhance the functionality, security, and performance of WordPress websites. The beauty of Jetpack is that it doesn't require you to download and install a bunch of extra plugins.
Thus, you'll only need to use a single plugin, reducing the overall number of plugins that slow down your website.
While it comes with various tools for website management, we'll focus specifically on its backup-related features.
Key Features:
- Automated and Incremental Backups: Jetpack offers daily automatic scheduling of backups along with incremental backups. Thus there is less human intervention and reduced storage space.
- Real-Time Backups: Backups happen in real-time preventing loss of data when the website crashes.
- Protection from Brute Force Attacks.
- Automated security fixes for vulnerabilities.
- Secured off-site backup storage.
- One-click restoration.
3. UpdraftPlus
 UpdraftPlus will allow you to back up your entire WordPress site to the cloud or download it locally. The plugin supports automated and scheduled backups. You can also choose which parts you want to back up, like themes, plugins, or data.
UpdraftPlus offers more remote storage options than any other WordPress plugin. The free version of the plugin supports cloud backup to Amazon S3, Rackspace Cloud Files, Dropbox, Google Drive, Microsoft OneDrive, Microsoft Azure, FTP/ SFTP servers, and many more.
The premium edition adds incremental backups, site migration to a new domain, and extensive safety reports.
Key features:
UpdraftPlus will allow you to back up your entire WordPress site to the cloud or download it locally. The plugin supports automated and scheduled backups. You can also choose which parts you want to back up, like themes, plugins, or data.
UpdraftPlus offers more remote storage options than any other WordPress plugin. The free version of the plugin supports cloud backup to Amazon S3, Rackspace Cloud Files, Dropbox, Google Drive, Microsoft OneDrive, Microsoft Azure, FTP/ SFTP servers, and many more.
The premium edition adds incremental backups, site migration to a new domain, and extensive safety reports.
Key features:
- Easy modular backup and restoration of your WordPress website.
- Encrypting database backups for security in the pro version.
- Compatible with multisite WordPress installations.
- Off-site backup storage
4. BackWPup
 Full backups, database backups, and selective file and directory backups are the backup options that BackWPup provides. This feature lets customers personalize their backup plan to meet their unique requirements.
Similar to others, scheduled and automated backups are provided in this plugin.
The plugin supports backup destinations like Google Drive, Dropbox, Microsoft Azure, Amazon S3, and more. Users can store backups offsite to reduce data loss.
Key Features:
Full backups, database backups, and selective file and directory backups are the backup options that BackWPup provides. This feature lets customers personalize their backup plan to meet their unique requirements.
Similar to others, scheduled and automated backups are provided in this plugin.
The plugin supports backup destinations like Google Drive, Dropbox, Microsoft Azure, Amazon S3, and more. Users can store backups offsite to reduce data loss.
Key Features:
- The users are notified about the status and results of backup operations through email.
- The plugin supports database optimization and maintenance tools. This feature reduces database size and fixes bugs to improve website performance.
- Automated and scheduled backups.
- BackWPup provides restoration and migration capabilities.
5. All-in-one WP Migration
 This plugin has been developed for non-technical people to migrate their websites from one server or hosting provider to another. The plugin makes it easy for you to back up your site's data (posts, plugins, media, and themes) and upload it to the cloud or local storage with just one click.
The plugin also supports incremental and scheduled backups. The backup frequency can be customized in accordance with your needs: daily, weekly, or monthly.
Key features:
This plugin has been developed for non-technical people to migrate their websites from one server or hosting provider to another. The plugin makes it easy for you to back up your site's data (posts, plugins, media, and themes) and upload it to the cloud or local storage with just one click.
The plugin also supports incremental and scheduled backups. The backup frequency can be customized in accordance with your needs: daily, weekly, or monthly.
Key features:
- All-in-One WP Migration lets you make several versions of backup copies at different times. This lets you choose from which backup you want to restore.
- All-in-One WP Migration has extensions for Google Drive, Dropbox, Amazon S3, and more, thus helping you with off-site storage.
6. Duplicator
 Anyone with minimal experience may quickly and easily create backups, move, and clone their WordPress sites using the Duplicator plugin.
The duplicator plugin provides automated and scheduled backups, and cloud backup storage (OneDrive, Google Drive, FTP, Dropbox, Amazon S3, or any S3 Compatible service).
The one-click migration feature of Duplicator simplifies the process of transferring your website to a new location. There is no other WordPress backup plugin like Duplicator, that allows you to back up a brand-new site. With Duplicator, setting up WordPress and configuring your site takes a few minutes.
Key Features:
Anyone with minimal experience may quickly and easily create backups, move, and clone their WordPress sites using the Duplicator plugin.
The duplicator plugin provides automated and scheduled backups, and cloud backup storage (OneDrive, Google Drive, FTP, Dropbox, Amazon S3, or any S3 Compatible service).
The one-click migration feature of Duplicator simplifies the process of transferring your website to a new location. There is no other WordPress backup plugin like Duplicator, that allows you to back up a brand-new site. With Duplicator, setting up WordPress and configuring your site takes a few minutes.
Key Features:
- Supports backup of large sizes of sites even in the free version. The plugin also creates a zip file of the backup in storage.
- Get quick notifications through email whenever Duplicator fails to complete a backup, takes too long, or requires manual intervention.
- Duplicator may generate new databases and execute search and replace operations during migration, improving its efficiency and versatility.
- Multisite support.
Conclusion
WordPress site owners need reliable backup and recovery solutions. The plugins mentioned in this blog are the ones that can protect your website from calamities and restore it quickly. Consider automatic scheduling, remote storage, migration, and convenience of use when choosing a backup and restoration plugin. Choosing the proper plugin and following best practices will protect and restore your WordPress website, letting you focus on content and business goals.
WordPress
14 min read
Celebrating 20 Years of WordPress: A Journey through Milestones
Introduction
On May 27th, 2023 WordPress will turn 20 years old! WordPress has grown exponentially over the last two decades. From its humble beginnings as a simple blogging platform to its transformation into a versatile content management system (CMS) that powers millions of websites worldwide. Many CMSs were launched, and gone but WordPress thrived like no other. Let's look back at some of the significant milestones of WordPress from the past 20 years.WordPress launched (May 27, 2003)
Matt Mullenweg, at the age of 18 (from Houston, Texas), used to weblog on his website, photmatt.net, where he wrote about technology, economics, politics, and his passion for jazz music and photography. Mike Little (from Stockport, England), on his weblog, wrote about books he read, and blogging technology. They both used the blogging tool b2/cafelog, which French programmer Michel Valdrighi created. On January 24, 2003, Matt posted a blog titled “The Blogging Software Dilemma,” where he expressed his concern that the then-famous blogging tool b2/cafelog had not been updated for months. The lead developer, Michel of b2/cafelog had disappeared for some unknown reasons. Matt’s blog was growing. At that time, his blog had passed twenty thousand unique visitors in 2003. He was looking for b2/cafelog alternatives. He tried the Textpattern and Movable Type weblog tools but due to licensing restrictions, he was not willing to use them. b2/cafelog was GPL, so Matt on his weblog proposed the idea of forking it since nobody was actively working on improving it.“Fortunately, b2/cafelog is GPL, which means that I could use the existing codebase to create a fork, integrating all the cool stuff that Michel would be working on right now if only he was around. The work would never be lost, as if I fell of the face of the planet a year from now, whatever code I made would be free to the world, and if someone else wanted to pick it up they could. I’ve decided that this the course of action I’d like to go in, now all I need is a name.”To which Mike Little replied back (the first comment).
“Matt, If you’re serious about forking b2 I would be interested in contributing. I’m sure there are one or two others in the community who would be too. Perhaps a post to the B2 forum, suggesting a fork would be a good starting point.”This conversation was the starting point for WordPress. That's the power of a single comment, and the rest is history. Here is a screenshot of the blog with the comment.

Matt proposed the idea of forking b2/cafelog on his weblog to which Mike responded.
Since then both Matt and Mike, from their homes started working on improving b2/cafelog script which then became WordPress (with the name coined by Matt’s friend Christine Tremoulet) Finally, on May 27, 2003, Matt announced the release of the first version of WordPress, 0.7.WordPress 1.2 "Mingus" (May 22, 2004)
WordPress 1.2 Mingus Write screen Image credit
WordPress version 1.2 is named “Mingus” in honor of jazz upright bassist, pianist, and composer Charles Mingus Jr.New Plugin Architecture
WordPress version 1.2 was the first major release since its launch, which included the addition of plugin support. This release was significant because WordPress became a fully mature product as compared to the weblog tools available back then. Ryan Boren invented the plugin system. In his 2013 interview, he recalled the idea behind the plugin system,“The 80/20 is like, is this useful to the 80 percent of our user's. If not, try it in a plugin. And it allowed us to do things like, you know, all these taxonomy plugins that did their own thing that kind of paved the way and then we later adopted. That was nice.”The new plugin architecture made it easy to modify or extend WordPress’ features. It uses hooks (actions and filters) that developers could use to extend WordPress functionality without having to edit core PHP files. The WordPress community loved this feature.
The luck of timing
Back in those days, the Moveable Type (MT) blogging tool was a top competitor to WordPress. Six Apart, the company behind the Movable Type weblog on May 13th, 2004, made changes to the licensing and, most importantly, the pricing structure for the version 3.0 launch. The users had to pay for personal or commercial licenses based on the maximum number of authors and active weblogs. The free version had only one author and three active weblogs. Nine days later, on May 22, 2004, the WordPress 1.2 version was released. Dissatisfied MT users migrate to WordPress, which is flexible and has no restrictions. WordPress downloads increased from 8,670 in April 2004 to 19,400 in May 2004 on the SourceForge website, which was more than doubled.WordPress 1.5 "Strayhorn" (February 17, 2005)

WordPress 1.5 Write Post screenshot
WordPress version 1.5 is named “Strayhorn” in honor of jazz composer, pianist, and lyricist Billy Strayhorn. This was another milestone event where WordPress version 1.5 was released with a Pages feature, better comment moderation tools, and a new theme system (on which the entire theme ecosystem that we see today was built)WordPress Pages
The Pages feature was first introduced so that, apart from traditional weblogs, users could create websites with custom pages such as About Us, and Contact Us, among others.Streamlined comment management Tools
To fight spam better, the comment management process was streamlined. For example, when someone comments on a blog, they are automatically held in moderation (called automatic whitelisting) unless the site owner has approved something from them before. Also, it was easy to deal with hundreds or thousands of comments, pingbacks, and trackbacks at once. Additionally, an option to blacklist spammers was added so that one does not need to monitor comments added to the list. And lastly, an option to allow comments only from visitors who verified their email and registered on the site.Flexible Theme System
WordPress Presentation Panel Image Source.
The introduction of the theme system allowed users to modify their blogs' look and feel. Common site elements were divided into sections like headers, footers, and sidebars, each with its own file. The theme system was so flexible that individual pages, posts, or even categories could have their own template design. Also, multiple theme support was implemented so that users could switch the entire look and feel of the site with a single click.New Default Theme Kubrick
This was the first time in WordPress history that a default (adapted version of the Kubrick theme) was bundled with a release. This theme was WordPress’ default theme (also in a sub-folder named “default” in the themes folder) until 2010. From 2010 onward, yearly themes such as Twenty-Ten, Twenty-Eleven, and so on were launched.
The Kubrick Theme was WordPress’ default theme until 2010.
WordPress 2.0 "Duke" (December 26, 2005)
WordPress version 2.0 is named “Duke” in honor of jazz pianist and composer Duke Ellington.
WordPress 2.0 Write Post screenshot Image Credit
New backend dashboard
WordPress 2.0 was released with a complete overhaul of the admin dashboard screens. Along with the User Interface (UI) facelift, the User Experience (UX) was also reimagined. For example, bloggers could add categories or tags without having to leave the post editor screen or delete comments or categories which will fade out without reloading the screen. Ability to drag and drop dialogs to rearrange and customize the admins' screens easily. In short, the publishing experience was faster and more streamlined thanks to AJAX functionality.New User Role System
Previous versions of WordPress had an old numerical user-level system ranging from 0 to 10. User Level 0 had the lowest privileges and User Level 10 had the highest level of access (basically administrator). The numbered access level was confusing and was not a direct indicator of how these levels (ranging from 0 to 10) were mapped to capabilities. In the new system, roles such as administrator, editor, and contributor were created, which made it easier to understand what capabilities the users had.New TinyMCE WYSIWYG Editor
In this version of WordPress, TinyMCE's WYSIWYG editor was integrated. This “What you see is what you get” (WYSIWYG) editor brought a smooth creating and editing experience natively to WordPress. TinyMCE remained the default editor from WordPress version 2.0 (December 26, 2005) to version 5.0 (December 6, 2018) for almost 13 years, which was then replaced by the Gutenberg Block Editor.WordPress 3.0 "Thelonious" (June 17, 2010)
Introducing WordPress 3.0 Video (CC-BY-SA-4.0)
WordPress version 3.0 is named “Thelonious” in honor of American jazz pianist and composer Thelonious Sphere Monk. It was the thirteenth major release and the culmination of 218 contributors' work over a half-year period.WordPress MU merged in the Core
3.0 release was bundled with lots of features that made WordPress a true CMS. One of the main features included the merging of the WordPress MU project (renamed to Multisite) into the core software. WordPress MU project was about creating the new multi-site functionality which makes it possible to run a single or multiple blogs (two or more) on the same WordPress installation.Custom Post Types and Taxonomies
Custom post type (CPT) was a groundbreaking feature in this release. It was one of the features that transformed WordPress from a simple blogging tool to a full-fledged CMS. Before 3.0 the default content types were Post, Page, Attachment, Revisions, Nav Menus (and two more). The introduction of CPTs allowed the creation of new types of content for users, CPTs such as events, testimonials, books, portfolios, case studies, e-books, and staff, among others could be created. This helped users organize their content beyond the default Post and Page post types. Prior to 3.0, WordPress had categories and tags as default taxonomies. Users could create custom taxonomies from 3.0 (similar to CPTs) thus helping to organize content in better ways.Default Theme every year

Twenty Ten theme was included in the WordPress 3.0 distribution
Along with WordPress 3.0, the Twenty Ten theme was launched, which replaced the Default (Kubrick) and Classic theme. Until then, Kubrick was the default theme from version 1.5 (February 17, 2005) to version 3.0 (June 17, 2010) for more than 5 years. The introduction of the Twenty Ten theme started the tradition of a new default theme every year. Since then, every year a new theme has been launched, such as Twenty Eleven, Twenty-Twelve, Twenty Twenty-Three, and so on.WordPress 3.7 “Basie" (October 24, 2013)

WordPress 3.7 Dashboard screen
WordPress version 3.7 is named “Basie” in honor of American jazz pianist and composer Count Basie. 211 volunteer contributors' worked on this release.Automatic maintenance and security updates.
With WordPress 3.7, maintenance and security updates were automatically applied. The update process happens in the background and is more reliable and secure than ever before. Minor point releases of WordPress (3.7.1, 3.7.2, for example) were automatically updated. Updates for major releases such as 3.7 and 3.8 were not applied automatically. Many users in the WordPress community didn't like this feature, as they felt it took away control from them since, without their permission, WordPress was updated in the background.A new plugin-first development process
WordPress 3.7 was launched with the new plugin-first development process. Using this process, the new features were developed as plugins, and once the development was complete, they would be merged into the core. This process helped the core development team release updates in a much shorter timeframe and decouple feature development from a release.One billion total plugin downloads (August 12, 2015)
WordPress Plugin Directory surpassed one billion total downloads between the 11th to 12th of August 2015. Below is a screenshot of the plugin directory.
One billion total plugins downloads
WordPress 4.4 “Clifford” (December 8, 2015)
Introducing WordPress 4.4 video (CC-BY-SA-4.0)
WordPress version 4.4 is named “Clifford” in honor of jazz trumpeter and composer Clifford Brown. 471 contributors helped develop version 4.4.REST API infrastructure.
In WordPress 4.4, the REST API infrastructure was integrated into the core. It was the first phase of the multi-stage rollout of the REST API integration. This was marking the dawn of a new era in developing with WordPress and it was one step closer to becoming a fully-fledged application framework. The REST API gave developers an easy way to connect WordPress with third-party applications. Most importantly it laid out the foundation for the Gutenberg Block editor, the future of publishing.In-built responsive images
Another awesome feature that was launched in WordPress 4.4 was native responsive image support. This removes the need for any custom code or plugin. WordPress smartly displayed responsive images on any device (based on the srcset and sizes attributes on the image tag.)WordPress 5.0 "Bebo" (December 6, 2018)

WordPress 5.0 screenshot
WordPress version 5.0 is named “Bebo” in honor of Cuban jazz musician Bebo Valdés. This release had 423 contributors with props.Say Hello to Gutenberg Editor
“What is Gutenberg?” video (CC-BY-SA-4.0)
WordPress 5.0 revolutionized the content editing experience with the introduction of a new block editor Gutenberg. The new block-based editor was a game-changer and the first step toward a next-level content editing experience. The Classic TinyMCE WYSIWYG editor (launched on December 26, 2005) was replaced by the Gutenberg editor (December 6, 2018) after almost 13 years. The classic editor was available as a plugin in the WordPress repository for users who wanted a legacy editing experience.
Native Gutenberg Blocks in WordPress 5.0
Gutenberg editor has basic website building blocks such as paragraphs, headings, code, and quote, among others, as well as more advanced blocks such as gallery, audio, video, cover image, and many more to build custom layouts. Using these blocks, users can build their websites without writing a single line of code.Introducing Twenty Nineteen theme
Twenty Nineteen theme Desktop and Mobile view.
Twenty Nineteen theme which has full Gutenberg support was launched with WordPress 5.0. It showcased the power of building websites using blocks. It’s a first-of-its-kind new generation theme where the layouts designed in the Gutenberg editor will be displayed exactly in the front end of the website.WordPress 5.9 "Josephine" (January 25, 2022)
WordPress version 5.9 is named “Josephine” in honor of dancer, singer, and actress Josephine Baker. 624 generous volunteer contributors contributed to WordPress 5.9.Introducing WordPress 5.9
Full Site Editing

Full Site Editing experience right in WordPress admin
WordPress 5.9 introduced Full Site Editing (FSE). In simple terms, in FSE, one can build and customize the entire website in the Site Editor. All the parts of the website, such as the header, footer, sidebar, pages, and posts in short, every section of the website can be built and customized using the Site Editor.Twenty Twenty-Two Theme
Twenty Twenty-Two, the first default block theme in the history of WordPress, was shipped with version 5.9. It's a perfect example of how block-based themes should be built, and how Full Site Editing works. It's also an excellent reference for theme and plugin developers to learn from by looking at the source code.Templates customization
WordPress 5.9 introduced various native block-based templates such as Home, Search, Single Post, and many others.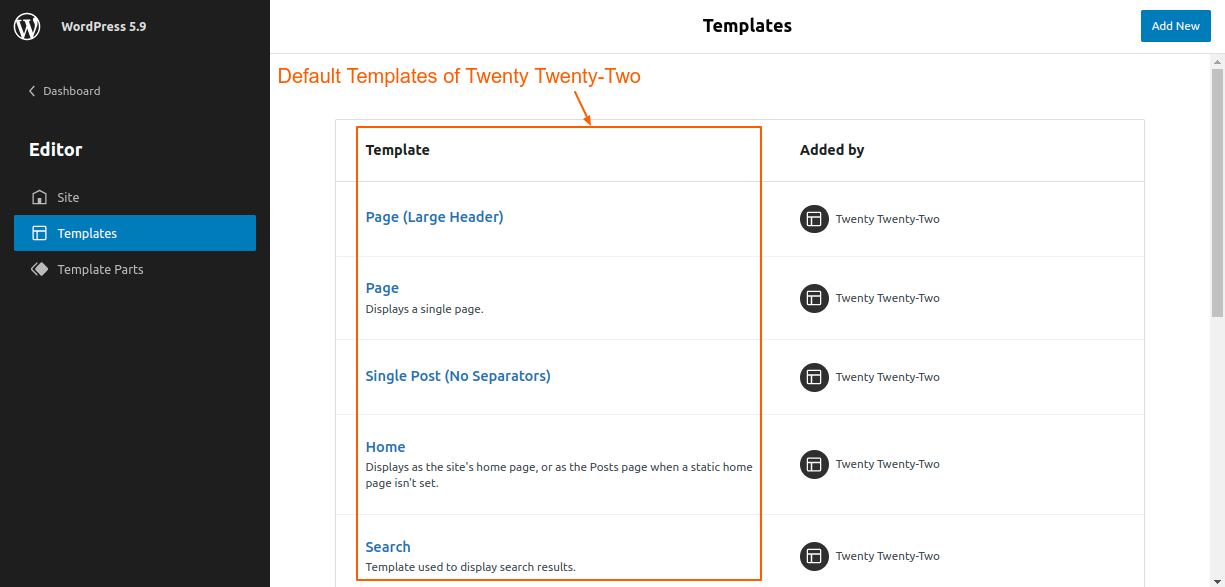
Templates of Twenty Twenty-Two Theme in Full Site Editing
In classic themes, these templates are PHP files such as home.php, single.php, and search.php, among others stored in the theme directory. In block-based themes such as Twenty Twenty-Two, there are HTML files stored in the “templates” directory. The best part about Full Site Editing is that these templates can be customized directly in the Site Editor without writing a single line of code. Below is a screenshot of editing the “Page” template right in the WordPress admin. All the layout changes in the site editor are stored in the database (instead of directly editing HTML files in the template folder of the Twenty Twenty-Two theme.)
Editing the “Page (Large Header)” template of the Twenty Twenty-two theme
Template Parts Customization
WordPress 5.9 also introduced the customization of template parts which are smaller reusable structural parts commonly used for site headers and footers. Again, one can customize the header and footer Template Parts in the Site Editor.
Template Parts in FSE
WordPress 6.2 "Dolphy" (March 29, 2023)
WordPress version 6.2 is named “Dolphy” in honor of e woodwind jazz wiz, and multi-instrumentalist, Eric Allan Dolphy Jr. Over 600 contributors have contributed to this release. Out of which 178 were new contributors.
The new Gutenberg editing experience
Reimagined Site Editor
WordPress 6.2 is the most recent, major, and stable release in 2023. The Site Editor is just getting better and better with every major release. The Site Editor has been completely reimagined and is now out of beta. Awesome new features were introduced, such as distraction-free mode, an easier-to-use navigation block, the ability to copy and paste styles between blocks, and many more.Openverse integration
 Over 700 million free, openly licensed, and public domain works are available in Openverse's library (currently only stock photos and audio).
Users can search the Openverse catalog right in the media tab of the block inserter. Once the image is selected, it gets uploaded and inserted in the content with the correct attribution.
Over 700 million free, openly licensed, and public domain works are available in Openverse's library (currently only stock photos and audio).
Users can search the Openverse catalog right in the media tab of the block inserter. Once the image is selected, it gets uploaded and inserted in the content with the correct attribution.
WordPress Powers 43.1% of The Web (May 27, 2023)
On May 27th, May 2023, WordPress Powers 43.1% of the top 10 million websites. The below screenshot shows yearly trends in the CMS usage statistics since January 2012.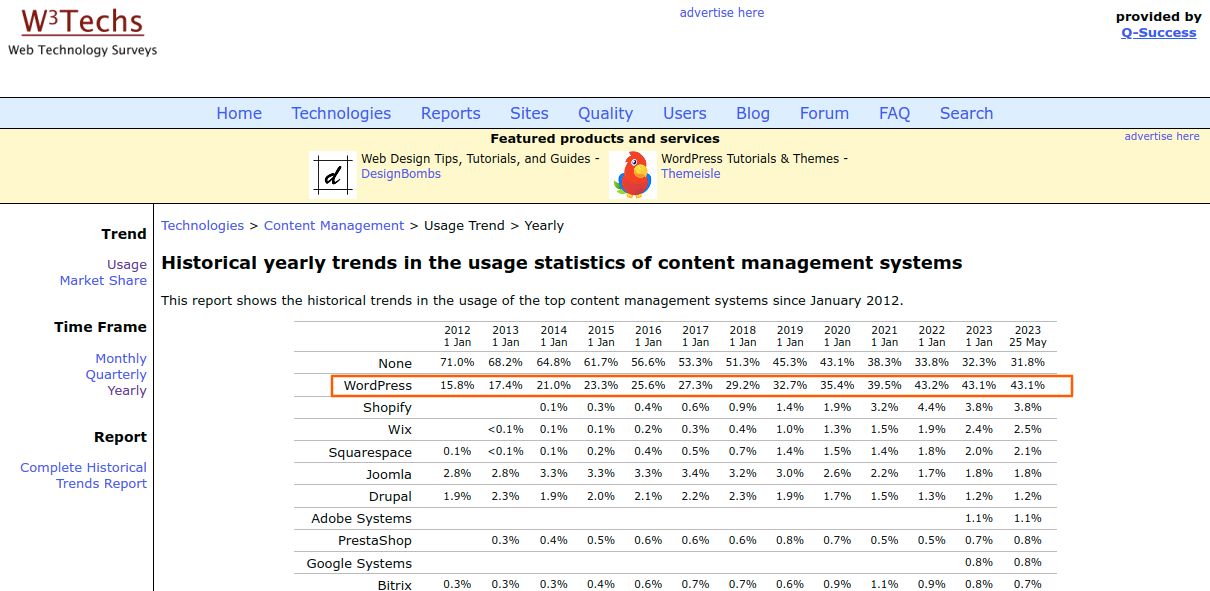
Wrapping up
Over the past two decades, WordPress has achieved remarkable milestones. Since its initial release on May 27th, 2003, it has come a long way. It now powers more than 40% of the web. It’s been an awesome journey so far, and one that won’t stop any time soon. Here is a video that shows how WordPress has grown. [video src="https://w3techs.com/pictures/cms-bcr-202209.mp4" /]The evolution of CMS usage statistics, 2014-2022, Video Source
That’s it for this article. Signing off for now. Happy birthday, WordPress, from the bottom of our hearts.
Plugins
5 min read
Best WordPress SEO Plugins for 2025
1. Yoast SEO
 Yoast SEO is one of the best WordPress SEO plugins. The free version provides multiple features, such as analyzing the content of your post or page, XML Sitemaps, social media integration, and many more.
The Yoast SEO Premium provides more sophisticated features like advanced language analysis that helps to write naturally, the use of synonyms and keyphrases that help to make text richer, adding schema markup, optimizing a page for up to five keywords, previewing your page appearance on Twitter and Facebook, and suggesting internal links to guide users to other areas of your site.
Furthermore, Yoast SEO boasts its own website, offering premium support options, a vibrant community in its forum section, an educational blog for SEO insights, and courses catering to beginners, intermediates, and advanced users.
Nevertheless, budget-conscious users can still take advantage of the free version, which outperforms most other WordPress SEO plugins by a significant margin.
Key features:
Yoast SEO is one of the best WordPress SEO plugins. The free version provides multiple features, such as analyzing the content of your post or page, XML Sitemaps, social media integration, and many more.
The Yoast SEO Premium provides more sophisticated features like advanced language analysis that helps to write naturally, the use of synonyms and keyphrases that help to make text richer, adding schema markup, optimizing a page for up to five keywords, previewing your page appearance on Twitter and Facebook, and suggesting internal links to guide users to other areas of your site.
Furthermore, Yoast SEO boasts its own website, offering premium support options, a vibrant community in its forum section, an educational blog for SEO insights, and courses catering to beginners, intermediates, and advanced users.
Nevertheless, budget-conscious users can still take advantage of the free version, which outperforms most other WordPress SEO plugins by a significant margin.
Key features:
- Preview your exact appearance in Google search results, allowing you to tweak the meta description and title for improved appeal and keyword usage.
- Yoast SEO allows you to add schema markup to your website, enhancing the visibility and appearance of your pages in search engine results.
- It enables you to use focus keywords, thus helping you to optimize content with targeted keywords.
- It comes with a Redirect manager, so you don’t have to install another plugin to handle your 301 redirects.
2. Rank Math
- Each post, page, or product undergoes an SEO analysis based on 40 criteria.
- It allows automatically adding alt or title tags to images that lack them.
- Rich Snippets support is built-in, with a choice of six different snippets, such as Article, Product, Recipes, Events, Video, and Local Business.
- The plugin also features a Redirection module, allowing you to direct 404 errors to more relevant content on your website.
- Breadcrumbs are incorporated within the plugin, eliminating the need for an additional plugin.
- Open Graph and Twitter Card support are also included.
3. All-in-One SEO (AIOSEO)
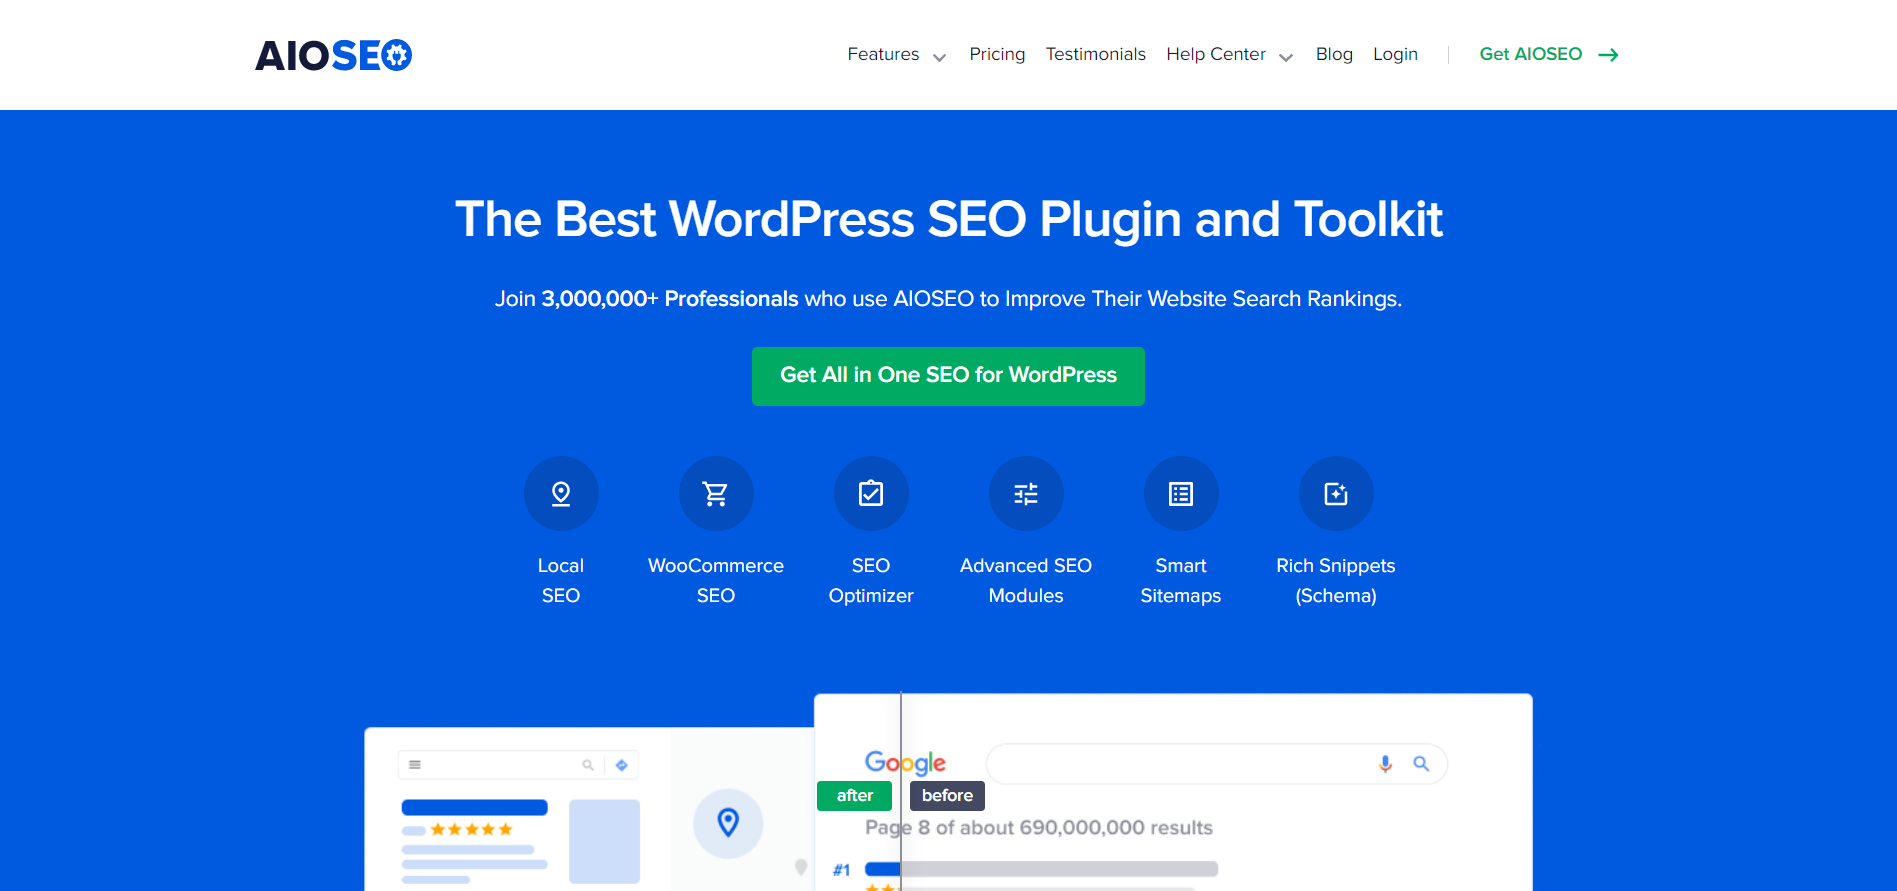 The most effective SEO plugin for WordPress is All in One SEO for WordPress (AIOSEO). It helps you improve your search results without learning complicated SEO terms.
XML sitemaps, SEO title and meta tags, schema markup, and social media integration are some of the features available in the free version. The premium features come with more extensions, such as advanced WooCommerce support, local SEO integration, and an advanced robots.txt editor that offers an intuitive interface for editing and managing the robots.txt file of your website, thus controlling search engine crawlers' access to specific areas of your site.
Key features:
The most effective SEO plugin for WordPress is All in One SEO for WordPress (AIOSEO). It helps you improve your search results without learning complicated SEO terms.
XML sitemaps, SEO title and meta tags, schema markup, and social media integration are some of the features available in the free version. The premium features come with more extensions, such as advanced WooCommerce support, local SEO integration, and an advanced robots.txt editor that offers an intuitive interface for editing and managing the robots.txt file of your website, thus controlling search engine crawlers' access to specific areas of your site.
Key features:
- Open Graph metadata is easily manageable with the built-in social media integration.
- SEO Audit Checklist.
- Faster Indexing with RSS sitemaps.
- 404 Error detection and redirection.
- It provides a Link Assistant, which completely revolutionizes the practice of internal linking.
- It offers the best features from different plugins, which eliminates the need for multiple plugins.
4. SEOPress
- WooCommerce optimization for enhanced SEO support to eCommerce websites.
- Local SEO integration.
- The premium feature Backlink Integration helps to monitor and analyze your website's backlinks to understand your link profile and improve your SEO strategy.
- Modify and optimize your website's URLs for better readability and SEO with URL rewriting.
5. Squirrly SEO
 Squirrly SEO is one of the finest WordPress plugins for large, unique-content websites with high traffic. To help you improve your WordPress site in all aspects, from its backlink profile to its domain authority, it employs artificial intelligence and has an easy-to-use interface.
The full keyword tracking and data tools make Squirrly SEO stand out. This WordPress plugin is also useful for regional search engine optimization thanks to features like local business schema and Google Earth integration.
Squirrly's SEO recommendations differ from those of the other plugins. To begin, enter the topic you want to write about. You then proceed to compose your piece while the green lights respond to the inputted term.
Key features:
Squirrly SEO is one of the finest WordPress plugins for large, unique-content websites with high traffic. To help you improve your WordPress site in all aspects, from its backlink profile to its domain authority, it employs artificial intelligence and has an easy-to-use interface.
The full keyword tracking and data tools make Squirrly SEO stand out. This WordPress plugin is also useful for regional search engine optimization thanks to features like local business schema and Google Earth integration.
Squirrly's SEO recommendations differ from those of the other plugins. To begin, enter the topic you want to write about. You then proceed to compose your piece while the green lights respond to the inputted term.
Key features:
- Optimization of keywords happens in real time as you write.
- If you're replacing another WordPress SEO plugin with Squirrly, your current settings will remain intact.
- You can share content reports created using Squirrly with colleagues.
- Analyze your competitor’s SEO strategies to gain insights and stay ahead of them.
Conclusion
In conclusion, when it comes to WordPress SEO plugins for 2023, there are several notable options to consider. Yoast SEO offers comprehensive features and user-friendliness, while Rank Math provides advanced functionality like keyword tracking and internal linking suggestions. All-in-One-SEO is a reliable choice with essential features, while SEOPress and SEO Squirrly offer a range of advanced features like competitor analysis (SEOPress) and social media monitoring (SEO Squirrly). Consider your specific SEO needs and budget when choosing the right plugin for your website. Stay updated with the latest developments as these plugins evolve to meet the changing SEO landscape. Ultimately, integrating an SEO plugin will optimize your content, improve visibility, and drive organic traffic in the years to come. We hope this article has helped you learn about the best SEO plugins that suit your needs.
Tutorials
10 min read
How to Add Google Analytics 4 in WordPress from Scratch (With and Without Plugins)
Introduction
Google is advising website owners to upgrade to Google Analytics 4, as Universal Analytics (UA) will be discontinued on July 1, 2023. (July 1, 2024, for Analytics 360 properties). It's critical that you switch to Google Analytics 4 as soon as possible since UA will stop collecting data after sunset. In this article, we’ll show you how to easily switch to Google Analytics 4 and add the tracking code to your WordPress website.Switch to GA4 from GA3 using the setup assistant
The first step to setting up Google Analytics 4 is to create a new property in your Google Analytics account. 1. Log in to your Google Analytics account. 2.1 Once you have logged in to your account, you will see a warning message to migrate to GA4 property (from UA). As seen in the below screenshot, click on the “Manage GA4 migration” link.
Screenshot 1: Migrate to GA4 warning message
2.2 If you don't see any warning messages, then head over to the admin section on the bottom left.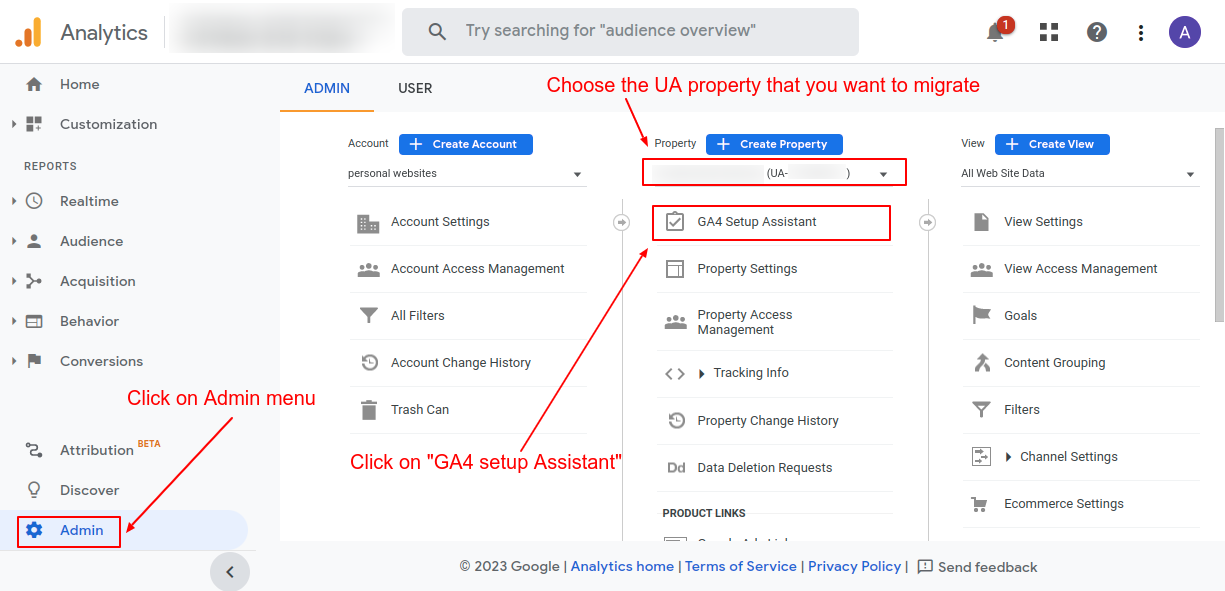
Screenshot 2: Choose the UA property to migrate
3. Choose the UA property you want to migrate, and click on the “GA4 Setup Assistant.” 4. To create a new GA4 property, click on "Get Started."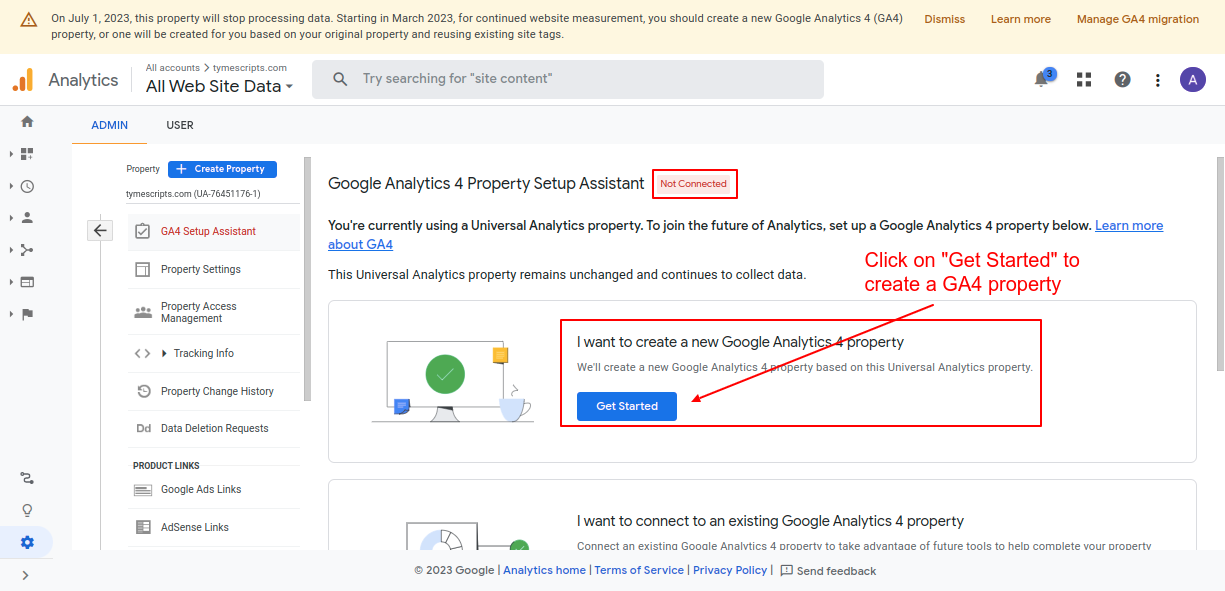
Screenshot 3: Click on “Get started” to create a GA4 property
5. The setup assistant popup will appear; click on “Create and continue.” This step will create a new GA4 property.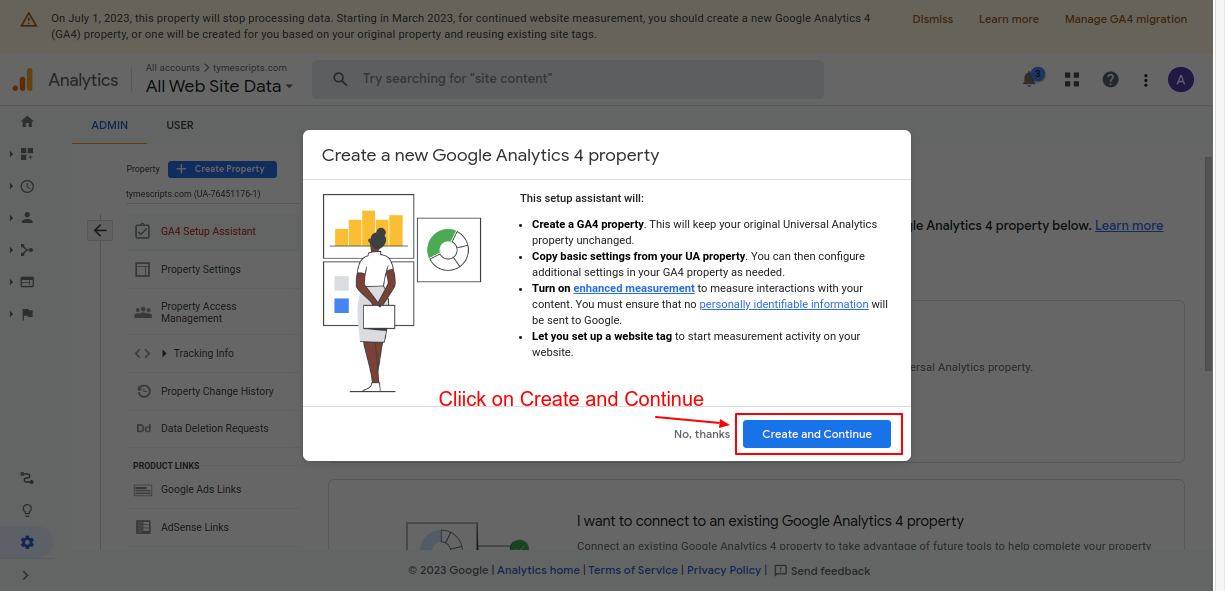
Screenshot 4: Click on “Create and continue” in the GA4 setup assistant popup
A few things to note when you are creating a new property using the GA4 setup assistant- The setup assistant will keep your original Universal Analytics (UA) property unchanged.
- Basic settings from your UA will be copied over to the GA4 property. If you have configured advanced settings in UA, then it needs to be set up manually in GA4.
- By default, the setup assistant creates a website tag to start measuring activity
- GA4 offers enhanced event measurements, which capture all the interactions on your website as events. This new feature is enabled by default.
| Measurement option (event name) | Parameters collected |
| Page views (page_view) |
|
| Scrolls (scroll) | No parameters are collected |
| Outbound clicks (click) |
|
| Site search (view_search_results) |
|
| Video engagement (video_start, video_progress, video_complete) |
|
| File downloads (file_download) |
|
| Form interactions (form_start, form_submit) |
|
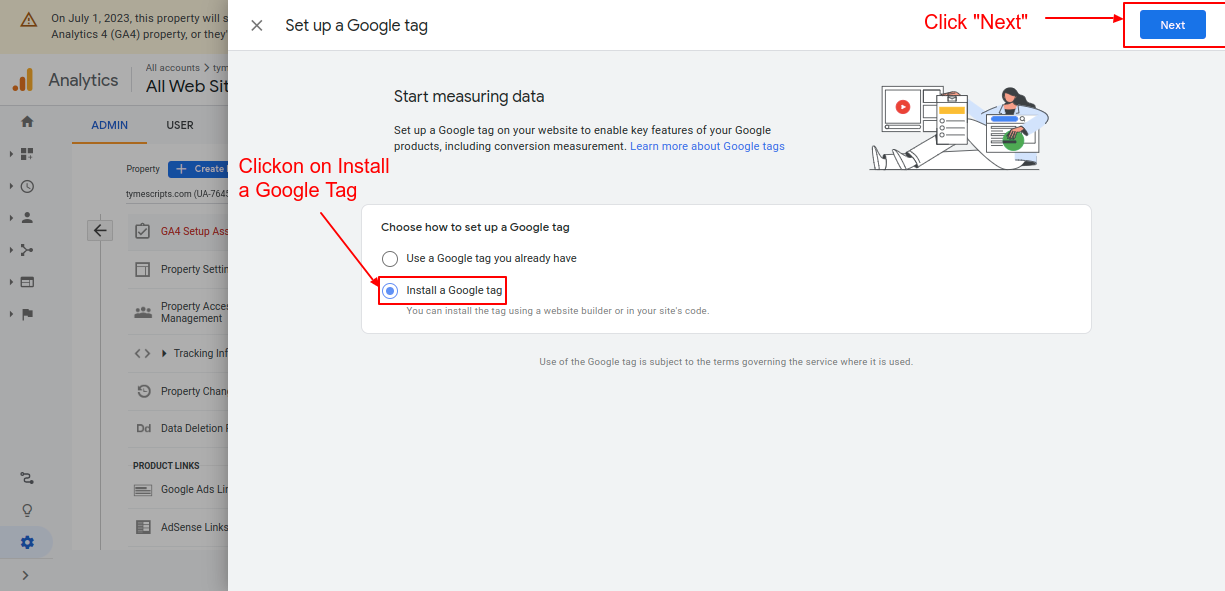
Screenshot 5: Choose how to set up a Google Tag
After that, it will give two options to configure Google Analytics 4 property

Screenshot 6: Two options to install GA4 code
7. Click on the “Install Manually” tab to copy the code that is generated. This will be later used in setting up GA4 manually.
<!-- Google tag (gtag.js) -->
<script async src="https://www.googletagmanager.com/gtag/js?id=TAG_ID"></script>
<script>
 window.dataLayer = window.dataLayer || [];
 function gtag(){dataLayer.push(arguments);}
 gtag('js', new Date());
 gtag('config', 'TAG_ID');
</script>Let’s dive deeper into both options to configure GA4.
Methods for adding GA4 to your WordPress website.
Once you have created your new GA4 property, the next step is to install the tracking code on your WordPress site. We’ll show how to do it using two different methods.- Method 1: Manually add the GA4 code (without plugins)
- Method 2: Using Site Kit and MonsterInsights Plugins
Method 1: Install the GA4 tag manually on your WordPress website (without plugins)
A few things to consider when you are manually adding code- We recommend adding GA4 code to the child theme instead of the Parent theme. If you don't have a child theme installed follow this tutorial for creating a child theme.
- Before making any changes to your site we recommend, you should always back it up. Read this blog on how to back up a WordPress website. At the minimum, you should make a copy of your child theme’s header.php file or functions.php since we are modifying it. if something goes wrong during the editing process then you can restore it.
- We recommend adding the tag manually only if you have the technical expertise to do so.
Option 1: Adding a tag to the header.php file (recommended for developers)
To install the GA4 tag manually, first log into your WordPress dashboard. 1. Go to Appearance -> Theme File Editor (If you’re using a block-based WordPress theme then go to Tools -> Theme File Editor ) Because we were directly editing the theme files, you will see a warning popup message as shown in below screenshot 3. Hence, we recommend this option only for developers.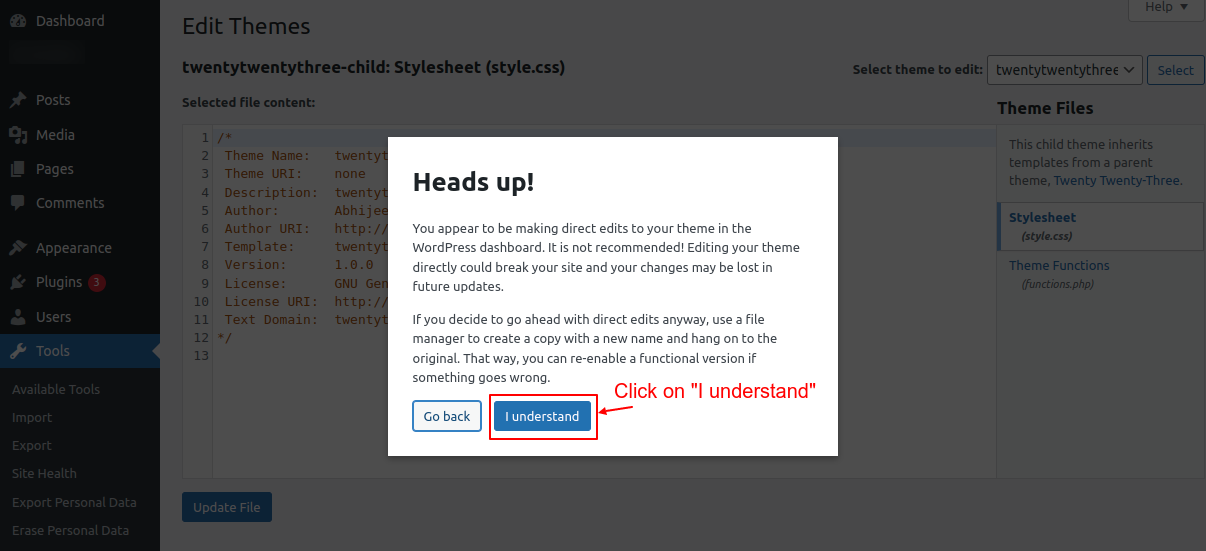
2. Select the child theme to edit from the dropdown on the right. After that, select the header.php file.
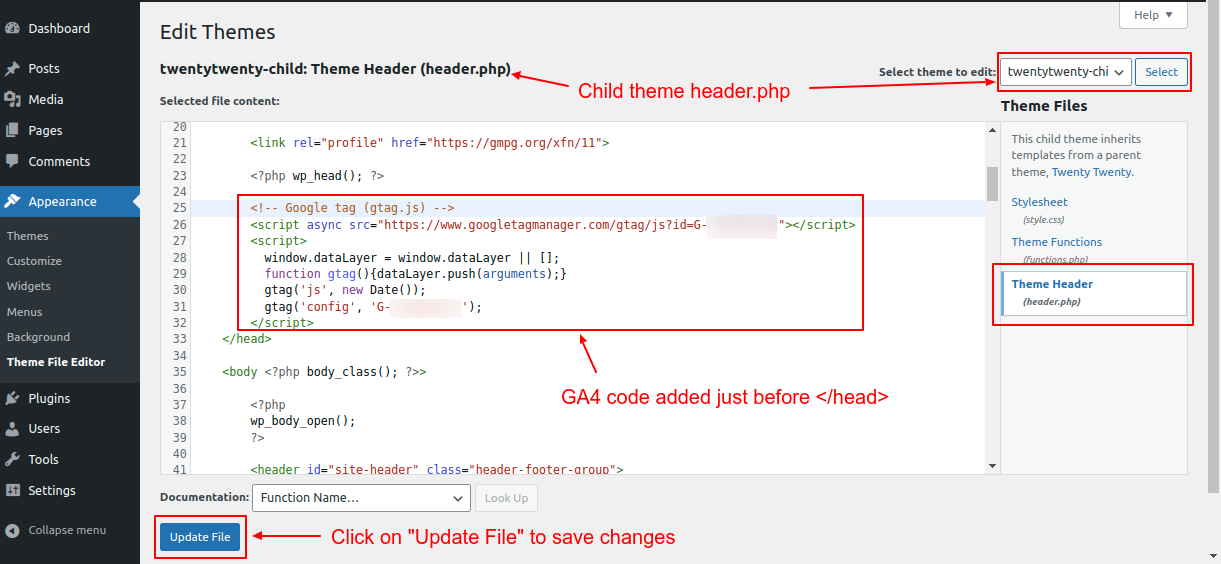
Screenshot 8: Paste the GA4 code before the HTML </head> tag
3. Paste the GA4 code (that was copied from the previous step) just before the HTML </head> tag, as shown in the above screenshot.
4. Click on “Update File.”
Option 2: Add a Google tag through the functions.php file (recommended for developers)
1. Open the child themes functions.php file in the code editor. Here is a blog for more information on the functions.php file. 2. Add the GA4 code snippet (that was copied from the previous step) at the end of the file.
Screenshot 9: GA4 code added through functions.php file
4. Save the file and reload your webpageadd_action( 'wp_head', 'add_ga4_code' ) ;
function add_ga4_code() {
?>
<!-- Google tag (gtag.js) -->
<script async src="https://www.googletagmanager.com/gtag/js?id=TAG_ID"></script>
<script>
window.dataLayer = window.dataLayer || [];
function gtag(){dataLayer.push(arguments);}
gtag('js', new Date());
gtag('config', 'TAG_ID');
</script>
}
Code snippet 2: Sample GA4 code added through functions.php file
Method 2: Using a free version of the plugins (Site Kit or Monsterinsights )
Note: In the steps that follow, we will assume that you are installing the Site Kit or Monster Insights plugin from scratch.Option 1: Adding GA4 tag using the Site Kit plugin by Google
1. Head over to Plugins -> Add New Plugin, in your WordPress backend. Search for the keyword “google analytics”. 2. Next, install and activate the Site Kit plugin, as shown in the below screenshot.
Screenshot 10: Install and activate the Site Kit plugin.
3. Once the Site Kit plugin is activated, click on "Start setup."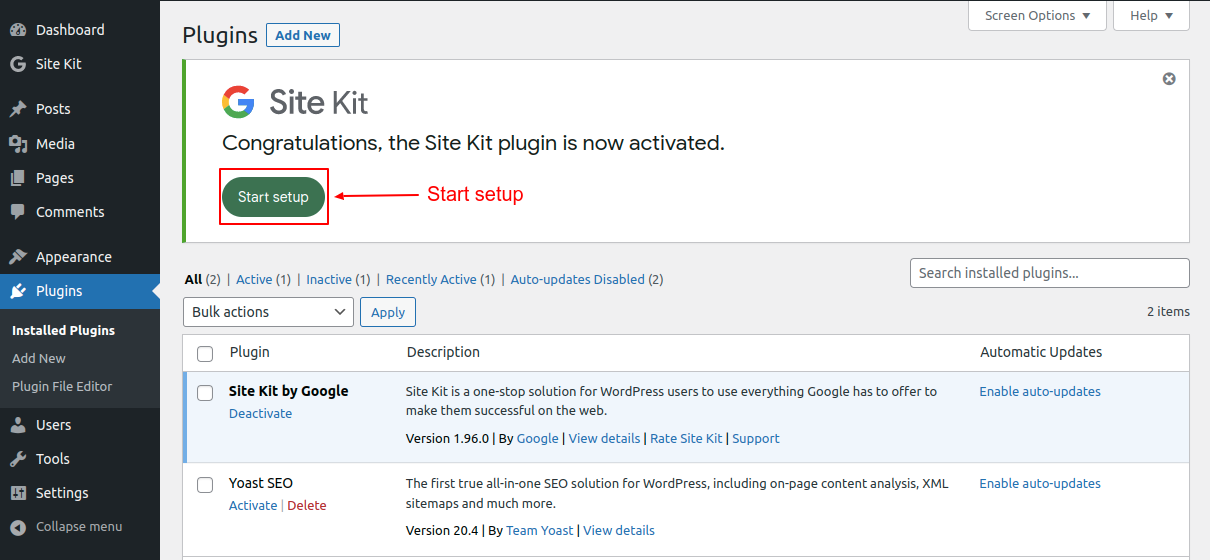
Screenshot 11: Click on "Start Setup."
4. Select the check box ”Connect Google Analytics as part of your setup.” This step is important in configuring GA4. 5. Click on “Sign in with Google.”
Screenshot 12: Connect Google Analytics as part of your setup
6. Choose an account that you use to login into Google Analytics.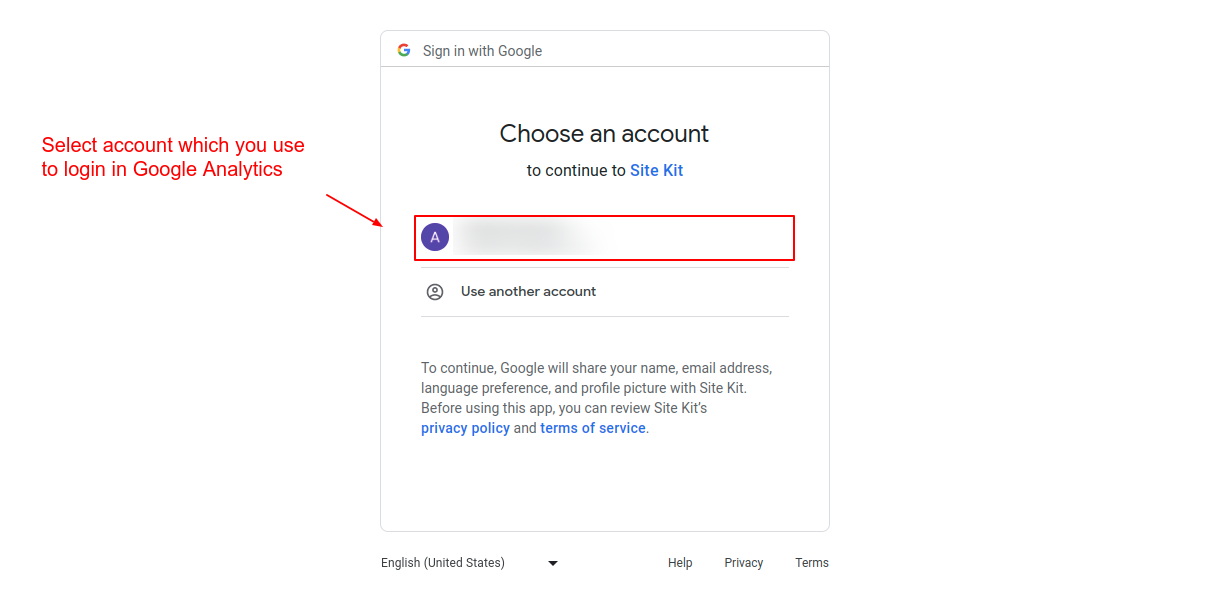
Screenshot 13: Choose the Google account that you use to log in to Analytics.
7. Give access to the Site Kit as shown in the below screenshot and click “Continue.”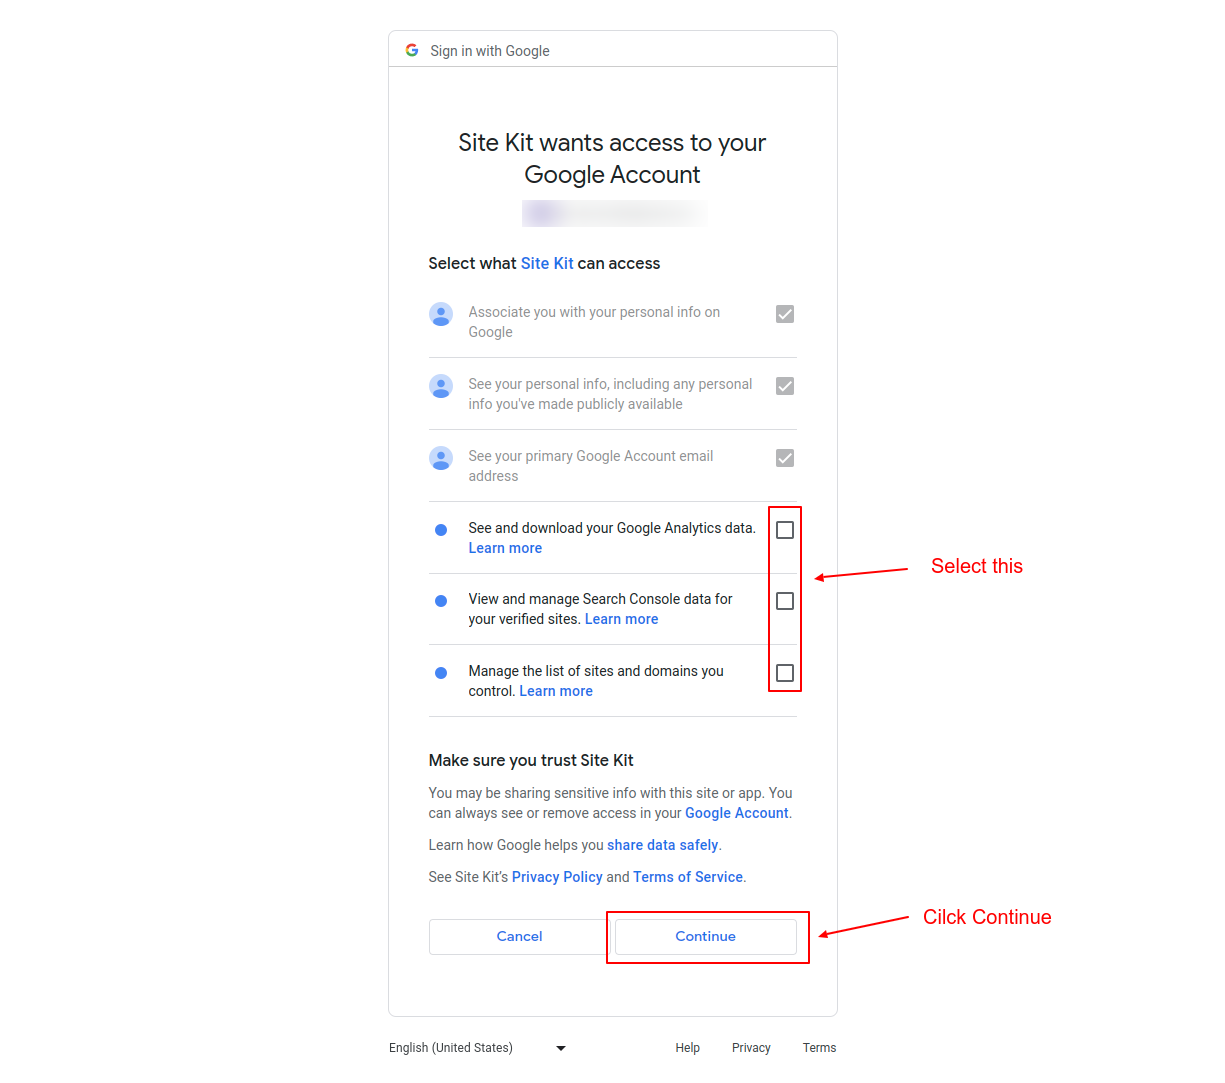
Screenshot 14: Select all the checkboxes to proceed further.
8. Click on “Verify.” This will add a verification token to your site's HTML code.
Screenshot 15: Verify site ownership
9. Click "Allow." It will allow your website to access Google Analytics data. The metrics will be shown in the Site Kit dashboard.
Screenshot 16: Allow your website to access Google Analytics data
10. Click on “Setup” to connect Site Kit and Search Console.
Screenshot 17: Connect Site Kit and Search Console
11. Click on “Next” to allow Site Kit to set up Google Analytics. You will be redirected to the Site Kit dashboard.
Screenshot 18: Allow Site Kit to add your website to Google Analytics
12. In the Site Kit dashboard, select the Google Analytics account and the newly created GA4 property. Also, select the associated UA (GA3) property as shown in the below screenshot.
Screenshot 19: Connect Google Analytics service
13 Click on “Configure Analytics,” and the Site Kit setup is complete.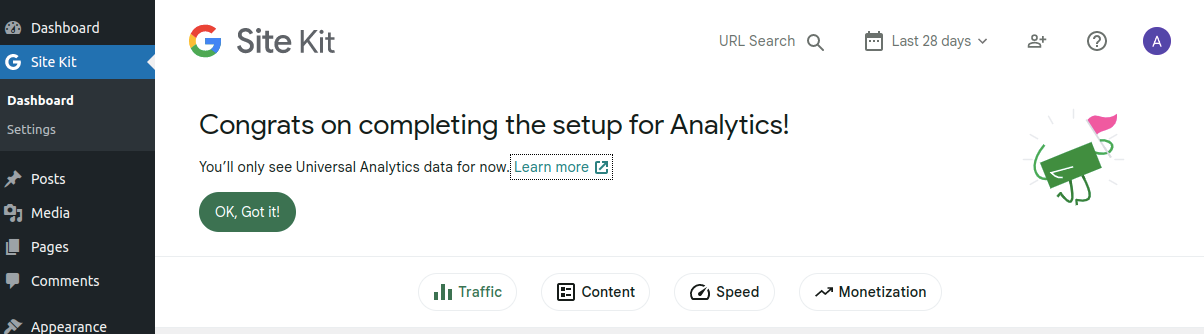
Screenshot 20: Site Kit setup completed
Here is a screenshot of the code snippet added by Site Kit.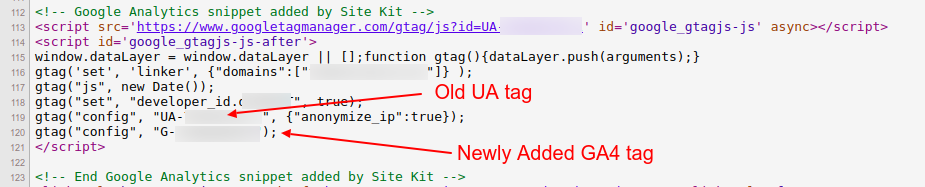
Screenshot 21: Google Analytics snippet added by Site Kit
Few things to note when you have installed the GA4 tag using the Site Kit Plugin- If Site Kit is used to configuring UA and GA4, stats will be tracked for both properties.
- At the time of writing, GA4 statistics are not shown in the Site Kit dashboard and can only be viewed. Integration of GA4 data to Site Kit’s dashboard is not yet implemented in the current version of the plugin hence you have to view GA4 data in your Analytics account.
Option 2: Adding GA4 tag using the MonsterInsights plugin
1. Go to Plugins -> Add New Plugin, in your WordPress backend. Search for the keyword “monsterInsights”. After that, install and activate the plugin as shown in the below screenshot.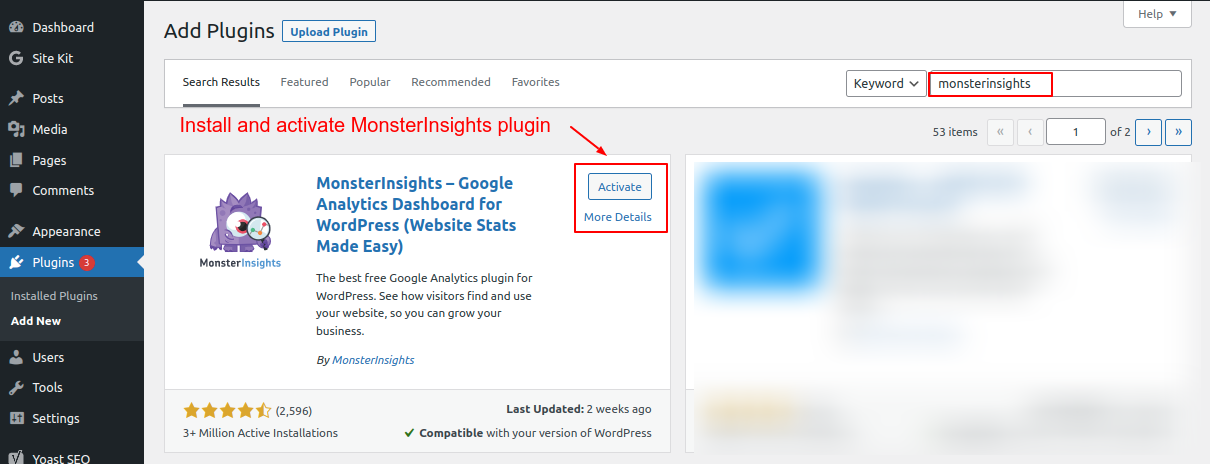
Screenshot 22: Install and activate the MonsterInsights plugin.
2. Click on “Launch the Wizard.”
Screenshot 23: Launch the wizard
3. Choose your website category and click “Save and Continue..”
Screenshot 24: Choose a category that best describes your website
5. Click “Connect MonsterInsights.” After which you will be redirected to the MonsterInsights website to connect your Google Analytics account.
Screenshot 25: Connect MonsterInsights
6. Choose a Google account to continue.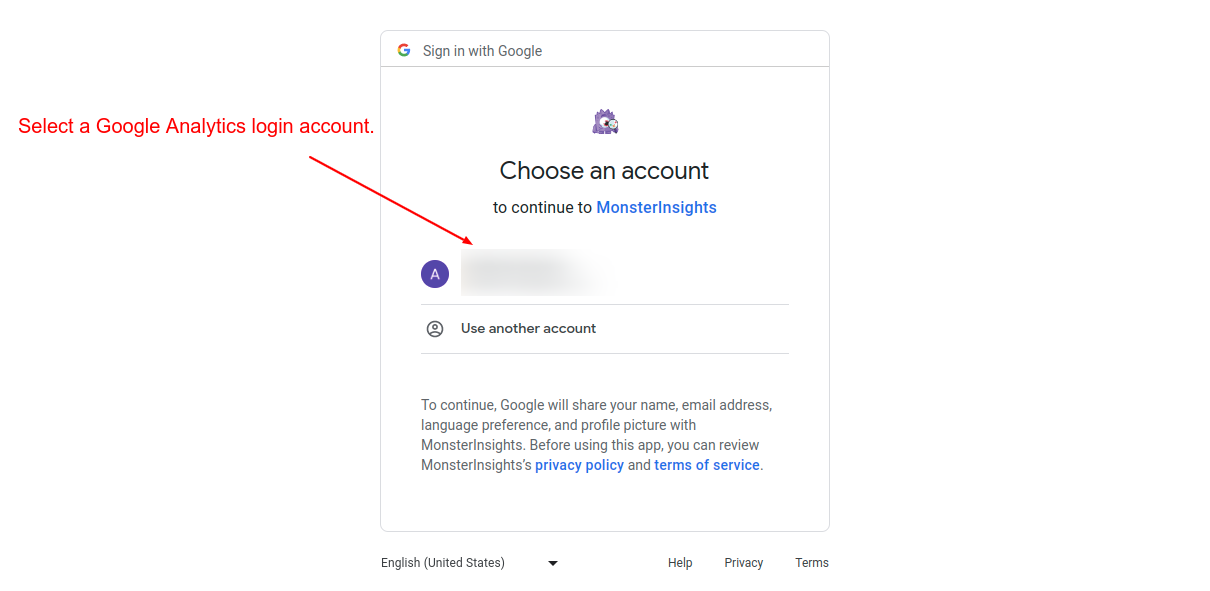
Screenshot 26: Select a Google Analytics account.
7. Click on “Allow” to give MonsterInsights access to your Google Analytics and Search Console data.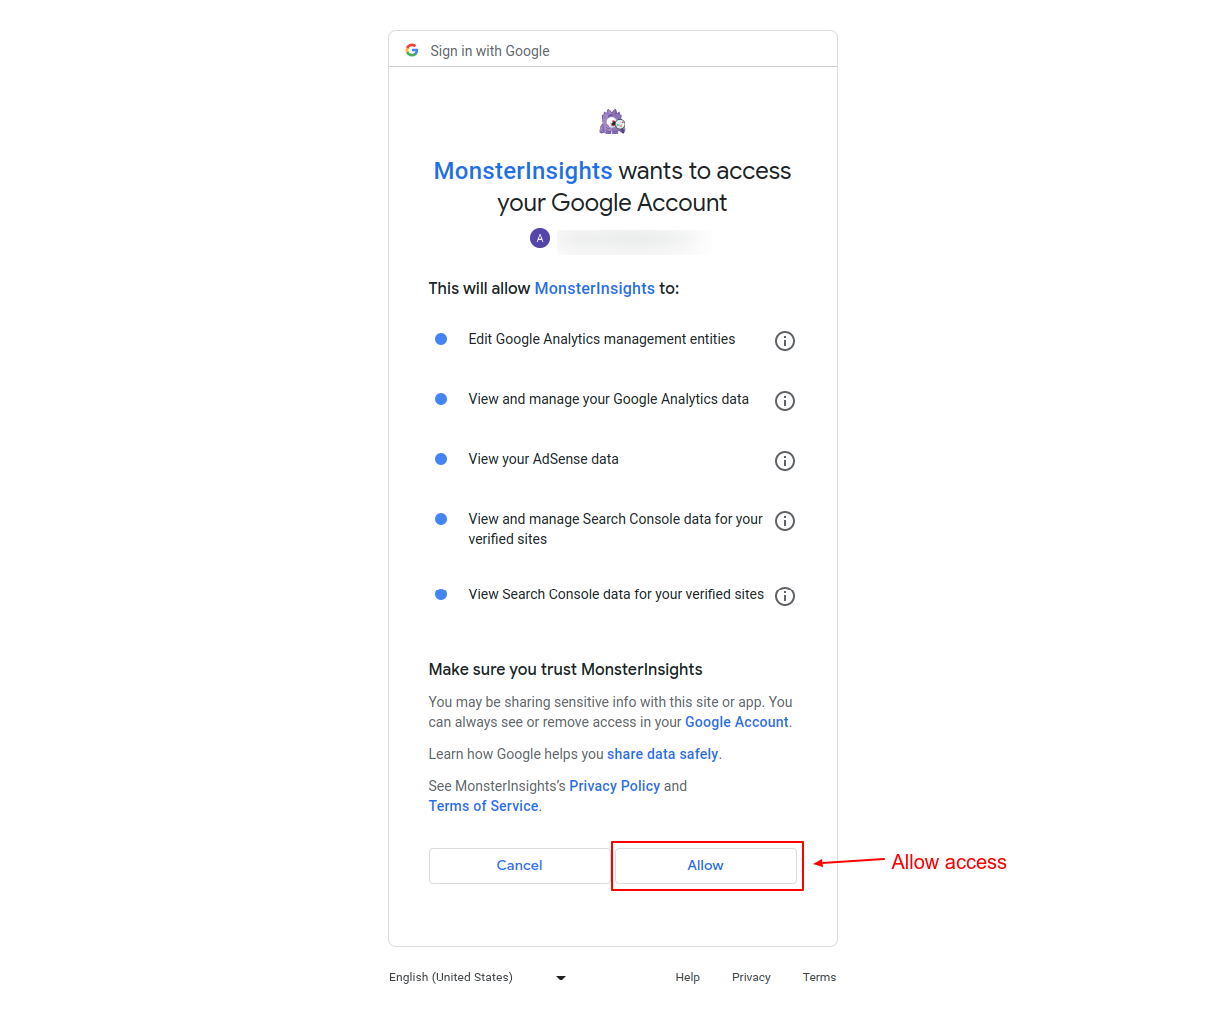
Screenshot 27: Allow Monsterinsights to access your Google account data.
8. Choose the GA4 property from the list of available properties and click on “Complete connection.”
Screenshot 28: Choose the GA4 property to connect
9. Click on “Save and continue” on the recommended settings page.Screenshot 29: Events tracking enabled by default
10. Choose which features you want the MonsterInsights plugin to enable. We recommend enabling the “Advanced Reports” and “Advanced Tracking” features. 11. Click on “Continue.”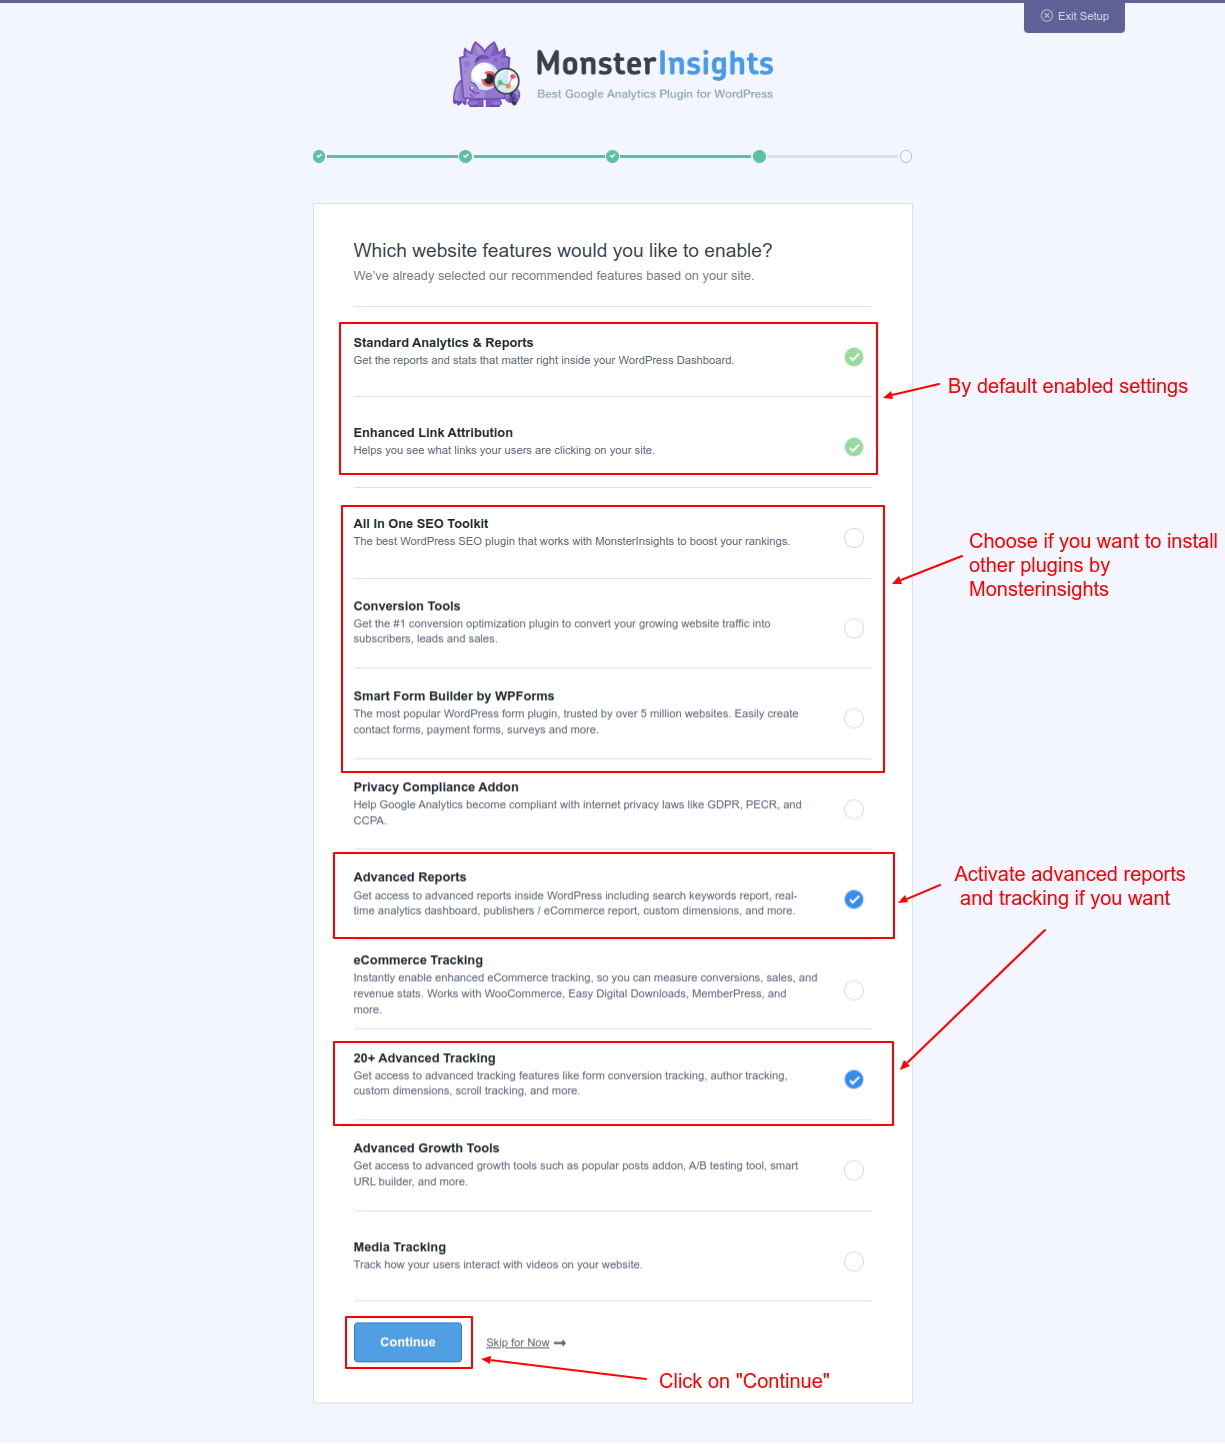
Screenshot 30: Choose which feature you want to enable.
At this point, the tracking and analytics setup is complete. 12. Next, click on “Complete setup without Upgrading.”Screenshot 31: Google Analytics is connected, and the tracking code is installed.
You will be redirected to the settings page, which will show a success message. 13. Click on “View Reports.”
Screenshot 32: Google Analytics 4 property is connected
You will be redirected to the “Reports” menu, where you will be able to see Google Analytics 4 data in the WordPress dashboard.
Screenshot 33: View reports to see your GA4 data flowing.
Note: It can take a few hours for the data to start appearing in GA4 and in your MonsterInsights Dashboard.Conclusion
Google is sunsetting Universal Analytics (UA) as of July 1, 2023, which means it will stop collecting and processing new data. In order to have a considerable amount of GA4 data tracked before UA is retired, we advise setting up Google Analytics 4 (GA4) as soon as you can. After this date, Site Kit will no longer display previous UA data. In this blog post, we discussed in detail two methods of adding GA4 code. First, by adding code manually, and second, by using the plugins Site Kit and MonsterInsights. That's it for this blog, Signing off for now. If you want experts to manage your WordPress website, then hire our awesome experts.
Tutorials
13 min read
How to Add FAQ Schema in WordPress with and without plugins (2023)
Introduction
Are you looking to add a FAQ schema to your WordPress website? If yes, then you have come to the right place. In this blog, we will discuss in-depth & step-by-step methods of adding an FAQ schema to a WordPress website.What is FAQ Schema, and why should you add it to your website?
In simple terms, a FAQ schema is structured data (JSON markup) that allows the contents of frequently asked questions (FAQs) on your website to be displayed in rich result snippets, as shown in the below screenshot.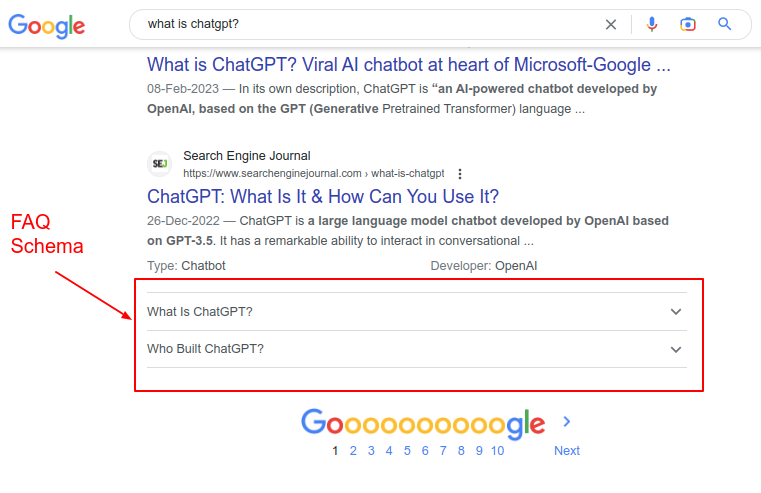
Screenshot 1: Example of FAQ schema in action
As you can see from the above screenshot when a user searches for the query “What is ChatGPT?”, along with the blog content that has ranked organically, there are two FAQs shown below it. You can accomplish this by adding a FAQPage schema markup to your website. The benefit of implementing FAQ structured data markup is that you get more screen estate in SERPs, it improves click-through rates, and it will drive more traffic to your website. In short, by adding an FAQ schema to your website, you can help search engines better understand your content so that they can display it in rich results.Methods for adding FAQ schema in WordPress
In this post, we’ll show how to add a FAQ schema using two different methods. Method 1: Using Plugins Method 2: Manually adding the schema code Note: All the methods that we discuss in this post use the Gutenberg Block Editor.Method 1: Using a free version of Plugins (Rank Math SEO and Yoast SEO)
The simplest and most straightforward method is to add an FAQ schema using plugins. The plugins will automatically generate the FAQ schema and dynamically add it to the post without you worrying about the underlying technical aspects of it.Option 1: Adding FAQ schema using Rank Math SEO
Step 1.1: Install and activate the Rank Math SEO plugin
The first step is to install and activate the Rank Math SEO plugin on your WordPress website. This plugin makes it very easy to add structured data markup to your website, such as FAQ Schema. If you have already installed the plugin on your website, you can skip this step and go to step 1.2.Screenshot 2: Search, install, and activate the Rank Math SEO plugin.
Search for the Rank Math SEO plugin and install it, or download (from here), upload, and install it on your website.Step 1.2: Create a new post and add the Rank Math FAQ block
Let's say you want to add the FAQ schema to a post (similarly, you can add it to a page).Screenshot 3 Search and add Rank Math FAQ block to the post
Search for the FAQ schema block in the Gutenberg blocks. You will see the Rank Math FAQ block since we have installed this plugin in Step 1 above. Add the FAQ block to the post.
Screenshot 4: Add the FAQ question and its answer
Next, fill out the question and answer as seen in the above screenshot. You can add multiple FAQ blocks as per your requirements. Once you've added your FAQs, you can publish them by clicking the "Publish" button. The Rank Math SEO plugin will automatically generate the FAQ structured data and add it to your post.Screenshot 5: FAQ and Styling options of Rank Math SEO plugin
The Rank Math SEO plugin also lets you set FAQ options such as- Choosing the List style of the FAQs (Numbered or Unordered HTML list )
- Setting the HTML elements as a wrapper for the title of FAQ (H3 to H6, P or Div element)
- Choosing a size of FAQ images (Thumbnail, Medium, and Large).
- Title wrapper CSS classes
- Content wrapper CSS classes
- List CSS classes.
Behind the Scenes of Rank Math SEO FAQ block (technical stuff)
Here is the schema markup that the Rank Math SEO plugin generated. You can see it by viewing the source code of the post once you have published itScreenshot 6: Schema markup added by Rank Math SEO
Note that the Rank Math SEO plugin by default adds a few schema types on the fly, such as:- Rich Results test tool detected Article Schema structured data along with FAQ Schema structured data.
- Schema.org’s validator tool detects BlogPosting schema as the root @type under which
- FAQ schema is added as isPartOf property with mainEntity as @type question and
- FAQ schema is added as mainEntityOfPage with mainEntity of @type Question
<script type="application/ld+json" class="rank-math-schema">
{
  "@context": "https://schema.org",
  "@graph": [
    {
      "@type": [
        "WebPage",
        "FAQPage"
      ],
      "@id": "http://v3.wpoets.com/testbench/?p=16#webpage",
      "url": "http://v3.wpoets.com/testbench/?p=16",
      "name": "Rank Math FAQ Schema - testbench",
      "datePublished": "2023-03-10T10:26:24+00:00",
      "dateModified": "2023-03-10T10:26:24+00:00",
      "isPartOf": {
        "@id": "http://v3.wpoets.com/testbench/#website"
      },
      "inLanguage": "en-US",
      "mainEntity": [
        {
          "@type": "Question",
          "url": "http://v3.wpoets.com/testbench/?p=16#faq-question-1677825596784",
          "name": "This is First FAQ question",
          "acceptedAnswer": {
            "@type": "Answer",
            "text": "Lorem ipsum dolor sit amet, consectetur adipiscing elit, sed do eiusmod tempor incididunt ut labore et dolore magna aliqua. Ut enim ad minim veniam, quis nostrud exercitation ullamco laboris nisi ut aliquip ex ea commodo consequat. Duis aute irure dolor in reprehenderit in voluptate velit esse cillum dolore eu fugiat nulla pariatur. Excepteur sint occaecat cupidatat non proident, sunt in culpa qui officia deserunt mollit anim id est laborum."
          }
        }
      ]
    }
  ]
}
</script>
Code snippet 1: JSON-LD schema markup generated by Rank Math SEO plugin
Option 2: Adding FAQ schema using Yoast SEO
Step 2.1: Install and activate the Yoast SEO plugin
The first step is to install and activate the Yoast SEO plugin, as we did for the Rank Math SEO plugin. You can use either of the two plugins to add the FAQ schema code.Screenshot 7: Search, install, and activate the Yoast SEO plugin
Search for the Yoast SEO plugin in the “Add New” plugin screen, install it, and then activate it. You can also download (from here), upload, and install it on your website.Step 2.2: Create a new post and Add the Yoast SEO FAQ block
Let's say you want to add a Yoast FAQ block to the WordPress post (similarly, you can add it to a WordPress page).
Screenshot 8: Search and add a Yoast FAQ block to the post
Search for “FAQ” in the Gutenberg blocks. You will see the Yoast FAQ Gutenberg block since we installed this plugin in Step 2.1 above. Click on the FAQ block to add it to the post. Now let's add the FAQ content. Enter the question and the answer to the question in the block. You can add as many questions and answers as you'd like by clicking the "Add Question" button at the bottom of the FAQ block.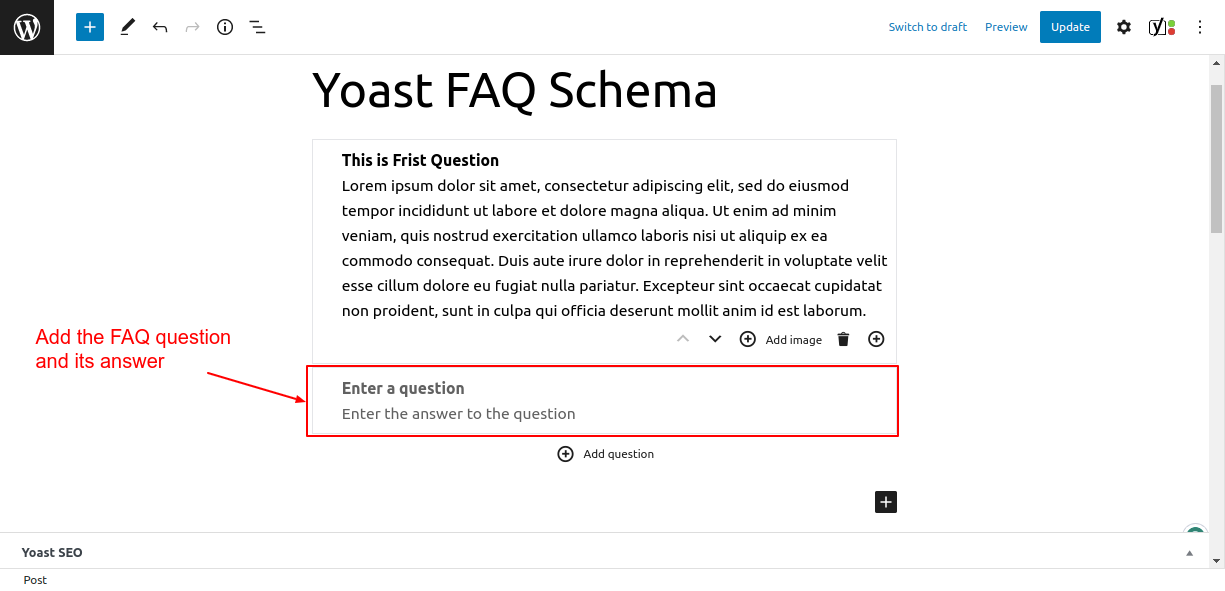
Screenshot 9: Add the FAQ question and its answer.
Once you've added your FAQ content, preview your post to make sure everything looks good. If the preview looks good, publish the post. That's it! By following these simple steps, you can easily add FAQ schema to your WordPress post using the Yoast SEO plugin.Behind the Scenes of Yoast SEO FAQ block
Below is the markup snippet that the Yoast SEO plugin automatically generated. You can see it by viewing the page source.
Screenshot 10: Schema markup added by Yoast SEO
Note that the Yoast SEO plugin by default adds a few schema types to the post, such as:- Rich Results test tool detects BreadCrumbs and Sitelinks searchbox structured data along with FAQ Schema structured data that was added.
- Schema.org’s validator tool detects only WebPage Schema and FAQPage schema as the root @type under which FAQ schema is added as mainEntity
- It also added breadcrumb schema as a child node to the root node of @type WebPage and FAQPage.
{
  "@context": "https://schema.org",
  "@graph": [
    {
      "@type": [
        "WebPage",
        "FAQPage"
      ],
      "@id": "http://v3.wpoets.com/testbench/2023/03/17/yoast-faq-schema/",
      "url": "http://v3.wpoets.com/testbench/2023/03/17/yoast-faq-schema/",
      "name": "Yoast FAQ Schema - testbench",
      "isPartOf": {
        "@id": "http://v3.wpoets.com/testbench/#website"
      },
      "datePublished": "2023-03-17T11:03:23+00:00",
      "dateModified": "2023-03-17T11:03:24+00:00",
      "author": {
        "@id": "http://v3.wpoets.com/testbench/#/schema/person/7481d9a511fe42faa4e1593e6f702108"
      },
      "breadcrumb": {
        "@id": "http://v3.wpoets.com/testbench/2023/03/17/yoast-faq-schema/#breadcrumb"
      },
      "mainEntity": [
        {
          "@id": "http://v3.wpoets.com/testbench/2023/03/17/yoast-faq-schema/#faq-question-1679044158945"
        }
      ],
      "inLanguage": "en-US",
      "potentialAction": [
        {
          "@type": "ReadAction",
          "target": [
            "http://v3.wpoets.com/testbench/2023/03/17/yoast-faq-schema/"
          ]
        }
      ]
    },
    {
      "@type": "Question",
      "@id": "http://v3.wpoets.com/testbench/2023/03/17/yoast-faq-schema/#faq-question-1679044158945",
      "position": 1,
      "url": "http://v3.wpoets.com/testbench/2023/03/17/yoast-faq-schema/#faq-question-1679044158945",
      "name": "This is a Second question",
      "answerCount": 1,
      "acceptedAnswer": {
        "@type": "Answer",
        "text": "Lorem ipsum dolor sit amet, consectetur adipiscing elit, sed do eiusmod tempor incididunt ut labore et dolore magna aliqua. Ut enim ad minim veniam, quis nostrud exercitation ullamco laboris nisi ut aliquip ex ea commodo consequat. Duis aute irure dolor in reprehenderit in voluptate velit esse cillum dolore eu fugiat nulla pariatur. Excepteur sint occaecat cupidatat non proident, sunt in culpa qui officia deserunt mollit anim id est laborum.",
        "inLanguage": "en-US"
      },
      "inLanguage": "en-US"
    }
  ]
}
Code Snippet 2: FAQ Schema code generated by Yoast SEO
If you observe the FAQ markup generated by Rank Math and Yoast SEO, the structure of the JSON-LD code is different in each case.Method 2: Adding schema manually
In this method, we will look into how to add FAQ schema data to the post manually without the use of plugins. There are a few things that you should know when adding the schema manually- Since we are not using any plugin, the styling of a FAQ block has to be done manually.
- The FAQ schema is to be coded manually or generated using an online tool
Step 2.1 Create the visual part of the FAQs in the Post
The first step is to add the question and answer to the post using inbuilt Gutenberg blocks. This will create the HTML (visual part) for the FAQs. To do that, search for the heading block (as shown in screenshot 2.1 below) and add it to the post. In the heading block, add your FAQ question. Change the heading level to H5 or H6 as per your choice. You can also use a paragraph block instead of a heading Gutenberg block.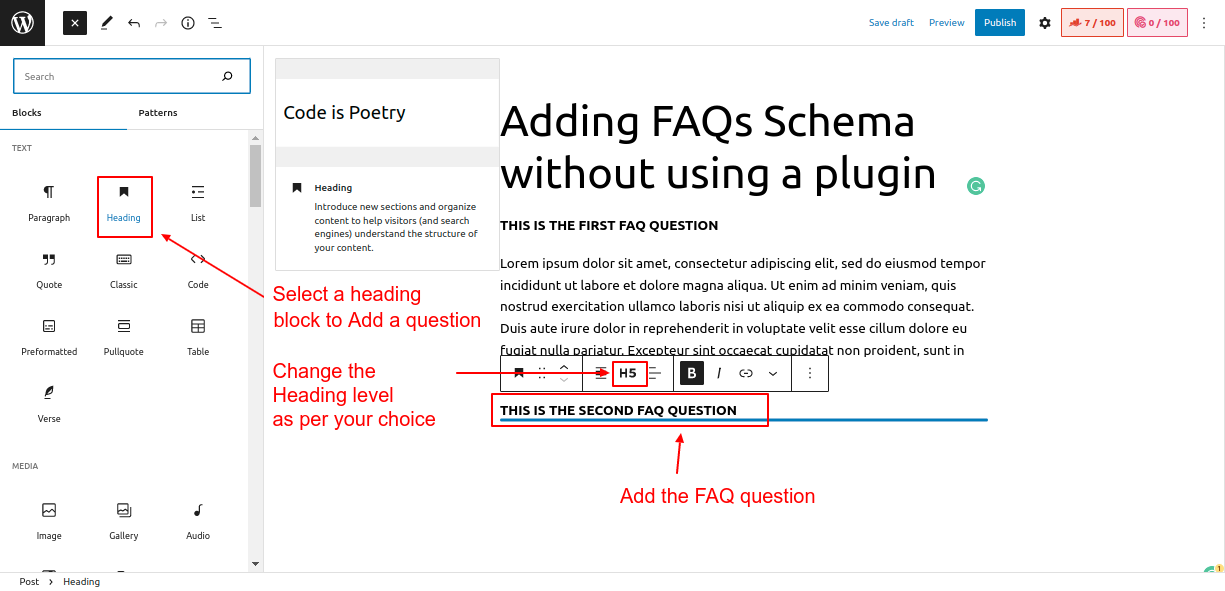
Screenshot 11: Add an FAQ question to the post using inbuilt Gutenberg blocks.
Once the question is added, enter the FAQ answer in the paragraph block, as seen in screenshot 2.2 below.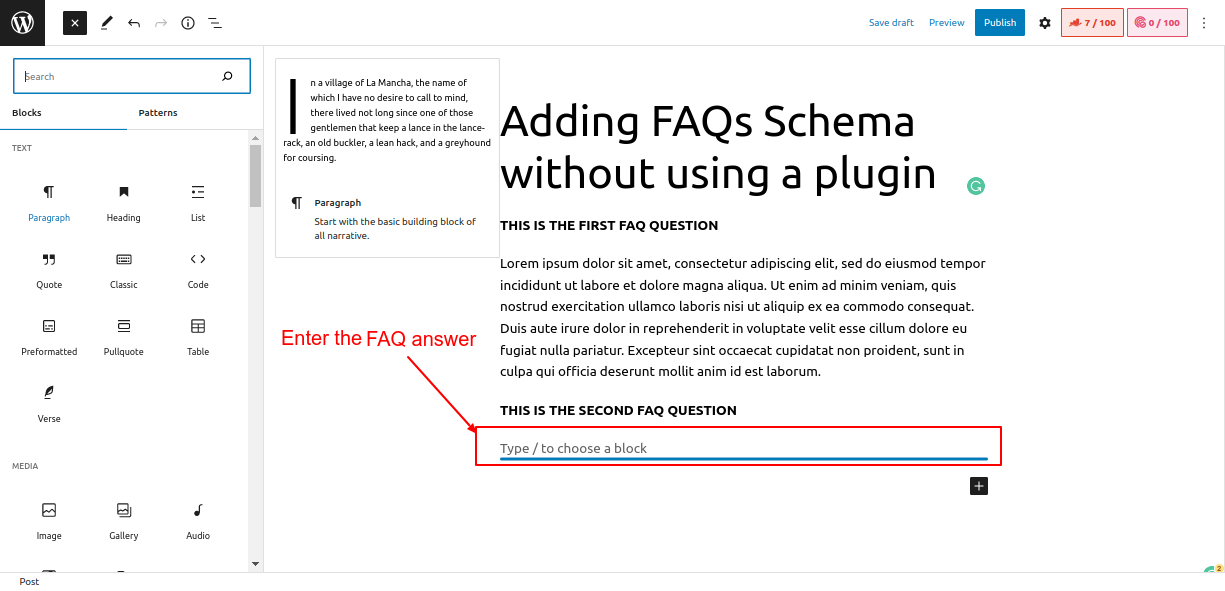
Screenshot 12: Enter the FAQ answer
Now we have added both the question and its answer to the post. Next, we will add schema code so that search engines can detect the FAQs and display them in rich search results.Step 2.2 Generating JSON-LD markup using online Schema Generator
Head over to this Link https://saijogeorge.com/json-ld-schema-generator/faq/ which is a free tool for generating FAQ schemas.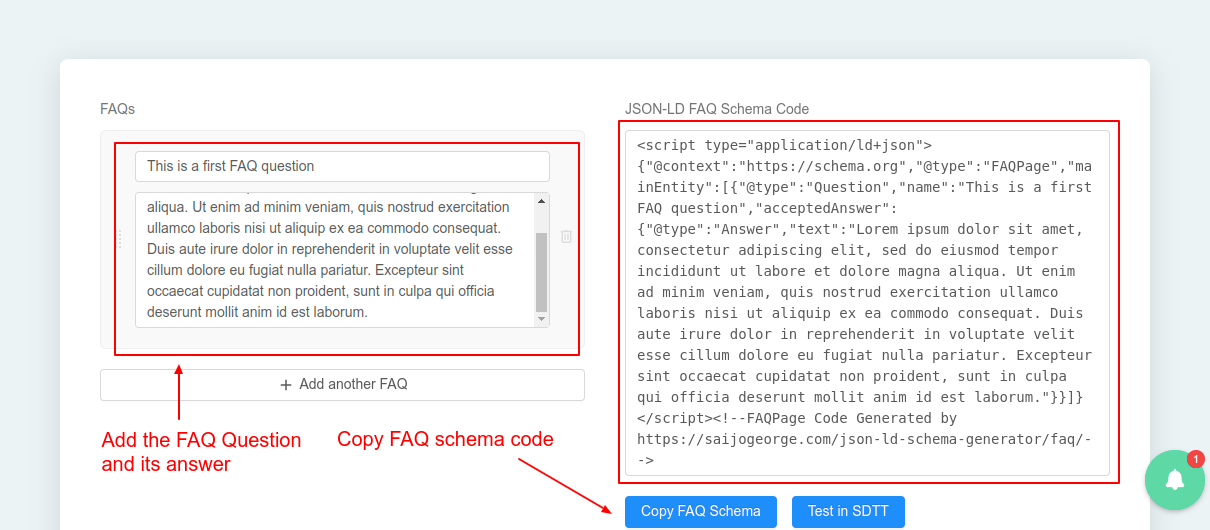
Screenshot 13: JSON-LD online Schema Generator
Add your FAQ question and its answer as shown in the above screenshot. You can add multiple FAQs at the same time. The schema generator will add structured data for that many FAQs.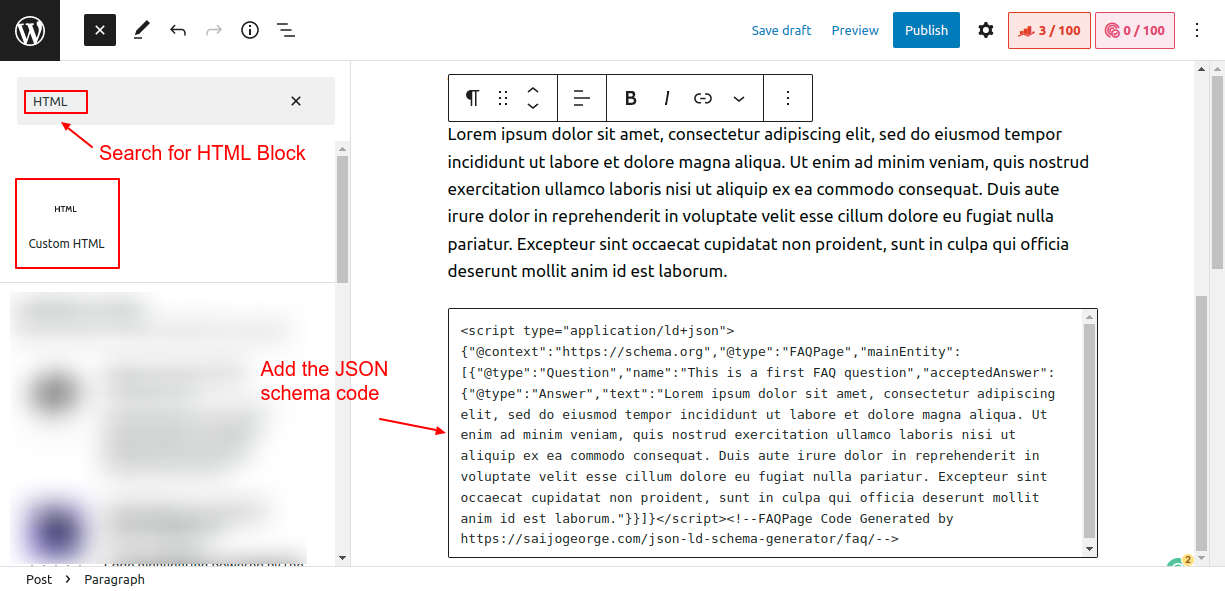
Screenshot 14: Add JSON-LD schema markup to the HTML block in your post
The next step is to add this generated code to our WordPress post. To do that, search for an HTML block and add it to the post as shown in the above screenshot (2.5). After that, you can update or publish the post. Visually, there is no difference after this step, but search engines can now crawl and display the FAQs as rich results.Behind the scenes of manually adding the FAQ schema
Once you have published the post, right-click on it and view its source.You will see the FAQ schema code that was added manually.
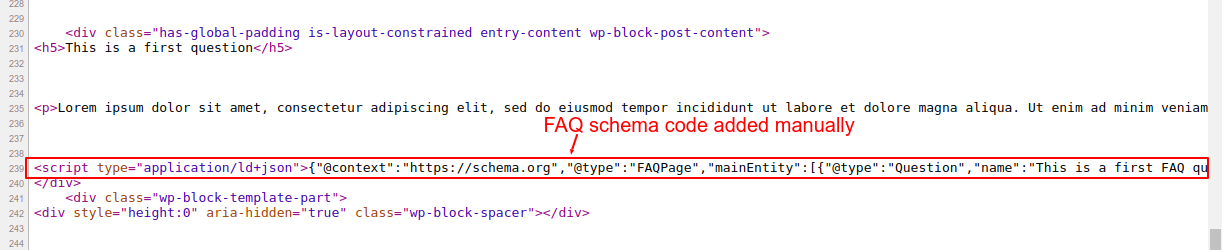 Screenshot 15: FAQ schema code added manually to the post
<script type="application/ld+json" class="rank-math-schema">
{
  "@context": "https://schema.org",
  "@type": "FAQPage",
  "mainEntity": [
    {
      "@type": "Question",
      "name": "This is a first FAQ question",
      "acceptedAnswer": {
        "@type": "Answer",
        "text": "Lorem ipsum dolor sit amet, consectetur adipiscing elit, sed do eiusmod tempor incididunt ut labore et dolore magna aliqua. Ut enim ad minim veniam, quis nostrud exercitation ullamco laboris nisi ut aliquip ex ea commodo consequat. Duis aute irure dolor in reprehenderit in voluptate velit esse cillum dolore eu fugiat nulla pariatur. Excepteur sint occaecat cupidatat non proident, sunt in culpa qui officia deserunt mollit anim id est laborum."
      }
    }
  ]
}
</script>
Code snippet 3: JSON-LD schema code generated by online schema generator
Drawbacks of manually adding schema
While you can manually add the JSON-LD FAQ schema to a WordPress site without using a plugin, there are some potential drawbacks to consider:- You need to manually update the schema markup every time you add or remove or update a FAQ question or answer. This means you have to either manually edit the question and the answer in the JSON code or regenerate the schema code for the FAQs. This can be time-consuming and error-prone.
- If your website has many web pages which consist of FAQ sections, manually adding FAQ schema to all those web pages will become time-consuming, error-prone, and not scalable.
- Managing multiple schemas on a single page or post can be challenging. Especially if you need to add or update properties to the existing schema code.
Testing the WordPress FAQ schema
Once you have implemented schema markup on your WordPress site, whether using a plugin or manually, make sure you test it. You can test it using these two toolsTesting the FAQ schema using Google’s Rich Results Testing tool
Rich results test tool allows you to check whether or not the structured data is correct. To test the validity of the FAQ schema code, simply copy the URL of your post and paste it into the tool.
Screenshot 16: Enter the URL in Google’s Rich Results Testing tool.
The tool shows the test results, as shown in the below screenshot. We can see that valid FAQ structured data is detected. If there are any errors or warnings, they will be highlighted in the test results.
Screenshot 17: Test results show a valid FAQ schema.
Testing the FAQ schema using Schema.org’s validator
https://validator.schema.org/ is an online tool where all the schema types can be validated. It shows a summary of the extracted structured data graph and points out syntax errors. Head to this URL https://validator.schema.org/ and enter the URL for which you want to test FAQ markup data. Once the URL is entered, click the "run test" button as shown in the screenshot below.
Screenshot 18: Testing structured data using schema.org validator
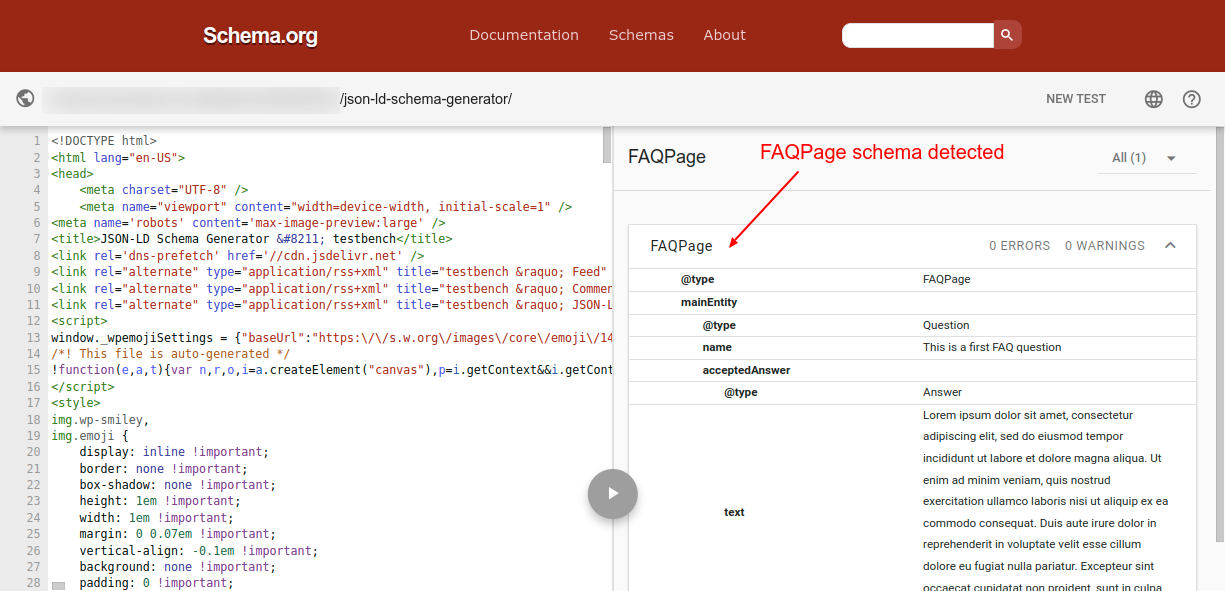
Screenshot 19: FAQPage detected by schema.org validator
As you can see from the above screenshot, the schema tool detected valid FAQPage structured data. If you have multiple schema codes added to the same post, they will also show up in the list. Also, If there are any errors in the markup, then make sure to fix them before submitting your pages for indexing by search engines. Note: If you are updating the schema code, make sure you clear the WordPress cache before testing it using these tools.Conclusion
In this blog post, we discussed in detail two methods of adding an FAQ schema. First, by using the plugins Rank Math SEO and Yoast SEO; and second, by using the manual method. We recommend that you use plugins to add the FAQ schema code to your website because it will automatically create and update the schema for you behind the scenes. It will also save a lot of time, and you need not worry about the underlying technical aspects of it. Also, once the schema code is added using any of the above methods, it's important to use the recommended tools to validate it to make sure it was added correctly and is visible to search engines. If you want experts to manage all the schemas of your website, then hire our Awesome WordPress experts. That's it for this blog, thanks for reading - happy optimizing :)Uncategorized
0 min read
Vavada Casino
Бонус Вавада быстро привлекает новых игроков
Займитесь игрой на платформе, где щедрые предложения ждут всех желающих! Получите сразу порцию приятных сюрпризов. Воспользуйтесь отличным предложением: за регистрацию и первый депозит вам начислят дополнительные средства для игры. Это шанс попробовать разные слоты и узнать, что подходит именно вам.
Почему это важно? Получив дополнительные средства на счет, вы сможете без риска для бюджета протестировать новые игры и найти свои любимые. А если подгадать так, чтобы играть с умом, можно возвращать с выигрышем.
Не упустите возможность! Действуйте, открывайте горизонты и наслаждайтесь качественным досугом с приятными акциями.
Как получить бонус Вавада при регистрации?
Для активации предложения при создании учетной записи нужно выполнить несколько простых шагов. Сначала перейдите на официальный сайт и нажмите на кнопку регистрации. Заполните все необходимые поля: электронную почту, пароль и личные данные. После этого изучите условия и подтвердите свое согласие с ними.
Не забудьте ввести специальный промокоды на вавада, если они есть, в отведенное для этого место на регистрационной странице. Это позволит получить дополнительные преимущества сразу после создания аккаунта.
После завершения регистрации рекомендуется зайти в личный кабинет, где можно увидеть статус начисления предложения. Учтите, что некоторые акции могут требовать верификации аккаунта, поэтому следует предоставить все запрашиваемые документы.
Что включает в себя бонус Вавада для новых игроков?
Каждый начинающий клиент получает щедрые предложения, которые варьируются от денежных средств до бесплатных вращений. Это позволяет сразу же ощутить атмосферу игры и сделать первые ставки с минимальными рисками.
- Депозитные предложения: Получите процентное увеличение вашего первого взноса, что даст большую стартовую сумму.
- Фриспины: Попробуйте без риска несколько популярных слотов. Это поможет освоиться и найти любимые игры.
- Кэшбэк: Даже если вы не выиграли, часть потраченных средств может быть возвращена, что немного сглаживает удар.
Обратите внимание на условия использования, чтобы максимально эффективно воспользоваться всеми преимуществами. Выполнение определённых требований позволит вывести выигрыши и наслаждаться подарками от платформы.
Как использовать бонус Вавада для увеличения выигрышей?
Чтобы максимально выгодно использовать полученное вознаграждение, первым делом внимательно изучите условия его активации и использования. Обратите внимание на требования по ставкам, так как чем ниже эти значения, тем быстрее получится вывести средства.
Выберите игры с высоким процентом возврата игроку (RTP). Такие развлечения способны ощутимо увеличить шансы на успех. Приоритетом могут стать слоты, которые часто предлагают бонусные функции – это дополнительные шансы на выигрыш.
Воспользуйтесь стратегиями управления банкроллом. Установите лимит на максимальные ставки и придерживайтесь его, чтобы избежать потерь. Рекомендуется делить сумму вознаграждения на несколько игорных сессий.
Следите за акциями и предложениями. Часто разные мероприятия могут предоставлять дополнительные средства или фриспины, что дает возможность увеличить ваш капитал. Применение коммуникационных каналов, таких как рассылки и социальные сети, поможет быть в курсе лучших предложений.
Не забывайте о необходимости изучения характеристик игр. Пробуйте новые слоты с демонстрационным режимом, чтобы понять механики и определить, какие из них лучше всего подходят для применения ваших средств. Зная игру, можно разработать свою собственную тактику.
Изучите отзывы других пользователей и результаты игры. Поделитесь своим опытом с другими участниками, так как коллективное мнение может оказать большое влияние на выбор и подход к играм.

General
4 min read
International Women’s Day: Stories of Empowerment at WPoets
At the Outset
“A Woman is a full circle. Within her is the power to create, nurture and transform” - Diane Mariechild.On the occasion of International Women's Day, we at WPoets decided to celebrate the remarkable women who make up our workforce. As part of our preparations for the day, we organized a video shoot where all the female employees of our organization expressed their thoughts, experiences, and ideas about being a woman in the modern workplace. Our hope was that by sharing their stories, these women would also inspire others to find their own voice and embrace their own power. We were excited to see what would come from this initiative and couldn't wait to hear from the amazing women of WPoets.
The Preparations
After holding a round of interactive brainstorming sessions, we came up with something special to celebrate this year's International Women’s Day. The idea was to enable women of WPoets to share their thoughts and to encourage more women out there. After a lot of discourse, we decided to interact with the women at WPoets, interview them, and record their sessions to understand their perspective on women's empowerment. Soon, the preparations began for the execution, and the team had the whats and hows in order.Getting ready for the IWD interview and some fun moments behind the scenes
Finally, all the women were asked to start preparing for the shoot. Some of our teammates are still working from home, so we held their recording sessions virtually. All the team members who were in town were called to the office to shoot their parts one after the other.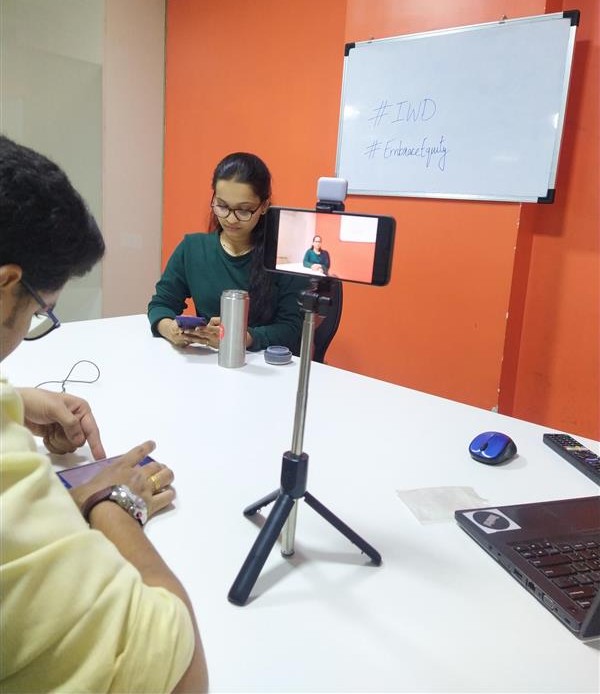
Awesome ladies getting ready for their video interview
We asked a series of questions to each one of them, and they expressed their thoughts about their success and struggles. (Which I hope everyone must have seen in the video posted earlier. If not yet, then it’s never too late. Click on this link to get a glimpse of what collective female brawn looks like.)

Fun rehearsals for the final shoot
There were times when camera consciousness kicked in, but drawing inspiration from each other and a few retakes were all it took to get the job done. The shoot was executed without a hitch, and the footage later went to the editing team for final preparations. The whole team of WPoets also had a small celebration as a token of appreciation, love, and respect for the ladies they have in their lives personally and professionally.Commencement of the celebration
Cake Cutting Scenes
A cake was ordered for the beautiful ladies of WPoets. The scrumptious cake left everyone drooling. Everyone laughed around and enjoyed snack time. Celebrating the Women's Power
Customized mugs as a token of gesture for all the Ladies
The team also came up with the idea of giving out customized mugs. Our designers did a fabulous job with their creativity in representing what exactly was initially visualized (as you can see in the design concept below).
Customized mugs designed
Distributing gifts to the Awesome Women of WPoets
We could witness the spark glowing on everyone’s face while being cherished at the time of celebration and gifts distribution.
Customized mugs gifted to the Awesome Ladies
The spotlight of the event
After all the hustle and bustle, the final video was rendered and launched.Kind and heartfelt gestures from the entire team on #IWD
The women of WPoets have always had a lot of support from their male colleagues. As for shooting the video interviews, Aashish guided, supported, and encouraged all his female colleagues. He recorded the video interviews at the office, put them all together, and edited them to make the amazing IWD interview you saw above. Pratik, who’s an avid blogger, wrote a benevolent post supporting and praising all the women out there. Check out his awesome post on IWD.Embrace Equity: International Women’s Day and Beyond
This year’s International Women’s Day for WPoets was empowering not just for the women but for the men as well. All the encouragement, support, and guidance that women received from the male colleagues was something in itself beautiful and inspiring to witness. It was an inspiring reminder that all of us can help create an environment of gender equality and equity. Here is the feedback from our co-founder, Savita Soni, on celebrating International Women's Day at WPoets.“Taking this opportunity to appreciate Sanjana Bhatt for organizing such a beautiful event for Holi and Women's day and it was not possible without mentioning Aashish’s and Pratik’s efforts and hard work. Thanks, everyone, for participating and making it wonderful!“That’s all for this International Women's Day. May we make it an even bigger success next year. After all, the females are Avyaanas….


General
8 min read
Debunking Common WordPress Myths and Misconceptions
Introduction
Every once in a while, we come across marketers and business owners who tend to believe WordPress myths. They believe that it's difficult to use, that only small-scale websites can be built using it, that it's not secure, that it’s too expensive to maintain, or that sometimes they even have personal excuses about it. Let's talk about why these misunderstandings happen in the first place and how to get past them so that the readers can make an informed choice.WordPress is not secure
This is one of the most common myths about WordPress and has been done to death. While no CMS is 100% secure, WordPress is actually quite secure when compared to others. WordPress security revolves around three things. Let's discuss this in more detail.WordPress Core
The WordPress core software is one of the most critical targets for attacks. Hackers are always looking to exploit out-of-date versions of the WordPress core. They use loopholes to gain access to the website and perform unauthorized activities. To protect that, the WordPress core software is regularly audited and updated by security experts and released to the public. The WordPress Security Team is in charge of core security. It’s made up of lead developers, security researchers, and web security professionals. Any security flaws that are detected, are reported to the security team. The team then works to confirm the vulnerability and figure out how severe it is. If the vulnerability is confirmed, the security team makes plans for a patch to fix it. Depending on how serious the problem is, the patch can either be added to a future version of WordPress or put out right away as a security release. In short, they are really working hard to keep the WordPress core secure.Themes and plugins system
One reason why so many people use WordPress is because of its theme and plugin system. The WordPress theme directory has over 10,000 themes to choose from, and the plugin directory has over 60,000 plugins. These numbers come from official directories, but just think about how many themes and plugins are available on third-party sites and in private repositories. Hackers take advantage of themes and plugins that are poorly coded because they are easy targets with many attack surfaces. If you are really serious of your WordPress website security then you should follow certain best practices such as- Installing themes and plugins from trusted sources
- Limit the use of plugins to a minimum
- Regularly updating themes and plugins
- Scanning themes and plugins from a security perspective
Managing the website
The security of WordPress also depends on how it's managed. We see that most website owners do not manage their websites because they lack knowledge, time, or budget, or are simply negligent. They don’t realize how important it is to keep their WordPress site secure until someone hacks it. If you follow the best security practices, like using two-factor authentication, installing SSL certificates, keeping the versions of your WordPress core, theme, and plugins up to date, and using a secure hosting provider, among others, you can easily prevent security problems. On top of that, it's recommended to use a third-party security plugin or service to further strengthen your website's security. To know more about "dos and don'ts" in WordPress security, go through this article.WordPress is not as trending as it was five years ago.
Another common myth about WordPress is that it's not as trendy as it was a few years ago.Here are the WordPress usage statistics. If we have a look at the growth of WordPress in the past five years, it is astounding.
 Historical yearly trends in the usage statistics of WordPress Source: https://w3techs.com
WordPress is difficult to use
WordPress started primarily as a simple blogging tool, but over time it evolved so that a wide spectrum of web solutions could be built. To achieve this flexibility, an architecture of themes and plugins was created. Concepts such as posts, pages, permalinks, blocks, widgets, etc. were used, Advanced concepts such as custom post types, and custom fields, among others, were introduced. When you first start using WordPress, all of this technical jargon may seem overwhelming. But over a period of time, you will get used to it. In fact, WordPress hits the sweet spot between being beginner-friendly and developer friendly. For beginners, it provides a great way to build websites. Of course, there is a learning curve for it, and to help them, a lot of resources are available on the internet to get them started. For developers, they can build everything from beautiful websites to complex web applications to high-traffic websites on top of WordPress.WordPress is slow
It's true that WordPress isn't fast out of the box; it needs to be optimized continuously, which is where this WordPress myth comes from. Here are a few possible reasons why WordPress may be slow.Slow WordPress admin dashboard
This is one of the most common problems that stakeholders who manage the site complain about. You know the scenario: You want to quickly publish a post, bulk upload images, add or reshuffle menus, or update content on pages, but WordPress admin takes forever to load. This problem gets worse when you have a team of people, like a web manager, content producer, developer, webmaster, marketer, and others, working on the admin dashboard at the same time. We can all agree that a slow WordPress admin dashboard is a productivity killer. But having said that, there are many ways the WordPress backend can be made faster. Here are a few- Upgrade the hosting plan or change your hosting provider
- Update PHP version
- Increase WordPress memory limit
- Optimize WordPress database
Slow Frontend
The front end of the website will receive almost all of your website traffic. If your front end of the website is slower, then, in the most simple terms, it's hurting your business.
Here are a few reasons for the frontend website being slow
- Bulky themes or slow page builders
- Slow plugins ( that add too much CSS/JS )
- Not using caching, image compressions, and other speed improvement techniques
- Not using CDN
- Relying on cheap or shared web hosting
- Get Good WordPress Hosting
- Use Optimized themes and plugins
- Use a Content Delivery Network(CDN)
- Use a Caching Plugin
- Reduce the number of HTTP requests
- Always optimize images
The future of WordPress is Uncertain
In recent times, this new misconception has popped up. We see that many marketers are talking about this as they are worried about the future of WordPress. Here is the reason why this misconception arises in the first place. Nowadays, a lot of popular JS frameworks are on the rise. You might be aware of or have heard of frameworks like ReactJS, Next.js, and Gatsby, among others. These are Javascript frontend frameworks, which are used for building websites and complex business applications. They use an architectural approach called Jamstack, which has recently become popular. Since these new frameworks are on the rise (along with the Jamstack approach), stakeholders are uncertain about the future of WordPress. They believe that WordPress will be obsolete in a few years and that they will need to switch to these frameworks to build their next website (which is a form of FOMO). Also, there is a lot of debate going on between WordPress and Jamstack about which one is better. You can read more about it here. There are many differences between Jamstack and WordPress. These tools use a different approach and architecture to build web solutions. Here are a few differences.| WordPress | Jamstack |
|---|---|
| All-in-one platform to build websites and applications | A collection of tools to create websites and applications |
| Monolithic architecture | Modular architecture |
| Dynamically generated web pages | Statically generated web pages |
| Everything, including databases, web servers, and business logic, is self-contained. | Custom logic and third-party services are consumed through APIs. |
| User-friendly (even nontechnical users can manage the website) | Developer-friendly (hence dependency on technical expertise to manage the website) |
| Performance optimization has to be continuously improved. | Static websites hence performance is out of the box |
| WordPress is good for building highly dynamic sites. This includes news sites, forums, and other sites with a lot of user interaction or sites that are updated often. | Jamstack is good for building static websites where there are few user interactions. |
| Extensive themes and plugin library | A relatively new ecosystem; hence, themes and plugins are limited. |
| Marketer-friendly | Non-Marketer-friendly (as of now) |
| Development costs are cheaper initially | Development costs are higher initially |
Conclusion
We discussed the top myths and misconceptions revolving around WordPress and tried to overcome them. It will help marketers and decision-makers make an informed decision about whether to use WordPress in their next project. If you have any further questions or would like to learn more about WordPress, please contact our web experts.Uncategorized
0 min read
Pokerdom Casino
Новые игровые автоматы отзывы
Ищете что-то захватывающее для досуга? Вашему вниманию представлены последние достижения в ассортименте азартных развлечений. С последних откликов видно, что пользователи в восторге от яркой графики и интересных механик. Высокие коэффициенты и разнообразие тем привлекают внимание и способствуют увлекательной игре.
Не упустите шанс попробовать самые свежие решения, которые предлагают не только новизну, но и проверенное время выигрышей. Участники отмечают, что новые функции и особые акции делают развлечения еще более привлекательными и доступными.
Обратите внимание на рейтинги и комментарии – эти рекомендации помогут вам выделить самые интересные предложения. Узнайте, какие варианты рекомендованы для максимального удовольствия и возможности получить прибыль. Ваши увлечения могут приносить не только радость, но и реальные призы!
Чем новые игровые автоматы отличаются от классических вариантов?
Современные слоты предлагают игрокам ряд уникальных особенностей, которые делают процесс более захватывающим и разнообразным. Вот несколько ключевых отличий:
- Интерактивные элементы: Новая волна устройств часто включает мини-игры и дополнительные раунды, позволяющие активнее участвовать в игровом процессе.
- Расширенные графические возможности: Современная графика и анимация создают более реалистичную атмосферу, улучшая общее впечатление от игры.
- Разнообразие тем: Тематика современных аппаратов охватывает широкий спектр, от классических фруктов до кино и популярных сериалов, что привлекает разные аудитории.
- Механика выигрышей: Часто используются механизмы, такие как "победы по всему экрану", предлагающие многоуровневые возможности для выигрыша.
- Мобильная совместимость: Многие продукты адаптированы для смартфонов и планшетов, позволяя играть в любой точке.
- Бонусные системы: Разнообразные акции и программы лояльности, например, бесплатные вращения и кэшбэк, делают игры более выгодными.
- Прогрессивные джекпоты: Увеличение призовых фондов, которые растут с каждым ставкой, привлекает игроков, стремящихся к крупным выигрышам.
Эти и другие аспекты делают современные слоты более привлекательными для игроков, чем классические варианты. Каждое нововведение стремится улучшить качество развлечения и повысить шансы на успех.
Как выбрать игровой автомат с учетом отзывов пользователей?
Сначала сосредоточьтесь на качество и количество мнений. Если один из автоматов имеет много положительных откликов, это сигнал о его популярности. Читайте как положительные, так и отрицательные мнения, чтобы понять, в чем сильные и слабые стороны аппарата.
Обратите внимание на детали: упоминается ли частота выплат и размер выигрышей. Проанализируйте, о чем рассказывают люди – систематические небольшие выигрыши или редкие, но крупные джекпоты. Это поможет сформировать представление о том, чего ожидать.
Сравните мнения о графике и звуковом сопровождении. Визуальные и аудиоэффекты могут сильно повлиять на ваше впечатление от геймплея, так что выбирайте то, что по душе именно вам.
Проверьте информацию о разработчике. Известные компании часто создают более качественные продукты. Читайте, что говорят о самой фирме – так вы поймете, стоит ли доверять их дизайну и механике.
И, наконец, обращайте внимание на личные предпочтения других пользователей. Человек с аналогичными интересами может подсказать, что именно понравится вам. Следите за тем, как другие воспринимают возможность взаимодействия и приятные моменты в процессе игры.
На что обратить внимание в обзорах экспертов перед игрой?
Технические характеристики – соблюдение соотношения RTP (возврат игроку) к волатильности. Чем выше RTP, тем лучше шансы на выигрыш в длительной перспективе. В обзорах часто упоминаются эти данные, так что ищите их в критически важных моментах.
Антикризисные стратегии и советы – проверяйте, предлагают ли авторы какие-то шаги для уменьшения потерь и повышения шансов на успех, такие как управление банкроллом. Это может пригодиться для оптимизации вашего игрового процесса.
Не игнорируйте сравнения! Если эксперт сопоставляет несколько платформ, это подскажет, где лучше размещать ставки. Например, пользовательский опыт в разных заведениях может оказать большое влияние на итоговые впечатления.
Смотрите на предоставленные ссылки для доступа к ресурсам, и проверяйте их на актуальность. Например, как покердом рабочее зеркало с возможностью удобного входа в игру. Это имеет значение для функциональности и доступности сервиса.

General
5 min read
How to lazy load YouTube videos in WordPress to improve Core Web Vitals
Introduction
One of the projects required us to put more than twenty YouTube videos on a WordPress page. They had various videos showcasing their expertise, which were to be added to the website. But the problem is that embedded YouTube videos slow down web page load times. It also has an impact on the Core Web Vitals. After embedding the YouTube videos, we conducted the PageSpeed test, and as you could anticipate, the result was poor. We were dissatisfied with it because page load time is an important factor in the user experience of a web page. So let’s discuss the problem in detail and the solution.The Problem
Let’s create a simple page consisting of six videos. We are using the built-in Youtube Embed block in Gutenberg, where we just copy and paste the video's URL into the editor.

Screenshot 1: YouTube embeds Gutenberg Block
Here is a demo page that is similar to the client’s video gallery page, which we discussed before.
Screenshot 2: A page with six videos in a video gallery.
The PageSpeed score is 49 (Lighthouse data), which is very low.
Screenshot 3: Low PageSpeed score
Let’s understand why the page load time is so high. When a YouTube video is embedded on a page, it requires many resources (mostly javascript files) to render it, which slows down the loading of the page. These resources are required to style the video player along with its functionality, such as pause, play, etc.
Screenshot 4: Number of JS requests
As we can see, fifty or more JS requests are made for the six videos embedded on the page (excluding the WordPress theme and third-party JS library requests). In general, the more videos that are embedded on a page, the heavier the page becomes, which makes the performance even worse.Solution
So now that we know the problem, let’s discuss the solution. To embed YouTube videos on a WordPress page, we are going to use the <lite-youtube> web component. It’s a custom HTML element that renders YouTube embeds faster. The awesome part is that it's just a vanilla web component with no dependencies. Let’s integrate this web component into WordPress.Step 1: Register and Enqueue Scripts
add_action( 'wp_enqueue_scripts', 'init_assets' ) ;

/**
 * Enqueue required assests.
*/
function init_assets(){
   $handle = 'lite-youtube';
  //You can also load this JS only for YouTube video-specific pages
   wp_register_script( $handle, 'https://cdn.jsdelivr.net/npm/@justinribeiro/[email protected]/lite-youtube.js', '', '', true );
   wp_enqueue_script( $handle );
}

add_filter('script_loader_tag', 'add_type_attribute' , 10, 3);
function add_type_attribute($tag, $handle, $src) {
   // if not your script, do nothing and return original $tag
   if ( 'lite-youtube' !== $handle ) {
       return $tag;
   }
   // change the script tag by adding type="module" and return it.
   $tag = '';
   return $tag;
}
Step 2: Using the <lite-youtube> web component
Now let's use this web component. Pass in the video id as a parameter.<lite-youtube videoid="guJLfqTFfIw"></lite-youtube>
Copy and paste this code into Gutenberg HTML blocks, as seen in the below screenshot.
Screenshot 5: <lite-youtube> custom HTML block
The page looks like this.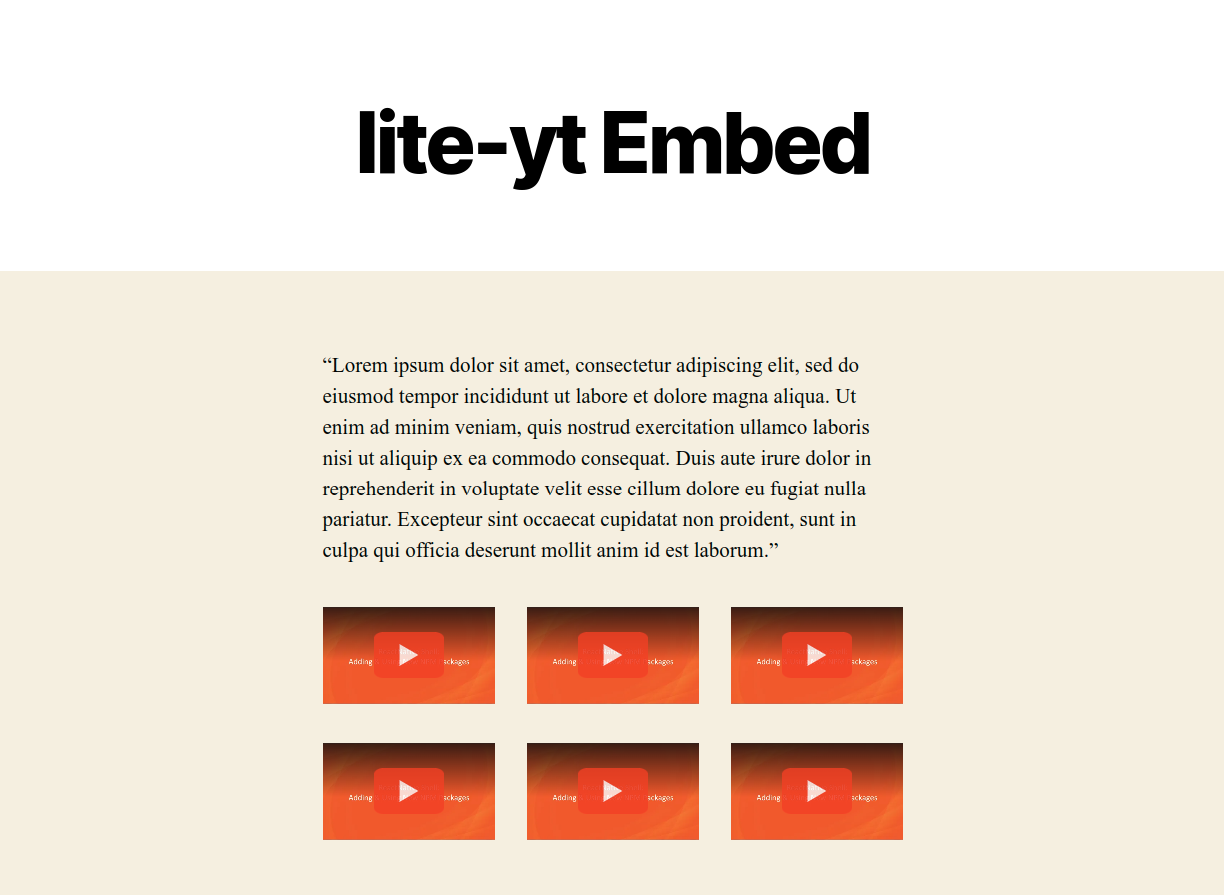
Screenshot 6: A video gallery displayed using <lite-youtube> component
In comparison to the original page's 48 PageSpeed score, this page has a 99 PageSpeed score on mobile devices (Lab data from Lighthouse). On the surface, the page looks similar to screenshot 2, but the story behind the scenes is different.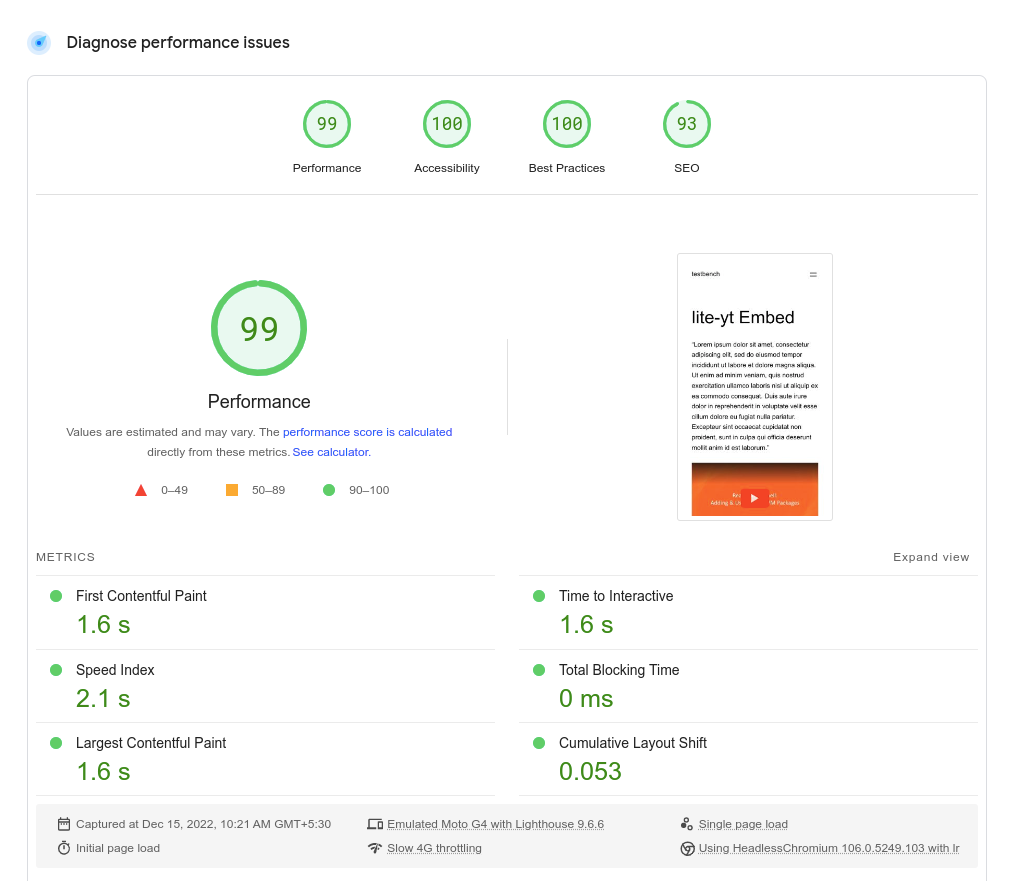
Screenshot 7: High PageSpeed score
Let’s see how this PageSpeed score was achieved. Instead of the YouTube iframe, the <lite-youtube/> web component only loads a thumbnail image of the video (as a placeholder) with a play button. Notice the slight difference between both play buttons in screenshots 2 and 4. Here is the code snippet.<div id="frame">
<picture>
<source id="webpPlaceholder" type="image/webp" srcset="https://i.ytimg.com/vi_webp/wmuEzcz3ebo/hqdefault.webp">
<source id="jpegPlaceholder" type="image/jpeg" srcset="https://i.ytimg.com/vi/wmuEzcz3ebo/hqdefault.jpg">
<img id="fallbackPlaceholder" referrerpolicy="origin" loading="lazy" src="https://i.ytimg.com/vi/wmuEzcz3ebo/hqdefault.jpg" aria-label="Play: Video" alt="Play: Video">
</picture>
<button id="playButton" aria-label="Play: Video"></button>
</div><div id="frame" class="activated"> <picture> <source id="webpPlaceholder" type="image/webp" srcset="https://i.ytimg.com/vi_webp/wmuEzcz3ebo/hqdefault.webp" /> <source id="jpegPlaceholder" type="image/jpeg" srcset="https://i.ytimg.com/vi/wmuEzcz3ebo/hqdefault.jpg" /> <img id="fallbackPlaceholder" referrerpolicy="origin" loading="lazy" src="https://i.ytimg.com/vi/wmuEzcz3ebo/hqdefault.jpg" aria-label="Play: Video" alt="Play: Video" /> </picture> <button id="playButton" aria-label="Play: Video"></button> <!-- iframe is injected--> <iframe frameborder="0" allow="accelerometer; autoplay; encrypted-media; gyroscope; picture-in-picture" allowfullscreen="" src="https://www.youtube.com/embed/wmuEzcz3ebo?autoplay=1&start=0&null"></iframe> </div>So, in short, when the page loads, the video has not been rendered. Instead, when the user clicks on the thumbnail image, only that video is dynamically inserted into the placeholder. This is known as lazy loading. Now let’s look at the number of requests made.

Screenshot 8: Less number of JS requests
On page load, the web components JS library is included (excluding the theme and third-party JS files). On subsequent play button clicks, requests are made to load the corresponding video. Here is the result of a visual comparison test performed on both pages.
Screenshot 9: Timings compared of the two pages
It can be seen in the above screenshot, the timings are less for the <lite-youtube> web component compared to plain YoutTube embeds.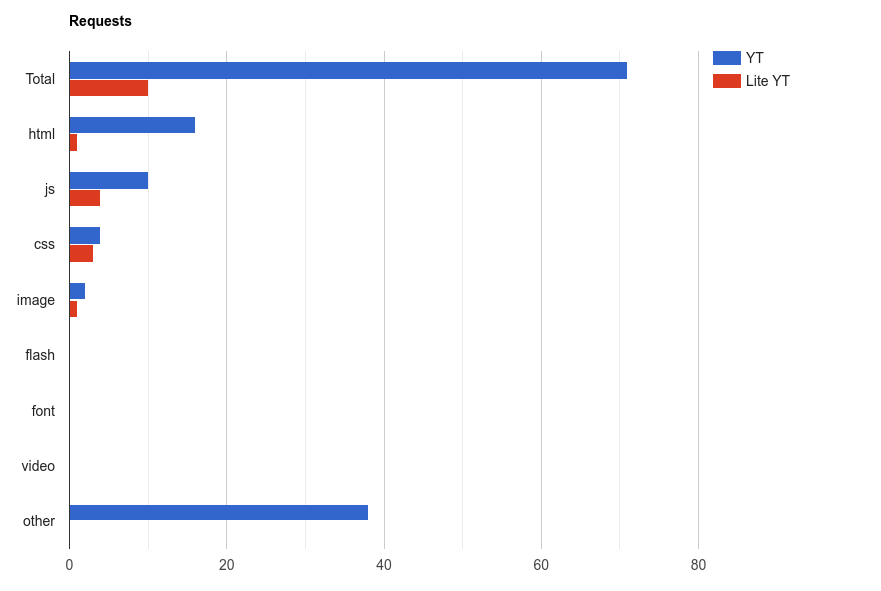
Screenshot 10:The number of requests compared between the two pages
The number of requests for the <lite-youtube> web component is lower than for plain YouTube embeds, as shown in the above screenshot.Conclusion
When you embed YouTube videos directly on a web page, it takes longer for the page to load, so it fails the Core Web Vitals test. The page load time is drastically reduced by using a lightweight web component <lite-youtube>. We compared Lighthouse (Lab) data from two pages: one with a direct YouTube embed and one with the <light-youtube> web component. Having said that, it's important to test and evaluate the Real User Monitoring (RUM) data, which represents the load times on actual user devices (over a 28-day period). That's it for this tutorial. If you need any help optimizing the Core Web Vitals of your WordPress website, talk to our web experts.
General
2 min read
(Secret) Santa is back at WPoets

Team members added themselves as Santa
After the list was complete, team members were shared virtual Santa boxes to draw the person's name for whom they would be Santa. It was all fun and games. Everyone’s biggest challenge was to hold their calm until their gifts arrived at their doorsteps.
Secret Santa choosing a gift for a teammate
Finally, everyone started receiving their gifts one by one. The ones who were a little late had their eyes glued to the doors, watches, and calendars. But as said, "it’s never too late," gifts were received, and the team members shared the photos, expressing gratitude to their secret Santa. Gifts by secret Santa
 Some more secret Santa gifts
 Some more secret Santa gifts (2)
 Some more secret Santa gifts (3)

General
5 min read
7 Ways You Can Improve WordPress Website Speed
How to check WordPress website speed
You don’t have to sit with a stopwatch to measure how long it takes for your site to load. There are tools that you can use to measure site speed and performance. These tools include:- PageSpeed Insights: PageSpeed Insights by Google captures the site’s mobile and desktop performance through different Web Vitals metrics. It also gives your site a score of 0-100 for both mobile & desktop, with clear explanations for improving the score. Here, you don’t get page loading time.
- Pingdom: Pingdom lets you check your website speed test with the option to choose from a list of servers worldwide. It gives you site grades and lets you know the exact load time.
- GTmetix: GTmetrix is comprehensive website optimization and testing tool. It grades your site and also lets you know the page load time.
- What is the size of the page you’re testing?
- Is the web page cached or not?
- How many requests does the page generate?
- Does the site load static or dynamic content?
1. Get a Good WordPress Hosting
 Website speed improvements start with your WordPress hosting. It is at the core of your site’s performance and directly influences the website loading time.
If you’re starting, you'll see a lot of shared hosting providers that sell their services as the "best" thing you can get. Here, you get unlimited bandwidth, email space, and even domains bundled into the package.
However, you may soon discover that shared hosting is limited and struggles during peak traffic hours. And that's why shared hosting plans are cheap.
You can get dedicated hosting, managed WordPress hosting, or a virtual private server(VPS) to solve the peak demand problem. These'll cost you more, but you'll get excellent service with fast server performance to boost your website loading times.
We recommend checking out DigitalOcean, SiteGround, and Bluehost. From there, choose the package according to your budget and requirements.
Website speed improvements start with your WordPress hosting. It is at the core of your site’s performance and directly influences the website loading time.
If you’re starting, you'll see a lot of shared hosting providers that sell their services as the "best" thing you can get. Here, you get unlimited bandwidth, email space, and even domains bundled into the package.
However, you may soon discover that shared hosting is limited and struggles during peak traffic hours. And that's why shared hosting plans are cheap.
You can get dedicated hosting, managed WordPress hosting, or a virtual private server(VPS) to solve the peak demand problem. These'll cost you more, but you'll get excellent service with fast server performance to boost your website loading times.
We recommend checking out DigitalOcean, SiteGround, and Bluehost. From there, choose the package according to your budget and requirements.
2. Optimize WordPress Database
 As your site grows, you’ll find your WordPress database filled with a lot of information. However, not all this information is needed to run your site optimally.
For example, the WordPress database contains pieces of information such as revisions, trashed posts, unused tags, deleted comments, etc. The server takes a little longer to get the user’s requests. In simple words, it slows down your website.
You can use plugins such as WP-Optimize or Advanced Database Cleaner to fix this. Both are excellent plugins and let you optimize the database with just one click. Moreover, they’re free to use.
As your site grows, you’ll find your WordPress database filled with a lot of information. However, not all this information is needed to run your site optimally.
For example, the WordPress database contains pieces of information such as revisions, trashed posts, unused tags, deleted comments, etc. The server takes a little longer to get the user’s requests. In simple words, it slows down your website.
You can use plugins such as WP-Optimize or Advanced Database Cleaner to fix this. Both are excellent plugins and let you optimize the database with just one click. Moreover, they’re free to use.
3. Use Optimized themes and plugins
 The WordPress ecosystem is huge, but only some of the available plugins/themes are optimized. If you use an unoptimized plugin/theme, you're bound to get problems, including slow load times.
That's why, to give your site the best possible way to load fast, you need to choose a theme and plugin that are properly coded and don't feature unnecessary features.
For themes, check out Themify, Astra, and StudioPress. And, for plugins, you can check out our 10 Must-Have WordPress Plugins for Business Websites.
The WordPress ecosystem is huge, but only some of the available plugins/themes are optimized. If you use an unoptimized plugin/theme, you're bound to get problems, including slow load times.
That's why, to give your site the best possible way to load fast, you need to choose a theme and plugin that are properly coded and don't feature unnecessary features.
For themes, check out Themify, Astra, and StudioPress. And, for plugins, you can check out our 10 Must-Have WordPress Plugins for Business Websites.
4. Use a Content Delivery Network(CDN)
 Website load times differ for different users across the world. This happens because your hosting server is located in one place and serves users worldwide.
To solve this, you can keep a copy of your site on a content delivery network(CDN) that is much closer to the user. It lowers website load times. The only limitation is that it stores static files, including CSS and JavaScript. This means your server will still do some work, preferably less, as static files are served through the CDN.
For CDN, you can use Cloudflare.
Website load times differ for different users across the world. This happens because your hosting server is located in one place and serves users worldwide.
To solve this, you can keep a copy of your site on a content delivery network(CDN) that is much closer to the user. It lowers website load times. The only limitation is that it stores static files, including CSS and JavaScript. This means your server will still do some work, preferably less, as static files are served through the CDN.
For CDN, you can use Cloudflare.
5. Use a Caching Plugin
 Whenever a visitor requests a webpage from your dynamic site, the server compiles and serves the request. This can cost you server performance and slow down your site.
However, you can use a cache plugin to speed up your WordPress site by saving up to 0.5-2 seconds of load time. The cache plugin creates a handy page copy and serves it to visitors without the need to generate a page every time.
There are plenty of good WordPress cache plugins you can try, including W3 Total Cache, WP-Optimize, WP Rocket, and WP Super Cache.
Whenever a visitor requests a webpage from your dynamic site, the server compiles and serves the request. This can cost you server performance and slow down your site.
However, you can use a cache plugin to speed up your WordPress site by saving up to 0.5-2 seconds of load time. The cache plugin creates a handy page copy and serves it to visitors without the need to generate a page every time.
There are plenty of good WordPress cache plugins you can try, including W3 Total Cache, WP-Optimize, WP Rocket, and WP Super Cache.
6. Reduce HTTP Requests
 Your WordPress site relies on multiple resources to load properly. Some of it is internally served by the server, while others are requested through external sources such as analytics services, typography, etc.
In an ideal scenario, you cannot completely stop external HTTP requests but can reduce them to improve your site’s speed. To reduce the HTTP requests, check which plugins or services are making the requests. Once found, try to disable them. You can also merge requests into one request to save time.
Your WordPress site relies on multiple resources to load properly. Some of it is internally served by the server, while others are requested through external sources such as analytics services, typography, etc.
In an ideal scenario, you cannot completely stop external HTTP requests but can reduce them to improve your site’s speed. To reduce the HTTP requests, check which plugins or services are making the requests. Once found, try to disable them. You can also merge requests into one request to save time.
7. Always Optimize Images
 Images give visitors a visual experience and engage them. If your post has the right images, it’ll perform and convert nicely. However, you need to optimize images so that it doesn’t slow the page down.
To optimize images, you can compress and re-size them through editing software. This will reduce the size significantly. You can also use an image optimization WordPress plugin such as Smush, EWWW Image Optimizer, or Imagify that takes care of image compression during upload.
Images give visitors a visual experience and engage them. If your post has the right images, it’ll perform and convert nicely. However, you need to optimize images so that it doesn’t slow the page down.
To optimize images, you can compress and re-size them through editing software. This will reduce the size significantly. You can also use an image optimization WordPress plugin such as Smush, EWWW Image Optimizer, or Imagify that takes care of image compression during upload.
Conclusion
Not all WordPress site owners understand the impact of speed and incur revenue loss. With our list of ways to improve site speed, you’re bound to get better load times, resulting in site growth in terms of visitors and revenue.
General
5 min read
5 Undeniable Signs Your Business Website Needs a Makeover
Introduction
Your website is one of the most critical assets your business has. It’s the first impression of your business. Most importantly, it's a 24/7 lead generation machine. Potential customers will visit your website, get information about the products and services that you offer, and decide whether they want to get in touch with you or not. Having said that, this critical asset is overlooked many times. To put things in context, we studied more than 1000+ companies' websites and found almost a third of businesses' websites were outdated and needed a complete makeover. Their design, content, site speed, user flow, updates, upgrades, maintenance, and overall user experience need to be seriously looked at. The websites weren't up to the mark as compared with current web standards and needed an overhaul. But the question is, how do you decide that your website needs an overhaul? What are the common signs to look for? This blog exactly discusses this. Here are the top five signs.1. Your website doesn't convert, hence it needs a makeover
 Imagine a visitor landing on your website through SEO or paid ads. The visitor is browsing through the site and has spent thirty minutes on your website but has not filled out the contact form or called the number you provided on the website.
S/he has gone through all your products or services, about us, and contact us pages but is still hesitant to contact you. Next, your website’s tab is closed and the visitor is never going to come back again. (Use visual analytics tools such as Clarity or Hotjar, which give information on how visitors are browsing your website.)
But the question is, why did the visitor not take the next step of contacting you?
Here are a few reasons,
Imagine a visitor landing on your website through SEO or paid ads. The visitor is browsing through the site and has spent thirty minutes on your website but has not filled out the contact form or called the number you provided on the website.
S/he has gone through all your products or services, about us, and contact us pages but is still hesitant to contact you. Next, your website’s tab is closed and the visitor is never going to come back again. (Use visual analytics tools such as Clarity or Hotjar, which give information on how visitors are browsing your website.)
But the question is, why did the visitor not take the next step of contacting you?
Here are a few reasons,
- Visitors had a bad user experience on your website.
- The website is slow to load.
- The navigation is confusing. The website's structure is not optimized in such a way that it helps visitors follow a clear path.
- The information on the website has not convinced the visitor to make a decision to contact you.
- The website does not offer a clear call-to-action that prompts visitors to take the next step.
2. Your competitors’ websites look and perform better.
 Have a look at your top three competitors' websites, and compare them with your website.
Compare the top five pages, including the home page, any products or services, and contact us.
Analyze where your website stands in terms of content, user experience, loading times, website traffic, and keywords that you rank for on search engines.
If you feel that their website is better than yours, informs better, and establishes trust faster, then congrats you are losing out to them.
Have a look at your top three competitors' websites, and compare them with your website.
Compare the top five pages, including the home page, any products or services, and contact us.
Analyze where your website stands in terms of content, user experience, loading times, website traffic, and keywords that you rank for on search engines.
If you feel that their website is better than yours, informs better, and establishes trust faster, then congrats you are losing out to them.
3. You have not upgraded your website for the past 1.5 years
 Does your website design look like it's from another era? Then it's time for redevelopment.
if your website was created more than 1.5 years ago, it's time for an upgrade.
Why more than 1.5 years?
Based on our experience, if the website is stagnant and non-maintained for that amount of time, it reaches a saturation point beyond which it becomes unengaging and outdated. One cannot have an old website that stays as it is for five to ten years and still expect it to generate business.
So why has it not been upgraded?
Typically, business owners delay website redevelopment for the following reasons
Does your website design look like it's from another era? Then it's time for redevelopment.
if your website was created more than 1.5 years ago, it's time for an upgrade.
Why more than 1.5 years?
Based on our experience, if the website is stagnant and non-maintained for that amount of time, it reaches a saturation point beyond which it becomes unengaging and outdated. One cannot have an old website that stays as it is for five to ten years and still expect it to generate business.
So why has it not been upgraded?
Typically, business owners delay website redevelopment for the following reasons
- It’s only been a year since the website was built, and it’s working fine.
- No budget is allocated for website development annually
- Our major source of leads is generated offline, so why worry about the website?
- Revamp will cost us a lot. Let’s use that money for marketing activities.
- Finding a new web agency is time-consuming so let's delay it this year.
- Our website is just a filler, so it doesn’t need attention.
4. Your brand has changed, hence it needs a makeover
 If your brand has changed or you are planning to rebrand, then it's time for your website to change too.
Typically, companies rebrand for the following reasons
If your brand has changed or you are planning to rebrand, then it's time for your website to change too.
Typically, companies rebrand for the following reasons
- The business has a new direction.
- The business is ready to go to the next level.
- The products or services offered have significantly changed since the last rebranding.
5. You feel it, your team tells you, or your existing website developer reminds you.

You feel it.
Do you cringe when you see your company’s website? Or do you feel embarrassed about your website? As a business owner, if you feel that the website is outdated, then it's the perfect time to get it redeveloped. To give a real-life example, here is one of our client's website home page screenshot. The client approached us to redesign the website because he was dissatisfied with it.
Screenshot 1: Old website of one of our clients.
At first glance at the website, we knew- The design looks dated, the photos are low quality, and the overall aesthetic is unappealing.
- The business has outgrown. It has evolved over the years, but the website doesn’t go hand in hand with this change.
- Over the years, the site has accumulated design and content inconsistencies, giving users a bad experience.
- The website didn’t incorporate the changes in the business's marketing strategy, which had changed over the period.
- Visitors were not as interested in the website as they were initially.
Your team tells you
Another sign to watch for is that your team constantly tells you, specifically the marketing and sales team, that the website needs to be upgraded. Here, business owners tend to ignore such requests since they think it's not a pressing need.Your existing website developer reminds you
Another important sign to look for is when your existing website vendor reminds you that the website is aging and needs a revamp. We ourselves tell our customers that their website has not been redeveloped for more than two years and needs serious attention. Since we know the market's trends inside out, we warn our clients that websites need to be upgraded even before they become stagnant and outdated.Conclusion
We discussed the top signs that you need to look for when determining whether your website needs a makeover or not. The next step is to head over to your website, go through these signs, and check if you feel that the website is stagnated, outdated, and needs an overhaul. Also, discuss this with all the stakeholders, specifically with your marketing and sales team. If you need expert advice on this, feel free to talk with our website experts.Sober living
3 min read
List of Ways Alcohol and Alcoholism Can Kill You
If you or your loved one is misusing drugs, know that you’re not alone in your struggle. There is help available in the form of medical detox, in-patient rehab, outpatient rehab therapies, and rehab. Contact Avenues Recovery 24/7 for support and https://dryamroka.com/alcohol-emergencies-recognizing-when-to-call-911-3/ guidance to start your journey toward recovery and sobriety.
How Does Alcohol Kill Gut Bacteria?
- When someone drinks too much, they are at risk of alcohol poisoning, and it mostly happens in binge drinking.
- For more information about alcohol and cancer, please visit the National Cancer Institute's webpage "Alcohol and Cancer Risk" (last accessed June 6, 2024).
- For example, red wine contains polyphenols that may promote certain beneficial bacteria despite its ethanol content.
- EPA-registered bed bug sprays provide more reliable results than alcohol.
This is primarily because drinking is linked to high blood pressure and obesity, both of which contribute to heart conditions. However, drinking also increases the level of triglycerides (harmful fats) in the blood. This can result in high blood pressure, increased caloric intake, and heart failure. Tolerance refers to the body's ability to adapt can alcohol kill you to the effects of alcohol over time.
- But even low amounts of daily drinking and prolonged and heavy use of alcohol can lead to significant problems for your digestive system.
- If your skin shows signs of dryness, consider using a hydrating hand cream as needed.
- Understanding the lethal dose of alcohol is crucial when it comes to responsible drinking and ensuring the safety of oneself and others.
- There were an estimated 80,816 drug overdose deaths involving opioids in the United States in 2021.
- In addition to heart and liver problems, alcohol misuse significantly elevates the risk of many cancers.
Using Alcohol to Kill Germs on Surfaces
Understanding your limits, setting boundaries, and seeking help and support when needed are all important aspects of responsible alcohol consumption. BAC is typically measured using various methods, including breathalyzer tests, blood tests, and urine tests. The most common method is breathalyzer testing, which estimates BAC by analyzing the alcohol content in a person's breath. Additionally, body composition, particularly the ratio of muscle to fat, can also impact alcohol tolerance. Therefore, individuals with a higher muscle mass may have a higher tolerance for alcohol.
Men Are More Likely To Die From Alcohol, But Women Are Also At Risk

This method ensures that the tick is removed completely, without leaving any parts behind. Additionally, you can use tick removal tools specifically designed for this purpose, which can be found at most pet supply stores or online. It’s always best to drug addiction treatment consult with a veterinarian for advice on tick removal and prevention.

Another incident involved apartment fires when alcohol vapors traveled to an adjacent ignition source. Rubbing alcohol provides that satisfying instant kill when you spray a visible bug. But after researching bed bug treatments for years and speaking with pest control professionals, I've learned why this common home remedy creates more problems than it solves. This article explains what actually happens when you use alcohol, the real dangers involved, and proven alternatives that work. By killing beneficial microbes and damaging the gut lining, alcohol weakens immune defenses and may allow harmful bacteria to overgrow.
Common Mistakes in Treating Scabies
Rubbing alcohol can be toxic to dogs if ingested or absorbed through the skin, causing symptoms such as vomiting, diarrhea, and lethargy. If your dog licks the area where the rubbing alcohol was applied, it can lead to ingestion, which can be hazardous. Additionally, rubbing alcohol can strip the skin of its natural oils, leading to dryness, itchiness, and potentially even skin infections. To safely remove a tick from your dog, you’ll need a pair of fine-tipped tweezers and a steady hand.

General
5 min read
How to reduce Cumulative Layout Shift
Major causes of Layout Shifts
CLS mainly occurs due to the change in the DOM element’s position or dimensions. The most common causes for CLS are,- Images without width and height attributes
- Ads, iframes, and embeds with no reserved space
- Web Fonts causing FOIT or FOUT
- Dynamically inserted elements above the existing elements
Images without width and height attributes
The problem
Consider the below situation. An image without width and height specified is requested from the server. [video width="800" webm="http://v3.wpoets.com/wp-content/uploads/2021/08/cumulative-layout-shift-by-image.webm"]A screencast showing Image loaded without width and height causing layout shift
Before downloading the image the browser doesn’t know the amount of space that it should allocate. Once the image is loaded, the browser allocates the required space thus shifting the elements below it. This causes layout jank.The solution
Following is the solution for responsive images with minimum layout shift.<style>
img {
width: 100%; height: auto;
}
</style>
<img
width=”800”
height=”800”
src=”demo-image-800.jpg”
srcset=”demo-image-480.jpg 480w,
demo-image-800.jpg 800w”
sizes=”(max-width: 600px) 480px, 100%”
alt=”This is Demo Image” />Ads, iframes, and embeds with no reserved space
The problem
As with the images, advertisements can contribute to a high CLS score. Advertisements in most cases load asynchronously. If sufficient space is not reserved beforehand they can cause CLS. [video width="600" webm="http://v3.wpoets.com/wp-content/uploads/2021/08/cumulative-layout-shift-by-advertisement.webm"][/video]A screencast showing Image loaded without width and height causing layout shift
Before downloading the image the browser doesn’t know the amount of space that it should allocate. Once the image is loaded, the browser allocates the required space thus shifting the elements below it. This causes layout jank.The solution
Following is the solution for responsive images with minimum layout shift.<style>
img {
width: 100%;
height: auto;
}
</style>
<img
width=”800”
height=”800”
src=”demo-image-800.jpg”
srcset=”demo-image-480.jpg 480w,
demo-image-800.jpg 800w”
sizes=”(max-width: 600px) 480px, 100%”
alt=”This is Demo Image”
/>
Ads, iframes, and embeds with no reserved space
The problem
As with the images, advertisements can contribute to a high CLS score. Advertisements in most cases load asynchronously. If sufficient space is not reserved beforehand they can cause CLS. [video width="600" webm="http://v3.wpoets.com/wp-content/uploads/2021/08/cumulative-layout-shift-by-advertisement.webm"][/video]A screencast showing advertisements causing layout shift
For optimal performance publishers often support dynamic ad sizes like fluid & multi-size ad slots which gives better CTR. These ads may expand or collapse, depending on the settings, thus triggering layout shift.The solution
To fix CLS issues created by ads, reserve space statically beforehand. Although, due to the variety of ad sizes available, a one-size-fits-all space allocation is difficult. Instead, make adjustments to size allocation until its layout shifts free. The size to be allocated can be determined by historical data reports from the publisher. For e.g, there are two ads of sizes 300x240 & 320x60 which are delivered. Allocating a height of 240 px can avoid layout shift. The bare minimum code for a multi-size ad slot could be,<div
id="publisher-ad-slot"
style="min-width: 300px; min-height: 250px;">
</div>
Dynamically inserting elements above the existing elements
The problem
As with images and ads, dynamic content is also responsible for CLS. The new content is dynamically added on top of the existing content. Following are some examples of dynamically injected content,- Newsletter signups
- Register for a webinar or conference
- Campaigns and special offers
- Install mobile apps
- Download whitepaper or ebook
Custom web fonts causing FOUT or FOIT
The problem
Another common cause of Cumulative Layout Shift is custom fonts. As compared to the other causes, custom fonts have a smaller impact but still, the layout shift is visible. Custom fonts have to be downloaded and rendered. Till the fonts are loaded two problems can occur depending on the font-display CSS property set. FOUT (Flash of Unstyled Text) occurs when the custom font is downloaded and is swapped with the fallback font. Until the font is being downloaded the fallback font is displayed. [video width="600" webm="http://v3.wpoets.com/wp-content/uploads/2021/08/cumulative-layout-shift-by-fout.webm"][/video]A screencast showing Flash of Unstyled Text (FOUT)
FOIT (Flash of Invisible Text) is when the browser doesn’t display any font, not even fallback font. It shows invisible text till the custom fonts are loaded. [video width="600" webm="http://v3.wpoets.com/wp-content/uploads/2021/08/cumulative-layout-shift-by-foit.webm"][/video]A screencast showing Flash of Invisible Text (FOIT)
In both cases any font that renders smaller or larger than its fallback causes layout shift.The solution
As of now to avoid CLS caused by fonts, there is only one solution. The idea is to use <link rel="preload"> along with CSS property font-display: optional. This will load fonts without layout jank when rendering custom fonts. Here is the code, <link
rel="preload"
href="/assets/Pacifico-Bold.woff2"
crossorigin as="font"
type="font/woff2" >Closing thoughts
Minimizing CLS score should be on high priority for website owners since layout shift leads to a poor user experience. The common solution to fix Layout shifts is to reserve space. Reaching a CLS score of 0 should be an ideal target. Here is a screenshot of Gtmetrix for a web page that we optimized for a CLS score of 0.
A web page optimized for CLS score of 0
CLS metric is the first step to make websites more visually stable. It’s evolving and in the coming years, based on data analysis it would tell us more about its impact on User Experience.
General
4 min read
Introduction to the Core Web Vitals
Introduction
Google is in the process of updating its search algorithm called “Page Experience Update” which introduces Core Web Vitals (CWV) as the new ranking factor. This update has started rolling out globally in June 2021 and is expected to complete by the end of August 2021. Core Web Vitals (CWV) will help in ranking web pages (along with hundreds of other ranking factors) that load fast, quick to respond to the user interactions, and are visually stable, thus giving the best possible experience for the visitors.The Basics of Core Web vitals
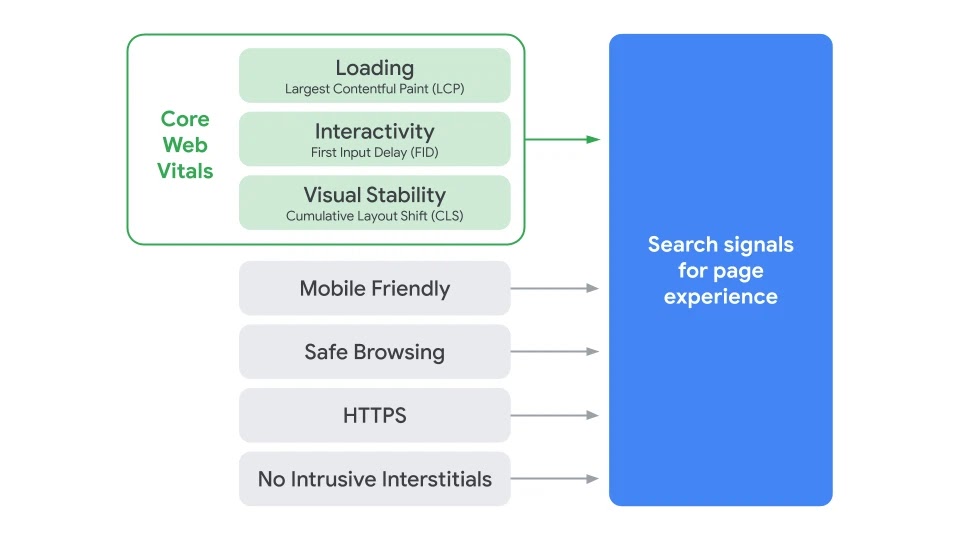
Search Signals for Page Experience Source: Google Search Central
As seen in the above image the “page experience signals” combine Core Web Vitals with Non-core Web Vitals. This blog focuses only on the Core Web Vitals.1) Largest Contentful Paint (LCP)
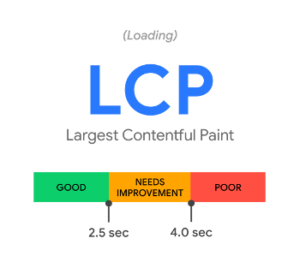
CWV metric 1: Largest Contentful Paint (LCP) Source: web.dev/vitals
The first metric in the CWV is the Largest Contentful Paint (LCP) which measures the loading performance of a web page. A web page consists of many elements such as text, images, videos, among others. The browser takes some time to render these elements. The time it takes for the web page’s largest element painted within the viewport (above the fold) is LCP. Let’s say there is a webpage where above-the-fold content consisting of five paragraphs and two images. The size of the first image is 100KB and that of the second image is 200KB. [aw2.module slug='pullquote' pull_class='float-left'] [aw2.this html] According to Google, a good LCP score is 2.5 seconds or less for the 75th percentile of the page loads segmented across mobile and desktop devices [/aw2.this] [/aw2.module] If we assume that the text size is less than the image size, the image of the size 200KB will be considered the largest element in the viewport and will be shown in the LCP. As of now only text and image blocks visible in the viewport are considered in the LCP metric. In the case of videos, the poster image is considered. The elements contributing to LCP could be different for mobile and desktop views. For mobile view, it could be a text element, but it could be an image for desktop, depending on the layout rendered in the viewport. There would be at least one LCP element on the web page by default.2) First Input Delay (FID)
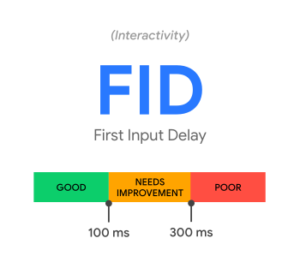
CWV metric 2: First Input Delay (FID) Source: web.dev/vitals
[aw2.module slug='pullquote' pull_class='float-right'] [aw2.this html] According to Google, a good FID score is 100 milliseconds or less for the 95th–99th percentile of the page loads segmented across mobile and desktop devices [/aw2.this] [/aw2.module] The second metric in the CWV is First Input Delay (FID) which measures the interactivity & responsiveness of a web page. Input delay (first one only) is when a user tries to perform some action like clicking a link or tapping a button or typing, but the browser's main-thread is busy doing other important tasks, thus it’s unable to respond to the user’s interaction. The browser’s main thread is responsible for various tasks such as loading the resources, parsing HTML & CSS, building the DOM, executing javascript, along with other important tasks.3) Cumulative Layout Shift (CLS)
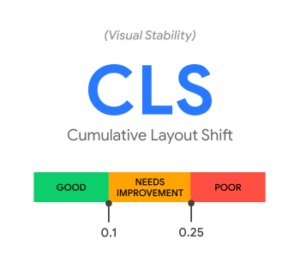
CWV metric 2: Cumulative Layout Shift (CLS) Source: web.dev/vitals
The third metric in the CWV is Cumulative Layout Shift (CLS) which measures visual stability. [aw2.module slug='pullquote' pull_class='float-left'] [aw2.this html] According to Google, a good CLS score is 0.1 or less for the 75th percentile of the page loads segmented across mobile and desktop devices. [/aw2.this] [/aw2.module] Visual stability is achieved when there are fewer or no unexpected layout shifts in the viewport. An example of an unexpected layout shift is when a user is viewing a piece of content and is about to click a menu, but suddenly due to an advertisement, the page layout changes and the user clicks the ad instead of the menu. This layout shift is annoying and causes a poor user experience. The most common causes for CLS are, images without width and height, dynamically inserted content above the existing content or ads, and iframes without dimensions.Conclusion
Google’s Page Experience Update is important (as for every minor or major update) for all stakeholders, from developers to marketers to business owners. This new update will change how the web pages are developed and tested. Before making any new web pages live, it’s now necessary to check the Core Web Vitals in the lab environment. Once the webpages are live they have to be continuously monitored with field data collected from real users and based on the data improve the page experience. We have already included Core Web Vitals in our continuous improvements program. This update is important for us, as we are always looking for ways to continuously improve our clients’ websites.Sober living
6 min read
IDHS: Recovery Residence Frequently Asked Questions
First of all, no Oxford House may permit individuals to remain as members if those individuals are drinking or using drugs. Second, an Oxford House must follow the democratic principles in running the house. Third, an Oxford House must, in essence be a good member of the community by obeying the laws and paying its bills.
The Legal and Policy Reasons Underlying Oxford House Group Leases
Loneliness and self-pity soon lead such individuals back to alcoholic drinking or drug use. With Oxford House there is no need for a recovering individual to live in an environment dominated by loneliness. At the Oxford House World Convention held annually, Oxford Houses throughout the country vote for representatives to the World Council. The World Council is comprised of 12 members, 9 of which presently live in an Oxford House, 3 who are alumni. In carrying out its mission the Council always keeps a focus on expansion of the network of individual Oxford Houses, to provide all recovering alcoholics and drug addictions the opportunity to develop comfortable sobriety without relapse.
- The Oxford House Manual is a vital guide for self-supported recovery, providing structure and accountability for individuals seeking long-term sobriety and personal growth.
- During the last days of our drinking or using drugs, most of us ceased to function as responsible individuals.
- However, if a majority of residents believe that any member has had a recurrence of use of alcohol or other illicit drugs, that person is immediately expelled.
Learn about Oxford House
Alcoholics and drug addicts seem to have a tendency to test and retest the validity of any real, potential, or imagined restriction on their behavior. Yes, there are Oxford Houses in Canada, Australia and Ghana with active interest in England, Bulgaria and other countries. Alcoholism and drug addiction are international problems and Oxford Houses can provide recovering individuals the opportunity to become comfortable enough in sobriety to avoid relapse. It is no more difficult than for an ordinary family to find a house to rent. Each Oxford House is an ordinary single-family house with two bathrooms and four or more bedrooms. Ideally several of the bedrooms are large enough for two twin beds so that newcomers, in particular, are able to have a roommate.
- Each house operates autonomously, united under shared principles and financial self-support.
- Immediate expulsion follows any substance use, ensuring a safe environment.
- Requiring an admission application for every resident also allows you to determine if the resident would be a good fit for your sober living home.
- Generally an individual comes into an Oxford House following a rehabilitation program, incarceration, or at least a detoxification program.
- If an applicant does not get voted into one house he or she should try another house in the area.
- All Oxford Houses have been careful to avoid undo dependence on government or other outside funds.
Find manuals, forms, and other resources from Oxford House.
Oxford House is built on the premise of expanding in order to meet the needs of recovering alcoholics and drug addicts. This principle contrasts sharply with the principle of providing oxford house sober living the alcoholic or drug addict with assistance for a limited time period in order to make room for a more recently recovering alcoholic or drug addict. Oxford Houses are established in good neighborhoods to integrate the recovering individuals into mainstream communities, away from former environments, people and habits. Behavior change is key for successful recovery and living in a nice house and a nice neighborhood helps restore pride and self-esteem and provides additional incentive for the member to stay clean and sober. Make a business plan to identify your goals and streamline the process of opening your sober living home.
Q. Are there Oxford Houses set up for special populations?
The Oxford House World Convention hosts annual events with themes that inspire and motivate recovery journeys. Each year’s theme addresses current challenges and successes, fostering a sense of community. Workshops, testimonials, and shared experiences highlight the impact of Oxford Houses worldwide, reinforcing the model’s effectiveness and sustainability. The manual emphasizes financial self-support, immediate expulsion for substance use, democratic decision-making, and mutual respect among members, fostering a structured environment for recovery and personal growth.

You will want to write down your company name, mission, description and services, determine what type of residence you will purchase or rent, how many residents you will accommodate at any given time, and what services you will provide. You will also want to study and analyze any other sober living homes nearby to determine what works (and what doesn’t work) and determine how you will make your sober living home stand out from the competition. A recovering individual can live in an Oxford House for as long as he or she does not drink alcohol, does not use illicit drugs, and pays an equal share of the house expenses.
An Oxford House member can stay as long as they like, provided they stay drug and alcohol free and pay their share of house expenses. In its simplest form, an Oxford House is a shared residence Drug rehabilitation where people in recovery can live together and support each other in a drug and alcohol-free environment. The Oxford House model continues to evolve, adapting to changing societal needs and expanding its reach across different communities.
Support the Oxford House
It was the first step in a nationwide movement, now almost 50 years old, that has been credited with helping thousands of people overcome addiction and lead productive lives. Instead of being left to their own fates, Mr. Molloy and other residents decided to take over the house themselves, paying the expenses and utilities, cooking the meals and keeping watch over one another’s path to recovery. Each member pays EES (Equal Expense Share) which includes the total amount of rent due for the month as well as the cost of utilities, telephone, cable TV and any other expenses that the house includes in its common expenditures. Some houses collect EES from its members on a monthly basis while many houses choose to collect EES on a weekly basis. This monthly or weekly amount varies from state to state and house to house and can range anywhere from $125 a week to $250 a week.

Expansion and Growth of Oxford Houses
Q. What if there is not an Oxford House in the area or there are no vacancies in any Oxford House in the region? All they need to do is to find a house to rent in the name of the Group, and apply to Oxford House, Inc., for a charter. Those who have benefited from an Oxford House have acquired enthusiasm for the Oxford House concept. In their enthusiasm, https://faithheartmagazine.com/what-do-good-coping-skills-look-like/ they have been anxious to share Oxford House with any recovering alcoholics and drug addicts who want to establish an Oxford House in their community. Nearly all members of Oxford House utilize the AA and/or NA program in order to obtain and keep a comfortable sobriety.
View All Resources
Yes, each state has in place a revolving loan fund that can make loans to cover the first month’s rent and security deposit (up to $4000) to rent a house in a good neighborhood. The loan must be repaid by the group within two years in 24 equal installments. Oxford Houses are democratically self-run by the residents who elect officers to serve for terms of six months.
Sober living
5 min read
A Goodbye Letter to Addiction
In that sense, you quickly became my worst nightmare. Because of you, I ended up doing things that I never in a million years thought I would be capable of doing. You turned me into what I hated more than anything else. You robbed me of my independence and freedom. Strictly Necessary Cookie should be enabled at all times so that we can save your preferences for cookie settings.
It didn’t take long before he ended up at South Shores for treatment. It was the greatest news I ever got when I found out he was in rehab. I had a good feeling about it, unlike the previous times he tried to get clean.
A "Love Letter" From Our Addiction:: (See All Authors)
But we understand it isn’t easy to write, particularly in the early going. You might tell yourself, ” I want to write a letter to my addiction,” but you don’t https://ecosoberhouse.com/ know where to start. Our facility is open and we’re available to answer questions, provide resources, and be a support for those who are struggling. Hathaway Recovery is continuing to provide help while following all CDC guidelines in regards to the COVID-19.
Our Addiction Programs Near
Writing a letter to that same self provides an unparalleled opportunity to reconnect and forgive oneself for the ways they feel they have damaged their own well-being. Expressing how you feel impacts you on a cellular level, allowing you to release the shame and guilt. Saying goodbye to your addiction in a goodbye letter to drugs will enable you to hold yourself accountable and encourage your future self. Writing about what you have lost to drug addiction can also help you remember why you want to get sober. Using cigarettes as an example, through writing the goodbye letter to addiction, the patient realizes cigarettes helped with a problem, but the net effect was negative.

Step 1: Download the worksheet
Drugs and alcohol are crutches that we fall back on when we don’t have the tools to deal with life’s challenges. Because of my time in recovery, I now have those tools at my disposal. With our guidance and your concerted effort, you can end your substance abuse for good. You can begin to discover the hope and promise of successful, long-term recovery. To learn more or to schedule a free assessment, please visit our Contact Us page or call our center today.
- Reach out when you need support, celebrate your victories, and continue to inspire those around you with your resilience.
- It helps streamline the therapy process, making it easier for practitioners to track their patient's progress and adjust as needed.
- If addiction has stolen your friendships, family, and job, Ingrained Recovery can help.
- I'm 57 and just now going through the hardest and darkest time of my life as well.
Inspirational Poem
And I’m able to watch my daughters, son, and grandkids grow older. You’ve reared your ugly head from time to time, but I’ve been able to kick you out faster than before. I know I’ll see you from time to time at a party, doctor’s office, or friend’s house, but I know now what I wish I would have known then.
ACT practitioners are guided to commit to actions reflecting these values, fostering congruence between intentions and behaviors. ACT stands out for its emphasis on psychological flexibility – the capacity to adapt to challenging thoughts and emotions while pursuing actions aligned with personal values. Individuals can goodbye addiction letter break free from negativity by acknowledging distressing experiences without judgment and learning to perceive thoughts as mere mental events. A proof of disability letter is a formal doctor's statement that can provide supporting medical evidence and is included in the patient's formal medical records. It explains the patient's medical condition and why they are considered disabled.
What is a Goodbye Letter to Drugs?
Because of my time at Icarus Behavioral Health, I was able to leave my addiction behind and become a driven, healthy individual. It all started with me writing that letter to my addiction. When I finished it, I felt a tremendous weight lifted from my shoulders. As incredibly cruel as I was to my own family members during my drug abuse, I wasn’t cruel to you. For a long time, I felt like you made me lose everything. At the end of the day, it was me who lost all of that.
And hindered my personal and professional growth. The worries you bring are no longer worth the pain. Surrounding yourself with supportive individuals can significantly increase your chances of maintaining long-term sobriety. Lean on loved ones, family, and friends without shame, as this is one of the most courageous things you can do. Saying goodbye is always one of life’s hardest things to do; it signifies change, which can be scary. Like I said already, one of the things that gave me a sense of comfort was writing a goodbye letter to addiction.
When interpreting the results, use a cut-off point of 3 for the general population. Consider scores of 3 or higher as indicators of potential psychiatric disorders or morbidity. Remember that higher scores suggest a greater likelihood of health issues (Gómez-Salgado et al., 2020). This interpretation framework allows for a quick assessment of the patient's mental health status, serving as a valuable screening tool in various clinical settings.

I was starting to crawl away from your evil clutches. It turns out that you are also vindictive, as you did everything in your power to pull me right back in. No matter how hard I tried, I couldn’t get away from you. All I wanted to do Sobriety was make changes in my life that would be for the better. There was even a part of me that believed I could become a better person with you. You constantly blocked me from doing any of the things I wanted to do.

My Farewell to Addiction Letter and Guidance on Writing Your Own
Many families also seek help from an interventionist, a neutral person to mediate. Sometimes in life, we all need a second chance. We need people who will tell us what we need to hear, even if it’s uncomfortable. Not only is my brother doing well in recovery, I see him trying to actively help others. By helping others, you set a great example for others. He has made me want to be a better person.
Sober living
5 min read
The Effects of Cocaine on Nasal and Oral Health
If you or someone you know is struggling with cocaine addiction or experiencing symptoms of cocaine nose, seeking professional help is imperative. There are numerous resources available, including addiction treatment centers, support groups, and hotlines staffed by trained professionals. Fixing cocaine nose, or addressing the nasal damage caused by chronic cocaine use, involves a combination of medical interventions, lifestyle changes, and addiction treatment. Over time, chronic inflammation and repeated irritation weaken blood vessels, causing spontaneous bleeding. Medical interventions for cocaine-induced nasal damage often involve complex treatments, including surgery, to repair the harm caused by the drug. However, early detection and cessation of cocaine use can What does cocaine do to your nose prevent further damage and aid in the recovery of nasal health.
- The best procedures and techniques will depend on a person’s specific case.
- Cocaine is a highly addictive stimulant drug commonly snorted through the nose.
- Cocaine use leads to various short-term effects on nasal and oral health, both of which can be categorised into acute and chronic consequences.
How cocaine affects the rest of the body

If you or someone you know is struggling with addiction and in need of support, the SAMHSA National Helpline is here to help. The helpline provides confidential and free assistance, serving as a valuable resource for treatment referrals and information related to mental and substance use disorders. Dopamine is a neurotransmitter related to the brain’s reward and pleasure systems. People may experience pleasurable, short-lived effects when using cocaine, including increased energy and euphoria. Cocaine is a highly addictive stimulant that affects various bodily systems, leading to both short-term and long-term health consequences, such as drug dependence and organ damage. Septum collapse is a condition in which the thin piece of cartilage that separates the nostrils is damaged or destroyed.

Effects of Cocaine on Your Nose: Risks and Consequences
In some cases, plastic surgery may be necessary to repair damage to the nasal tissues. In more serious cases, long-term cocaine use can cause physical changes like a perforated septum and a saddle nose deformity. These would require medical attention, like plastic surgery, to try repair the damage. The nasal septum, or the wall of cartilage and bone that divides the two nostrils, can also be damaged by cocaine. When blood flow is reduced to the septum, the tissue will eventually die, and holes will form in the septum wall.
It can include mild symptoms, like sneezing and stuffiness, or serious complications, like holes in the nose or tissue death. Even if the blood flow does not slow enough to kill the tissue, it may not be enough to adequately fight off bacteria, heal wounds, or resolve inflammation. In addition to the conditions listed, a person may experience loss of smell from nasal tissue damage. These same effects can occur throughout the body and damage the GI tract, cardiovascular system, brain, and other systems. Frequent and long-term cocaine abusers are more prone to sinus infections.
- These pictures highlight the severity of the nasal damage caused by long-term use.
- It is important for individuals struggling with cocaine addiction to seek help to address their substance abuse issues and mitigate the damage caused to their oral health.
- Cocaine use can cause damage to the membrane lining of the nose and sinuses.
Symptoms And Signs Of Coke Nose
Cocaine is a highly addictive stimulant drug commonly snorted through the nose. When snorted, the drug is absorbed into the bloodstream through the nasal tissues. A deviated septum is a condition where the nasal septum is no longer https://carbonotattoo.com/how-to-keep-sober-in-recovery-from-alcoholism-6/ straight.
Nasal damage can be fixed with a rhinoplasty procedure performed by a septal perforation specialist. In order to fix coke nose, the specialist usually needs to reconstruct the nasal lining using forearm tissue. Understanding the link between snorting cocaine and nosebleeds is important, especially for those who might be unaware of the extent of the damage caused by the drug.

Diagnosis of coke nose
Understanding the implications of cocaine nose is essential for those who may be considering the consequences of their substance alcoholism symptoms use. Recognizing these potential effects can be a significant step toward seeking assistance and support for substance abuse issues. It is important to note, though, that reconstructive surgery will not be successful if the patient continues to snort cocaine, as repeated use will simply damage the surgical repair.
The Effects of Cocaine: What Does Cocaine Do To Your Nose?
- We would liken it to someone trying to force a camel into the eye of a needle.
- Medications, such as antidepressants or anti-anxiety medication, can help manage the physical and psychological symptoms of withdrawal, making the recovery process more manageable.
- For some, medication-assisted treatment (MAT) may be beneficial in managing withdrawal symptoms and cravings.
It can occur gradually over many years, but it can immediately appear even after one prolonged period of excessive use. Therefore, using cocaine intranasally can cause permanent nasal damage or result in surgery. If someone you know often suffers from nosebleeds and exhibits other signs of cocaine addiction, they might be using cocaine regularly. Dry air also can result in random nose bleeds, so understanding othereffects of regular cocaineuse can help someone determine if a loved one is at risk.
Get support from UKAT
Over time, this diminished blood flow can result in the degradation of the mucous membranes within the nasal passages, leading to various complications. A “cocaine nose-job” is the medical process of repairing a deviated septum that was caused by regular intranasal use of the substance. The long-term effects of cocaine nose can be permanent if left untreated. Seeking professional treatment early can prevent irreversible damage and improve nasal and overall health.
To explore additional treatment options, you can view editorially selected providers on our site or visit the SAMHSA Treatment Locator. Calling the number is free and confidential, but treatment services may involve costs depending on your insurance coverage and the level of care required. Cocaine is a highly addictive stimulant drug commonly sold on the streets to those who want a quick boost of its tropane alkaloid properties, which are similar to those of amphetamines.
If you or someone you know is struggling with cocaine addiction, it's important to seek help as soon as possible. Snorting cocaine regularly can negatively impact a person’s nose because the drug constricts blood vessels and limits the blood flow to the septum. When blood supply is limited, less oxygen is delivered to the septum and the lining begins to die, which can then cause the cartilage to die and perforations (holes) to form. When perforations form, acocaine nose collapsecan occur since the septum cartilage is what supports a person’s nose. The side effects of cocaine use on the nose include a range of problems for the nose, nasal passages, and related areas in the body. This condition, caused by snorting cocaine frequently over time, is commonly called “coke nose”.
Bookkeeping
4 min read
Law Firm Accounting & Bookkeeping A 2026 Guide

Once you've selected a bookkeeper, billing is handled monthly through our secure platform. Everything, from invoicing to communication, is managed in one convenient location. The right bookkeeping investment balances cost against risk and value. Underpaying leaves you exposed to compliance failures, messy books, and strategic blindness. Monthly retainers work better than hourly billing for ongoing bookkeeping.
Guides Parent Form
Manually tracking hard and soft law firm expenses can become time-consuming. Even if you use apps or other solutions to track expenses, it can be tedious to consolidate data into one spot. The ABA requires lawyers to maintain client trust account records for at least five years after work has ended. Records can include bank statements, checkbook registers, and any supporting documents related to the account. Accounting for law firms requires a keen eye and a specific skillset.
- Legal billing software with built-in expense management tools can aid in this process.
- They should also have a proven track record of accurate recordkeeping, trust account management, and generating comprehensive legal industry financial reports.
- These mistakes waste time, create mismatched records, create billing complications, and potentially compliance violations.
- If your team does not have a clear time tracking policy or a clear agreement with the client, you may also have issues properly billing for that time.
Specialized Law Firm Bookkeeping Services Secure. Accurate. Timely.
Starting with lower rates can help you gain initial traction, but adjusting your prices to reflect your expertise and the value you offer is crucial as you grow. Instead of debiting cash and crediting income, you should debit the IOLTA account with a corresponding credit to Trust Account Liabilities. When you later earn your fee, you would debit Trust Account Liabilities and credit your revenue account. Having too many accounts creates headaches later on, as it takes more time to review the books and increases your chances of making mistakes. For example, if you purchase office supplies for your business, you should have an “Office Supplies Expense” account. But you don’t want to set up separate accounts for legal pads, pens, printer ink, etc.

Legal-Specific Integration Costs: The Make-or-Break Factor

Conversely, if you provide services to small companies with less complex needs, your pricing should reflect the level of work involved. The Law Lab Blog offers real-world perspectives, best practices, and actionable strategies for legal accountants and law firm professionals navigating an ever-changing industry. If there are any differences between the three, your trust reconciliation report should show the reason for the discrepancy. For example, say you deposited a check for $10,000 to the trust account on December 30 but the deposit didn’t clear the bank until January 2. The December 31 bank statement shows a balance that is $10,000 less than your books or the client’s trust ledger due to a timing difference.
Accounting
- Understanding what goes into accounting is essential; you still are not an accountant or a bookkeeper.
- Leverage a spend management solution, like MyCase Smart Spend, to streamline your law firm’s financial planning and expense management.
- You can't use Excel spreadsheets to maintain all of your financial books and records for an entire year.
- It is important for lawyers to account for any discrepancies between billed hours and actual payments.
- The December 31 bank statement shows a balance that is $10,000 less than your books or the client’s trust ledger due to a timing difference.
- One option is to ask clients to include an additional retainer deposit for anticipated expenses that the firm holds in its trust account.
LawPay also ensures your law firm accepts payments that comply with your state bar's regulations surrounding trust (IOLTA) accounts and the American Bar Association (ABA) guidelines. Managing your books via accounting software may get you started as a solo attorney. But, if you want to spend your time focused on practicing law rather than deep in the weeds of your law firm’s accounting and financial management, you may want to consider hiring help. One (or more) of these professionals can greatly assist with your law firm's accounting. This includes preparing tax returns and reconciling bank statements with general and client ledgers.

Questions to ask potential accounting professionals
Pricing your work as an expert professional requires careful consideration of various factors. Remember, pricing is an art form that requires continuous evaluation and adjustment. As you gain experience, you will find the right balance that maximizes your profitability while offering fair value to your clients. Setting the right price for your work is crucial to running a successful business. Whether you provide cleanup services, bookkeeping, or accounting, determining the optimal pricing strategy requires careful consideration.
Generic bookkeepers charge less but rarely deliver the compliance oversight law firms require. At TydeCo, we understand the complexities of law firm accounting, from accurate time tracking to trust accounting compliance. Our services are designed to streamline your financial processes, helping you save time and increase profitability. We specialize in bookkeeping for law firms - monthly trust reconciliation, IOLTA compliance, and financial reporting designed for legal practices. Yes, there are firms and providers that focus specifically on accounting services for legal practices.
Your bookkeeper goes into your accounting software regularly (at least weekly) and records all the money coming in and all the money going out so that it appears in the correct place. As a solo attorney, managing your books via accounting software may get you started. Yet, if you own a small firm with multiple attorneys, employees, or contractors, hiring a bookkeeper is more than worth it. Once you grasp these basic methods, we recommend bringing in an expert bookkeeper to help you keep the most accurate books. Hire a tax professional like a CPA to help you with your business taxes. Bring in a legal accountant to help you strategize how to help run your How Bookkeeping for Law Firms Strengthens Their Finances business through financial reports.
Bookkeeping
2 min read
Bookkeeper Downtown Austin- 512 730-1159

We are the top bookkeeping & accounting services provider in Austin, fixed assets TX. Our mission is to help entrepreneurs and businesses focus on success by providing great accounting and bookkeeping service and advice, no matter where you are. Our bank reconciliation services ensure 100% accuracy for your bank, credit card, and loan statements. Our bank reconciliations support timely tax returns and reliable income & cash flow statement reporting.

Staff Accountant
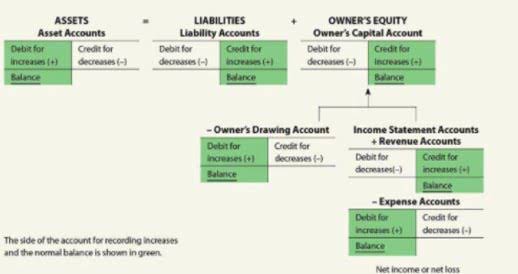
Our QuickBooks professionals help you set up your Quickbooks online account fast and easy. We doing custom Quickbooks training so you get the hand of doing your own double-entry bookkeeping or have us do it. Our expert bookkeepers will work with you to review your business and provide a customized plan that fits your spending plan and management Opening Entry design. Get monthly financials, route profitability reporting, and tax prep readiness tailored to vending businesses in Austin, Texas. Austin operators gain clarity when performance is tracked by route and location.
See Bench’s features in action

Before doing that, just remember that finance has many positions and you may find one to suit your style. They will take care of all the documents you need and ensure that everything is in order and no problems will arise. Bookkeepers work daily for the benefit of their company, and each of their actions is one to ensure that everything works perfectly. In any company, a qualified person must handle everything related to that company’s financial situation; therefore, be sure that your job is safe.
How Much Do Austin Bookkeepers Cost?
JK Bookkeeping Solutions, L.L.C. is a local bookkeeping firm that provides cost-effective financial consulting services for small to medium-sized companies in the Austin area. JK Bookkeeping Solutions, L.L.C. is a certified QuickBooks ProAdvisor. Dimov Tax Specialists helps different types of businesses, like limited liability corporations, partnerships, bookkeeper austin and sole proprietorships, in Austin.
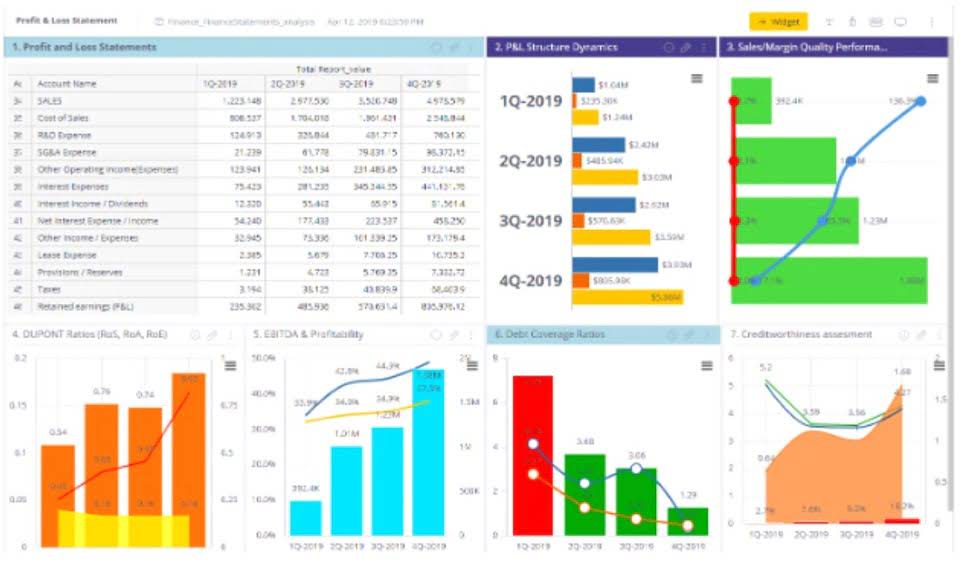
Top Bookkeeping Services in Austin
- Businesses save time and improve accuracy by outsourcing bookkeeping, while accountants provide strategic insights that support growth and compliance.
- Additionally, accurate and well-organized records will also make tax preparation time much simpler.
- Simply payroll, automate computation, adhere to compliance laws, and cut down costs.
- If you partner with Fourlane, then you will have a dedicated bookkeeping team to help you with your financial system challenges.
So, we can tell you that our services are a better investment, even though it may not be cheaper, depending on the partners you choose. Bookkeeping ensures accurate, organized financial data that accounting professionals use to create reports and strategies. Together, they enhance transparency, compliance, and long-term business success. We offers a suite of services designed to support the accounting needs of small businesses. We can help manage all aspects of your business finances, including taxes, payroll, bookkeeping, entity formation, and more.


Bookkeeping
4 min read
Accounting for Tech Startups Accounting For Startups Complete Guide

If you’re not comfortable with numbers, you could end up with messy books and poor reporting. If you’re pre-seed to Series A, and your financials are relatively simple, an accounting platform is all you need. Outsourcing to an accounting firm is generally cheaper than hiring a full-time employee to work in-house. It represents money your startup owes to vendors, suppliers, and other service providers. Once you’ve developed a budget, it’ll be easier to make smarter decisions on processes such as hiring.
- Investors also use it to measure your progress and see if you’re hitting certain milestones.
- Whether you’re handling accounting for startups on your own, using accounting software, or working with an accountant, understanding the basics is crucial.
- Starting a new business is an exciting venture filled with potential and opportunities.
- Book a demo today to see what running your business is like with Bench.
- Creating a budget helps you plan for future expenses and revenue.
- It’s a useful but incredibly costly tool that requires over $10,000 a month to maintain.
- Keep thorough and organized records of all financial transactions.
Underutilized software

You’ll want to find out why and make business decisions based on your findings. For example, you might decide to run ads geographically targeted to that area or open an office there for easier access to your prime demographic. Your business entity determines how you are taxed, how you can pay yourself, your potential business liability, and more. Learn more about Bench, our mission, and the dedicated team behind your financial success.
Neglecting to reconcile books with bank statements
- As your startup grows, this will help you manage cash flow and attract investors.
- Plus, the added efficiency creates time during the day to focus on more important things, such as cash flow management.
- It also plays a significant role in evaluating investment opportunities and ensuring the sustainability and viability of your startup.
- That’s because effective bookkeeping helps ensure correct fund management and financial transaction recording.
This is the easiest of the two methods; however, it doesn’t always provide the most in-depth or accurate representation of the company’s financial position. Furthermore, it is not recommended for businesses with staff or plans for expansion. As a startup founder, you're likely juggling multiple roles and responsibilities.
- First, you can scale services up and down according to your business needs.
- The five most basic accounts in bookkeeping are Assets, Liabilities, Equity, Revenue, and Expenses.
- Clients who have switched to us have complained about frequent, often monthly, price increases as their startups’ expenses have grown.
- The Bureau of Labor Statistics states that accounts are paid $78,000 annually or $37.50 per hour on average.
Key bookkeeping tasks
Proper accounting for your startup business can save you from being subjected to an IRS audit or an audit from your state taxing agency. Tax compliance is a complicated thing, and when businesses get audited, it’s usually because there are red flags in their tax returns that indicate potential issues. Accounting might not be the most exciting part of launching a startup, but it is undoubtedly one of the most crucial. Accurate financial records are not just about compliance—they provide valuable insights that can influence strategic decision-making. When you loan money from banks, they care about your personal credit score just as much as the businesses.


It also helps you track funding progress and showcases your effective management of resources. Both bookkeeping and accounting are vital to every business’s success, but you may have an additional need to keep good records as a startup. If you have investors, they’ll require that you provide financial reports. And if you are trying to get a business loan, you’ll need clear and easy-to-read financials so that potential investors can make an informed decision about investing in your vision. Outsourcing accounting can be helpful in your early stages, but you don’t https://dimensionzen.com/streamline-your-finances-with-expert-accounting-services-for-startups/ necessarily need to. You can likely rely on one of the software packages covered above to track your spending and do your financial reporting.
Bookkeeping for startups

However, to turn your startup dreams into a sustainable reality, understanding the essentials of accounting is crucial. Good accounting practices not only keep you compliant with laws and regulations but also provide insights that drive strategic decision-making. Here’s a comprehensive guide to the essential accounting practices every startup needs to know. While hiring an accountant offers numerous benefits, some startups opt for DIY accounting. However, there are drawbacks to consider, including limited expertise, potential errors, and the time required to manage your startup’s accounting on your own.
Tax Planning

Due diligence is the process other businesses use when assessing your business as a potential accounting for startups partner, supplier, borrower, or investment. This is where inaccurate journal entries or patchy record-keeping can cause lucrative business deals to fall away. Accurate accounting ensures adherence to IRS tax regulations and legal requirements, preventing penalties and financial issues down the line.
If you are audited, your accountant can help you through the process, interacting with the auditor and providing all necessary information. While it’s possible for an accountant to manage your bookkeeping, the reverse is not true unless the bookkeeper obtains certification. Forecasting allows you to predict revenue, expenses, and cash flow over a specific period. This helps you make strategic decisions, such as when to hire or invest in new projects.

EdTech
8 min read
Top online Platforms that Educational Institutions should use to engage their students amid the Coronavirus lockdown
Introduction
The world is hit by a pandemic caused by coronavirus due to which all the educational institutions such as Schools, Colleges, Universities, Private institutions, have to abruptly & temporarily shut down to prevent the rapid spread of the virus. This is unprecedented where millions of students right from primary schools to colleges are forced to switch to e-learning tools to ensure their educational continuity. Educators are now under extreme pressure to complete the remaining activities such as assignment submission, oral viva’s, practical examinations, summative exams, among others for the current academic year. They are also worried about how things are going to move forward in the next academic year when the entire existing system has collapsed. Many educational institutions have completely stopped their teaching activities, while some institutions are carrying out activities through online tools, emails, and WhatsApp. But the remaining major part has not yet fully adopted or doesn't use online tools at all. The purpose of these tools is to virtually create an environment similar to their classroom so that the students can feel that they are in their classrooms from the comfort of their home. The classroom teaching has few activities- Attendance of students
- Teaching and Learning
- Notes sharing (Presentation / Printed materials / Dictation)
- Assessments (Objective or Subjective, Formative or Summative)
Google Classroom
Google Classroom is built with a purpose to manage teaching and learning online. It helps teachers to create and organize classes, subjects, assignments. Students are enrolled in these classes, are assigned classwork in the form of assignments & quizzes, and have access to shared educational materials. Teachers can post class announcements to all the students or only to selected students. They can track the quizzes and assignments given to students. A detailed progress report, along with the grades of the students, is available all in one place. As expected, the Google Classroom seamlessly integrates with other Google tools such as Google Docs, Google Drive, Google Forms, among others. It's not a full-fledged LMS (as compared to other LMS discussed later in this post), but teachers can quickly configure it and start using it right away. Also, it can scale to any number of teachers and students, thanks to Google's infrastructure. One of the best features of the Google classroom is where Teachers can invite Parents to share summaries of the student’s work. This encourages the parent’s participation in the academic context as they have detailed access to the student’s progress right from the beginning.Your Educational Institution can use the Google Classroom in the following ways
- Teachers can quickly create classes and invite their students to join them.
- A single dashboard to manage all the classes.
- Distribute teaching materials & assignments.
- Easy communication between teachers and students.
- Allows students to take assignments and quizzes.
- It allows teachers to upload educational materials where the students can view them.
| Official Website | https://edu.google.com/products/classroom/ |
| Teacher Center | https://teachercenter.withgoogle.com/first-day-trainings/welcome-to-classroom |
| Help Center | https://support.google.com/edu/classroom/#topic=6020277 |
| Teachers Essential Guide | https://www.commonsense.org/education/articles/teachers-essential-guide-to-google-classroom |
Moodle
Moodle is one of the most flexible tools used by educators for blended learning (mix of both classroom and online teaching and learning), e-learning, distance education, flipped classroom. It’s a powerful learner-centric software that is highly flexible and scalable, which extends both teaching and learning beyond traditional methods, making it accessible for learners any time, anywhere. It’s used by nonprofit, government, businesses of all shapes and sizes, among others, to meet their wide array of learning needs.Your Educational Institution can use the Moodle in the following ways
- Engage students with both online and offline teaching and learning.
- Classes can be instructor-led, self-paced, blended, or entirely online.
- Create courses, share teaching resources to students in the form of PDF, Word, Audio, Video, among others.
- Conduct online exams using quizzes that use pre-built question templates of MCQs, Match the Columns, fill in the blanks, etc.
- Create and share assignments, collect submissions from students digitally (Online text or File submissions). Grade or give feedback on the assignments.
- Moodle has an inbuilt full-fledged file management system, which makes it easy for teachers to upload their teaching materials such as Word Files, Presentations, PDFs. Documents can even be directly imported from various cloud storage services such as OneDrive, Google Drive, Dropbox, among others.
- Teachers can track the progress of each student such as Activity completion & Course completion. All online and offline learning activities can be recorded.
- A calendar to keep track of the various academic activities such as course completion dates, assignment due dates, upcoming quizzes, among others.
| Official Website | https://moodle.com/ |
| Documentation | https://docs.moodle.org/38/en/Main_page |
| Teacher quick guide | https://docs.moodle.org/38/en/Teacher_quick_guide |
| Learn Moodle | https://learn.moodle.org/ |
Zoom
Zoom is a video conferencing service that allows people to meet virtually via audio and video. It is a highly scalable service with real-time messaging and screen sharing, mimicking the classroom environment, perfectly fit for teachers. Video conferencing makes it easier to engage students than any other means. It is a go-to option for teachers to host live classes. It has a simple, intuitive interface with lots of useful options that makes it possible to conduct live classes for even hundreds of students simultaneously. Educational institutions use Zoom for conducting their classes, internal faculties, or administrative meetings; conduct placement drives virtually, among others. This tool makes it possible to extend both teaching and learning beyond traditional classrooms. Students can virtually join classes conducted by their teachers, from the comfort of their home or view recorded sessions later to learn at their own pace.Your Educational Institution can use the Zoom in the following ways,
- Teachers can conduct their classes live or record and share them
- Internal faculties meetings or administrative meetings
- Student Viva’s
- Conduct placement drives virtually, Schedule online interviews.
| Official WebPage | https://zoom.us/ |
| Zoom Training Resources | https://zoom.us/docs/en-us/covid19.html |
Smriti EdTech
Smriti is an EdTech platform we built ground up by working closely with private Schools, Institutes & top NAAC rated colleges. This platform has been constantly improved upon through the feedback from various stakeholders of educational institutions such as top-level management, teaching & administration staff, students & alumni. Although we have discussed Google classroom and Moodle in this blog, we strongly recommend a tailormade solution like Smriti EdTech, which is designed from scratch for Educational Institutions like yours. Note that this platform is not a turn-key solution, which can be installed quickly and be used from day one. Instead, it’s a custom-tailored solution that solves specific challenges that a particular institution may have. It is not another generic ed-tech solution that is out there in the market. We believe that every institution is unique and has its own set of challenges, and this platform is built to solve those challenges. Currently, this platform consists of 20+ integrated modules(Click here to see a detailed list of modules), which are custom developed to solve various challenges that educational institutions face.Your Educational Institution can use the Smriti EdTech platform in the following ways,
- Teaching and learning
- Conduct Online Objective and Subjective Exams
- Track progress of students
- The amount of content that has been consumed by the individual student.
- The number of attempted or completed quizzes.
- Detailed tracking of the given assignments.
- Analytics of the Videos (recorded lessons) such as no. of views, the percentage of video viewed.
- Detailed tracking of the given tasks.
- Master Calendar
Conclusion
All the above mentioned online platforms have different features and are designed for various purposes. Teachers should use them for remote teaching & learning, thus keeping the students occupied. Such use of technology, especially in these unprecedented times, has shifted the entire focus from teachers to students hence it has truly become a learner-centered education. The lockdown has forced the entire education sector to switch to online platforms for their operations. There is no better time than now for all the educational institutions to go online as much as possible. I am signing off for now. See you soon. Till then, stay home and stay safe.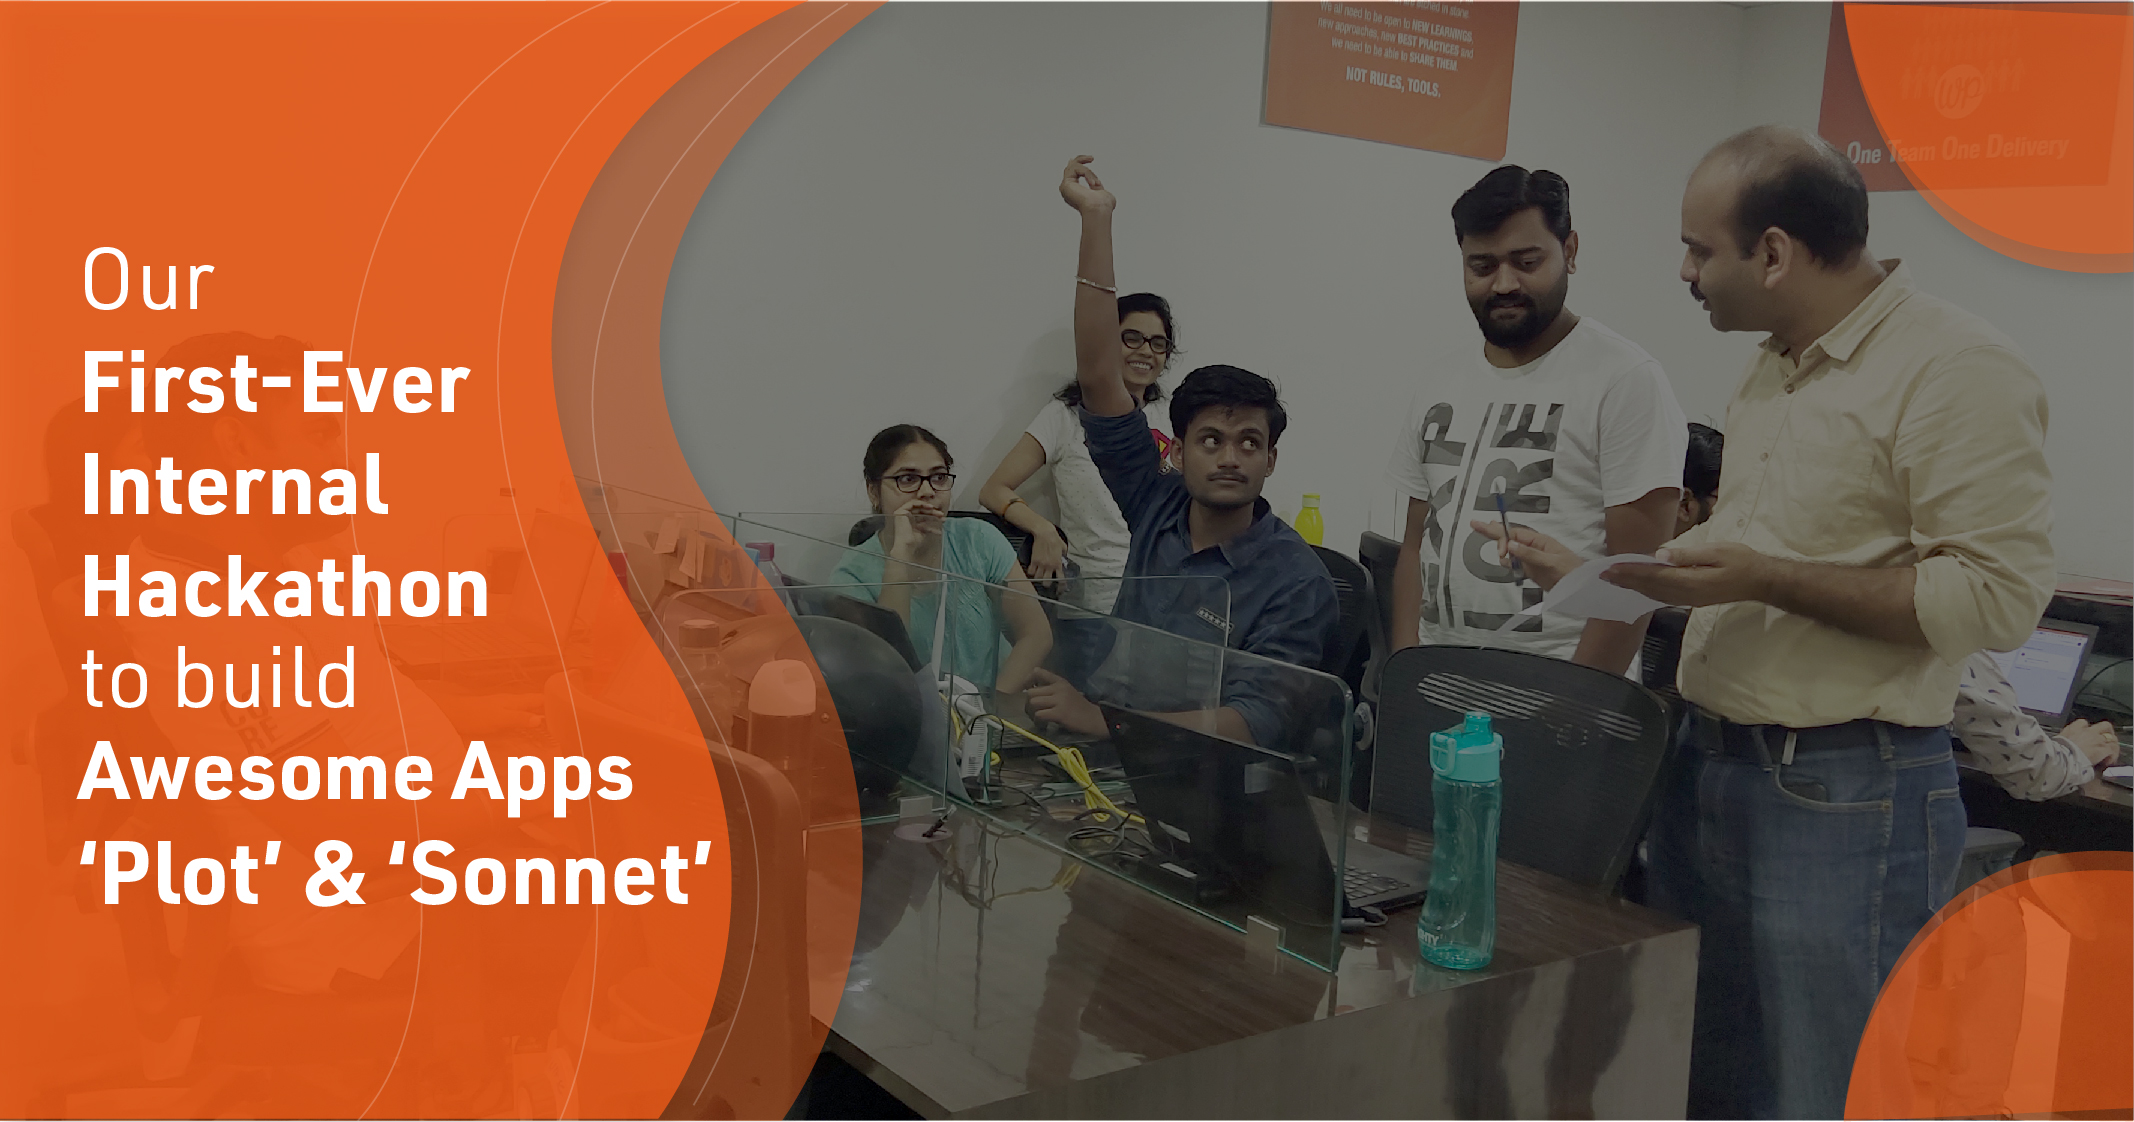
General
4 min read
Our First-Ever Internal Hackathon to build Awesome Apps 'Plot' and 'Sonnet'
The Purpose
For a while, we wanted to build two Awesome Apps Plot (v2) and Sonnet. Things were going slow. We wanted to build these Apps rapidly. So we decided to do an internal hackathon. The entire team would collaborate to build these Awesome Apps in One Day.The Preparations
The core team at WPoets was planning this hackathon for a while. Small preparations were going in the background for a few weeks. A rough plan was presented in our weekly review meeting on 18th September. In the meeting we discussed how and when we could do the hackathon. A few dates were considered. Finally, we decided to do this event (on short notice), on the upcoming Saturday, 21st September.
The Plan for the Day.
Fast forward to the day before the event, we prepared a plan, created two teams, one for Plot and the other one for Sonnet. All the tasks were created and distributed to the team beforehand.The Start
It was around 9.00 A.M, our team gathered in the office (some members were late). All were excited to start the hackathon. The goal was to build a fully functional Awesome Apps at the end of the day. The first thing we did was a small discussion, where the team was briefed with the exact details. It was followed by a (much needed) Pep Talk by our Core Team to inspire the team members for completing tasks at the end of the day. The team members rolled up their sleeves and started working on the tasks.
Sonnet Team

Plot Team
One hour into the hackathon, the team gathered around for breakfast.
The Team having breakfast.

Back to work after breakfast.
Halfway Down The Hackathon
The second half was intensive as compared to the first half. The team was crushing their to-do list. Along the way, they were helping each other if needed. There were a few discussions between themselves to resolve any issues that arose. There were many challenges along the way. Against all the odds the team was making sure everyone is on the same page, saving them plenty of crucial time. At 1.45 P.M. we had lunch. A much-needed break since morning.
It’s Lunchtime
")
It’s Lunchtime (2)
As everything seemed normal after lunch; suddenly, the development server went down for some reason. The team was unable to work. Then came our DevOps engineer into the picture. He resolved the server issues, and the team was back to work. Throughout the second half, there were several server hiccups. The development servers were running at maximum capacity. The DevOps had to work hard to get things to normal and keep the servers functional.
All Systems Operational.
Towards The End
The entire team worked through the morning continued through the afternoon till evening. Work stopped at 7.30 P.M. Finally; It was demo time. The team had to show a working demo of what they had built until now. Each team presented their work for the final review.
Plot Demo

Sonnet Demo
The evaluation of the work was done. More than 98% of the tasks were completed. The team was directed to complete the remaining tasks until the next weekly review meeting.The Feedback From The Team
Before signing off the event, we collected feedback from the team.Few points from the feedback were
- Better overall planning was needed (This event was planned at very short notice)
- Better Task breakdown.
- Insufficient information against a few tasks.
- It was really a good opportunity to take a break from routine work and hack for a while.
- Dev Server issues (I don't know how we missed this).
- Food Choices. No Pizza’s Please.
Big positives
- Newly joined members learned a lot of new stuff.
- The team leveraged each other’s strengths, worked collaboratively.
- There were some confusions between the teams still they managed to stay on course.
- An opportunity to rub shoulders with each other.
- Better team bonding
Few challenges that we faced
- Keeping team members on track.
- Keeping track of Tasks.
- Collecting feedback on Tasks every hour.
Wrapping Things Up
This was the first internal hackathon that we conducted at WPoets. The entire team worked on a set of challenges. It was an excellent opportunity for team members to work on some cool ideas that were drifting around for a while. Throughout the day, we spent quality time together. Everyone enjoyed themselves! One of the final comments from the developer was,“We built two Awesome Apps in One day
which would have taken a fair amount of time.“
I’d call our first internal hackathon a huge success. By the way, we decided to organize such hackathons every quarter.
General
11 min read
Awesome Websites : A Subscription-based Fully Managed Continuous Improvement Program
- What is Awesome Website
- Why we created Awesome Plans, a subscription-driven service.
- What we offer
- How we are Different
- How your business can Qualify for “Awesome Website” service
1. What is Awesome Website
Awesome Websites is state of the art service offered by us for developing enterprise websites. It’s based on the continuous improvement process which employs incremental improvement of a website over time, replacing traditional all at once approach, better fit for continually growing and evolving business organizations. [aw2.module slug='pullquote' pull_class='float-right'] [aw2.this html] Awesome Websites is based on a continuous improvement process which employs incremental improvement of a website over time, replacing traditional all at once approach, better fit for continually growing and evolving business organizations. [/aw2.this] [/aw2.module] We consider a website to be “Awesome” when it can demonstrate the following qualities,- Brand:
- The website must reflect and add to the brand proposition of the business.
- Adaptive
- The website should be adaptive and must take advantage of the screen it is on, to show the right information, beyond just a responsive site.
- Enabler
- The website should be beyond a Static site. It should enable business workflows to achieve more with less effort.
- Optimized
- It should be continuously optimized to adapt to its visitor behavior.
- Data-Driven
- The Website should be continuously improved upon with feedback from the Analytics. It should leverage valuable insights hidden in data about the website’s visitors.
- Should do its job
- The website is a vital primary marketing tool. It's an online conversion machine, working in parallel with other offline marketing strategies.
2. Why we created Awesome Plans, a subscription-driven service
The long and short of the story is,“Having created hundreds of websites for the customers over the last 10+ years, we have garnered keen insights on what works, and what doesn’t work for the web. We have distilled these insights into a comprehensive improvement plan for our client’s website and created a subscription-driven program to make their website awesome.”
Let’s elaborate more on it. We have been part of many customer journeys. We have seen what had worked for them and what did not. At times things that had worked for a particular client did not work for the other. Few factors that led us to design Awesome Plans were,Unengaging, non-maintained and outdated business website had a negative impact on its visitors.
[aw2.module slug='pullquote' pull_class='float-left'] [aw2.this html] In the past, we have built hundreds of websites, which languished because it never got updated. It almost stayed the same for a long period of time as they were at the time of launch. It never gave the returns that it should have given. [/aw2.this] [/aw2.module] In the past, we have built hundreds of websites, which languished because it never got updated. It almost stayed the same for a long period of time as they were at the time of launch. It never gave the returns that it should have given. While they performed at its best for a period ranging from a few months to a year or so, but over the period it reached the saturation point, beyond which it was never the same website as it was when it was built. By reaching the saturation point, it didn’t mean that the website stopped working, but it started having the following symptoms,- The website was not visually appealing as it was when launched or as compared to current trends.
- The business had outgrown. It has evolved over the years, but the website doesn't go hand in hand with this change.
- The Website didn't incorporate the change in the marketing strategy of the business which had changed over the period.
- Visitors were not much interested in the website as they were initially.
- The content was not engaging anymore, or even worse, the information about products and services was not up to date.
- The Website looked stagnant and outdated.
Drawbacks of Traditional Web Development process
The clients for whom we were developing websites, always came back with requirements small or big. Once the requirements came in, both sides had to sit and discuss what needs to be built, how its gone be achieved, how much time it will take, and the most crucial part, what is the effort and cost for that change. All good so far, but things we never easy as they looked. Clients requirements would change, even in the later stages of the development, more changes would happen closer to project deliveries which would change the scope of work. To accommodate these changes, we had to re-quote, renegotiate, which affected our efforts and the most critical thing, clients expenditure. On our end, we had to align the resources such as designers, developers, project manager’s etc. across projects according to the need of the hour. And to complicate things more, multiple such projects were running in parallel. This traditional web development process was cumbersome and inefficient, costing time and money for both the stakeholders, we and our clients.Drawbacks of Traditional “Fixed Price Cost” Model
[aw2.module slug='pullquote' pull_class='float-right'] [aw2.this html] Working with fixed price model for website development looked easier, cheaper and more profitable in the beginning. [/aw2.this] [/aw2.module] Working with fixed price model for website development looked easier, cheaper and more profitable in the beginning. However, again, it was not the case as it looked. Clients came to us for either development their website from scratch or some maintenance tasks of their existing website. Whatever the case based on the requirement, the time, cost and effort required for that project or task was estimated. The cost was an important parameter in the estimate. Majority of times, our client’s would need a certain amount of time discussing with all the stakeholders within their organization to allocate the required budget. On our end, we had to take deposits upfront (minimum 50% or more of project cost) to start the work. These upfront costs were a barrier to many customers, and it looked like initial entry cost was high, even if the price was divided into smaller payment milestones. And needless to stay that the project requirement would undoubtedly change. In short Back and forth SOW for changing client requirements, negotiations, and renegotiations of the estimate, rearranging payments milestones, countless amount of time that was spent but not billed, awkward late-payment reminders through emails, phone calls. All these things were costing us in terms of time and money. We knew we needed a better pricing model.Clients needed True partnership, on an Ongoing Basis
Not all of our clients were tech-savvy. Most of them wanted to offload their technical requirement to a team of experts who are reliable, talented, experienced and most importantly, who are willing to take responsibility for their business website. [aw2.module slug='pullquote' pull_class='float-left'] [aw2.this html] We defined our services and Bundled them into a subscription model called “Awesome Plans.” [/aw2.this] [/aw2.module] Also, the client’s didn't want to invest internally hiring tech team and manage them by themselves. All they wanted is access to the tech team, which is always available, listening to them whenever they are in need. Going through these factors mentioned above, some trial and error tactics, connecting the dots from the experiences that we had, We came up with a bespoke solution which addresses almost all the problems and most importantly which will work for broad categories of clients.3. What we offer
Currently, as of now writing this blog post, we have three subscription plans. Depending on the client's needs, they can choose a plan which is the best fit for their business. Following Awesome Plans are available,- BASIC: Business Websites
- A starter plan designed for targeting entry-level SMEs
- PRO: Marketing Portals
- Best suited for mid-level SMEs
- EPIC: Business Workflow
- Best suited for Enterprise clients.
4. How we are Different
Being a part of the Software industry, specifically being into the WordPress ecosystem, there are N number of Companies, Agencies, & Freelancers who offer WordPress based services which are more or less similar. [aw2.module slug='pullquote' pull_class='float-right'] [aw2.this html] The fact that we incorporate “Continuous Improvement Process” to build “Awesome Websites” sets us apart from the rest of the service providers in the same niche. [/aw2.this] [/aw2.module] Making it extremely difficult for prospects to choose from these options. The following section describes how we are different and how our solutions are better than similar competitors in the niche.Business Solutions based on Continuous Improvements
The fact that we incorporate “Continuous Improvement Process” to build “Awesome Websites” sets us apart from the rest of the service providers in the same niche. Traditional website development approach leads to a website which is stagnant, non-maintained, outdated. CI approach breaks from this conventional way, to continuously improve and deliver a website which will always be fresh, up-to-date and on the cutting edge. [aw2.module slug='pullquote' pull_class='float-left'] [aw2.this html] Having years of experience under our belts and diverse expertise helps us take up and solve the complex business challenges. [/aw2.this] [/aw2.module]Reliable Experts that can be banked on
We are a team of experts who are creative, talented, reliable, professional and experienced. Having years of experience under our belts and diverse expertise helps us take up and solve the complex business challenges. And the most important part, we take full responsibility for our clients business website.Services Beyond Traditional Retainers
Our services go beyond traditional retainers. Traditional retainers generally consist of following services- Free Hosting
- Uptime Monitoring
- Daily Backups
- Minor Tweaks, Fine-Tuning of the website.
- Plugins and Theme updates
- Virus and Malware Scanning
- Proactive changes to the site every month
- Designing and Developing of
- Landing Pages
- Newsletter Templates
- Analytics & Monitoring
- Awesome Apps
- Complimentary Mobile Apps (running parallel with the Business Website)
- Unlimited Help and Support
- Development of Custom Workflows
We offer True partnership
We believe in delivering solutions that solve real business problems. We are with our clients on every step of building their “Awesome Website” right from planning, development, testing to launching it and beyond. [aw2.module slug='pullquote' pull_class='float-right'] [aw2.this html] Our clients consider us an extension of their team working collaboratively with them on solving their toughest online challenges. [/aw2.this] [/aw2.module] Our clients consider us an extension of their team working collaboratively with them on solving their toughest online challenges.Beyond SOW
Instead of leaving client projects stuck in the pipeline due to renegotiating terms, the scope of work, cost estimates, payment milestones etc., with Awesome Plans subscribed to our clients, and we focus on getting things done.5.How your business can Qualify for “Awesome Website” service
When we designed “Awesome Website” we knew it’s not meant for every website on the planet. We knew for which businesses it’s the best fit and for which it was not. We wanted to work with Clients which resonated with us on the following points,The Website is Not just an online brochure, but a serious marketing tool
[aw2.module slug='pullquote' pull_class='float-left'] [aw2.this html] Building a website and launching it is not the goal. Running it in a way to maximize its potential should be the goal. [/aw2.this] [/aw2.module] A website helps business in building its identity, trust, and reputation. Basically, it's an online conversion machine. We want to work with companies who are serious about their website, who think their website as one of the primary Marketing tools and wanted to harness its power.Can understand Continuous Improvement Process benefits
Building a website is not a one-time event. It may work for a countless number of sites and is nothing wrong about it, but it has its drawbacks. We want to build reliable, scalable, stable, well-maintained web portals for our clients which can only be achieved by continual improvements over time delivering outstanding results to our clients and their customers.Ready to shift towards a long-term mindset
“Rome was not built in a day.”
You can download a free theme, customize it a bit, add content to it and make the website live in a few days. Building a website and launching it is not the goal. Running it in a way to maximize its potential should be the goal. Shifting towards a long-term mindset has its benefits,- Increase Brand Awareness
- Improve visibility in the search engines hence increase in website traffic
- Generation of qualified Leads which will drive more conversions
- Establish a connection with the target audience through fresh content and design.
Lastly Budget
“You get what you pay for.”
We want to work with clients who are ready to invest in their website. Having a budget allocated helps to focus on the problem at hand, which is more important than anything else. Our pricing is transparent. This allows our potential clients can have a better understanding of what they are paying, and what value they are getting for that investment. We have also listed down all the features of various plans in a comparison table so that it becomes easy for them to compare and choose which plans fit in for their budget.Conclusion
The primary goal of this article is to give a brief introduction to Awesome Websites service offered by us to our potential future clients. On the closing thoughts, we expect the readers of this article, especially prospects to think about the benefits that this service will bring to their business. Take the first step, subscribe to our Awesome Plans, then sit back & relax. Let us take care of your business website.
EdTech
10 min read
Why Educational Institutions should Automate their Admission Process
The challenges of Manual Workflows in the Admission Process
The educational institution's admission office is full of the hustle and bustle, especially during the peak admissions period. It's stacked with long queues of students who want to take admissions. The administration staff is busy with registration and enrolment processes. Presently, several educational institutions have not adopted the technology to the fullest. Their management still trusts the manual process for 'behind the scenes' work; which includes a student registration process, fees procurement, admission verification, among others. [aw2.module slug='pullquote' pull_class='float-right'] [aw2.this html] The manual admission process is not only tedious and frustrating but also highly stressful and prone to errors. [/aw2.this] [/aw2.module] The manual admission process is not only tedious and frustrating but also highly stressful and prone to errors. Your in-house administration staff's time is fully occupied, handling the sequential admission process of hundreds of students. The administrative staff is also busy doing repetitive & tedious tasks, which takes up a lot of their time, ultimately resulting in less productivity. They work very hard to complete the entire admission process on time. Along the way, they also have to resolve any discrepancies and errors that emerged by the manual process. In short, they end up being frustrated. This frustration will have a negative impact on students and can lead to dissatisfaction, as the admission lacks the kind of efficiency it needs. On top of that, the students and parents are stranded in the long queues of admission application submission and fee payments. They are left with no alternative but to follow the manual process conducted by the educational institutions.Solution - Automate the Admission Process
With the increasing number of students taking admission in the academic institutes, the need for having a solution to manage, simplify, and streamline student admissions has become imperative. [aw2.module slug='pullquote' pull_class='float-left'] [aw2.this html] The enrollment module of the Smriti EdTech platform is designed in such a way that it will reduce the pain points of the admission process that your institution face. [/aw2.this] [/aw2.module] Smriti EdTech's enrolment module automates the entire admission process, providing a hassle-free experience to both students and the institution's staff. It takes out the headache of managing the entire end to end admissions lifecycle making it more efficient than ever. The admission process is the first actual interaction of students and parents with the educational institution. By automating the admissions process, it makes a good impression on them, boosting the brand identity of the institution. The enrollment module of the Smriti EdTech platform is designed in such a way that it will reduce the pain points of the admission process that your institution’s face. It lets you efficiently manage the overall admission process in the following ways:- It enables you to manage your entire admission process from one place (Dashboard), thus saving your staff's time. It also reduces the complexity of the process, making sure that it's error-free.
- It provides you with a real-time view of the prospective student's pipeline along with the stages in which they are.
- It provides insights about the entire enrollment process, which allows your institution's management team to help identify the challenges of the admission process. They can take quick measures to increase admission conversions based on these insights.
- Since the admission process is automated, it requires less human intervention, thus freeing your staff for more productive work.
Benefits of automating the Admission Process
Smriti EdTech's enrollment module automates the entire end to end lifecycle of the admission process for all types of educational institutions whether its Schools, Institutes or Colleges. This platform not only streamlines the admission procedure but also provides a better experience to the students. Following are the benefits achieved by automating the enrollment process,1.Convert Your Potential Admission Enquiries
The ultimate aim of having automation in the admission process is to simplify the operations and maximize the enrollment of new students, along with retaining qualified students. The admission module of the Smriti EdTech Platform helps you in providing the right insights of overall admission inquiries, how it has been progressing, and how many seats are confirmed. This educational software provides you with intuitive admission automation, designed to capture maximum student leads so that they can be transformed into sure shot admissions. For Schools, this module allows the parents to check the admission eligibility of their child online, submit the school admission application, upload the various documents from the comfort of their home. The admission inquiries are collated centrally. The school staff can conduct the necessary processes such as sorting the admission applications, reach out to the prospective parents to schedule admission interviews, waiting list management, etc., thus helping convert the inquiries into admissions. The streamlined online admission registration process makes the job of your administrative staff easier and efficient by reducing errors, manual paperwork, and redundant administrative chores. For Institutes, your admissions team can easily reach out to potential students who have enquired, can schedule counseling sessions, and follow-up with them. All the communications history such as SMS, emails, call logs are maintained in one place. For Colleges, they have to go through a centralized admission process for first-year students. This module allows colleges to have a custom online admission process so that they can admit students who have qualified the common entrance tests conducted by Statutory Central Admission Authorities. For the rest of the student's admission is conducted similarly. [aw2.module slug='pullquote' pull_class='float-right'] [aw2.this html] The lead stages can be tracked as the prospects move through the admission funnel, thus saving time for your admin staff on scrutinizing the same. [/aw2.this] [/aw2.module] The admissions automation feature captures required student's information and does the routing of applications based on the program/course selected, caste or category, and other influential parameters. It also detects whether a new student or existing student is taking admission depending on CET number. or PRN entered. Also, the lead stages can be tracked as the prospects move through the admission funnel, thus saving time for your admin staff on scrutinizing the same.2. Minimize the Manual Data Entry Process
The influx of students taking admissions is increasing day by day. The academic institutes have a hard time to cope up with this scale of the enrollment process. Also, they have to work with lesser resources along with traditional manual systems. [aw2.module slug='pullquote' pull_class='float-left'] [aw2.this html] The manual form filling process is completely eliminated as the students and parents can fill online admission forms at the comfort of their home, without coming to the institution campus. [/aw2.this] [/aw2.module] Manual data processing is time-consuming and full of errors. The administration staff enters the data collected from the paper-based admission forms into excel sheets. This process is more error-prone since the data entered might be wrong due to incomplete information, unrecognizable handwriting, among others. Smriti Edtech's admissions module digitally stores almost all information of the admission process. The students apply for admission through online registration forms. The manual form filling process is completely eliminated as the students and parents can fill online admission forms at the comfort of their home, without coming to the institution's campus. The digital scan copies of mandatory documents are uploaded to the system hence removing the need for storing and managing them physically.3. Your Students Admissions Data is in a Single place
Your institution's staff is already struggling to streamline the admission procedures. On top of that, all the student's data is scattered in various paper-based forms, stored in file cabinets. Some institutions are implementing a slightly better solution of entering the student's data into excel sheets. It has its own challenges. Over the period as the number of enrolled students increases, it becomes challenging to manage students data in one excel sheet. Also, to recall students information year, program, branch, and department wise becomes difficult and time-consuming. The worst part is, these excel sheets are shared among various members through emails or pen drives, making it difficult to maintain one version of the excel sheet which consists of the up to date information of the students'. This problem scales as the number of students enrolling for various programs & courses increases. And even worse multiple versions of the excel files are created with names like 'final,' 'copy of final,' 'final of final,' 'final version 1' etc. Smriti EdTech's admission module gives you a complete view of data generated from the admission process conducted for different programs or courses. Your institution's data is stored in one central location, with zero redundancy. [aw2.module slug='pullquote' pull_class='float-right'] [aw2.this html] You can manage the student data from multiple campuses through a single dashboard. [/aw2.this] [/aw2.module] Your in-house staff can retrieve, monitor, and analyze the students and their admissions data whenever required. The details such students personal information, program/course they have enrolled, uploaded documents, along with the information of fees paid is available on demand. Not just that, you can manage the student's data from multiple campuses through a single dashboard.4. Collect Fees from the Students using Credit or Debit Card, Mobile Wallets & UPI
Fee collection is the most crucial component of the admission process. Educational institutions can collect fees from the students, through online payments by Credit or Debit Card, Mobile Wallets & UPI, among others. [aw2.module slug='pullquote' pull_class='float-left'] [aw2.this html] Educational institutions can collect fees from the students, through online payments by Credit or Debit Card, Mobile Wallets & UPI, among others. [/aw2.this] [/aw2.module] After the students submit their online admission application, they can view the fee structure, including its components and pay for it. These fee components are pre-configured depending on the program, course, caste, or any other parameter. Late fees & super late fees per day, along with their collection start and end dates can also be configured. Partial fees can also be collected from students in the form of installments. Automatic reminders can be sent to students who have opted for partial payments for the next installment or whenever they have any overdue payments. In short, the students or their parents can directly pay all types of fees without traveling to the institution's campus.5. Make more informed decisions with Real-time, Data-driven & On-demand Reports.
Smriti EdTech's enrollment module gives you real-time insights about your entire admission process. Insights such as, how many total numbers of students have applied, what's their status and how the admissions are progressing at every stage. It provides you with accurate information which lets you figure out how good are the enrollments for the year, have they increased or decreased, etc. You can generate customized reports of the accounts of the institution to keep a record of the money flow throughout the year. Real-time, data-driven, easy-to-visualize & on-demand reports can be generated, which helps decision-makers to make more informed decisions related to admissions. Student wise reports of fees received, outstanding fees, installments, can be generated based on daily, weekly, quarterly, yearly, or for a custom date range.Conclusion
Smriti EdTech’s Enrollment Module is equipped with the necessary features for the automation of the admission and enrollment process. The entire flow of admission is taken care of. This Module is custom-built ground up catering to the different needs of educational institutions viz Schools, Institutes & Colleges. There are many benefits of automating the admission process, but one of the main benefits is that it reduces the overall costs of operation by digitizing the entire process. It lowers recruitment costs and effectively optimizes the resources. It also ensures a seamless flow of communication with students using web & mobile devices. It also provides your institution with the real-time information and analytics of how the process is performing. Based on that, you can make informed decisions, continuous improvements & work on the flaws of the process. Lastly, it lessens the time required for the execution of the entire admission life cycle from weeks to a few days. To learn more about how Smriti EdTech's enrolment module can automate the admission processes of your educational institution get in touch with us today.
EdTech
11 min read
Make Educational Institutions Smarter using Smriti EdTech Platform
How Smriti makes Educational Institutions Smarter?
Smriti Edtech Platform offers a holistic approach to facilitate smooth management of the entire educational institution's affairs. It has got all the necessary modules that are needed to manage the institution efficiently.1.Enrollment Module
Enrollment module handles the entire enrollment life-cycle right from online admission application to fee collection to enrolment. It replaces the manual admission process which is tiring, time-consuming, stressful and error-prone for both administrative staff and students. Enrollment module automates the entire admission workflow, eliminates duplication of work, hence reducing the overall cost of operations & enabling better utilization of resources. Educational institutes can collect students fees online, replacing time-consuming, mundane standard fees collection process through cash, cheque or DD. Admin department can track stages and statuses of almost n number of students in real time. The entire time required for the execution of end to end enrolment process is reduced from weeks to a few days. Enrollment Module makes Educational Institutions smarter by following ways,- Technology-driven, automated & smart admissions processes.
- Less administrative work hours per week required for handling admission processes.
- Eliminate admission bottlenecks and simplify operations with online admissions.
- Accept fee payments online from students, eliminating the need for manual fee processing in the form of cash, cheque or DD.
- Data-driven based decision making, due to availability of information stored digitally.
- End to end digital processes online admission application, digital scan copies of documents are uploaded instead of Xerox copies, online fee payments.
- Daily reports generated, exported & mailed to authorized persons consisting the details of fee collections.
- MIS reports can be generated giving a clear picture of admissions & cash flow.
2. Assessment Engine
The learning process is not deemed completed unless it's assessed. Whether learning has happened in the student can only be concluded with assessments which are then evaluated. This module lets you quickly create comprehensive online assessments using pre-built question templates such as MCQs, MRQs, Drag and Drop, Match the Columns, True or False, Fill in the Blanks, among others. These electronic assessments allow faculties to quickly evaluate the performance of the students and give them instant feedback so that they can improve students who are weak. Assessment Module makes Educational Institutions smarter by following ways,- Create and manage online assessments, such as practice tests & quizzes.
- Teachers can build a question bank which is used to create online tests.
- Conduct tests periodically instead of summative assessments.
- Effective assessment of students at individual performance level
- Go paperless, by conducting online examinations.
- Conduct class tests, practice tests or test at home on mobile devices.
- Custom reports of online assessments help teachers identify problem areas in students so that they can improve them.
3. Learning Module
This module helps in delivering content through a new type of learning model called Blended Learning, which is a combination of offline (face-to-face, traditional learning) & online learning. The content is delivered through computer or smartphones thus providing an interactive learning experience. The backbone of the Learning Module is the Learning Management System (LMS). Faculties can collaboratively create, arrange, publish & manage the learning content using LMS. Various content types such as text, images, audio & video can be bundled together to create engaging and interactive learning content. Exercises & quizzes can be mixed in between the learning content, which allows teachers to gauge if students have grasped the concepts. Teachers can track the progress of the students such as how much learning content they have consumed & their performance in exercises & quizzes. Learning Module makes Educational Institutions smarter by following ways,- Allow students to study anywhere, any time, at their own pace using Mobile Apps.
- Integrate blending learning approach in the institution.
- Using LMS, faculties can deliver interactive & engaging learning content.
- The teacher can track students learning progress, identify struggling students to help them in their studies.
- Learning is no more passive activity; it’s active by practicing online learning.
- Students have access to helpful resources such as course material, lecture notes, presentations, sample question papers & question banks, among others, through web and mobile apps.
4. Certification Management
With certification management module; students can easily request attendance, character, bonafide, transfer & certificates. Traditional certificate request process consisted of manually filling form application, submission of xeroxed copies of supporting documents, filling bank challan to pay by cash, then submit one part of challan to the educational institution. Staff then handwrites the student information in the certificate & issues it to the student. Using Certification Management module the students from anywhere can request for various certificates online, upload scanned supporting documents, pay the certificate fees online. The certificate generation request goes to the authorized personnel who then verifies the details & documents. Once verified the certificate could be downloaded, printed on the institutional letterhead, get it signed from signing authority, finally issued it to the students. Certification Management module makes Educational Institutions smarter by following ways,- Track history of certificates that are issued to the students.
- Eliminate the need to maintain paper-based applications, xerox copies of supporting documents. All the data is stored digitally.
- Payments are made online by students.
- Cuts downs the entire certification generations process to just verification of application & documents to printing the certificate.
- Just download the requested certificate, print it on letterhead, (student details are pre-populated from the database), get it signed & stamped from the authorities, issue the certificate to the students.
- Students can collect the certificate from office counter or can receive it at their home by courier (for those who demanded it.)
5. Placement Platform
Placement Management System helps educational institutions to automate their placement activities. Employers can post jobs or internship opportunities, be it a campus or walk-in drives, send notifications to all the students, view student profiles & resume or CVs, shortlist students, conduct, track & manage interviews, give interview feedback to students. TPO’s can maintain the academic information of students such as students profile, digital mark sheets, the progress of students, shortlist & recommend students that match employers criteria, share students profile and resume online. Placement platform also helps to track students through various stages of the interview process, resolve queries of employers or students. Students can create and maintain their multiple job profiles; upload resumes/CVs, search and apply for jobs. They can follow the companies which they are interested in and get real-time notifications of opportunities. Up to date information on various stages of the placement, activities are available to them. Placement Platform makes Educational Institutions smarter by following ways,- All the information is stored digitally like student profile, mark sheets, resumes or CVs.
- TPO’s from one place can manage entire recruitment activities.
- The employer has all the access of students information, can conduct campus or walk-in drives, shortlist students based on the requirements.
- Students can manage their profiles online along with documents such as mark sheet and resumes or CVs.
- Only eligible & interested students are in the loop of interview process saving the time of all the stakeholders.
6.Student Dashboard
Students dashboard is a section of a portal for students, where all the information about their profile, parental information, fees details, attendance & even health information is maintained. Students can upload assignments, submission or project work, have access to learning materials, can attempt quizzes and complete exercises, also get notified about events, placement or internship opportunities. Student Dashboard makes Educational Institutions smarter by following ways,- The administration, as well as students, can view and manage their details from one place.
- It lets students manage their profile, upload profile photo & necessary documents such as aadhar card, caste certificate, among others.
- They can upload their assignments, view their attendance or even pay the outstanding fees.
- All the communications can be handled from one place,
- They can view the entire academic calendar consists of important dates such as
- Start & end dates of Registration, Admissions, Fee payment,
- Detailed Program/Course schedules
- Commencement & Conclusion of teaching Semester wise
- Official Holidays calendar
- Sessions / Viva Dates, Submission of Term work
- Schedule of Internal, Oral/Practical Exams & University exams.
- Notifications about workshops, seminars & conference conducted in the campus.
- They can also view Master Timetable and plan their studies accordingly.
7. Events Module
Smriti EdTech’s event module delivers a rich event management functionality, that has easy and user-friendly configuration capabilities, so that the entire event lifecycle right from events sign-up, attendance, to collecting post-event online feedback, can be managed from one place. It is specially designed for the educational institutions so that they can manage online registration and ticketing for various events hosted on the campus. Attendees can register online for the events, pay the ticket fees online. A notification email / SMS is sent to the attendees along with e-ticket thus completing the process of registration. Event Module makes Educational Institutions smarter by following ways,- Go paperless by digitally handling all the event process right from online registration, online secure payments processing, mail /SMS e-tickets to attendees.
- Configure ticket prices dynamically, allow early bird discounts, generate coupon codes, limit the no. of registrations.
- Allow discounts to students & faculty of the institution & bulk registration discounts.
- Display the entire event calendar along with its information such as venue details, timings & capacity.
- Eliminate data entry, streamline, simplify and automate almost all the processes of the events.
- Accept digital payments.
- Real-time reports to get a more accurate count of expected attendees, tickets sold, revenues generated.
- Allow attendees to register any time whether even after office hours.
8. Feedback Module
Feedback Module helps collect online feedback from all the institutional stakeholders viz students, parents, teachers, alumni among others. It also helps in conducting online surveys. If educational institutions are not collecting feedback, they will be not able to gain other people’s insights, opinions, and reviews. They may miss out any opportunities for improvements. Problems & issues in the institutional processes or operations may go unnoticed. It may also give the wrong message that they are not listening. If educational institutions are collecting manual paper-based feedback, it has its own set of drawbacks. Manually conducting surveys or collecting feedback is a lengthy & cumbersome process which consists of the distribution of the forms to the respondents, collecting them back, entering responses into a computer, analyzing the results, generating & sharing reports, acting on the feedback obtained. They are resource intensive as well since it needs a workforce to distribute the questionnaire, collect them, transfer the responses to a central location where it can be processed. It's also an expensive affair as it includes printing & making copies. Feedback and surveys conducted online have lots of benefits. The information entered by the respondent is stored in the database making it easy to mine this data. Real-time graphs and charts can be generated which helps in making more informed decisions. Feedback Module makes Educational Institutions smarter by following ways,- Collect feedback & reviews, conduct surveys online through the web or mobile apps.
- The teacher can give feedback on student's performance, or students can give feedback on their teaching, thus helping both of them to improve continuously.
- All the stakeholder's viz students, employers, alumni can give their suggestions through a structured feedback system which if required can be made available publicly for review.
- Annual survey of student satisfaction on various aspects or functions of educational institutions can be conducted.
- Since all the feedback is collected online, various reports for analysis can be dynamically generated, helping decision makers take necessary actions, plan future policies to improve the overall quality of the education.
- Students and Parents feedback on admission processes, institutional facilities, curriculum & teaching methods or overall academics can be collected.
- Feedback analysis can be shared with NAAC and other accreditation agencies.
9. Alumni Module
This module helps maintain alumni records and contact information. Alumni can create their profile, connect with their batchmates, browse the alumni network or even post job and internship opportunities. It also keeps them updated with the latest news & events, information about the progress of the institution. Educational institutions can create and run online fundraising campaigns and collect donations from alumni. All the donations can be accepted through online payment gateways. Alumni Module makes Educational Institutions smarter by following ways,- Alumni through their portal or mobile app can create or import their profile from social networking sites.
- It helps build alumni directory with up to date information such as their name, graduation year, branch/stream from which they graduated, contact details, employment details such as job title, place of work.
- Alumni are updated with the latest news & events, along with the progress of the institution.
- Alumni can collaborate with peers, teachers, and staff members.
- Create and run online fundraising campaigns and collect donations from Alumni through online payment gateways.
Conclusion
Smriti EdTech platform can transform the way Educational Institutions used to work. It's a SAAS based platform that streamlines everything right from student admission to managing alumni information. It offers a holistic approach to facilitate smooth management of the entire institution's affairs. Feel Free to connect with us - We would be Happy to cater your Educational Institute’s need.
General
5 min read
Avoid these Most Common Onsite WordPress SEO Mistakes
Permalinks not optimized
Permalinks are the permanent URLs ( ideally should never change hence permanent ) to individual pages and blog posts. There are two steps for optimizing permalinks for SEO as described belowStep 1
WordPress Supports different types of URL structures such as- Default - http://www.sample.com/?p=123
- Post name - Sets the URL to WordPress Page or Post name http://www.sample.com/sample-post
- Custom structure - One example is /archives/%year%/%monthnum%/%day%/%postname%/.
Step 2
Once the structure is finalized, the next thing in Permalink optimization is to ensure that each of the permalinks has keywords into it. For e.g. the keywords that are targeted for the current article are- common seo mistakes
- seo mistakes
Images Not optimized for SEO
Optimization of the images from an SEO perspective is another most common WordPress SEO mistake that users make. By optimizing the images for SEO we mean the following things,Image Filename
Search engines cannot see an image; they can only identify an image through the text. The first thing to do is to set an image file name which contains rich keywords. Focus Keyword can be used for the featured image. For every other image make sure it contains keywords from the keywords research that you have done.Image ALT text
For some reasons, if the images can’t be displayed to the visitor, there will be descriptive text shown in the place of the image from ALT text. So make sure to enter rich keywords in ALT text. For a detailed way to optimize the images for search engines go through this article here.No interlinking between the Pages
Interlinking is SEO terms can be described as let's say content in a blog post can be linked to other content on the same site which could be another blog post or even a website page which is relevant to the article from where it's linked. This kind of interlinking makes sense since the reader might be looking for another piece of content similar to what he is reading. Interlinking gives search engines an idea of the structure of the website. That’s one aspect. Another aspect is when search engines encounter linking of the pages with the relevant pages containing relevant content; they are more likely to understand your site better. Another benefit from it is, it increases user engagement increasing the website’s authenticity.No Links to the External Websites
Adding trustworthy, authoritative, and relevant external links which contains high-quality content will help your website appear to be an authority, which in turn increases the credibility of your website. Throughout the content, the reader might need valid references, resources which would more help understand the content better or even putting things into context. By doing this, Search engines can learn from whom you link to and how. Also external linking also a kind of endorsement of third-party content which may encourage them to do you a favor of linking back to your site. The more other websites link back to your content, the higher the chances your site appear the Search Engine Results Pages (SERPs) However, adding poor-quality links will backfire, so before adding any external links make sure if they are needed and have that much of importance.Not having an XML sitemap
A site map is a directory of all the links on a website typically listed in a logical hierarchical order. An XML sitemap consists of all the links with its metadata such as- URL location
- The full URL to the webpage
- Last modified date of the page
Entirely depending on Plugins for SEO
This is not at all an onsite technical SEO issue, as we discussed throughout this article. However, it's an important point which should be discussed. Even if you are using top-notch SEO plugins such as Yoast or All in one SEO PAck and among others for WordPress, but if you are not following basic SEO guidelines then you are killing your SEO efforts. No doubt these plugins do all the heavy lifting required for SEO, assisting you throughout its entire life cycle but still, it does not replace the efforts needed for a good SEO.Wrapping Up
Although we tried to list down important WordPress SEO mistakes, still there are a lot more things that can go wrong and needs to be taken care off. This list may look as incomplete; maybe we will write a part two of this article for further SEO mistakes in which can be avoided. For detailed inquiry about WordPress website, connect here.
General
5 min read
Top 10 Reasons You Should Choose WordPress for Your Business Website
1. It Is easy to learn, Use and Manage
One of the significant reason why business entrepreneurs choose WordPress over other options is its relatively easy to learn, use and manage. Learning WordPress is very easy. There are n number of tutorials, guides, how-to articles and videos, e-books free and paid, all available at our disposal. It's easy to use interface helps to manage the content on the site a breeze. Also, there are inbuilt features provided through admin dashboard such as managing users and their roles, blog comments, RSS feeds, Posts & Pages with their revisions, installing and updating third-party plugins and much more.2. Google Loves WordPress
 WordPress primarily being a blogging platform is full of content. It consists of Posts & Pages containing text, images & videos, etc. Content is loved by Google and is one of the main reasons why Google loves WordPress.
Next, the search engine friendly features of WordPress (along with the integration of third-party plugins like Yoast ) makes sure that the necessary information is available for search engine spiders to consider, relevant to keyword searches that are done.
SEO friendly features of WordPress are,
WordPress primarily being a blogging platform is full of content. It consists of Posts & Pages containing text, images & videos, etc. Content is loved by Google and is one of the main reasons why Google loves WordPress.
Next, the search engine friendly features of WordPress (along with the integration of third-party plugins like Yoast ) makes sure that the necessary information is available for search engine spiders to consider, relevant to keyword searches that are done.
SEO friendly features of WordPress are,
- It lets configure Permalinks ( search engines friendly unique URL )
- It allows us to set the Title & Description of the Page or Post.
- In the content part, it has an easy way to add images with their captions and alt tags.
- Its editor allows editing content with relevant Keywords.
3. WordPress wears many hats
WordPress “wears many hats,” means it can be used to build any website. It was originally was created as a blogging platform, but with the time, it evolved and now has transformed into an amazingly flexible, easy to use, robust website design and developing tool. Few examples of what can be built using WordPress- Personal Blog or Website
- E-commerce Website
- Membership Website
- Forums
- Knowledge Base Websites
4. Mobile Friendly
Google officially says that it's using the mobile version of the content for indexing and ranking. Which means it will not entertain websites, which are not mobile friendly. When you build your website on the WordPress platform using themes and plugins which are built with the mobile first approach, then you don’t have to take up that added effort to make it mobile-friendly.5. Ease of Integration of Third Party Services
WordPress can integrate with the most popular platforms which could be social media networks such as Facebook, LinkedIn & Twitter, Payment gateways such as PayPal 2checkout, Email campaign services like Aweber, MailChimp, and much more. These numerous integrations can boost your business website depending on what kind of type it is. Connect with your WordPress Experts here to guide you in Integration of Third Party Services.6. Safe & Secure
Another primary reason for switching your business website to WordPress is the security measures it offers to its users. The WordPress community is consistently working on the newer safety measures of the CMS, and periodically releasing it to the public. Whenever there is a new update of WordPress available, it will be notified in the WordPress Dashboard. From version 3.7 WordPress provides its users with Automatic Background Updates. Having said that, WordPress security is not just about its core framework. It also has Plugins and Themes which are majority developed by third-party developers. In that case, certain safety measures such as, avoid downloading the Plugins and Themes from unknown sources, download them from trusted sources, making sure that all the Plugins and Themes are up to date & among other things should be practiced. Also using top security plugins such as Wordfence or Sucuri Security will help further tighten up the website security. Lastly taking regular backups is of utmost importance. For more details regarding the security of WordPress read this article.7. Inbuilt Roles and Capabilities framework
WordPress has the concept of user roles and capabilities. It helps site owners (who are not the sole one to run their business website) to create users and delegate tasks to them. Below is the list of roles of WordPress.- Super Admin - Gives complete access to the website.
- Administrator - Is provided access to the administration features
- Author - Makes it easy to manage and publish the day to day Posts
- Editor - Has an authority to publish the Posts, as well as remove or approve other member’s post.
- Contributor - Is given access to manage and write the Posts, however, have to rely on the administrator’s approval.
- Subscriber - Is provided with an authority to view and edit own profile.
8. It has Themes Free and Paid Ones
A WordPress theme is the “front view” of the website. It's bundling of code, functionality, and styles which defines the overall design or style of the website. It provides much more control over the look and presentation of the material on your website. Themes can be Free or Paid or best of both worlds freemium. All of them have their pros and cons. Free themes are good to start with but have the limited feature set and most important limited support (it depends on the theme to the basis, some free themes have great support). Paid themes to have out of the box features and are generally bundled with premium plugins and support.9. A Plethora of WordPress Plugins
There are more than fifty thousand WordPress plugins in the official WordPress repository. These plugins help, right from creating image galleries and sliders to collect leads on the website using contact forms & optins to optimize website performance using caching plugins to securing WordPress websites.10. WordPress Websites are Scalable
Lastly, WordPress is highly scalable. It can serve simultaneous hundreds of logged-in users at a time or can handle huge volumes of traffic without any problems. This feat can be achieved by the right resources, proper configuration and of course scalable infrastructure. Is already powering hight traffic enterprise websites like TechCrunch, The New Yorker and mission-critical websites like Loantap, and others. Hope these reasons convinced you to build your business website on WordPress. To make your Business Website Awesome; we can connect here.
General
6 min read
10 Must Have WordPress Plugins for Business Websites in 2019
1. Yoast SEO
 Today there’s a constant influx of the users using search engines like Google and others. Moreover, that number is ever increasing. Also, there’s no doubt that the traffic from these search engines is one of the primary sources of leads for any website.
The significance of search engine optimization has become more relevant than ever before.
Yoast SEO plugin helps in search engine optimization of your WordPress business website.
It helps create better content using its inbuilt SEO analysis tool, which analyzes different aspects of copy text such as post title, focus keyword, meta description and among other things which helps improve the ranking of your website on search engines.
A beginner guide for this plugin can be found here.
Today there’s a constant influx of the users using search engines like Google and others. Moreover, that number is ever increasing. Also, there’s no doubt that the traffic from these search engines is one of the primary sources of leads for any website.
The significance of search engine optimization has become more relevant than ever before.
Yoast SEO plugin helps in search engine optimization of your WordPress business website.
It helps create better content using its inbuilt SEO analysis tool, which analyzes different aspects of copy text such as post title, focus keyword, meta description and among other things which helps improve the ranking of your website on search engines.
A beginner guide for this plugin can be found here.
2.OptinMonster
 Business websites struggle for generating high-quality leads. OptinMonster is a smart lead generation tool that can transform your WordPress website into a lead generation machine.
It is the best lead generation plugin that lets the user create and integrate effective signup forms a.k.a. opt-in forms on the website to collect emails address; helps in building a database out of it.
This user-friendly plugin will let you modify and customize the optin-forms, perform A/B tests, and most importantly it provides analytics and reports for the same.
The plugin comes with a range of pre-built templates, which a novice user can start using to create exceptional opt-in forms in a few minutes. It can be easily integrated with third-party newsletter services like MailChimp, Aweber, Constant Contact, Campaign Monitor etc.
Business websites struggle for generating high-quality leads. OptinMonster is a smart lead generation tool that can transform your WordPress website into a lead generation machine.
It is the best lead generation plugin that lets the user create and integrate effective signup forms a.k.a. opt-in forms on the website to collect emails address; helps in building a database out of it.
This user-friendly plugin will let you modify and customize the optin-forms, perform A/B tests, and most importantly it provides analytics and reports for the same.
The plugin comes with a range of pre-built templates, which a novice user can start using to create exceptional opt-in forms in a few minutes. It can be easily integrated with third-party newsletter services like MailChimp, Aweber, Constant Contact, Campaign Monitor etc.
3.Sucuri Security
 Web Security, in general, is about risk reduction, not risk elimination. Securing a website is not a one-time activity since its always prone to various threats, attacks and is always at risk. Keeping a website secure is a continuous process requiring frequent assessments periodically.
Sucuri Security WordPress plugin is built by a reputable, globally-recognized company named Sucuri Inc which also offers website security software and services to businesses of all sizes around the world.
The plugin is one of the best when it comes to providing security. It protects the WordPress website from potential viruses, malware, as well as from DDoS attacks using its robust safety features.
The plugin monitors the website continuously from a security perspective thus avoiding or eliminating any threats. We can also configure security alerts which notifies whenever there is any suspicious activity happening on the website like, multiple failed attempts when trying to login into the WordPress admin section.
Sucuri’s built-in website firewall filters all the traffic through one of the various Points of Presence that it has around the world. Read more here for more details on how to use this Plugin.
Web Security, in general, is about risk reduction, not risk elimination. Securing a website is not a one-time activity since its always prone to various threats, attacks and is always at risk. Keeping a website secure is a continuous process requiring frequent assessments periodically.
Sucuri Security WordPress plugin is built by a reputable, globally-recognized company named Sucuri Inc which also offers website security software and services to businesses of all sizes around the world.
The plugin is one of the best when it comes to providing security. It protects the WordPress website from potential viruses, malware, as well as from DDoS attacks using its robust safety features.
The plugin monitors the website continuously from a security perspective thus avoiding or eliminating any threats. We can also configure security alerts which notifies whenever there is any suspicious activity happening on the website like, multiple failed attempts when trying to login into the WordPress admin section.
Sucuri’s built-in website firewall filters all the traffic through one of the various Points of Presence that it has around the world. Read more here for more details on how to use this Plugin.
4.W3 Total Cache
 Page load speed of the website is one of the important aspects to keep in mind while building a WordPress website. Page speed gives better user-experience since website visitor will switch to another website if the page load time is more than a few seconds. Also from the SEO perspective page speed helps boost the rankings on search engines like Google.
Page load times can be improved using caching techniques. It is one of the primary ways to significantly improve website performance.
To leverage caching in WordPress, a plugin such as W3 Total Cache helps a lot.
This plugin when configured will help cache posts & pages as static HTML files so that when the user requests the same page again, the cached version of it is served to the user. This helps avoid server serving the same page to the same visitor.
The main advantage of this is that the page load time of cached pages is significantly low which helps optimize the site performance.
W3 Total Cache also offers transparent content delivery network integration with different types of CDN (mainly Origin Push or Origin Pull) to further optimize the site's performance.
Page load speed of the website is one of the important aspects to keep in mind while building a WordPress website. Page speed gives better user-experience since website visitor will switch to another website if the page load time is more than a few seconds. Also from the SEO perspective page speed helps boost the rankings on search engines like Google.
Page load times can be improved using caching techniques. It is one of the primary ways to significantly improve website performance.
To leverage caching in WordPress, a plugin such as W3 Total Cache helps a lot.
This plugin when configured will help cache posts & pages as static HTML files so that when the user requests the same page again, the cached version of it is served to the user. This helps avoid server serving the same page to the same visitor.
The main advantage of this is that the page load time of cached pages is significantly low which helps optimize the site performance.
W3 Total Cache also offers transparent content delivery network integration with different types of CDN (mainly Origin Push or Origin Pull) to further optimize the site's performance.
5. CSS Hero
 The plugin allows us to customize the look of your WordPress website. It helps style any element on websites such as background, color, size, margin, padding, and among other things.
It also allows us to save various versions of the designs so that they can be compared later, making it easier to decide which design looks better before activating the same.
CSS Hero plugin is loved by WordPress users since now they can design their website without knowing any technical stuff such as HTML & CSS and among other things.
The plugin allows us to customize the look of your WordPress website. It helps style any element on websites such as background, color, size, margin, padding, and among other things.
It also allows us to save various versions of the designs so that they can be compared later, making it easier to decide which design looks better before activating the same.
CSS Hero plugin is loved by WordPress users since now they can design their website without knowing any technical stuff such as HTML & CSS and among other things.
6. Nivo Slider
 The Nivo Slider is one of the premium WordPress plugins (a lite version is also available) designed by Dev7Studio.
The plugin is famed for being a user-friendly WordPress Content slider creator. The users of the plugin find it easy to use, design & manage sliders on their WordPress website.
Images can be added to the Nivo slider manually or can be imported from existing WordPress media or even can be added from social media platforms such as Instagram, Flickr, Dribble etc.
The Nivo Slider is one of the premium WordPress plugins (a lite version is also available) designed by Dev7Studio.
The plugin is famed for being a user-friendly WordPress Content slider creator. The users of the plugin find it easy to use, design & manage sliders on their WordPress website.
Images can be added to the Nivo slider manually or can be imported from existing WordPress media or even can be added from social media platforms such as Instagram, Flickr, Dribble etc.
7.Super Socializer
 Super Socializer makes integration of Social Login, Social Share and Social Comments on your website a breeze.
Some of the benefits this plugin offers are,
Super Socializer makes integration of Social Login, Social Share and Social Comments on your website a breeze.
Some of the benefits this plugin offers are,
- Social Login: Login using various Social Networks – Facebook, Google, Linkedin, Twitter, Instagram, Xing etc.
- Social Share: Easily add Share and Like buttons of around 90 social networks.
- Social Comments: Add Facebook Comments, Google Plus Comments, Disqus Comments to your Blog.
- Compatible with BuddyPress, bbPress, WooCommerce, and other popular WordPress Plugins.
8.ThirstyAffiliates
 If your website is into monetizing business, or something related to affiliate marketing, then ThirstyAffiliates plugin is the right choice for you. The plugin lets you insert affiliate links directly within blog posts & pages effortlessly.
It is one of the best business plugin designed for bloggers who intend to make money through their website and is also the most favored plugin amongst them.
The plugin helps manage your affiliate links, along with a complete review of its stats showcasing how your links are performing.
If your website is into monetizing business, or something related to affiliate marketing, then ThirstyAffiliates plugin is the right choice for you. The plugin lets you insert affiliate links directly within blog posts & pages effortlessly.
It is one of the best business plugin designed for bloggers who intend to make money through their website and is also the most favored plugin amongst them.
The plugin helps manage your affiliate links, along with a complete review of its stats showcasing how your links are performing.
9.Monster Insights
 MonsterInsight is one of the most powerful plugin which effortlessly connects Google analytics with your website. It makes easy for you to review the analytics of the website right in the WordPress dashboard.
The plugin is easy to set-up as all you need to do is connect it with your Google Analytics account. The plugin lets you see all crucial metrics right from the WordPress dashboard eliminating the need moving back and forth between Google analytics account and WordPress.
MonsterInsight is one of the most powerful plugin which effortlessly connects Google analytics with your website. It makes easy for you to review the analytics of the website right in the WordPress dashboard.
The plugin is easy to set-up as all you need to do is connect it with your Google Analytics account. The plugin lets you see all crucial metrics right from the WordPress dashboard eliminating the need moving back and forth between Google analytics account and WordPress.
10. AdSanity
 If you are looking for a “simplified Ad management” tool for your WordPress website then Adsanity is the perfect plugin to do the same. Its one of the best plugin in its category offering management of self-hosted and network ads on your WordPress site.
This plugin has a user-friendly interface from where you can create and manage your Ad campaigns. Users can also see how their ads are performing along with essential statistics such as the number of views and clicks.
If you are looking for a “simplified Ad management” tool for your WordPress website then Adsanity is the perfect plugin to do the same. Its one of the best plugin in its category offering management of self-hosted and network ads on your WordPress site.
This plugin has a user-friendly interface from where you can create and manage your Ad campaigns. Users can also see how their ads are performing along with essential statistics such as the number of views and clicks.
Conclusion
As mentioned above, the list comprises of the best WordPress plugins in terms of- Security
- SEO friendly
- Page Speed optimization
- Marketing and social media plugins

General
3 min read
What is Gutenberg WordPress editor? An Intro with its Pros and Cons
What is “Gutenberg WordPress Editor”
The Gutenberg WordPress editor replaces TinyMCE which was traditional and the default content editor (for years) and is its now a part of the WordPress core. This new WordPress update is named after “Johannes Gutenberg” the founder of the printing press (invented it probably 500 years ago) which was equipped with the mechanical movable type technology. The primary aim of this new update is to make the editing experience of WordPress more user-friendly and enjoyable for everyone.
Top Pros of Gutenberg WordPress Editor
- If you are familiar and love the “Medium style” editing experience, then you will “feel at home” when using the Gutenberg editor, as it also gives a similar editing experience.
- “Blocks” are the building blocks of this editor. This helps a more integrated editing experience and offers a unique way to create pages and posts in case if you are thinking to start a blog.
- It’s a drag and drop visual editor hopefully eliminating the need of any third-party drag drop page builders.
- Gutenberg editor is extremely user-friendly as the web pages you’d be designing are by default mobile friendly furthermore, it lets you do the editing on the go.
- The best part of it is, It provides the user with a distraction-free view (thanks to more screen space this editor gives ) so that more focus is on content and the design of the web pages.
Top Cons of Gutenberg WordPress Editor
- Gutenberg editor currently has partial support for meta boxes. Meta boxes allowed the addition of extra metadata to pages/posts. Websites built until now relied heavily on Metaboxes (post meta). The Gutenberg official documentation recommends porting of PHP meta boxes to blocks.
- Even though the Gutenberg editor offers responsive designs, it doesn’t support responsive columns yet. This is believed to be a temporary issue and will be fixed soon.
- WordPress currently has thousands of plugins and themes, making them work with Gutenberg editor is quite challenging and will take time.
- Existing sites which have lots and lots of content may face a challenge to migrate content from classic editor to Gutenberg blocks.
- Developers have to keep iterating their plugins and themes alongside the changes in Gutenberg editor which is likely to happen.
Final Thoughts
Since its inception “Gutenberg editor” has stirred some controversies and continuing to do so. Amid these controversies, it saw the light of day for which it was destined. There are mixed reactions from the WordPress community, some of them are considering is at a bold and thoughtful move for WordPress ecosystem while others describing it is a big disaster. As of now, the majority of WordPress Plugins and themes do not support Gutenberg editor architecture. All we can do is to wait till these themes and plugins adapt to this new change for good. There is no doubt that Gutenberg is the next generation editor but still needs a lot of improvements and has a long way to go. Let's see how Gutenberg editor evolves with time. Till then, Get in touch with our team for building Enterprise WordPress Websites and Apps.
WordCamps
3 min read
All you need to know about Upcoming WordCamp in Pune 2019
Hold on, But What is a WordCamp?
“WordCamps are casual, locally-organized conferences covering everything related to WordPress.”
It is organized by volunteers from the WordPress community where WordPress developers, designers, writers/bloggers, and casual users can attend this conference, exchange ideas, get to know each other and mingle in an informal setting. It helps attendees learn new things, catch up on the latest trends in WordPress, hear from experts exchanging their views, ideas, experience and more. Besides this, it’s also a networking platform with like-minded people from the WordPress community all gather under one roof. For sure this WordCamp in Pune will be one of the best conferences happening in the year 2019.WordCamp Pune 2019 Details
The preparations are in full swing for WordCamp Pune 2019 (abbreviated as WCPune hereafter) which started way back in 2013. Here are details for the Conference, Date : Feb 16, 2019. Venue : CV Raman Auditorium IISER Pune. Dr. Homi Bhabha Road, Ward No. 8, NCL Colony, Pashan, Pune, Maharashtra 411008. You can get the directions of the venue from here.Talks in the WCPune 2019 Conference
This WordCamp has exciting talks lined up, and as we move closer to the event date, more speakers along with their topics will be announced. Here are few details about the talks announced until now. To start with, Vaidehi Singh Sharma a Digital Marketer from Pune will talk about a fascinating and debatable topic (for years) Remote Job Or 9 Hours Office?. Covering Daily Stories. She will be discussing the difference between a remote job versus a full-time office-based job. Attendees are going to enjoy this one, especially the real stories. Next talk is from Ionut Neagu an Entrepreneur from Bucharest, Romania will talk about The Good, The Bad and The Ugly of SEO. He will shed some light on SEO myths and how to debunk them with practical examples. Further speaker lined up is Vikram Kulkarni from Pune. He will talk on Backups, Restore and Migration for WordPress. This talk aims to shed light on best practices of taking backups, restoration them and also how to tackle the migration issues of moving between the development stage and Production environment. As of now the official schedule of WordCamp Pune 2019 is still not published. Above para lists down speakers with their topics announced until now. For more updates for upcoming speakers tune in to this link.WPoets at #WCPune conferences until now
We participated in all WC Pune Conferences until now. Our involvement in these conferences was right from attending it to help co-organizing it. Here is a quick rundown of WPoets at all WCPune conferences till now.WordCamp Pune 2013
It was first ever WordCamp in Pune which happened on 23rd & 24th of February, 2013. We participated in speaking at that WordCamp. Here is the list of the sessions that we delivered

"Power of WP Query” - A Talk by Savita Soni


“How to get your themes in WordPress.org repository or theme repo” -A Talk by Nisha Singh
WordCamp Pune 2015
-
- Participated in panel discussion on the topic “The Business of WordPress.”
- Conducted a session on “Building a Good Quality WordPress theme” - by Nisha Singh

“Building a Good Quality WordPress theme” – A Talk by Nisha Singh
WordCamp Pune 2017
This time also we helped co-organize the event. We conducted the following session.-
- "Building a Fintech Startup on WordPress.” - by Vikas Kumar
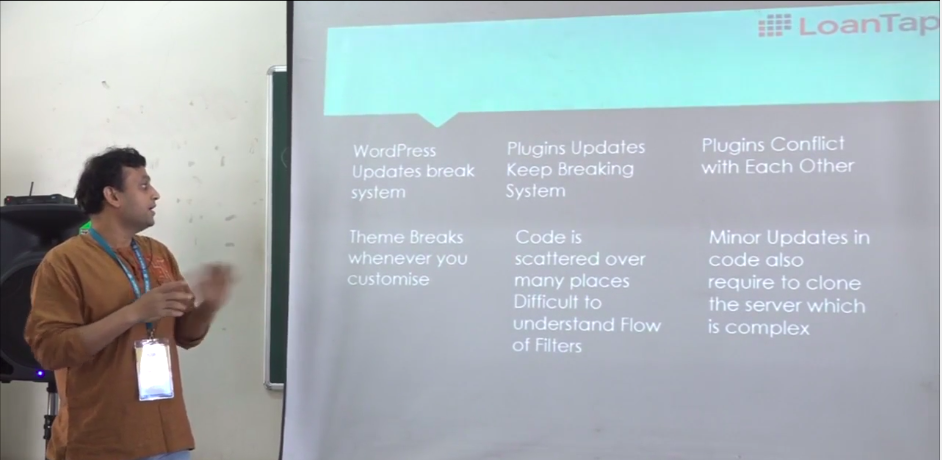
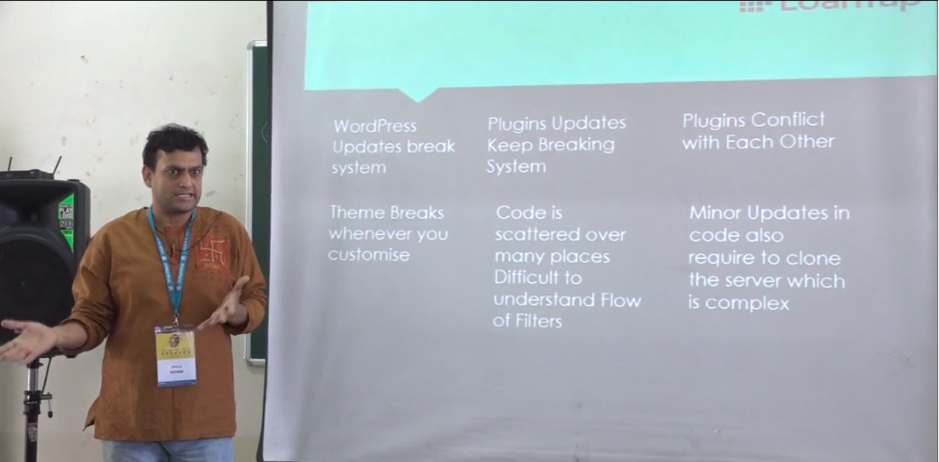
"Building a Fintech Startup on WordPress.” - A Talk by Vikas Kumar
Closing Thoughts
Past WordCamps in Pune has witnessed an influx of attendees from WordPress fraternity. This year the number has already reached 300+ attendees. We are attending this conference, and shortly we would publish what we experienced about it. More information regarding this WordCamp can be found here. Also, follow the official twitter and facebook page of WCPune for further updates. We are going to tweet live updates right from the conference on WPoets channel. See you at the Conference.
General
4 min read
Continuous Improvement - Your website will become worthless if you don't opt for this strategy!
Insight-Driven
Continuous Improvement is a largely data-driven process. It involves testing and analyzing the elements of the current website and performing alterations on the basis of your goals. [aw2.module slug='pullquote' pull_class='float-right'] [aw2.this html] Continuous Improvement is a largely data-driven process involving testing and analyzing the elements of the current website and performing alterations on the basis of your goals. [/aw2.this] [/aw2.module] For example, if on the basis of analytics data, if a pop-up advertisement about your product on the home page is followed by a large number of drop-offs, you can change or remove that advertisement. Similarly, by running speed-tests of your pages and performing iterations over the different elements on your site, you can decide which parts to keep and which ones to let go off. By putting your website on a Continuous Improvement Cycle, you can know what’s working and what’s not working at different stages due to which it will be easy to make informed design decisions. It is also an important step toward getting to know what your customers want!Adaptive to Changes
The market is changing every minute. In the age of constant digital innovation, a strategy like Continuous Improvement has become a prerequisite. In today’s dynamic and competitive market, it is essential to nurture a website and not only create it. By consistently gathering insights about your site, it will be easier to give your site a fresh, modern and up-to-date feel. For instance, a lot of sites today are being viewed not only on desktop screens but also on all sorts of portable mobile devices. With Continuous Improvement, it will be easier to keep up with these shifts and make your business appear adaptive and brand new at all times.Optimised & Viable
Search-engine optimization is a vital element aimed at increasing the ranking of a website and it is an intrinsic part of Continuous Improvement. By making smaller changes over a larger period of time you not only make your site more in-tune with the shifts in the market but you also maintain the SEO ranking of your site along the way. If you look at any of the leading websites today, you will observe that they have made tiny changes over a long period of time instead of sudden transformations. Be it Amazon or Youtube, they have undergone changes continuously and consistently and in that process, maintained their huge popularity and high ranking.Helps Consistent Development
Continuous Improvement eliminates the need for short term remedies and instead becomes a constant, ongoing process for the maintenance and development of your website. [aw2.module slug='pullquote' pull_class=''] [aw2.this html] Continuous Improvement eliminates the need for short term remedies and instead becomes a constant, ongoing process for the maintenance and development of your website. [/aw2.this] [/aw2.module] A successful website remains relevant, viable and up-to-date in the long run. Continuous Improvement enables such consistent development. Be it the regular updations, backups, strengthening security, regular scans for malware or adopting new features, the Continuous Improvement strategy will ensure that the site is well-equipped and efficient at all times. Moreover, problems would keep popping up, but by adopting this strategy, it can be possible to pre-empt certain events and be one-step ahead of the tumultuous shifts in the online sphere. For overall development, it is always advisable to undertake a durable strategy rather than short-lived solutions.Keeps up with your Brand
A website is essentially a window giving the consumer a sneak-peek into your brand’s world. It has to be reflective of what your brand stands for. By conducting Continuous Improvement, your website will be able to keep up with the brand-image at all times. Moreover, a website must always nudge the consumers toward becoming associated with your brand in some way or the other. The website must convert visitors into customers. This can be achieved by examining the visitors of your website, their behavior, and their paths and by using these insights to incur higher traction over a longer period of time.
Conclusion
By adopting the strategy of Continuous Improvement, you will be able to nurture your website and tweak it on the basis of real-time, measurable data. It is true that it is a daunting process that requires arduous and constant effort, but for the long term well-being of any website, it is worth investing in a strategy like this.
General
4 min read
How Creating a Digital Eco-system will aid the marketing of your business
What is a Digital Ecosystem?
Mirroring the way natural ecosystems function, a digital ecosystem merely is the defined ‘structure’ consisting of the various digital activities that a company may carry out online- be it digital media marketing, engaging with the audience through their website, creating newer channels to advance their sales or even instituting a nexus with potential partners or associates. A digital ecosystem unifies your brand, your product or service and your strategy to multiply profits. It also creates an ecosystem for the entire industry to come together, yes you read that right- a digital ecosystem may enable interaction with your competitors as well! By meticulously managing your company’s digital ecosystem, you can also propel promotions for your brand, product or service. Let us explore the many perks of a digital ecosystem.Strengthens Your Relationship With Customers
Creating a digital ecosystem that actively communicates with your core consumer-base through social media, email marketing, and search engine optimization will significantly reflect upon your company’s marketing targets. Centralizing all channels of communication by linking it to your website will make your target audience feel better acquainted with your product or service. Moreover, introducing participative functions on your website or social-media handles like accepting comments, testimonies, or creating external apps for customers will make the consumer feel ‘included’ in your brand. This goes a long way with fostering relationships in business.Creates Partnerships
A digital ecosystem may not only be restricted to your relationship with your customers, but also with potential collaborators. [aw2.module slug='pullquote' pull_class=''] [aw2.this html]A digital ecosystem may not only be restricted to your relationship with your customers but also with potential collaborators.[/aw2.this] [/aw2.module] Businesses can create eco-systems which consist of a collaborative platform for many stakeholders like sponsors, investors or other companies whose product or service can be allied with your business. This may also bring competitors together and give birth to innovative solutions for the industry as a whole. This type of an ‘automotive ecosystem’ is on the rise. It can be highly beneficial for streamlining costs and creating new avenues for developing or expanding your business.Establishes a Free and Trustworthy Environment
Transparency is a major attribute of the digital world. The web offers the audience/consumers a clear view into each brand- through its website, social-media handles and other digital presence like apps. This has fostered a fundamental trust and connection with the consumer. The various apps introduced by the Government of India are a shining example of how a digital ecosystem cultivates trust between the parties involved. Applications like GST Rate Finder, BHIM, UMANG, mPassport seva, Online RTI, etc. have instituted a free, transparent and trustworthy environment. It has enabled a channel for citizens to participate equally with the government. Similarly, by establishing such an ecosystem for your business, you will essentially build a digital society of seamless interaction and open communication.Reaches Far and Beyond
[aw2.module slug='pullquote' pull_class='float-right'] [aw2.this html]Digital ecosystems enable you to reach audiences that may be way beyond the ambit of traditional marketing techniques.[/aw2.this] [/aw2.module] Digital ecosystems enable you to reach audiences that may be way beyond the ambit of traditional marketing techniques. The digital effort of JPMorgan Chase is an important example in this respect. The company has introduced digitization on a momentous scale by investing over $20 Billion to escalate its technological spectrum. Naturally, this has been very beneficial to their bottom line. Digitization enables your business to expand its territory and explore untested markets.
Conclusion
Digital ecosystems are the indisputable future of businesses. They are contributing to the evolution of business processes every day and are a major wing of marketing in business. Due to cloud technology, it is easy to regulate and manage these systems on-the-go. They not only refine communication but also propagate innovation within different industries. The major hurdle in the process of digitization is the cost of this technology as well as the tremendous IT support required to enable the system successfully. Yet, given the rate of contracting costs of technology, digital ecosystems will become very much viable in the near future. Hence, digital solutions (like the ecosystem) must undoubtedly be considered for marketing and promoting your business website.
 A Knowledge Base (KB) is an online library or a bank of information that runs on the basic principle of self-service. It is made up of valuable pieces of information such as FAQ’s, blogs, white papers, case studies, manuals, policy guidelines, workflows—essentially all the ins and outs of a given company’s business, and industry. It acts as a preliminary source of information for consumers.
The reason that really makes Knowledge Base, and its management such a promising venture, is the potential of inbound marketing that it brings to the table.
Traditional (outbound) marketing ventures such as advertising are slowly becoming obsolete in the digital space. Features such as AD blockers, the expense that such initiatives bear, and their growing unpopularity among users, have cast them into an unfavourable light, both with business owners and investors.
[aw2.module slug='pullquote' pull_class='']
[aw2.this html]A Knowledge Base will improve customer interactions[/aw2.this]
[/aw2.module]
Knowledge Base offers the flexibility, control, as well as relative cost-efficiency of content creation and social media marketing. It is a far more meaningful way for businesses to target consumers, mainly because it presents the potential for a conversation that is comparatively personal and beneficial for both parties.
A Knowledge Base (KB) is an online library or a bank of information that runs on the basic principle of self-service. It is made up of valuable pieces of information such as FAQ’s, blogs, white papers, case studies, manuals, policy guidelines, workflows—essentially all the ins and outs of a given company’s business, and industry. It acts as a preliminary source of information for consumers.
The reason that really makes Knowledge Base, and its management such a promising venture, is the potential of inbound marketing that it brings to the table.
Traditional (outbound) marketing ventures such as advertising are slowly becoming obsolete in the digital space. Features such as AD blockers, the expense that such initiatives bear, and their growing unpopularity among users, have cast them into an unfavourable light, both with business owners and investors.
[aw2.module slug='pullquote' pull_class='']
[aw2.this html]A Knowledge Base will improve customer interactions[/aw2.this]
[/aw2.module]
Knowledge Base offers the flexibility, control, as well as relative cost-efficiency of content creation and social media marketing. It is a far more meaningful way for businesses to target consumers, mainly because it presents the potential for a conversation that is comparatively personal and beneficial for both parties.
 Having a singular source that has all the necessary information permits people to visit the Knowledge Base at their own convenience. They don’t have to worry about being redirected from one employee to another.
Neither do they have to worry about whether or not they are asking their questions at an appropriate time. Due to this queries are solved faster and more effectively in a single attempt.
Having a singular source that has all the necessary information permits people to visit the Knowledge Base at their own convenience. They don’t have to worry about being redirected from one employee to another.
Neither do they have to worry about whether or not they are asking their questions at an appropriate time. Due to this queries are solved faster and more effectively in a single attempt.
 The Knowledge Base eliminates the need to hire people simply for the purpose of answering questions. It also eliminates the costs of running several different communication platforms for customers to reach.
A Knowledge Base may even be useful as a reference point when new employees are still getting familiar with the company.
The Knowledge Base eliminates the need to hire people simply for the purpose of answering questions. It also eliminates the costs of running several different communication platforms for customers to reach.
A Knowledge Base may even be useful as a reference point when new employees are still getting familiar with the company.
 When customers can have their questions solved in a simple and systematic manner, their loyalty to the company is guaranteed. Smooth operation creates appeal and hence builds a larger consumer base.
Having a Knowledge Base increases the number of people using the company website as well.
A Knowledge Base will only improve customer interactions. Hence the necessity for a Knowledge Base cannot be disputed. They are customizable to fit the individual needs of the company. But while designing your Knowledge Base, there are a few things that must be considered.
[aw2.module slug='pullquote' pull_class='float-right']
[aw2.this html]Knowledge Base offers the flexibility, control, as well as relative cost-efficiency of content creation and social media marketing[/aw2.this]
[/aw2.module]
When customers can have their questions solved in a simple and systematic manner, their loyalty to the company is guaranteed. Smooth operation creates appeal and hence builds a larger consumer base.
Having a Knowledge Base increases the number of people using the company website as well.
A Knowledge Base will only improve customer interactions. Hence the necessity for a Knowledge Base cannot be disputed. They are customizable to fit the individual needs of the company. But while designing your Knowledge Base, there are a few things that must be considered.
[aw2.module slug='pullquote' pull_class='float-right']
[aw2.this html]Knowledge Base offers the flexibility, control, as well as relative cost-efficiency of content creation and social media marketing[/aw2.this]
[/aw2.module]


WordPress
3 min read
Twenty plus meetups in India to celebrate 15th anniversary of WordPress
| City | What is planned | Meetup URL |
|---|---|---|
| Ahmedabad | WordPress quiz, general WordPress discussion with cake cutting, Swag distribution, and conclusion. | https://www.meetup.com/ahmedabad-wp-meetup/events/249095620/ |
| Ajmer | General WordPress discussion, some refreshments and maybe even a WordPress birthday cake. | https://www.meetup.com/ajmer-wordpress-meetup/events/249028077/ |
| Banglore | Some refreshments with WordPress birthday cake. | https://www.meetup.com/BengaluruWordPress/events/248083951/ |
| Bhandara | Get together with some refreshments and a WordPress birthday cake. | https://www.meetup.com/Bhandara-WordPress-Meetup/events/249736210/ |
| Bhopal | 15th anniversary WordPress birthday cake with some refreshments. | https://www.meetup.com/WordPress-Bhopal/events/249109543/ |
| Bhubaneswar | Some refreshments, a casual discussion and maybe even a WordPress birthday cake. | https://www.meetup.com/Bhubaneswar-WordPress-Meetup/events/250129034/ |
| Chandigarh | Celebration of 15th anniversary with light refreshments and a WordPress birthday cake. | https://www.meetup.com/WordPress-Chandigarh/events/249254226/ |
| Goa | Session on WordPress Stories - "My experience with WordPress", WordPress Helpdesk where any WordPress queries will be resolved. | https://www.meetup.com/WordPressGoa/events/249835504/ |
| Kanpur | Wordpress introducing session. Following this session, there will be a brief introduction session to Gutenberg - the new content editor for WordPress. Some refreshments (and maybe even a WordPress birthday cake). | https://www.meetup.com/WordPress-Kanpur/events/249026730/ |
| Kochi | Session to learn more about WordPress, have some refreshments, and cut a WordPress birthday cake. | https://www.meetup.com/Kochi-WordPress-Meetup/events/250305008/ |
| Kolhapur | Get together with light refreshments and cutting of WordPress birthday cake. | https://www.meetup.com/WordPress-Enthusiasts-in-Kolhapur/events/249026550/ |
| Kozhikode | Session on “The new Gutenberg editing experience”, refreshments, casual discussion and maybe even a WordPress birthday cake. | https://www.meetup.com/Kozhikode-WordPress-Meetup/events/250246256/ |
| Lucknow | Get together for some light refreshments and sweet treats. | https://www.meetup.com/Lucknow-WordPress-Meetup/events/250222200/ |
| Mumbai | WordPress Birthday cake and maybe a party. Details are still being worked out do check meetup page for more details. | https://www.meetup.com/WordPressMumbai/events/249605456/ |
| Nagpur | WordPress birthday cake with some light refreshments. | https://www.meetup.com/Nagpur-WordPress-Meetup/events/249489354/ |
| New Delhi | Learning sessions with some renowned experts speaking on the occasion. Information of these sessions/speakers will be updated soon. | https://www.meetup.com/WordPress-New-Delhi/events/248986486/ |
| Pune | Casual discussion, refreshments and 15th anniversary WordPress birthday cake. | https://www.meetup.com/Pune-WordPress-Knowledge-Exchange/events/249910602/ |
| Surat | It will start from 10:00 am, they are planning general WordPress discussion, a small WordPress quiz, a discussion on implications on GDPR followed by a cake. | https://www.meetup.com/Surat-WordPress-Meetup/events/250824509/ |
| Trivandrum | Lightning talk session, to share WordPress experience. Games and some refreshments and cake cutting. | https://www.meetup.com/Trivandrum-WordPress-Meetup/events/249537638/ |
| Udaipur | Will have a general discussion, share some stories of how WordPress has changed people’s lives and fun of course. | https://www.meetup.com/Udaipur-WordPress-Meetup/events/251042705/ |
| Vadodara | Discuss glorious WordPress 15 year journey, followed by a WordPress quiz, WordPress helpdesk, cake cutting, celebration, and Networking. | https://www.meetup.com/Vadodara-WordPress-Meetup/events/250107889/ |
Till then happy WordPressing!.


General
0 min read
Announcing Awesome Apps
WordCamps
1 min read
Our Experience at WordCamp Nagpur 2017
 While, we could not attend all the workshops, we did attended the one on setting up WordPress on VPS and using WP-CLI.
 Finally the day ended with plugin pratiyogita, where four participants shared the concept and demoed plugins they had build.
Day 2
Second day of WordCamp Nagpur was day of talks, they had two tracks one specifically for users and another for developers. On day two, Amit was one of the speaker in the Developer Track and he talked about Alternative Development Techniques on WordPress.
Finally the day ended with plugin pratiyogita, where four participants shared the concept and demoed plugins they had build.
Day 2
Second day of WordCamp Nagpur was day of talks, they had two tracks one specifically for users and another for developers. On day two, Amit was one of the speaker in the Developer Track and he talked about Alternative Development Techniques on WordPress.
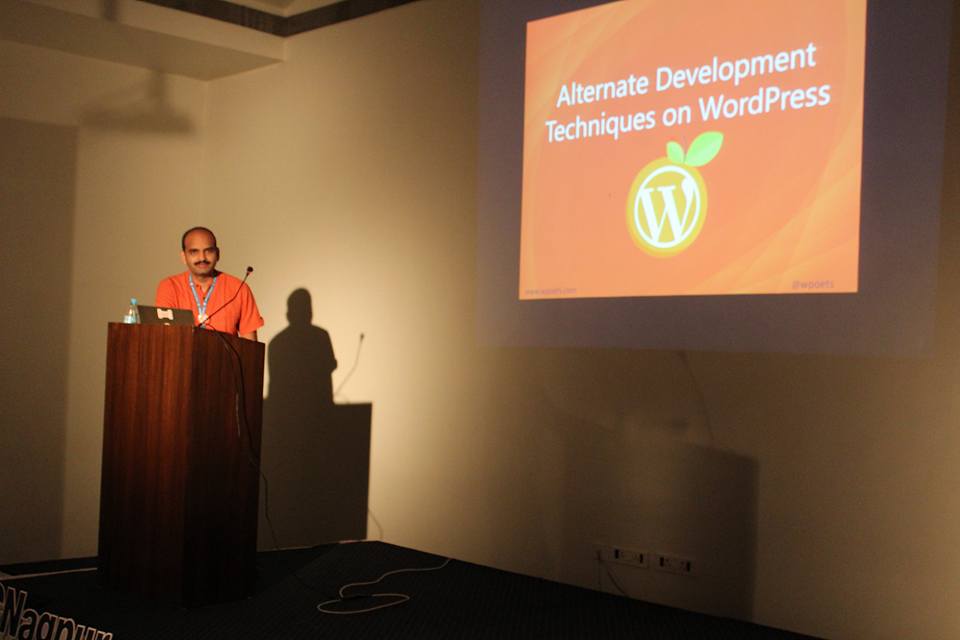 Here are slides from his talk
https://www.slideshare.net/teamphp/alternate-development-techniques-on-wordpress
Apart from that we attended talks on using Vue.js for consuming WordPress Rest API, using Composer for managing WordPress projects and panel discussion on making money form WordPress.
Here are slides from his talk
https://www.slideshare.net/teamphp/alternate-development-techniques-on-wordpress
Apart from that we attended talks on using Vue.js for consuming WordPress Rest API, using Composer for managing WordPress projects and panel discussion on making money form WordPress.
 Overall Nagpur WordCamp was a very well organized, let's thank the organizers and volunteers of WordCamp Nagpur who worked hard to make this WordCamp such a memorable event.
 Now, we are looking forward to WordCamp Kanpur and other upcoming WordCamps in India.
WordCamps
2 min read
Upcoming WordCamps in India - Part 2

WordCamp Nagpur
WordCamp Nagpur is happening for the first time on 24 & 25th June 2017, even though they had a local WordPress community meetups happening for a long time. It is going to be a two-day multi-track event. On day one they are planning to have workshops and plugin pratiyogita, while on day two they will have talks. Team members from WPoets will be speaking at Nagpur WordCamp.
WordCamp Kanpur
Immediately after WC Nagpur, we are going to have WordCamp Kanpur. It is happening on 9th July 2017 and it will be the first WordCamp that is happening in Uttar Pradesh. They have already announced some of the speakers. If you live in and around Uttar Pradesh, this might be only WordCamp this year that you can easily attend, so go and buy the tickets.
WordCamp Delhi
WordCamp Delhi is happening for the 2nd time, the first one was WordCamp India that has happened way back in 2009, It is the only WordCamp that no one has attended from WPoets. This time Delhi WordCamp is scheduled for 19th August, more details will start coming soon, meanwhile, you can subscribe to their website or follow them on Facebook.
WordCamp Ahmedabad
WordCamp Ahmedabad is happening for the first time on 6th, 7th and 8th October 2017. After a gap of three years, WordCamp is back in Gujrat. WordCamp Ahmedabad is also the first WordCamp in India that is going to happen for a period of three days. Day one is targeted at beginners and students, day two is focused on users and developers while the third day is about contributing back to WordPress. More details will come soon, meanwhile, you can subscribe to their blog or follow them on Facebook.
WordCamp Nashik
The second edition of WordCamp Nashik is planned to happen on 5th November 2017. The last edition of WordCamp Nashik was awesome, you can read our experience here. It was one of the very well organised WordCamps last year, so our expectations are high from this year's edition as well. It is still very early, so for more details, you can subscribe to their blog or follow them on Facebook.
General
1 min read
14th Birthday Celebrations for WordPress
| City | What is planned | Meetup URL |
|---|---|---|
| Pune | Come for the cake and talks on how much WordPress has evolved, some of us has been following it for over a decade now | https://www.meetup.com/Pune-WordPress-Knowledge-Exchange/events/240187341/ |
| Mumbai | Cake and maybe a party, details are still being worked out | https://www.meetup.com/Mumbai-WordPress-Meetup/events/238856421/ |
| Nagpur | Cake, discussion on evolution of WordPress and upcoming WordCamp | https://www.meetup.com/Nagpur-WordPress-Meetup/events/240232016/ |
| Kanpur | Celebration of milestone event in Kanpur, and may be some discussion about upcoming WordCamp | https://www.meetup.com/WordPress-Kanpur/events/238886588/ |
| Kochi | WordPress Malayalam Translation and a big Cake, they have planned full day event | https://www.meetup.com/Kochi-WordPress-Meetup/events/240054916/ |
| New Delhi | Apart from birthday celebrations, they have planned for panel discussion on how to expand the WP community, a brief on Translations and potential WordCamp | https://www.meetup.com/WordPress-New-Delhi/events/240114500/ |
| Kolhapur | Birthday celebrations with cake and talks | https://www.meetup.com/WordPress-Enthusiasts-in-Kolhapur/events/240288996/ |
| Bhopal | Birthday celebrations with cake and talks | https://www.meetup.com/WordPress-Bhopal/events/240288410/ |

WordCamps
2 min read
Our Experience at WordCamp Kochi 2017
Day 1
We started our journey from Pune to go to Mumbai as our train to Kochi was starting from Mumbai. It was 24 hours train journey from Mumbai to Kochi, and we made the most of it.
Day 2
We reached Kochi, checked into the hotel and quickly got ready to go to the volunteer's meetup. At met the volunteers and some organisers of Kochi WordPress meetup group for the first time, we were given our responsibilities for next day. We enjoyed our dinner with other speakers and sponsors then we were back to hotel.
Day 3
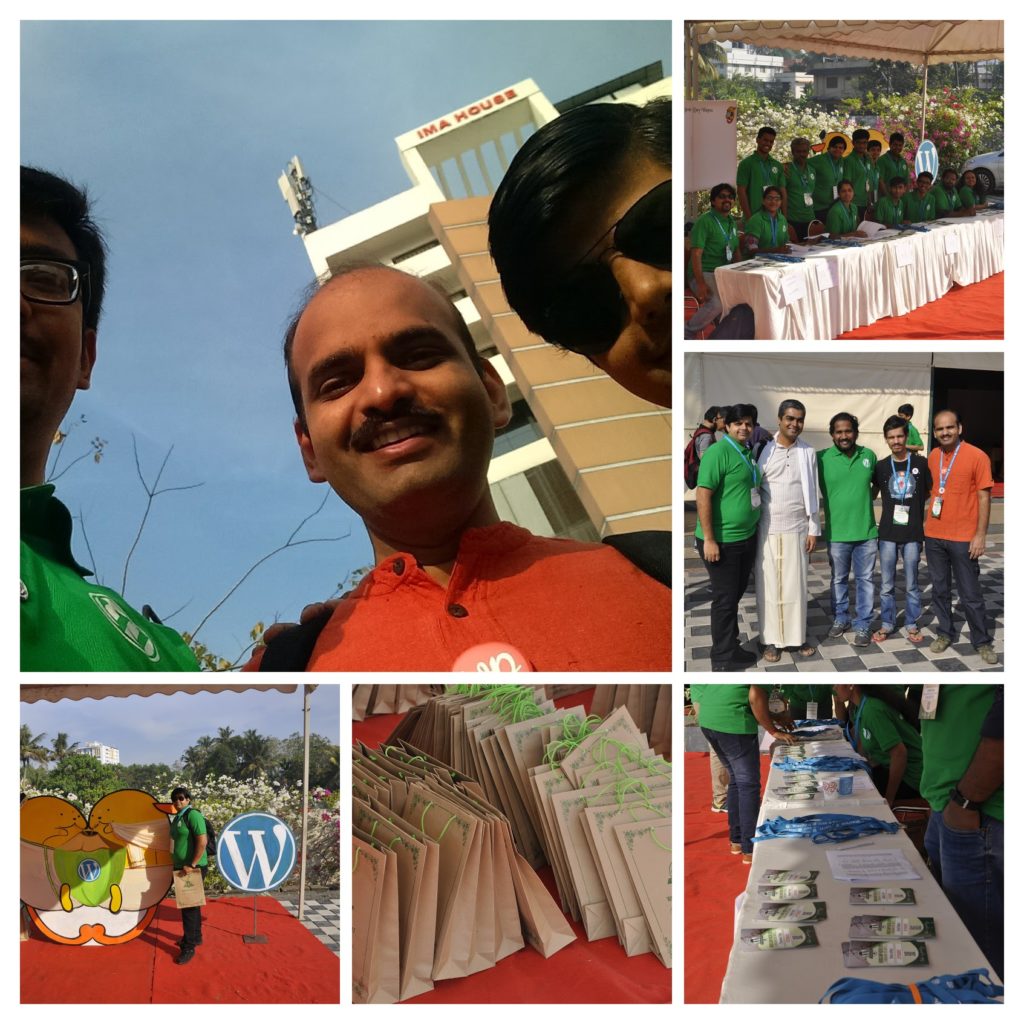 We left the hotel early to reach the venue of WordCamp Kochi in time, we did our registrations and started visiting sponsor booths to collect the goodies before they get over :)
 Amit was volunteering at the Happiness Bar helping attendees with WordPress related problems, he was also giving a talk on Creating MVP with WordPress and shared the case study of Ask Careers who had successfully used the MVP approach to validate their idea.
https://www.slideshare.net/teamphp/building-minimal-viable-product-mvp-with-wordpress
WordCamp Kochi had some great line-up of speakers, we learned few things from them and we are making some changes at WPoets based on what we learned at Kochi.
Amit was volunteering at the Happiness Bar helping attendees with WordPress related problems, he was also giving a talk on Creating MVP with WordPress and shared the case study of Ask Careers who had successfully used the MVP approach to validate their idea.
https://www.slideshare.net/teamphp/building-minimal-viable-product-mvp-with-wordpress
WordCamp Kochi had some great line-up of speakers, we learned few things from them and we are making some changes at WPoets based on what we learned at Kochi.
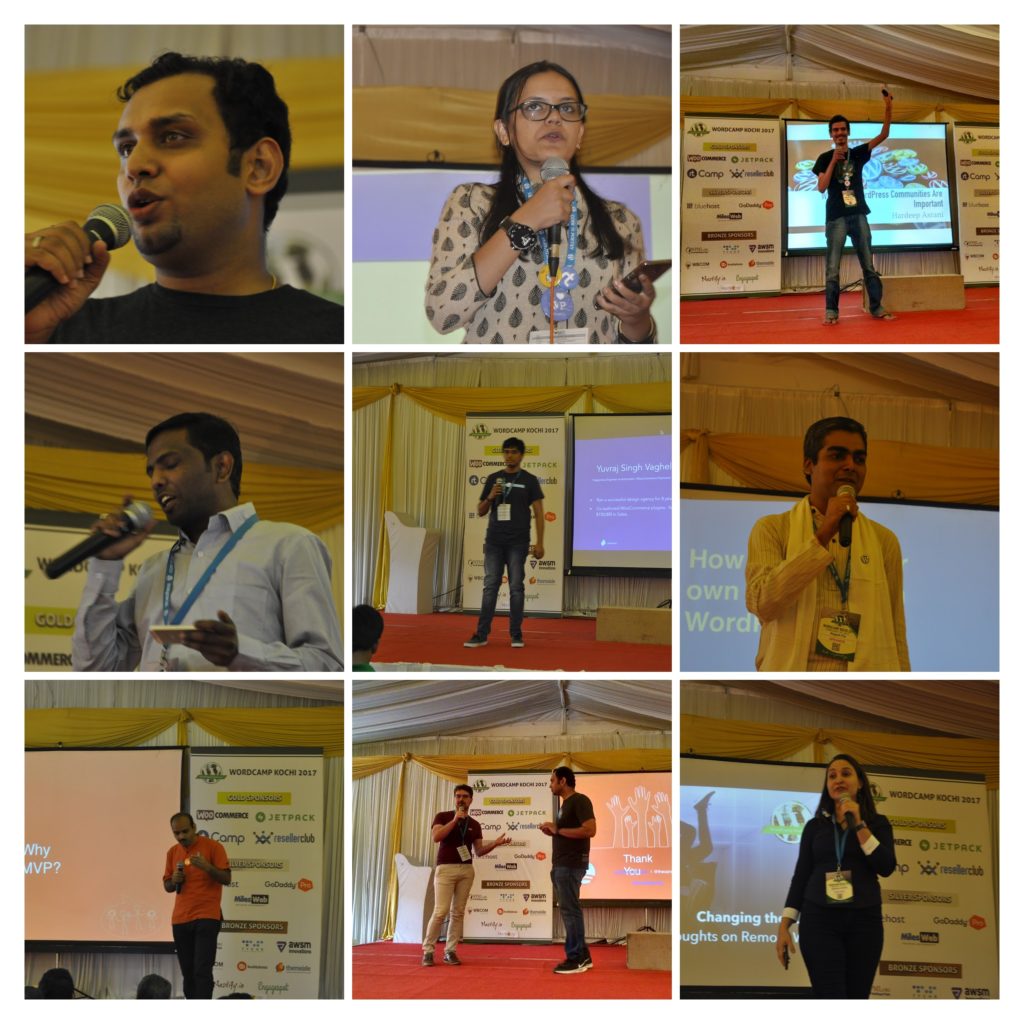 Hari introduced the youngest volunteer at WordCamps in India, he started blogging at age 8, and now he is just 13 years old and now builds Android apps.
 Afterparty of WordCamp Kochi was made special by cutting a cake for Wappu and lots of talk, but the best part was the after-after-party trip to Pai Dossa. We eat dossa after having full dinner at 12 AM in the night. I think this would the highlight of WordCamp Kochi.
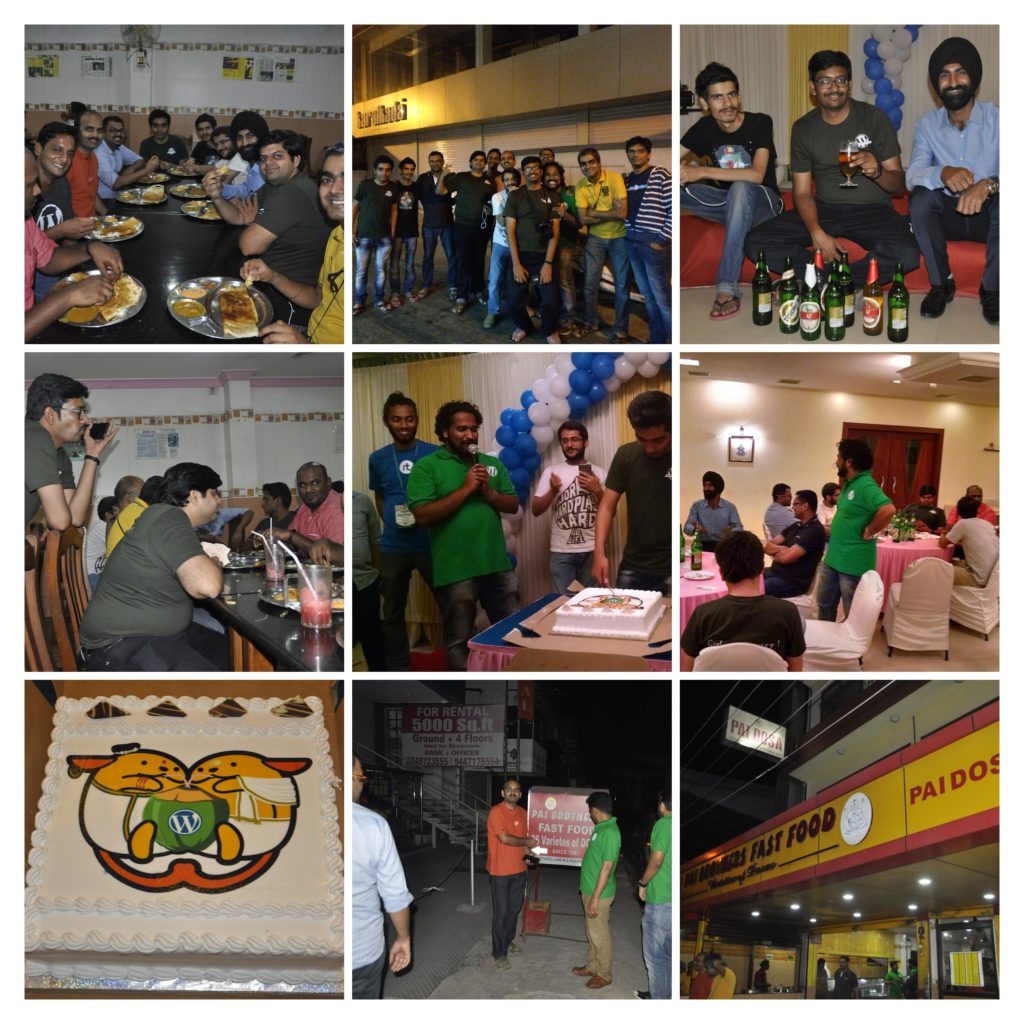
Day 4 & Day 5
We went around Kochi and visited Fort Kochi & Abhayaranyam, before flying back to Pune. At Fort Kochi we had a chance to check out some of Kochi Biennale event Nithin and Abhilash helped us with sightseeing and some great suggestion as to where to go, how to and most important connecting with locals who could understand English.
 Here is a small list all the variety of dossa and other food items we tried at Kochi and remembered to take a click before we finished them.
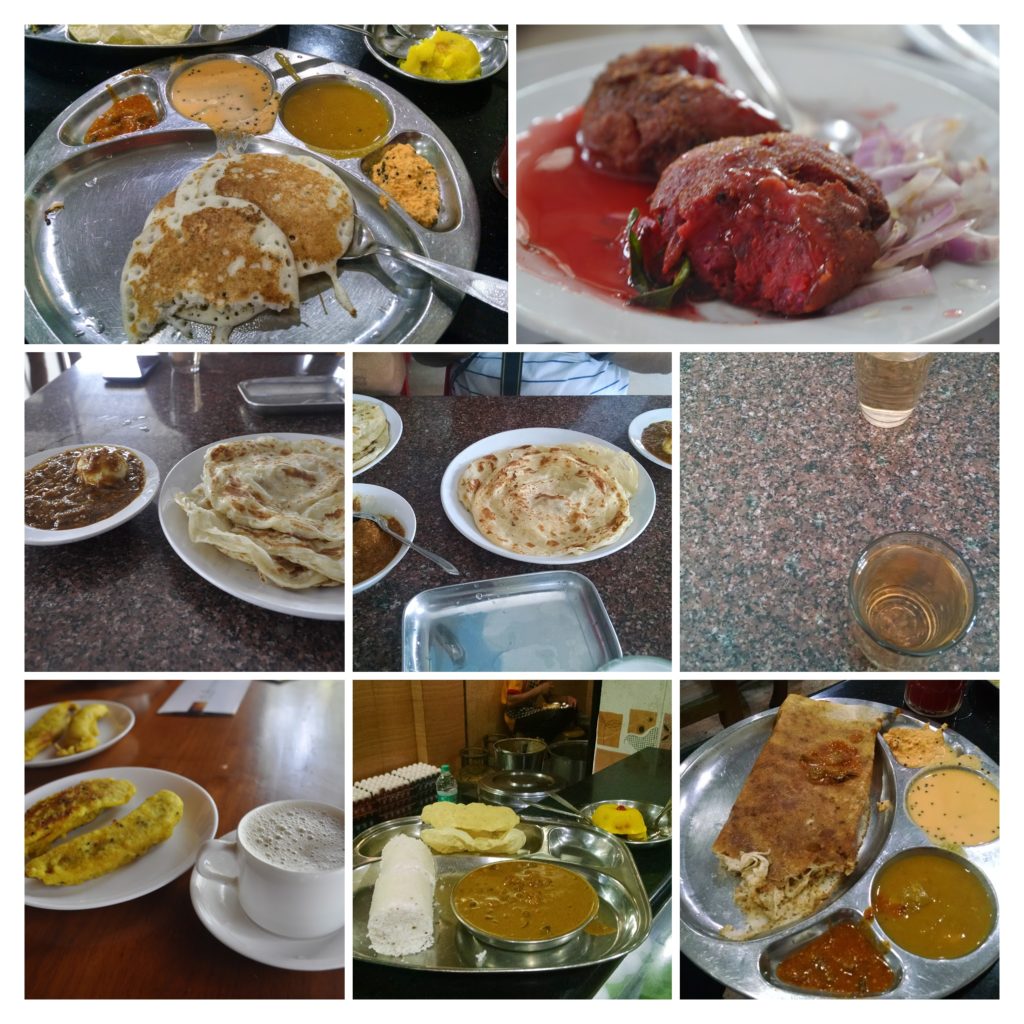
 You can check out all the photos of the event in our facebook album. Let's thank all the organisers and volunteers for organising such a wonderful WordCamp Kochi and maintaining the high standards.
 We are now looking forward to WordCamp Mumbai, which is in its 5th edition and happening on 25th & 26th March 2017. If you attended WordCamp Kochi then share your experience or comments here.
WordCamps
3 min read
Our Experience at WordCamp Udaipur 2017
Day 1
We started from Pune to Bandra in the afternoon and reached Bandra Terminus around 9 PM. We had two-hour stay at Bandra before our train to Udaipur arrived and around 11:25 we left Bandra.
Day 2
We had awesome Poha for breakfast and for lunch we had fruits and Channa. We reached Udaipur at 3:55 PM, and were checked it at the hotel by 4:30 PM. Since both Amit & Nisha were speaking at WordCamp Udaipur our team was invited to the speaker's dinner. After a refreshing tea, we were ready to explore Udaipur, and the first place we went for was Gangaur ghat. We met with Abhishek, Vachan and rest of the gang, after spending some time with them we decide to go towards the Rass Leela hotel for the speaker's dinner. It was nearby, so we decided to walk, and for the first time, our reliance on google maps failed us. We reached somewhere in the vicinity of the hotel and we had to basically fall back to old ways of asking for directions to finally reach the venue. It was a cold night, but the lakeside view made us all forget all about the cold. We had fun eating and mingling with other speakers, volunteers and sponsors. We had a hard time finding an auto to take us back to the hotel, but overall, it was great first day intro to the city of Udaipur.
Day 3
The day of WordCamp. Amit left early for the venue, as he was volunteering and was responsible for swag distribution. While Amit was busy with swag distribution, Savita and Nisha were attending talks. Anyone coming for the WordCamp Udaipur can be forgiven for thinking if they have come for WordCamp Pune ;) as registration desk was also managed by volunteers from organizers of WordCamp Pune.
During the day we also had some fun with Wappu Sa.
Anyone coming for the WordCamp Udaipur can be forgiven for thinking if they have come for WordCamp Pune ;) as registration desk was also managed by volunteers from organizers of WordCamp Pune.
During the day we also had some fun with Wappu Sa.
 At WordCamp Udaipur, Amit talked about rapid prototyping with WordPress, and Nisha was part of Panel on Women in WordPress. Here are the slides from Amit's talk.
https://www.slideshare.net/teamphp/rapid-prototyping-with-wordpress
At WordCamp Udaipur, Amit talked about rapid prototyping with WordPress, and Nisha was part of Panel on Women in WordPress. Here are the slides from Amit's talk.
https://www.slideshare.net/teamphp/rapid-prototyping-with-wordpress
 Nisha talked about the importance of family support in her career, you should also read her heropress story.
As the WordCamp came to an end, we were once again stuck with a situation of not getting any Uber or Ola to the hotel, and this time Vajrasar came to our rescue and he dropped us back to our hotel.
Nisha talked about the importance of family support in her career, you should also read her heropress story.
As the WordCamp came to an end, we were once again stuck with a situation of not getting any Uber or Ola to the hotel, and this time Vajrasar came to our rescue and he dropped us back to our hotel.
 We collected lot's of goodies from the sponsors of WordCamp Udaipur.
 Next, from our hotel we went to after party, we had some great discussions and dinner.

Day 4
We started the day with simple breakfast, and then we went to explore the Udaipur city, we visited a Car Museum. https://twitter.com/thecancerus/status/825557136163868672 We went back to Gangaur Ghat and had awesome lunch of Dal Batti with WordCampers from Pune and Mumbai. We took a boat ride in lake Pichola to get the awesome view of Udaipur.
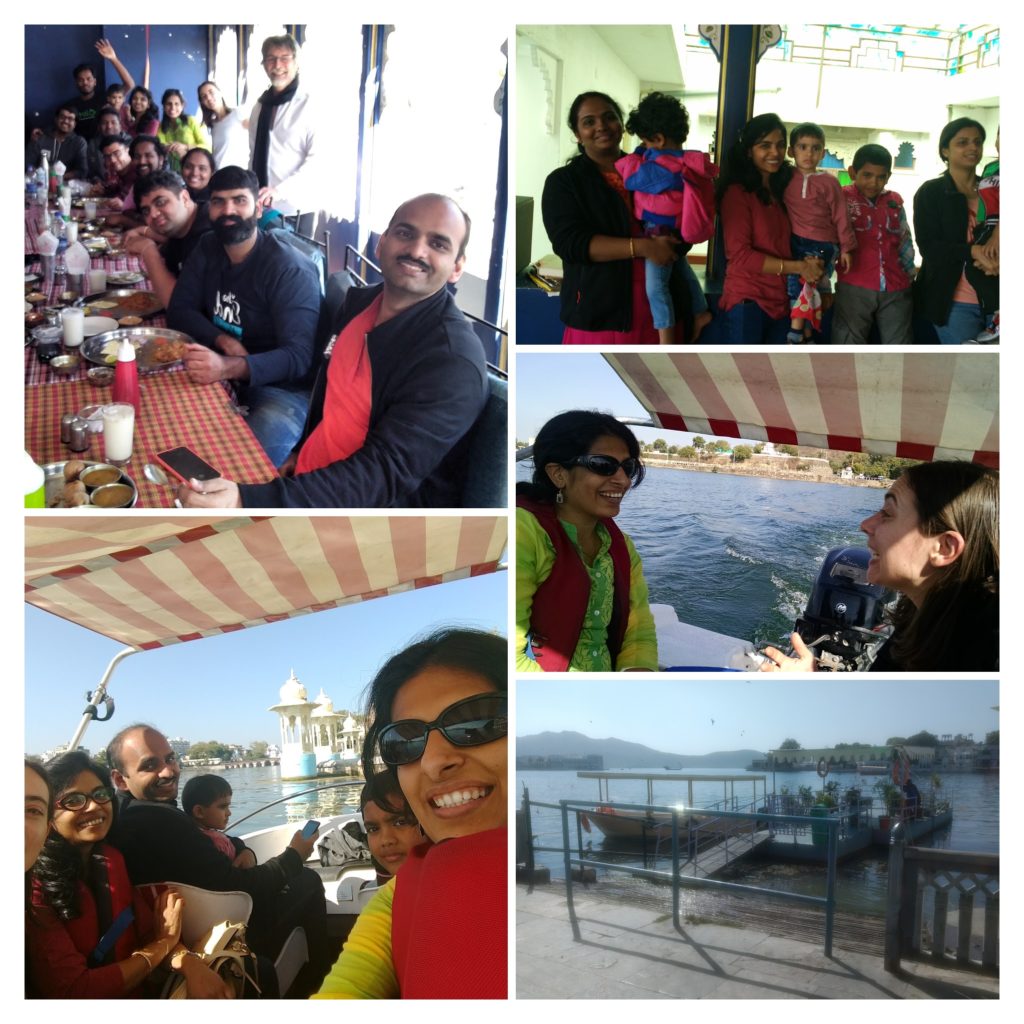 Finally, we went to city palace and we walked for almost 2 hours and we meet almost everyone from after party again during the tour.
 After city palace tour we were so tired, we called it a day and back to our hotel, this time it was easier to get a cab. Our fun filled stay at Udaipur was over.
https://twitter.com/wpoets/status/825727493055328256
After city palace tour we were so tired, we called it a day and back to our hotel, this time it was easier to get a cab. Our fun filled stay at Udaipur was over.
https://twitter.com/wpoets/status/825727493055328256

Day 5
We reached Bandar in the afternoon, and back to Pune by evening. Our trip to WordCamp Udaipur was longest WordCamp trip that we had taken as a team. We came back with the bunch of learnings and managed to attend all talks we were looking forward to. It's time to thank all the organizers and volunteers of WordCamp Udaipur for making it rock, and raising the bar of organising WordCamps in India.
 Leave your feedbacks and comments on our facebook post.
General
1 min read
Upcoming WordCamps in India

WordCamp Pune
WordCamp Pune is happening for the 3rd time tomorrow on 15th January 2017, ( I hope you have bought the tickets ). Pune WordCamp is known for its one-day event with 4 parallel track and extra focus on talks in an Indian language(Hindi, Marathi), this year we have 5 talks in Marathi out of 19 talks. Not only that, as an experiment, we have kept 8 slots open for attendees to give talks like a Barcamp. Two of our poets are part of organising team and two of them are part of volunteering team.
WordCamp Udaipur
WordCamp Udaipur is happening on 28th January 2017, (currently, even they are sold out). This is going to be first WordCamp in Rajasthan, and have some exciting talks, I am personally looking forward to hearing Nirav and Vinodh talk about their experiences. Three of us from WPoets team are going to be part of Udaipur WordCamp.
WordCamp Kochi
WordCamp Kochi is happening on 19th February 2017, (ticket sales will start next week). This is first WordCamp in south India, and we hope this kick starts more WordCamps in southern part on our country. They are looking for sponsors and speakers. One of us will be going to Kochi.
WordCamp Mumbai
One of the oldest WordCamp in India that is still happening(since 2012), WordCamp Mumbai is on 25th and 26th March 2017. They have opened the sale of tickets with early bird discounts. They are also looking for Sponsors and Speakers, and at least 4 poets from WPoets will be attending the event.
WordCamps
0 min read
Our Experience at WordCamp Kathmandu 2016
 It was one of the first WordCamp events we have attended that actually started on time. It started with Sakin, the lead organizer for this year's edition recounting the history of WordCamps in Nepal, and why they renamed this year's edition to WordCamp Kathmandu and ended with a panel discussion on career in WordPress. You can check out rest of the photos of the event at our Facebook page.
 Amit talked about his pet theme of being able to assemble websites, check the video of his talk below and you can watch other talks at WordPress.tv.
http://wordpress.tv/2016/12/07/amit-singh-stop-coding-start-assembling-your-websites/
We hope he was able to convert at least few people to stop thinking about code, and instead start thinking about solutions.
Overall WordCamp Kathmandu was an awesome experience for us, and we would like to thanks all the organizers and volunteers for putting a great show.
Amit talked about his pet theme of being able to assemble websites, check the video of his talk below and you can watch other talks at WordPress.tv.
http://wordpress.tv/2016/12/07/amit-singh-stop-coding-start-assembling-your-websites/
We hope he was able to convert at least few people to stop thinking about code, and instead start thinking about solutions.
Overall WordCamp Kathmandu was an awesome experience for us, and we would like to thanks all the organizers and volunteers for putting a great show.
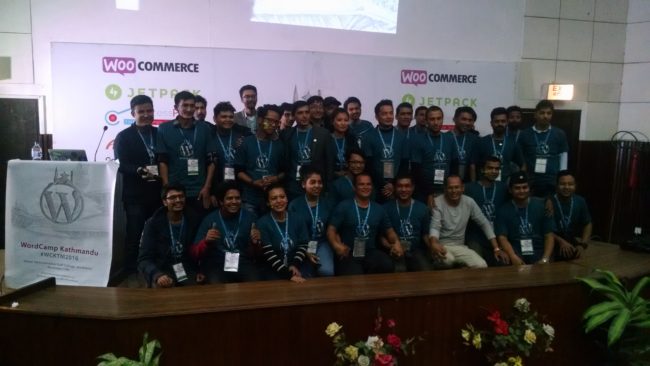 In case you still don't know, WordCamp Pune is around the corner and WordCamp Udaipur is right after.
General,WordCamps
0 min read
Our Experience at WordCamp Nashik 2016
 Even though it was a single day, single track event they managed to cover the needs of everyone. They had advanced and long talks, they had basic and lighting talks and they had panel discussions on contributing to community & starting a business.
The best part was networking area, that actually facilitated the discussions, and during various breaks, people took full advantage of it.
We would like to thank all the Organizers, Volunteers and Speakers of WordCamp Nashik, they have raised the bar for WordCamps in India further.
Even though it was a single day, single track event they managed to cover the needs of everyone. They had advanced and long talks, they had basic and lighting talks and they had panel discussions on contributing to community & starting a business.
The best part was networking area, that actually facilitated the discussions, and during various breaks, people took full advantage of it.
We would like to thank all the Organizers, Volunteers and Speakers of WordCamp Nashik, they have raised the bar for WordCamps in India further.
 For us the WordCamp ended the next day with a visit to Tapovan, MilesWeb office and awesome veg thali at Nashik coffee house.


General,WordCamps
1 min read
Our Experience at WordCamp Bhopal 2016
 In most ways it was the usual WordCamp, except that it was organised by students(from Oriental and LNCT) & for students, which reminded us of WordCamp Jabalpur and we had to keep reminding students not to call us Sir.
Another thing worth noticing was that venue sponsor for the event Laxmi Narayan College of Technology not only provided the venue but they also provided the students with a dedicated room for future WordPress user group meets.
Two of the most popular talks were by Rahul who talked about building high quality WordPress Agency and Nirav who talked about how to become better developer, while Saurabh in his usual style become the most popular person for the day.
In true spirit of WordCamp's all the speakers were seen interacting with students during breaks and I believe attendees got most out of this event during these discussions.
[caption id="attachment_7166" align="alignnone" width="700"]
In most ways it was the usual WordCamp, except that it was organised by students(from Oriental and LNCT) & for students, which reminded us of WordCamp Jabalpur and we had to keep reminding students not to call us Sir.
Another thing worth noticing was that venue sponsor for the event Laxmi Narayan College of Technology not only provided the venue but they also provided the students with a dedicated room for future WordPress user group meets.
Two of the most popular talks were by Rahul who talked about building high quality WordPress Agency and Nirav who talked about how to become better developer, while Saurabh in his usual style become the most popular person for the day.
In true spirit of WordCamp's all the speakers were seen interacting with students during breaks and I believe attendees got most out of this event during these discussions.
[caption id="attachment_7166" align="alignnone" width="700"] Saurabh talking to students[/caption]
[caption id="attachment_7168" align="alignnone" width="700"]
Saurabh talking to students[/caption]
[caption id="attachment_7168" align="alignnone" width="700"] Puneet talking to students[/caption]
[caption id="attachment_7170" align="alignnone" width="700"]
Puneet talking to students[/caption]
[caption id="attachment_7170" align="alignnone" width="700"] Alex talking to students[/caption]
Amit was one of the speakers at WC Bhopal and he talked about how lot of things can be build without writing any code in WordPress and also talked about our initiative in that direction.
http://www.slideshare.net/teamphp/stop-coding-start-assembling-your-websites
During the panel discussion on "Career Opportunity in WordPress", Amit mentioned about our hiring process, and promised to share one of our hiring test online for everyone to try.
https://twitter.com/ethicaladitya/status/779592697325744129
Over all the organizing team did a great job in making WordCamp Bhopal happen, and we would like to thank all of them for putting up a great show.
Alex talking to students[/caption]
Amit was one of the speakers at WC Bhopal and he talked about how lot of things can be build without writing any code in WordPress and also talked about our initiative in that direction.
http://www.slideshare.net/teamphp/stop-coding-start-assembling-your-websites
During the panel discussion on "Career Opportunity in WordPress", Amit mentioned about our hiring process, and promised to share one of our hiring test online for everyone to try.
https://twitter.com/ethicaladitya/status/779592697325744129
Over all the organizing team did a great job in making WordCamp Bhopal happen, and we would like to thank all of them for putting up a great show.
 Now that WordCamp Bhopal is over it's time to prepare for upcoming WordCamp Nashik. If you haven't yet booked your ticket you should do so now.
General,WordCamps
1 min read
Our Experience at WordCamp Mumbai 2016
 First talk for the day was by Shilpa Shah which set the tone for the day, all the talks on day one were good, I especially wanted to mention two talks from that day, which I think stole the show for us
- What Customer Wants by Shilpa - Where she shared her insights on understanding customer expectations. This talk made us think about our customer engagement activities.
- WordPress accessibility by Raghavendra - He showed us the importance of accessibility, and pointed to resources. This talk forced us to re-evaluate the accessibility of modules that we are building for Awesome Studio , and we are going to make all of them accessible.
 For us day two ended with a visit to Band Stand and Bandra Fort.
General
0 min read
Awesome Studio Is Now Public

News
0 min read
WPoets in WordCamp Pune 2015

General
0 min read
Continuously Improve Your Website

General
0 min read
Introducing Awesome Studio Framework
General
0 min read
WordCamp Pune is back in town
 After a gap of one year, we have a WordCamp happening in Pune on 6th September 2015. It's being organized by Wordex meetup group.
This year it is going to be one day, multi track event and we can promise you that it is going to be better then all other WordCamps that has happened in India. Organizing team has decided to give special focus to हिन्दी and मराठी talks.
You should buy the tickets and attend or you will miss out on best WordCamp in India.
After a gap of one year, we have a WordCamp happening in Pune on 6th September 2015. It's being organized by Wordex meetup group.
This year it is going to be one day, multi track event and we can promise you that it is going to be better then all other WordCamps that has happened in India. Organizing team has decided to give special focus to हिन्दी and मराठी talks.
You should buy the tickets and attend or you will miss out on best WordCamp in India.
General
0 min read
Hello world!

News
0 min read
WordCamp Mumbai is coming up
General
0 min read
Can We Have Indian Language Website or Blog in WordPress?
Yes it is possible to create WordPress based blogs and websites in Indian language. It is already translated in various Indian languages, and using following plugins, you can write your post in Indian languages.If you need setting up your site in your language do not hesitate to contact us, we are here to help.You can download fully localized version of WordPress from http://www.wordpressindia.com
- http://wordpress.org/extend/plugins/indic/
- http://wordpress.org/extend/plugins/indic-ime/
- http://wordpress.org/extend/plugins/indic-language-comments/

Portfolio
0 min read
Site Launch: Redesign of Lighthouse Insights Blog
 2) Category Page Listing
 3) Single Blog Page

What we did for this Thesis site
- We created a Child theme for thesis.
- Advised them on theme framework to use and why.
- Advised and suggested few plugins to use.
Portfolio
0 min read
Site Launch: Unitedbuzzz, social networking site exclusively for Manchester United fans
 2) After You login, your activity feed
 3) Quick Overview page for ManU
 4) Players Page
 5) Matchcast
 6) Chat with your buddies

What We Did
- Created the UI for the Unitedbuzzz
- Created the fully compatible BuddyPress template for WordPress
- Created a Plugin for Matchcast
- Created many widgets to display various information's
- Used various types of custom post types needed for displaying and managing all the information's
- Integrated Facebook like Video chat on the site.
- Integrated and configured various plugins to work together to give full experience.
- Hosting it on our servers
News
0 min read
WordCamp Cuttack 2012 - 3rd WordCamp In India
 This one is organised with help of Soumya Pratihari, with whom i was fortunate enough to meet in last WordCamp. In case you had missed last WordCamp, you can read about it here and here to know how exciting it was, and why you should attend this one.
We are supper excited, and even more excited by the fact that event like WordCamp are happening in smaller cities of India.
P.S. Book your (train)tickets now, or it might be too late
This one is organised with help of Soumya Pratihari, with whom i was fortunate enough to meet in last WordCamp. In case you had missed last WordCamp, you can read about it here and here to know how exciting it was, and why you should attend this one.
We are supper excited, and even more excited by the fact that event like WordCamp are happening in smaller cities of India.
P.S. Book your (train)tickets now, or it might be too late News
0 min read
1 million downloads for WordPress 3.3

News
1 min read
WordPress 3.3 is Out
- Drag and drop uploader.
- Ability to upload rar and 7z files.
- Now widgets don’t go away just because you changed the theme.
- Import from tumblr.
- New hover menu for navigation.
- Improved admin tool bar.
- Pointer tips for all the new features.
- Improved co-editing notification
- In case you are new, help tabs have been revamped to make it easier to find help when you need it.
- Dashboard optimized for iPad’s and touch.
- Latest version of jQuery.
- Improved editor API, to make it easier to add buttons.
- Performance improvement for ‘post slug’ permalink structure.

Portfolio
0 min read
Site Launch: Ayurveda Live
Screenshots
1) Home page. 2) Single Page

What We Did
- We created the WordPress Template from PSDs provided by client.
- Site Configurations and Optimizations.
- Setting up feedburner for subscribing to the blog posts.
News
0 min read
WordPress Now Host More Then 60 Million Blogs
General
0 min read
Know History Of WordPress Via An Infographics


General
0 min read
WordCamp Jabalpur 2011
 I am here in Jabalpur for WordCamp Jabalpur, and for next two days i am going to talk about it on our twitter account so don’t forget to follow it.
General
0 min read
Which CMS Powers More then 60% of Top One Million Websites?
 When the sample was reduced to top 100,000 sites even the WordPress share was whooping 54.07%.
 Even for top 10,000 sites, WordPress accounted for 49.72% Sites.
 Some neat stats isn’t?
News
0 min read
WooCommerce: A Free e-Commerce Plugin for WordPress
Along with it they have released bunch of e-commerce templates and one free template. A more detailed review of this plugin coming tomorrow.
- A revamped admin interface, which is more native to the WordPress dashboard & thus more familiar to the average WordPress user.
- Improved reporting, with more stats, graphs and built-in support for Google Analytics e-commerce (goal) tracking.
- New front-end features, including catalog sorting and built-in up-sells / cross-sells.
- Revised coupon system complete with coupon expiry dates and usage limits.
- Built-in HTML email templates.
- Improved order management.
- Simplified product data entry plus better product sorting / duplication within the WP dashboard.
Plugins
0 min read
Introducing Featured Today Plugin For WordPress


 To use it, all you have to do is, go to Appearance->widgets and put the widget in widgetized area of your theme. You can download the plugin directly from WordPress Plugins Repo.
If you have any questions, just leave a comment below.
To use it, all you have to do is, go to Appearance->widgets and put the widget in widgetized area of your theme. You can download the plugin directly from WordPress Plugins Repo.
If you have any questions, just leave a comment below.


